How to Crochet a Frog (Beginner Amigurumi Pattern)

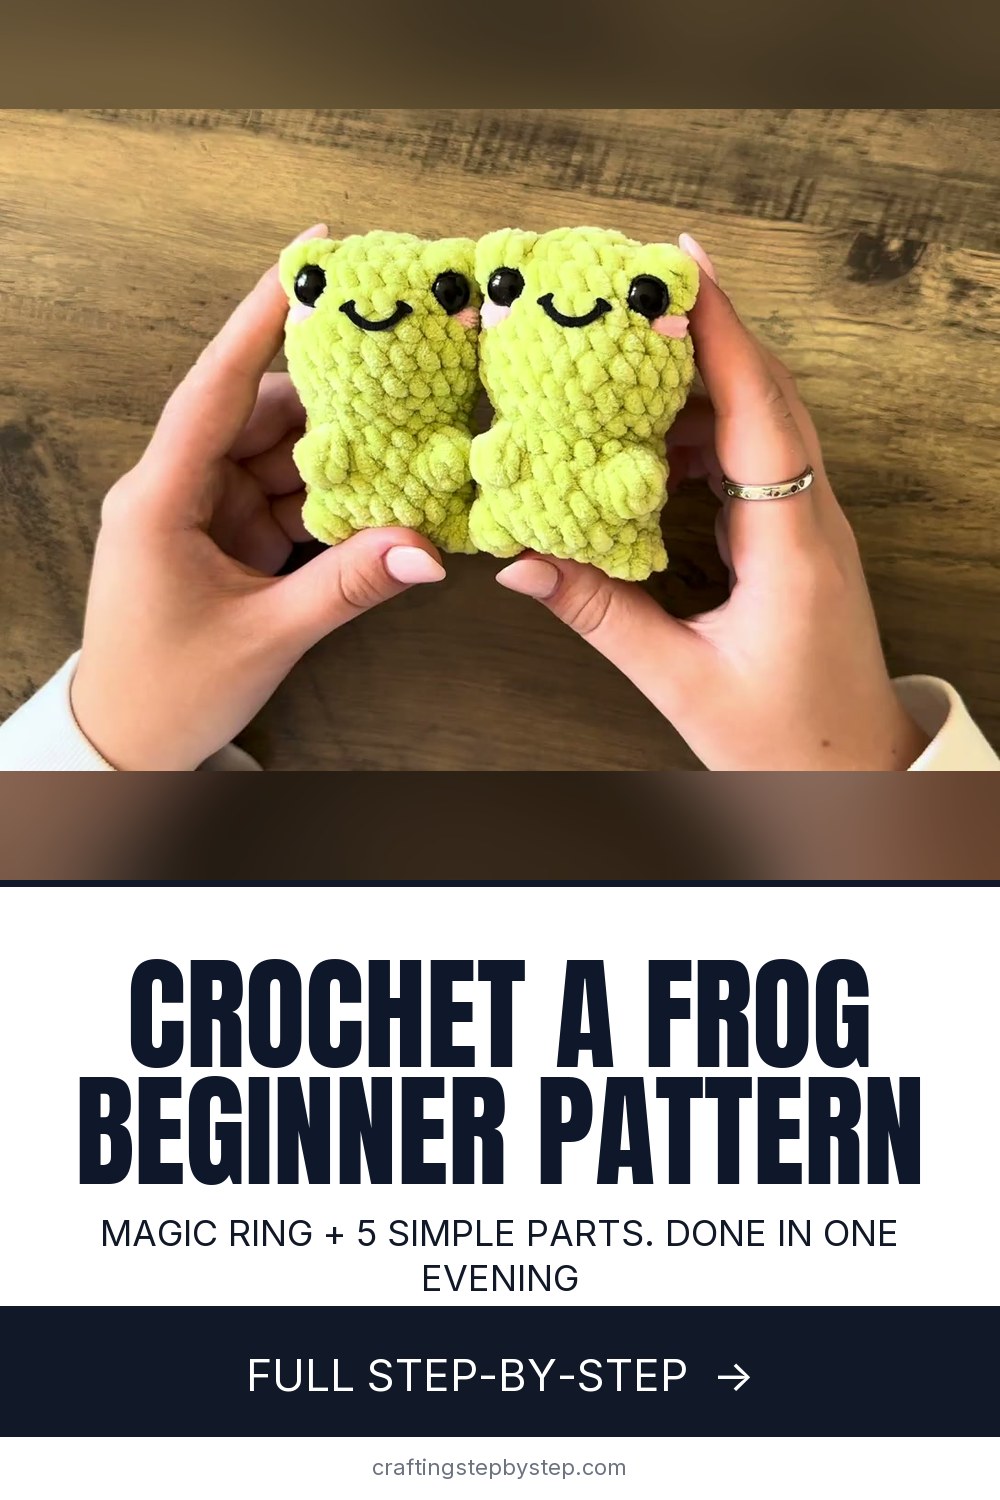
The finished result: How to Crochet a Frog (Beginner Amigurumi Pattern)
  • Difficulty: Easy
  • About 3 hours 30 minutes
  • 8 steps

You tapped Save

Save this project for later

We'll email you a link, no password.

How to Crochet a Frog (Beginner Amigurumi Pattern)

  • Your saved projects in one list
  • Your ticked steps on any device

Check your inbox for an email from us. Not there? Look in your spam folder.

Print

Steps written out by Crafting Step by Step from CrochetGrove's video (opens YouTube) (14:37). Published .

Also in:Crafts

This little frog is the kind of project that sells out at craft markets and disappears off shelves the moment you finish it. The whole thing is one piece - body, head, arms, legs - worked in a continuous spiral from a single magic ring. No sewing, no color changes, just steady single crochet with a few bobble stitches for the eyes, arms, and legs.

Annabelle from CrochetGrove walks through every round in real time. If you've already made a magic ring and stitched a few rows of single crochet, you can finish this frog tonight. It runs about 15 minutes of pure crochet time, plus a few minutes for stuffing, blushing, and gluing on a felt smile.

What you'll need

You can swap yarns freely - the pattern works with any worsted or chunky weight as long as you size the hook to match. The version in the video uses Yarn Bee Dolce chenille (about $7.99 for a small skein) and a 3.25 mm Clover Amour hook. The chenille gives the finished frog that soft, plushie texture; a regular acrylic worsted will give you a tighter, sturdier toy.

You'll also want 12 mm safety eyes, polyfill stuffing, a stitch marker, a yarn needle, and a felt smile (Annabelle uses the "Cheeky Smile" appliques from Jen's Crafty Creations). If you'd rather embroider the mouth, a length of black embroidery floss works fine.

Stitch abbreviations

Before you start, here's the shorthand the on-screen pattern uses:

  • MR - magic ring (see our magic ring walkthrough if you're new to it)
  • sc - single crochet
  • inc - increase (two single crochets in one stitch)
  • dec - decrease (invisible decrease preferred)
  • BO - bobble (5 double crochets worked into one stitch and pulled through together)

Choosing your yarn color

Classic frog green is the obvious pick, but this pattern doesn't care - work it in lavender for a chubby pastel friend, in brown for a toad, or in pink for a strawberry-frog hybrid. Single-color amigurumi is the friendliest place to practice because you never stop to change yarns mid-round.

More amigurumi animals to try next

Once you've finished your frog, the same shape language transfers straight to other animals. Each of these uses a magic-ring start, continuous rounds, and the same bobble-stitch trick for facial features:

Tips before you start

Work tighter than you think you need to. Loose amigurumi shows the stuffing through the gaps. If you can see your finger through the fabric when you hold a finished round up to the light, drop down a hook size.

Keep your stitch marker in the first stitch of each round. The whole frog is worked in a continuous spiral - there are no slip stitches between rounds - so the marker is the only way to know where the round starts and stops.

Place the safety eyes carefully. They lock in permanently once you snap the washer on. Hold the frog up at arm's length to check the placement before committing.

Free printable

Print the steps and supply list for this project

One page you can take to the table. Free with a free account, no password.

Get the free printable

What you'll need

Free, for this project

Get this checklist by email

  • All 10 tools and materials, with tick boxes
  • A link to print all 8 steps on paper, to keep by you while you craft

No password. The whole tutorial stays free on this page.

Quick answer

Beginner amigurumi frog: single-color green body worked in continuous rounds from a magic ring. An easy project: about 3 hours 30 minutes. Materials cost about $10 to $18. You need 10 things, including Worsted-weight chenille yarn in green, Polyester fiberfill stuffing and Felt smile applique. The 8 steps start with start with a Magic Ring and 6 Single Crochets, round 2 - Six Increases (12 Stitches) and round 3 - Single Crochet + Increase (18 Stitches).

Step-by-step guide

8 steps, about 15 minutes. Tap a picture to jump to that step. Your progress saves automatically.

Tick each step off as you go.

  1. Step 1: Start with a Magic Ring and 6 Single Crochets

    Watch this step · 1:00

    Wrap the yarn around your two fingers and cross it into an X on top. Insert the hook under the front strand, grab the back strand, and pull it through. Yarn over and pull up a chain to lock the loop in place.

    Now work 6 single crochets into the ring. Count them out loud as you go - this is round 1 of the whole frog, so you want exactly 6. Once you have all 6 stitches, pull the yarn tail to close the ring tight. The hole should disappear completely.

    Tip:

    New to magic rings? Our magic ring walkthrough shows the wrap-and-pull motion frame by frame. It's the single most useful stitch for amigurumi and worth practicing once on a scrap of yarn before you start the frog.

    Back to all steps

  2. Step 2: Round 2 - Six Increases (12 Stitches)

    Watch this step · 1:50

    Round 2 doubles the stitch count. Place an increase (2 single crochets) in each of the 6 stitches from round 1. That's 12 single crochets total.

    Before you start, drop a stitch marker into the very first stitch. You're working in a continuous spiral - no joins, no chains - so the marker is your only way to find where the round begins. Move it up at the start of every new round.

    Tip:

    If your stitches are leaning to one side, that's normal for a spiral. Don't try to correct it - amigurumi closes up beautifully when stuffed.

    Back to all steps

  3. Step 3: Round 3 - Single Crochet + Increase (18 Stitches)

    Watch this step · 2:15

    Round 3 is one single crochet, then one increase, repeated 6 times all the way around. That brings you to 18 stitches.

    By now the disc is starting to cup into a small bowl - that's the spiral wanting to form a sphere. Don't fight it. The cup will deepen as you stop increasing in later rounds and the fabric grows up the sides.

    Tip:

    Move your stitch marker up to the first stitch of round 3 before you start. If you forget, you can usually find the round boundary by looking for the small jog in the spiral, but the marker saves you the squint.

    Back to all steps

  4. Step 4: Round 4 - Build the Eye Bobbles

    Watch this step · 3:05

    Round 4 adds the signature frog eye bumps with bobble stitches. The full sequence: 2 sc, inc, 2 sc, inc, bobble, sc, inc, 2 sc, inc, bobble, sc, inc, 2 sc, inc. You'll end with 24 stitches.

    Each bobble is 5 double crochets worked into the same stitch and pulled through together. Yarn over, insert your hook, pull up a loop, yarn over and pull through the first two loops only - that's one half-finished double crochet. Repeat four more times into the same stitch until you have six loops on your hook. Then yarn over once more and pull through all six. The bobble pops out the back of the fabric, which becomes the front of the frog.

    Tip:

    If the bobble is sitting on the inside instead of the outside, you're working with the wrong side facing you. Flip the piece and continue - the bobble pops the direction you're looking at.

    Back to all steps

  5. Step 5: Rounds 5-8 - Single Crochet the Head

    Watch this step · 5:20

    Now for the easy part. Rounds 5 through 8 are plain single crochet all the way around - 24 stitches per round for four rounds. No increases, no bobbles, just steady stitching.

    This is where the head shape forms. The walls grow straight up from the wider base of round 4, building the rounded dome where the safety eyes will sit. Keep your tension consistent so the fabric stays dense - any loose round will show as a visible seam later.

    Tip:

    If you need to put the project down mid-round, slide the loop on your hook onto a stitch marker so it doesn't unravel. Don't pull the yarn tight - just clip the marker through the working loop.

    Back to all steps

  6. Step 6: Insert the Safety Eyes

    Watch this step · 6:40

    Place each 12 mm safety eye between rounds 4 and 5, directly underneath one of the eye bobbles. Push the post through the fabric from the outside in. You should feel it pop through cleanly between two stitches.

    Before snapping on the washer, hold the frog up and check that both eyes are level and the spacing looks right. Once you snap the washer onto the back of the post, the eye is locked in forever - there's no removing it without cutting the fabric.

    Tip:

    If you push the post through a stitch instead of between stitches, it'll stretch the yarn and the eye will sit crooked. Use the tip of your hook to gently spread the fabric until you find the gap between two stitches, then push the post through.

    Back to all steps

  7. Step 7: Shape the Body, Arms, and Legs

    Watch this step · 8:00

    Round 9 starts the neck shaping: 2 sc, invisible dec, repeated around. Round 10 narrows further with 4 sc + 1 dec patterns. Round 11 increases back out (2 sc, inc x 5) to widen into the body.

    Round 12 places the arms. After 10 single crochets, work a 5-double-crochet bobble, then 4 more sc, then another bobble, then 4 more sc. That gives you two arms pointing forward at the right spacing. Rounds 13 and 14 are plain single crochet (20 stitches each round). Round 15 mirrors the arm placement to create the two legs at the bottom of the body.

    Tip:

    If your arms or legs don't line up centered with the eyes, your tension is slightly different from Annabelle's - that's normal. Shift the bobble placement by one stitch left or right on subsequent rounds to get them lined up the way you want.

    Back to all steps

  8. Step 8: Stuff, Close, and Finish

    Watch this step · 11:10

    Stuff the body firmly with polyfill - more than you think you need. Underfilled amigurumi sags within a few weeks. The chenille yarn is very forgiving, so push the stuffing in until the frog holds its shape when you set it down.

    The final round is 10 decreases all the way around to close the bottom. Slip stitch into the first stitch, cut your yarn with a long tail, and thread it through a yarn needle. Weave the needle through the front loops of each remaining stitch, pull tight to cinch the hole closed, and tie a small knot inside. Bury the tail in the body and snip it.

    For the finishing touches, thread a length of pink yarn through your needle and stitch three small lines below each eye for blush. Then either embroider a smile with black floss or hot-glue on a felt smile applique. That's your frog.

    Tip:

    If you skip the blush, the frog still reads as a frog. But the pink cheeks are what makes this design feel finished. They take less than a minute and use almost no yarn.

    Back to all steps

How to Crochet a Cactus (Easy Amigurumi for Beginners)

Keep going

How to Crochet a Cactus (Easy Amigurumi for Beginners)

Keep going with crochet

More on this topic, picked for this frog.

You reached the last step

Save this project to come back to it

Your ticked steps, the free printable and your other saved makes, together in My Projects. Free, no password.

You tapped Save

Save this project for later

We'll email you a link, no password.

How to Crochet a Frog (Beginner Amigurumi Pattern)

  • Your saved projects in one list
  • Your ticked steps on any device

Check your inbox for an email from us. Not there? Look in your spam folder.

Free printable

Printable sheet and shopping list for this project

The bonus is hidden until you sign up.

Free with a free account, no password. Every step above stays open to everyone.

Products Used

The Checklist

How to Crochet a Frog (Beginner Amigurumi Pattern)

Tools
5
Materials
5
Steps
8
Video
15 min

Tools we recommend

As an Amazon Associate we earn from qualifying purchases. Links on this page may be affiliate links - clicking them and buying doesn't change your price, but helps support Crafting Step by Step.

Tags

The Crafter's Weekly

New crochet tutorials, every Sunday

One short email with the week's best step-by-step guides. Free, no spam, unsubscribe anytime.

Test your knowledge

Did the lesson stick? Start with this one.

5 questions covering what you just read. No signup, no score saved, and you can stop after this one.

Question 1 of 5

How does this amigurumi frog begin?

Quick reference

Key takeaways from How to Crochet a Frog (Beginner Amigurumi Pattern)

5 questions, answers, and one-line explanations. Tap to expand.

  1. 1.How does this amigurumi frog begin?

    Answer: A magic ring with 6 single crochets

    Amigurumi starts in a magic ring so you can cinch the center hole closed.

  2. 2.Why drop a stitch marker into the first stitch of the round?

    Answer: You work in a continuous spiral with no joins

    A spiral has no obvious seam, so the marker tracks where each new round begins.

  3. 3.What creates the frog's bulging eyes in round 4?

    Answer: Bobble stitches worked into the round

    Bobbles, five double crochets in one stitch, make the raised eye bumps.

  4. 4.When must you insert the safety eyes?

    Answer: Before you stuff and close the body

    The washer locks on for good, so eyes go in before stuffing while you can still reach inside.

  5. 5.Why stuff the frog more firmly than feels necessary?

    Answer: Understuffed amigurumi sags within a few weeks

    Firm stuffing holds the shape; underfilled pieces slump over time.

Did this work for you?

What's next

Similar tutorials

Hand-picked next reads based on the one you just finished.

Liked this crochet tutorial?

Pick the crafts you want to hear about. One email every Sunday with new step-by-step tutorials. No spam, easy to unsubscribe.

Get more like this in your inbox

Weekly digest. Pick the categories you want. Unsubscribe anytime.

Send me tutorials about

We only email about new tutorials. Easy unsubscribe anytime.