How to Read a Crochet Pattern (Beginner Guide)

  • 8 steps
  • 18:01 video
  • Difficulty: Easy
  • About 30 minutes
  • Materials about $4 to $8
  • Crochet

Based on a video by Crochet With Tiffany

Opens their YouTube channel

Steps written out by Crafting Step by Step · Published · Updated

Watch the original video (opens YouTube)
The finished result: How to Read a Crochet Pattern (Beginner Guide)
Also in:Fiber Arts

You found a crochet pattern you love, you sat down to start, and the first line said something like ch 7, *dc in ch, sk 1 ch, ch* and your brain noped right out. That is the universal beginner moment. Patterns are written in a shorthand that nobody is born knowing.

Tiffany Hansen from Crochet With Tiffany walks through the anatomy of a pattern, the core abbreviations, repeats, stitch diagrams and the multiple-of formula. This page is the cheat sheet to keep open beside her video.

Crochet pattern meanings: the abbreviations

These cover almost every beginner pattern. The key printed on your pattern always wins if it disagrees.

AbbreviationMeaning
chchain
sl stslip stitch
scsingle crochet
hdchalf double crochet
dcdouble crochet
trtreble crochet
st(s)stitch(es)
skskip
spspace (the gap under a chain)
reprepeat
inc2 stitches in the same stitch
dec2 stitches worked together
BLO / FLOback loop only / front loop only

US vs UK crochet terms

Same words, different stitches. Every UK name sits one step taller than the US one.

USUK
scdc
hdchtr
dctr
trdtr
skipmiss
gaugetension

If a pattern says "miss" or "tension", it is almost certainly written in UK terms.

Repeats inside repeats

Patterns nest their shorthand. Take *[dc, ch 1] 3 times in next sp, sk 2 sts, sc in next st; rep from * across. Read it from the inside out: the brackets are one small unit you make three times in the same space. Everything between the star and the semicolon is one repeat of the row. Say it out loud once, work it once, then check the stitch count before you go on autopilot.

Stitch counts and gauge

The number at the end of a row, like (24 sts), is your early warning. Most counting errors come from the turning chain. Some patterns count it as the first stitch and some do not, and the pattern notes usually say which.

Gauge is how many stitches and rows fit in 4 inches. Too many stitches? Go up a hook size. Too few? Go down one. For a blanket a little drift is fine. For a hat or a sweater it decides whether the thing fits.

Reading a symbol chart

Worked flat, a chart is read from the bottom up, with rows alternating direction the way your work turns. Worked in the round, it starts in the middle and spirals out, usually counterclockwise for right-handers. Lefties read it mirrored.

Common mistakes

  • Working a UK pattern in US stitches. The fabric comes out short and dense. Check the terms before row 1.
  • Skipping the gauge swatch. Everything after it is off by the same percentage.
  • Counting the turning chain wrong. The row grows or shrinks by one stitch every time.
  • Repeating one time too many. Read what comes after the repeat. The end of the row is often different.

Once the words make sense, each stitch has its own page: single crochet, double crochet, decreasing, changing colors and fastening off.
What you'll need

Step-by-step guide

8 steps, about 18 minutes. Tap a picture to jump to that step. Your progress saves automatically.

Tick each step off as you go.

  1. Step 1: Read the Pattern's Anatomy

    Watch this step · 1:40

    Before you make a single stitch, read the top of the pattern. Every well-written crochet pattern tells you four things up front: skill level, finished size, yarn weight and hook size, and gauge.

    Skip the gauge box and your scarf turns into a bath mat. The yarn label tells you the weight number (1 through 7) and the suggested hook in millimeters. Match what the pattern asks for or your stitch count will be off, even if you follow every instruction perfectly.

    Tip:

    If the pattern lists a brand-specific yarn you cannot find, look up its weight class on the label and substitute any yarn of the same weight with the same hook.

    Back to all steps

  2. Step 2: Decode the Five Core Abbreviations

    Watch this step · 2:10

    Almost every beginner pattern uses the same five abbreviations: ch (chain), sl st (slip stitch), sc (single crochet), hdc (half double crochet), and dc (double crochet). Memorize these and you can read 90% of beginner patterns on sight.

    You will also see sk (skip), st (stitch), sp (space), rep (repeat), and tr (treble crochet). Every pattern includes a key, usually at the top or in a sidebar. When in doubt, check the key before you guess.

    Tip:

    Write the abbreviations and what they mean on a sticky note and park it next to the pattern. After two projects you will not need the note anymore.

    Back to all steps

  3. Step 3: Spot the Repeats - Asterisks, Brackets, Parentheses

    Watch this step · 11:20

    Repeats are how patterns avoid writing the same instructions over and over. There are three flavors:

    • Asterisks *like this* mean "repeat everything between these two stars across the row".
    • Brackets [like this] usually group a sequence that gets repeated a specific number of times, e.g. [dc, ch 1] 5 times.
    • Parentheses (like this) can mean either a repeat or a stitch count check, e.g. (7 sc) at the end of a row tells you what your total should be.

    When you hit an asterisk pair, read what is inside it once out loud, then do that exact sequence again every time you see another star until the row ends.

    Tip:

    Highlight your asterisks with a colored pencil before you start. You will glance back at them a dozen times per row and the highlight makes them jump off the page.

    Back to all steps

  4. Step 4: Watch for US vs UK Terminology

    Watch this step · 5:20

    This is the single biggest beginner trap. US and UK crochet patterns use the same abbreviations for different stitches.

    • US single crochet (sc) = UK double crochet (dc)
    • US half double crochet (hdc) = UK half treble (htr)
    • US double crochet (dc) = UK treble (tr)
    • US treble (tr) = UK double treble (dtr)

    Check the top of the pattern for a country flag, a note like "written in US terms", or the publisher's location. A UK pattern that calls for "dc" wants you to do what a US crocheter calls a single crochet. Get this wrong and the whole fabric comes out the wrong texture and the wrong size.

    Tip:

    No note on the pattern? Look at the first instruction. If row 1 starts with "ch 2" for a tall stitch like double crochet, it is probably US. UK double crochet only needs ch 1.

    Back to all steps

  5. Step 5: Use the Stitch Count and Multiple-Of Formula

    Watch this step · 6:40

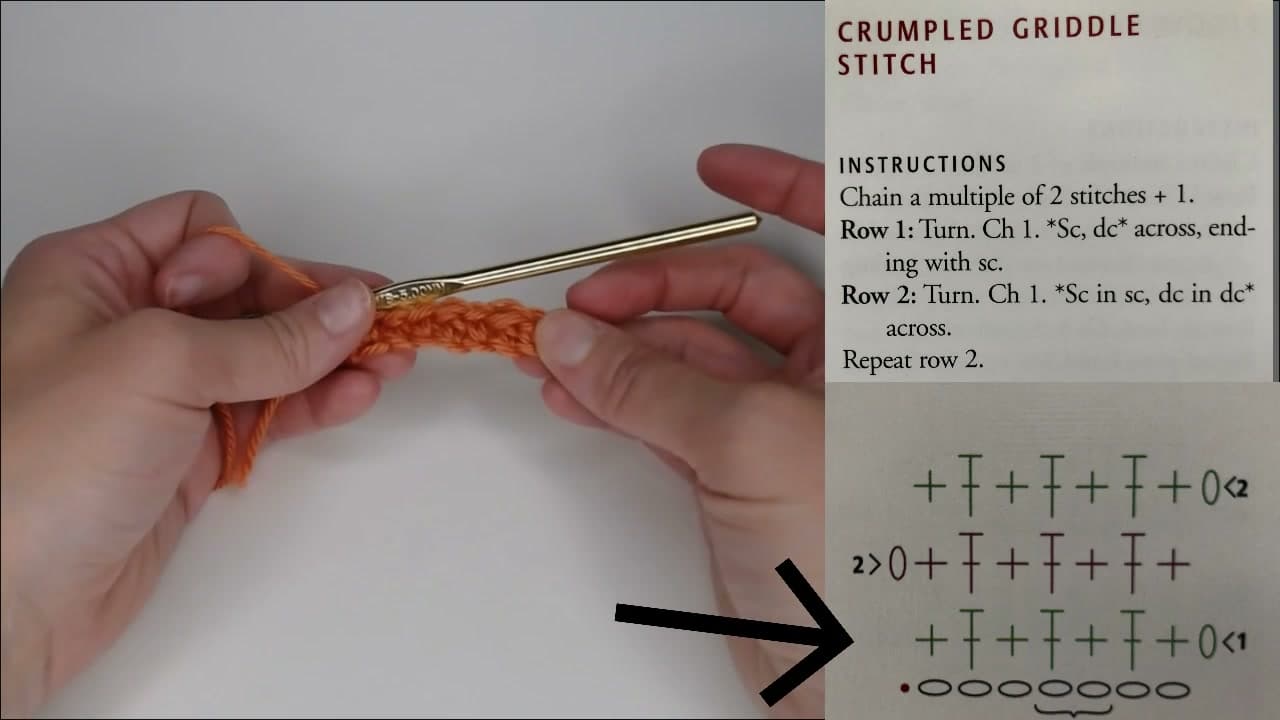
    Patterns tell you how many stitches to start with as a multiple. Something like "chain a multiple of 2 + 1" means your foundation chain has to follow that formula or the pattern will not work out evenly at the ends.

    To pick a starting chain, decide the width you want, divide by your gauge, then round to the nearest valid multiple. The video shows 7 chains as an example: 7 minus 1 is 6, and 6 is evenly divisible by 2, so 7 works.

    Patterns also drop stitch counts at the end of rows like (36 dc). After every row, count your stitches and check against the number in parentheses. If you are off, frog back to the start of the row and recount before you go further.

    Tip:

    Make a 4-inch square in your chosen yarn and hook, count the stitches and rows, and compare to the pattern's gauge before you start the real project. Ten minutes here saves ripping out hours later.

    Back to all steps

  6. Step 6: Read Charts and Symbols Alongside Written Instructions

    Watch this step · 7:40

    A lot of patterns include a stitch diagram next to the written instructions. The diagram uses standardized symbols: an open oval for a chain, a plus or cross for single crochet, a T-shape for half double crochet, a T with one slash for double crochet, and a T with two slashes for treble.

    A red dot or arrow marks where you start. Numbered arrows next to each row show which direction you are working. The big advantage of the chart is you can see exactly which stitch goes on top of which - written instructions sometimes leave that vague.

    When the written form confuses you, look at the chart for the same row. When the chart confuses you, read the written form. They are two views of the same instructions.

    Tip:

    Print the chart larger than it appears in the pattern. Tiny symbols are hard to track once you are six rows in.

    Back to all steps

  7. Step 7: Track Your Progress on Every Row

    Watch this step · 9:40

    Once you start working, the pattern stops being abstract and starts being a checklist. Use real tools to keep your place:

    • Stitch markers in the first stitch of each row tell you where the row begins when you come back to it.
    • Washi tape or a sticky note across the current row in the printed pattern stops you from re-reading row 4 when you are on row 5.
    • Row counter (the clicker or an app) keeps your row number honest when you put the project down for a week.

    Read one row, work that row, then make the mark before you go on. Do not work two rows ahead of where you marked - you will lose your place every single time.

    Tip:

    If you put the work down mid-row, leave the hook in the loop and slide a stitch marker into your current spot. Future you will thank present you.

    Back to all steps

  8. Step 8: When the Pattern Assumes Something Is Obvious

    Watch this step · 13:40

    Most patterns skip the boring parts: turning chains, where to insert the hook on row 1, how to count the turning chain as a stitch (or not). When a line of instructions feels like it has a gap, the pattern is assuming you know what to do.

    The two most common gaps to fix yourself:

    • Turning chains: at the end of every row you chain a number of stitches and turn the work. Single crochet rows usually chain 1, double crochet rows chain 2 or 3. Whether that turning chain counts as your first stitch is sometimes stated, sometimes not. When in doubt, look at the chart - the symbol next to the row number is your turning chain.
    • Where to put the first stitch of a row: if the pattern says "dc in next dc" but does not say where to start, it usually means the first stitch after the turning chain. Look at the chart for confirmation.

    When in doubt, search the designer's name plus the pattern name. Most designers post errata or follow-up videos when a question comes up twice.

    Tip:

    Bookmark a free abbreviation key from the Craft Yarn Council. When a pattern uses a rare abbreviation, that's your fastest lookup.

    Back to all steps

Keep going

How to Add Edging to Crochet

7 steps · about 9 minutes

Products Used

The Checklist

How to Read a Crochet Pattern (Beginner Guide)

Tools
5
Materials
1
Steps
8
Video
18 min

Tools we recommend

As an Amazon Associate we earn from qualifying purchases. Links on this page may be affiliate links - clicking them and buying doesn't change your price, but helps support Crafting Step by Step.

Tags

Free printable

Get the Crochet Cheat Sheet

Every basic stitch on one printable page. No spam, one-click unsubscribe.

Test your knowledge

Did the lesson stick? Start with this one.

5 questions covering what you just read. No signup, no score saved, and you can stop after this one.

Question 1 of 5

What does the abbreviation 'sl st' mean?

Quick reference

Key takeaways from How to Read a Crochet Pattern (Beginner Guide)

5 questions, answers, and one-line explanations. Tap to expand.

  1. 1.What does the abbreviation 'sl st' mean?

    Answer: Slip stitch

    Slip stitch. Other core abbreviations: ch (chain), sc (single crochet), hdc (half double crochet), dc (double crochet).

  2. 2.A US 'single crochet' equals which UK stitch?

    Answer: Double crochet

    US sc = UK dc. The biggest beginner trap: same abbreviations, different stitches. Always check whether a pattern uses US or UK terms.

  3. 3.What do asterisks *like this* mean in a pattern?

    Answer: Repeat between stars

    Repeat everything between the two asterisks across the row. Brackets group a sequence repeated a specific number of times.

  4. 4.Why make a gauge swatch before starting?

    Answer: Verify size matches

    Make a 4-inch square, count stitches and rows, compare to the pattern's gauge. Skip it and your scarf turns into a bath mat.

  5. 5.Stitch diagram symbol that means 'chain'?

    Answer: Open oval

    Open oval = chain. Plus/cross = single crochet. T-shape = half double crochet. T with one slash = double crochet.

Did this work for you?

What's next

Related collections

Curated theme pages that include this tutorial.

Similar tutorials

Hand-picked next reads based on the one you just finished.

Liked this crochet tutorial?

Pick the crafts you want to hear about. One email every Sunday with new step-by-step tutorials. No spam, easy to unsubscribe.

Get more like this in your inbox

Weekly digest. Pick the categories you want. Unsubscribe anytime.

Send me tutorials about

We only email about new tutorials. Easy unsubscribe anytime.