How to Sew a Ladder Stitch (Invisible Hand Stitch)

The finished result: How to Sew a Ladder Stitch (Invisible Hand Stitch)
  • Difficulty: Easy
  • About 15 minutes
  • 10 steps

You tapped Save

Save this project for later

We'll email you a link, no password.

How to Sew a Ladder Stitch (Invisible Hand Stitch)

  • Your saved projects in one list
  • Your ticked steps on any device

Check your inbox for an email from us. Not there? Look in your spam folder.

Print

Steps written out by Crafting Step by Step from smarmyclothes' video (opens YouTube) (6:30). Published .

Also in:Crafts

The ladder stitch is the hand stitch that closes a seam so you cannot see it. You use it to shut the turning gap on a pillow, close up a stuffed toy, finish a lined bag or mend a split seam. It also goes by the invisible stitch and the slip stitch. In this tutorial the maker behind smarmyclothes and What The Craft closes a small pillow with black thread so every stitch shows, then shows how it nearly disappears in matching thread.

How to sew a ladder stitch: the short version

  • Press both seam allowances so you have two crisp folded edges.
  • Mark the fold lines, and mark quarter inch spacing if you want help.
  • Bring a knotted thread up from inside at one end of the gap.
  • Cross straight over, take a small stitch along the opposite fold, cross back, repeat.
  • Pull the thread tight every few stitches, then knot and bury the tail.

Why it disappears

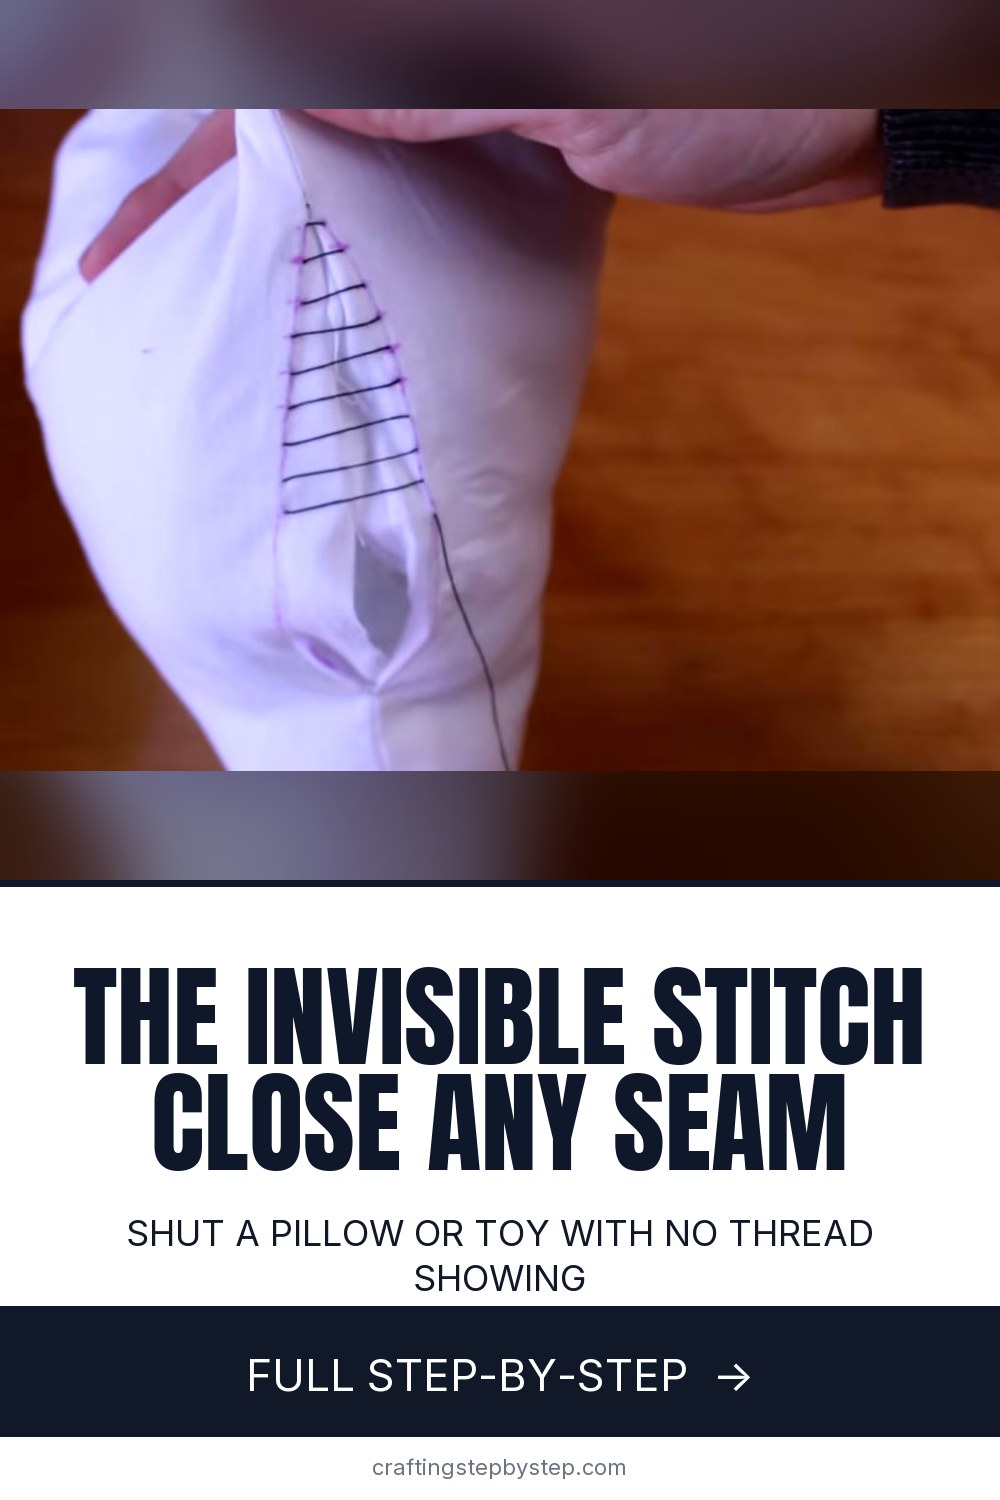
Every stitch runs inside the fold, along the line where the fabric would have been machine sewn. The only thread that crosses the gap is the short rung between the two folds. When you pull it tight, the folds meet and the rungs vanish into the seam. That is also why it is called a ladder: before you pull, the rungs look like the steps of a ladder lying on its side.

The two rules

Keep every stitch on the fold line, and keep the stitches even and parallel. Wander off the line and the seam puckers. Let the rungs slant and the fabric twists. The marking tricks here exist to make both rules easy.

Thread and needle

Match the thread to the fabric. Contrast thread is only for learning. A fine, sharp hand sewing needle slips through the fold without leaving holes. All-purpose polyester thread is strong enough for stuffed toys and pillows. Run it over a bit of beeswax if it tangles.

Stitch length

A quarter inch is about as long as you want to go. Smaller is less visible, so drop to 3/16 or 1/8 inch where the seam meets machine stitching or on fine fabric. Bigger stitches are faster, but they let the gap gape between rungs.

A shortcut for spacing

Marking every notch with a ruler works, but it is slow. Try this instead: draw quarter inch marks on the side of your finger with a fine-tip marker. Hold your finger along the seam and use the marks as a guide for each stitch.

Common problems

  • Thread shows. A stitch strayed off the fold. Pull it out and redo that stretch.
  • Puckers. The stitches were uneven or pulled too hard. Ease them out along the seam with your fingers.
  • A bump at the end. The knot was tied too tight. A press with steam usually flattens it.

Where to use it next

Close the gap on a pillowcase or a lined drawstring bag. Pair it with the backstitch for strong hand seams, keep your clothes going with how to sew a button by hand, or tidy a hem in how to hem pants at home.

Free printable

Print the steps and supply list for this project

One page you can take to the table. Free with a free account, no password.

Get the free printable

What you'll need

Free, for this project

Get this checklist by email

  • All 7 tools and materials, with tick boxes
  • A link to print all 10 steps on paper, to keep by you while you craft

No password. The whole tutorial stays free on this page.

Quick answer

Learn the ladder stitch to close a pillow, stuffed toy or lined bag by hand with no visible thread. An easy project: about 15 minutes. You need 7 things, including hand sewing needle, fabric marking pen and ruler or sewing gauge. The 10 steps start with press the Seam Allowance Folds Before the Ladder Stitch, mark the Fold Line for an Even Ladder Stitch and mark Quarter Inch Spacing Along the Ladder Stitch Seam.

Step-by-step guide

10 steps, about 7 minutes. Tap a picture to jump to that step. Your progress saves automatically.

Tick each step off as you go.

  1. Step 1: Press the Seam Allowance Folds Before the Ladder Stitch

    Watch this step · 0:48

    Turn your project right side out and tuck both raw edges of the opening inside. Press them flat with a hot iron so each side has a crisp fold that lines up with the machine seam. That fold is your stitching line. A sharp crease makes every later step easier, because you can feel and see exactly where each stitch should go.

    Tip:

    Chenille and velvet will not hold a crease. Mark the fold line with chalk instead.

    Back to all steps

  2. Step 2: Mark the Fold Line for an Even Ladder Stitch

    Watch this step · 1:04

    Even when the fabric pressed well, draw along each fold with a fabric marking pen. The clearer the line, the straighter your stitches turn out. Mark both sides of the opening so you have two matching lines to stitch between. Use a water soluble pen so the marks rinse away when you are done.

    Tip:

    Test the pen on a scrap first to be sure it washes out of your fabric.

    Back to all steps

  3. Step 3: Mark Quarter Inch Spacing Along the Ladder Stitch Seam

    Watch this step · 1:39

    Line a ruler up with the marked fold and make a small notch every quarter inch from one end of the gap to the other. Do the same on the opposite side so the marks line up straight across from each other. You are planning where every stitch goes before you thread the needle. That is the trick to stitches that come out even.

    Tip:

    Prefer metric? Half centimeter spacing works the same way.

    Back to all steps

  4. Step 4: Bring the Needle Up to Start the Ladder Stitch

    Watch this step · 2:39

    Thread a hand needle and knot the end. Start right beside the machine stitching at one end of the gap. Push the needle up from inside the project so it comes out exactly on the marked fold line. The knot stays hidden inside. Getting this first stitch right on the line is the fiddly part, so take your time.

    Tip:

    Right-handed? Work from right to left. Lefties often find the reverse easier.

    Back to all steps

  5. Step 5: Cross the Gap and Take the First Ladder Stitch

    Watch this step · 2:56

    Take the needle straight across the gap to the opposite fold, directly across from where your thread came out. Push it into the fold on that mark and bring it back out at the next mark along, all in one motion. The thread now runs inside the fold for one stitch length and crosses the gap in a short, straight rung.

    Tip:

    Cross at a right angle. A slanted rung twists the seam.

    Back to all steps

  6. Step 6: Repeat the Ladder Stitch Back and Forth Along the Seam

    Watch this step · 3:12

    Cross straight back to the first fold. Go in on the mark directly opposite and come out on the next mark down the line. Pull the thread through and keep going, back and forth, one fold and then the other. Each new stitch should sit parallel to the last. Keep every stitch on the marked lines.

    Tip:

    Lost your place? The next stitch always starts directly across from the last exit.

    Back to all steps

  7. Step 7: Check the Ladder Rungs, Then Pull the Thread

    Watch this step · 3:54

    After a few stitches, open the seam a little and look. You should see neat, even rungs crossing between the folds, like a ladder on its side. If one slants or sits off the line, pull it out and redo it now. Then hold the end and pull the thread gently. The rungs draw together and close the seam.

    Tip:

    Pull a little at a time. One big tug can snap the thread or pucker the seam.

    Back to all steps

  8. Step 8: Close the Opening With the Finished Ladder Stitch

    Watch this step · 3:58

    Keep stitching and pulling until you reach the machine stitching at the far end. Each time you pull, the folds meet and the thread sinks out of sight. Run your finger along the seam. It should feel flat and even, with no gaps or puckers. Uneven spots mean the stitches strayed, so pull them out and start that bit again.

    Tip:

    Smaller stitches, down to 1/8 inch, hide even better on fine fabric.

    Back to all steps

  9. Step 9: Tie Off the Thread at the End of the Ladder Stitch

    Watch this step · 5:00

    When you reach the end of the gap, take a small stitch backward under the previous stitch. Loop the thread around through that stitch to make a knot, and repeat it. Triple knotting holds best, especially on a stuffed toy that gets squeezed. Keep the knots snug against the fabric, but not so tight that the end puckers.

    Tip:

    A knot tied too tight leaves a dimple. Snug is enough.

    Back to all steps

  10. Step 10: Bury the Thread Tail to Finish the Ladder Stitch

    Watch this step · 5:18

    Push the needle into the project right beside the knot and bring it out somewhere on the side, an inch or two away. Pull the thread taut and snip it close to the fabric. Let go and the tail springs back inside, hidden for good. Give the seam a quick press with steam to help the stitches settle in.

    Tip:

    Pull the thread a little before you snip so the tail pops inside.

    Back to all steps

How to Sew an Apron From One Yard of Fabric

Keep going

How to Sew an Apron From One Yard of Fabric

Keep going with sewing

More on this topic, picked for this ladder stitch.

You reached the last step

Save this project to come back to it

Your ticked steps, the free printable and your other saved makes, together in My Projects. Free, no password.

You tapped Save

Save this project for later

We'll email you a link, no password.

How to Sew a Ladder Stitch (Invisible Hand Stitch)

  • Your saved projects in one list
  • Your ticked steps on any device

Check your inbox for an email from us. Not there? Look in your spam folder.

Free printable

Printable sheet and shopping list for this project

The bonus is hidden until you sign up.

Free with a free account, no password. Every step above stays open to everyone.

Products Used

The Checklist

How to Sew a Ladder Stitch (Invisible Hand Stitch)

Tools
6
Materials
1
Steps
10
Video
7 min

Tools we recommend

As an Amazon Associate we earn from qualifying purchases. Links on this page may be affiliate links - clicking them and buying doesn't change your price, but helps support Crafting Step by Step.

Tags

The Crafter's Weekly

New sewing tutorials, every Sunday

One short email with the week's best step-by-step guides. Free, no spam, unsubscribe anytime.

Did this work for you?

What's next

Related collections

Curated theme pages that include this tutorial.

Similar tutorials

Hand-picked next reads based on the one you just finished.

Liked this sewing tutorial?

Pick the crafts you want to hear about. One email every Sunday with new step-by-step tutorials. No spam, easy to unsubscribe.

Get more like this in your inbox

Weekly digest. Pick the categories you want. Unsubscribe anytime.

Send me tutorials about

We only email about new tutorials. Easy unsubscribe anytime.