How to Make a Woven Paper Easter Basket

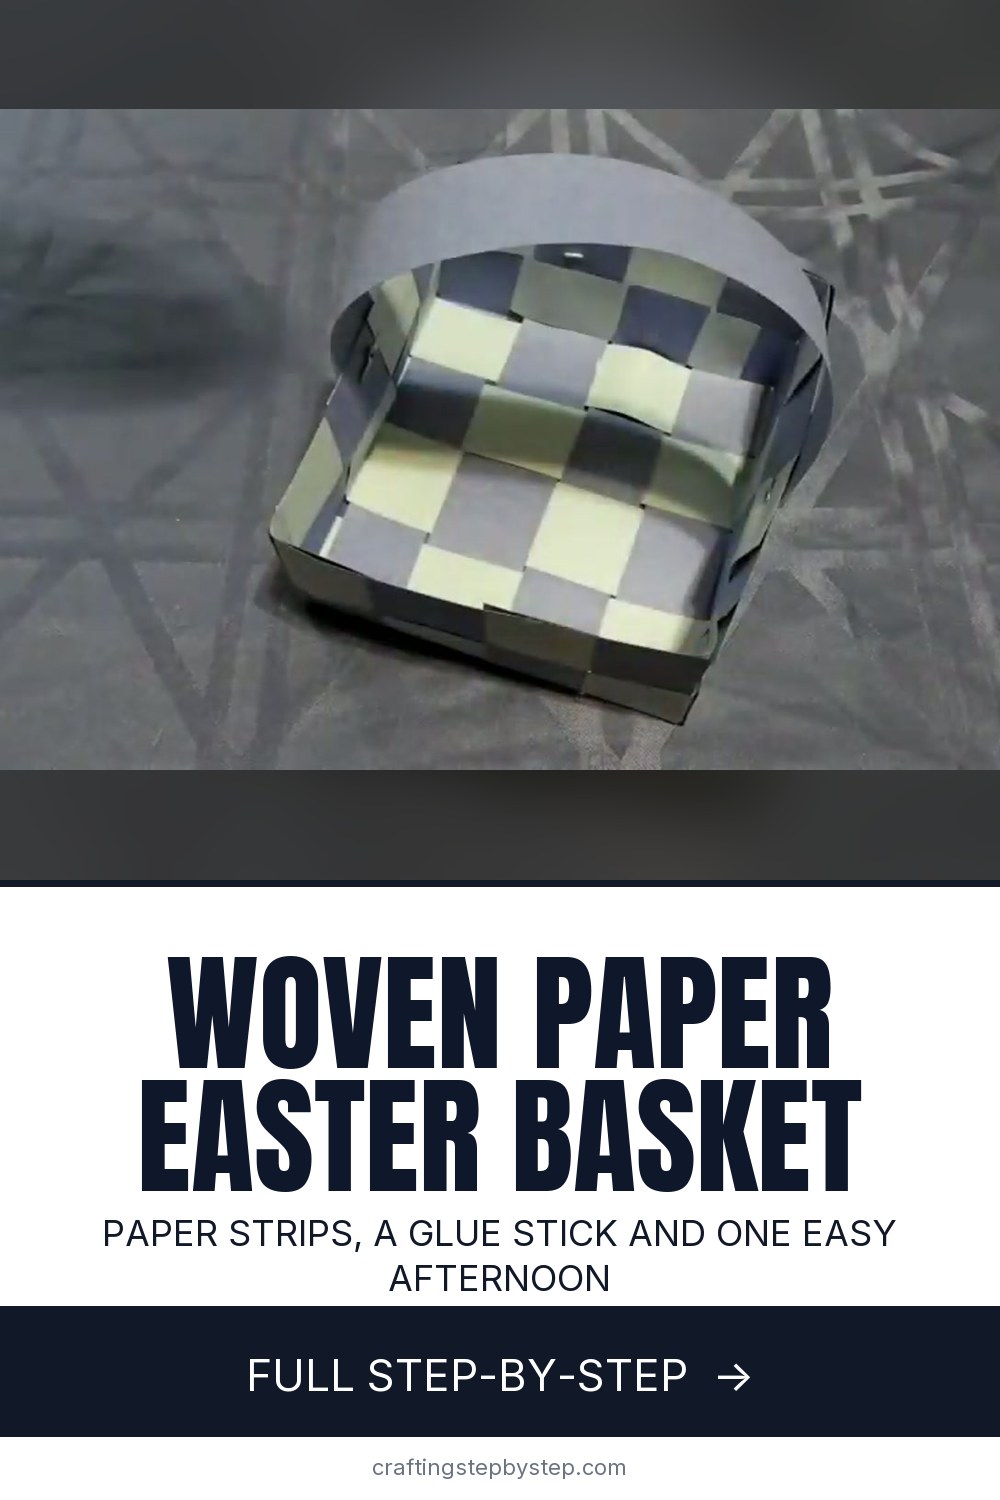
The finished result: How to Make a Woven Paper Easter Basket
  • Difficulty: Easy
  • 10 steps

You tapped Save

Save this project for later

We'll email you a link, no password.

How to Make a Woven Paper Easter Basket

  • Your saved projects in one list
  • Your ticked steps on any device

Check your inbox for an email from us. Not there? Look in your spam folder.

Print

Steps written out by Crafting Step by Step from Cramahe Library's video (opens YouTube) (5:38). Published .

Also in:Crafts

This woven paper Easter basket starts as flat strips of construction paper and ends as a small square basket with a handle. You weave a checkerboard base, fold the ends up, and weave the walls around them. The method comes from the Cramahe Library, a public library in Ontario that shares craft tutorials on its YouTube channel. It needs paper, scissors, a glue stick and two paper fasteners, so it is an easy afternoon craft to do with a grandchild.

How to make a woven paper Easter basket

The whole basket is one over-under pattern. Four strips of one colour lie flat. Four strips of the second colour weave through them to make the base. The loose ends become the uprights of the walls, and new strips weave around them two rows high. A paper strip handle goes on last.

Materials and swaps from home

  • Paper. The library uses light and dark blue. For Easter, pick two pastels that contrast, like pink and yellow or lilac and mint. Cardstock is sturdier but harder to weave, so keep it for the handle.
  • Glue. A glue stick holds the corners without soaking the paper. Tape works too.
  • Brads. Paper fasteners hold the handle. No brads? Staple it or glue it inside.

Sizes in plain words

Cut 9 x 12 inch sheets the long way into strips 1 inch wide and 12 inches long. One sheet of each colour gives nine strips, which is enough with a spare. The finished basket is about 4 inches square and 2 inches deep. That holds a handful of foil eggs or a small chocolate bunny.

How long it takes and who it suits

Plan on 30 to 45 minutes the first time. Children around seven and up can weave the base. Younger ones do well if you fold the corners and they weave and glue. Make one per child for an egg hunt, a row of them for a church or class party, or set one at each place on the Easter table.

Easter variations

  • Colours. Weave in a third pastel on the walls for stripes.
  • Kid-friendly. Use 2 inch strips. Fewer, wider strips are quicker to weave.
  • A spring version. Green and yellow paper makes a basket you can leave out after Easter. Fill it with paper flowers or an egg carton butterfly.

For a matching door decoration, try a paper wreath. If you would rather work with yarn, a crochet basket holds up to years of egg hunts, and a crochet bunny fits right inside.

Troubleshooting

  • The base keeps sliding apart. Push each strip snug against the last one and dab glue under the corner squares.
  • The pattern breaks at a corner. Check the colour of the last square before you start the next wall. It should change.
  • The walls lean out. Glue the folded tab at each corner and hold it a few seconds.

Storing it for next year

Paper baskets crush in a bin. Stack them inside each other in a shoebox, and keep them dry. Keep a few spare strips cut and you can repair a torn wall in a minute.

Free printable

Print the steps and supply list for this project

One page you can take to the table. Free with a free account, no password.

Get the free printable

What you'll need

Free, for this project

Get this checklist by email

  • All 6 tools and materials, with tick boxes
  • A link to print all 10 steps on paper, to keep by you while you craft

No password. The whole tutorial stays free on this page.

Quick answer

Make a woven paper Easter basket from construction paper strips, a glue stick and two brads. An easy project. You need 6 things, including construction paper in two colours, glue stick and 2 brass paper fasteners. The 10 steps start with weave the First Paper Strip Through the Basket Base Strips, weave the Second Paper Strip in the Opposite Pattern and finish the Woven Checkerboard Base of the Paper Basket.

Step-by-step guide

10 steps, about 6 minutes. Tap a picture to jump to that step. Your progress saves automatically.

Tick each step off as you go.

  1. Step 1: Weave the First Paper Strip Through the Basket Base Strips

    Watch this step · 0:32

    Cut both colours of construction paper the long way into 1 inch strips. Lay four strips of one colour side by side on the table, close together but not overlapping. Take a strip of the second colour and weave it across them near the middle: over the first strip, under the second, over the third and under the fourth. Pull it through so the ends stick out evenly on both sides.

    Tip:

    A ruler and pencil line on each sheet keeps the strips the same width, and the weave stays square.

    Back to all steps

  2. Step 2: Weave the Second Paper Strip in the Opposite Pattern

    Watch this step · 0:57

    Take another strip of the second colour and lay it beside the first one. This time do the opposite: under the first strip, over the second, under the third and over the fourth. Slide it up until it sits snug against the first woven strip. Straighten the flat strips between rows so the squares line up. You can already see the checkerboard start.

    Tip:

    If two squares of the same colour sit side by side, that strip went the same way as the last one.

    Back to all steps

  3. Step 3: Finish the Woven Checkerboard Base of the Paper Basket

    Watch this step · 1:20

    Weave the third strip like the first one, starting over. Weave the fourth like the second, starting under. Now you have four strips going one way and four going the other, with a neat checkerboard square in the middle. Push all the strips tight together and center the square, so the loose ends on each side are about the same length. Those ends become the walls.

    Tip:

    Dab glue under the four corner squares. They are the ones that slip when you fold the sides up.

    Back to all steps

  4. Step 4: Fold Up the Strip Ends on All Four Sides of the Basket Base

    Watch this step · 1:51

    Fold each loose strip end straight up along the edge of the woven square. Work all the way around the base, one side at a time, and press a firm crease into every fold. The square becomes the bottom of the basket and the folded ends stand up as the uprights for the walls. They will flop a little for now. The woven rows hold them in place.

    Tip:

    Run a fingernail along each fold. A sharp crease gives you straight walls.

    Back to all steps

  5. Step 5: Weave the First Wall Strip Through the Upright Ends

    Watch this step · 2:05

    Pick a strip in the colour opposite to the uprights on the side you are working on. Weave it through the uprights low against the base: under the first, over the second, under the third and over the fourth. Leave a short tail at the start and fold it up. That tail joins the next wall. Glue every spot where the strip crosses an upright so the wall is firm.

    Tip:

    Keep the glue stick close. A quick swipe at each crossing is all it needs.

    Back to all steps

  6. Step 6: Fold the Corner Tab and Trim the Extra Wall Strip

    Watch this step · 2:43

    When the strip reaches the end of the wall, make a small fold at the corner so it can join the next side. Cut off the extra length with scissors. Keep that offcut. It is long enough to use on another wall later. Now the bottom row of the first wall is done and the basket starts to take shape.

    Tip:

    Fold the corner tab inward so the outside of the basket stays tidy.

    Back to all steps

  7. Step 7: Weave the Next Basket Wall in the Opposite Colour

    Watch this step · 3:38

    Move to the next side and use the other colour of paper. Look at the wall you finished and note which colour it ended on at the corner. Start the new wall with the opposite colour so the checkerboard carries around the corner. Tuck the strip under where it needs to go, glue it along the tab you left earlier, and carry on with the over-under pattern. Trim the extra at the end, then repeat on the last two walls.

    Tip:

    Lift the basket and look at each corner as you go. It is easier to fix one now than at the end.

    Back to all steps

  8. Step 8: Weave the Top Row of the Woven Paper Basket Walls

    Watch this step · 4:07

    With the bottom row done all the way around, weave a second row on top of it. This time go the opposite way from the row below. Where the bottom row shows a light square, the top row should show a dark one. Glue the strip at each corner as before and trim the ends. Keep going until the whole top row is woven on all four walls.

    Tip:

    Hold the basket in one hand while you weave. It keeps the walls upright and the rows even.

    Back to all steps

  9. Step 9: Trim the Upright Strips Level Along the Top of the Basket

    Watch this step · 4:32

    Take your scissors and snip off the ends of the uprights that stick up past the top row. Go all the way around the basket until the rim is a neat straight line. Cut slowly, a little at a time. If an end works loose after trimming, a touch of glue stick under it holds it flat against the top strip.

    Tip:

    Cut a hair above the top row, not into it, so the woven strip stays whole.

    Back to all steps

  10. Step 10: Attach the Paper Strip Handle to the Basket With Brads

    Watch this step · 5:12

    Take a leftover strip for the handle and arch it over the basket from one side to the other. Push a brad through one end of the handle, leaving a little paper past the hole so it does not tear. Press the brad through the basket wall without splitting the weave. Open the brad legs flat on the inside to hold the handle. Repeat on the other side and your basket is ready to fill.

    Tip:

    Use a sharp pencil to poke a starter hole, and the brad goes through without crumpling the wall.

    Back to all steps

How to Make Personalized Stationery at Home: DIY Notepads

Keep going

How to Make Personalized Stationery at Home: DIY Notepads

Keep going with paper crafts

More on this topic, picked for this woven paper easter basket.

You reached the last step

Save this project to come back to it

Your ticked steps, the free printable and your other saved makes, together in My Projects. Free, no password.

You tapped Save

Save this project for later

We'll email you a link, no password.

How to Make a Woven Paper Easter Basket

  • Your saved projects in one list
  • Your ticked steps on any device

Check your inbox for an email from us. Not there? Look in your spam folder.

Free printable

Printable sheet and shopping list for this project

The bonus is hidden until you sign up.

Free with a free account, no password. Every step above stays open to everyone.

Products Used

The Checklist

How to Make a Woven Paper Easter Basket

Tools
3
Materials
3
Steps
10
Video
6 min

Tools we recommend

As an Amazon Associate we earn from qualifying purchases. Links on this page may be affiliate links - clicking them and buying doesn't change your price, but helps support Crafting Step by Step.

Tags

The Crafter's Weekly

New paper crafts tutorials, every Sunday

One short email with the week's best step-by-step guides. Free, no spam, unsubscribe anytime.

Did this work for you?

What's next

Related collections

Curated theme pages that include this tutorial.

Similar tutorials

Hand-picked next reads based on the one you just finished.

Liked this paper crafts tutorial?

Pick the crafts you want to hear about. One email every Sunday with new step-by-step tutorials. No spam, easy to unsubscribe.

Get more like this in your inbox

Weekly digest. Pick the categories you want. Unsubscribe anytime.

Send me tutorials about

We only email about new tutorials. Easy unsubscribe anytime.