How to Make Personalized Stationery at Home: DIY Notepads

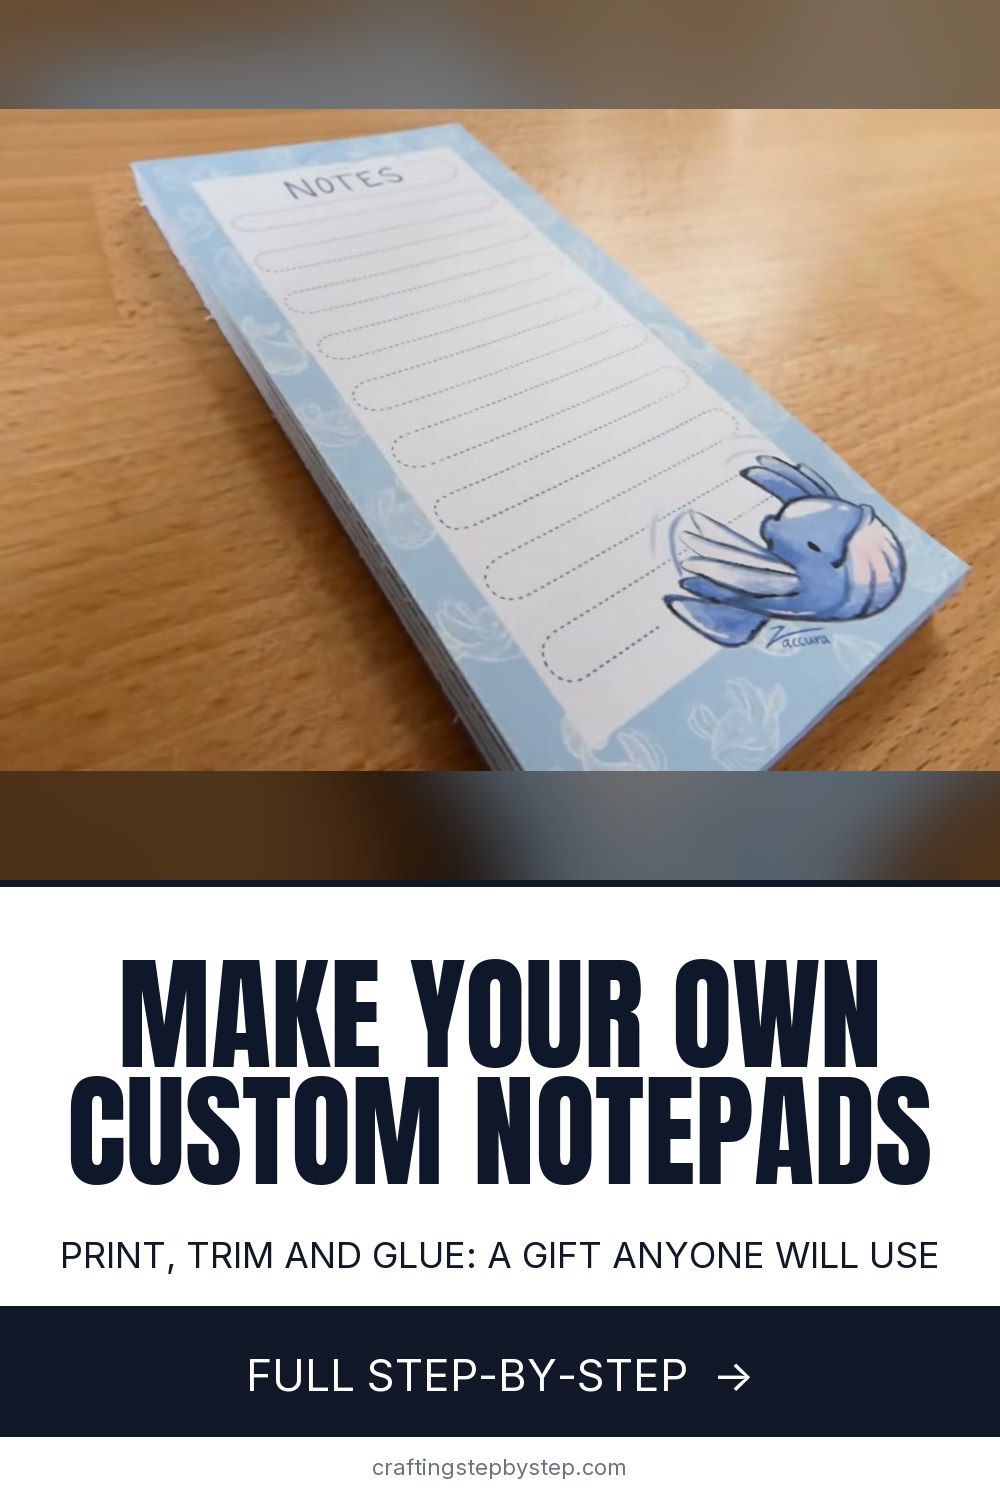
The finished result: How to Make Personalized Stationery at Home: DIY Notepads
  • Difficulty: Easy
  • About 1 hour, plus 2 hours to dry or set
  • 10 steps

You tapped Save

Save this project for later

We'll email you a link, no password.

How to Make Personalized Stationery at Home: DIY Notepads

  • Your saved projects in one list
  • Your ticked steps on any device

Check your inbox for an email from us. Not there? Look in your spam folder.

Print

Steps written out by Crafting Step by Step from Zaccura's video (opens YouTube) (11:39). Published .

Personalized stationery is easier to make at home than you would think. A custom notepad with your own art, a name or a favorite pattern on every page takes a printer, some paper, a bit of cardboard and white glue. Zaccura walks through the whole thing in her video, from designing the pages to padding them into a real tear-off notepad. She calls it three steps, and she is right.

How to make personalized stationery: the short version

  1. Design a page at the size you want.
  2. Arrange several copies on one sheet and print.
  3. Trim the pages and cut a chipboard back.
  4. Clip the stack and brush glue along the top.

Designing without fancy software

Zaccura draws her pages in Clip Studio Paint, but you do not need it. Free tools like Canva, Google Slides or even a word processor can hold a border, a few lines and a small picture. You can also draw or paint a design by hand and scan it. Ideas that make it personal:

  • A name or monogram across the top.
  • A grandchild's drawing in the corner.
  • A pet photo, faded to a soft tint so you can still write over it.
  • A heading like "Grocery list", "To do" or "From the kitchen of".

Keep the art light and to the edges. Dark backgrounds use a lot of ink and make your writing hard to read. Print a test page before the full run.

The size math

Zaccura's pages are 2.75 by 5.38 inches. That is not random. Six of them fit on US letter paper (8.5 by 11) with an eighth of an inch left on every edge, which most home printers need. If you would rather have a bigger pad, a quarter sheet (4.25 by 5.5) fits four to a page. Set your design to 300 dpi or more so it prints crisp.

Paper and glue choices

Plain printer paper tears off cleanly and works with any inkjet or laser printer. Heavier paper feels nicer, but is harder to pad and uses more glue. For the glue, Zaccura uses Elmer's Glue-All, which dries flexible. Bookbinding PVA works too. Special padding compound gives the cleanest tear, if you plan to make a lot.

Making them as gifts

A stack of matching notepads is a lovely, low cost gift. Make a set with a name for each family member, or a teacher gift with a classroom theme. Tie two or three together with twine or wrap them in a strip of scrapbook paper. Pair them with a nice pen and you have a stocking stuffer.

Common problems

  • Pages fall out. Not enough glue reached every sheet. Add a second thin coat once the first dries.
  • Pages glued together. Too much glue soaked down. Brush it thin and keep the clips tight.
  • Uneven top edge. Tap the stack on the table to square it before you clip.

More paper projects

Finish your set with a matching handmade envelope and some envelope calligraphy. Leftover sheets are good for a handmade thank you card, and washi tape dresses up a plain pad in seconds.

Free printable

Print the steps and supply list for this project

One page you can take to the table. Free with a free account, no password.

Get the free printable

What you'll need

Free, for this project

Get this checklist by email

  • All 7 tools and materials, with tick boxes
  • A link to print all 10 steps on paper, to keep by you while you craft

No password. The whole tutorial stays free on this page.

Quick answer

How to make personalized stationery at home: design and print custom notepad pages, trim them and glue them into a real tear-off pad. An easy project: about 1 hour, plus 2 hours to dry or set. Materials cost about $2 to $5. You need 7 things, including printer paper, chipboard or a cereal box and white PVA glue. The 10 steps start with design Your Personalized Notepad Page and arrange Six Notepad Pages on a Letter Size Sheet.

Step-by-step guide

10 steps, about 12 minutes. Tap a picture to jump to that step. Your progress saves automatically.

Tick each step off as you go.

  1. Step 1: Design Your Personalized Notepad Page

    Watch this step · 3:28

    Start with one page design at the exact size you want your notepad to be. Zaccura draws hers in Clip Studio Paint at 2.75 by 5.38 inches and 350 dpi. Add a border, a title like "Notes", some artwork and writing lines. She spaced her lines about a quarter inch apart, which is comfortable for handwriting. Keep the art to the edges so there is room to write.

    Tip:

    No drawing software? A free tool like Canva works, or draw it by hand and scan it.

    Back to all steps

  2. Step 2: Arrange Six Notepad Pages on a Letter Size Sheet

    Watch this step · 5:44

    Make a new canvas the size of your printer paper. For US letter that is 8.5 by 11 inches. Use the same dpi as your page design. Import your page and copy it until the sheet is full. Leave at least an eighth of an inch margin on every edge so the printer does not cut off your design. At Zaccura's page size, exactly six fit.

    Tip:

    Line the pages up edge to edge with no gaps. It makes trimming much faster.

    Back to all steps

  3. Step 3: Print the Personalized Stationery Sheets

    Watch this step · 6:26

    Print as many sheets as you want pages. Each sheet gives you six, so five sheets make a thirty page pad. Zaccura made a slim 30 page notepad and also sells thicker 60 page ones. Plain printer paper is fine and tears off easily later. Let inkjet prints dry for a few minutes before you stack them.

    Tip:

    No printer at home? Most office supply stores print for a small fee.

    Back to all steps

  4. Step 4: Trim the Printed Notepad Pages With a Paper Cutter

    Watch this step · 6:41

    Cut the sheets apart along the edges of your design. A paper trimmer makes it quick and keeps every page the same size. Cut the long strips first, then the individual pages. You can stack two or three sheets at a time if your trimmer handles it. Scissors work too, but take your time to keep the edges straight.

    Tip:

    Small differences show up on a padded edge. Measure twice, cut once.

    Back to all steps

  5. Step 5: Cut a Chipboard Backing for the Notepad

    Watch this step · 7:12

    Cut a piece of chipboard the same size as your pages. This stiff back lets you write on the pad without a table underneath. You can buy chipboard sheets or recycle the side of a cereal box. Cut a couple of extra small strips too. You will use them to protect the pages from the binder clips.

    Tip:

    A cereal box back looks fine, and nobody sees it once the pad is in use.

    Back to all steps

  6. Step 6: Line Up the Notepad Pages Against the Chipboard

    Watch this step · 7:32

    Stack all your pages on top of the chipboard back. Tap the top edge on the table until every page lines up as evenly as you can get it. That top edge is the one you will glue, so it matters most. Lay a small strip of chipboard along the front at the top. It stops the clips from denting the first page.

    Tip:

    Square the top edge, not the bottom. The bottom can be a little uneven.

    Back to all steps

  7. Step 7: Clamp the Notepad Stack With Binder Clips

    Watch this step · 7:38

    Hold the stack steady and clip it together with binder clips on both sides near the top. The clips press the pages tight so the glue cannot run down between them. Check that nothing slipped while you clipped. If the top edge moved, open the clips, tap it square and try again.

    Tip:

    Large binder clips grip a thick stack better than small ones.

    Back to all steps

  8. Step 8: Squeeze Glue Onto the Top Edge of the Notepad

    Watch this step · 7:46

    Hold the clipped stack with the top edge facing up. Squeeze a small line of white glue along it. You do not need much. Zaccura uses Elmer's Glue-All, which is cheap and easy to find. Bookbinding PVA glue works as well. Too much glue can soak between the pages and stick them together.

    Tip:

    Work over scrap paper. White glue drips are hard to get off a wood table.

    Back to all steps

  9. Step 9: Brush the Glue Evenly Across the Notepad Spine

    Watch this step · 7:59

    Spread the glue along the edge with a small paintbrush. Work it back and forth until the whole top is smooth and evenly covered, with every single page touched by glue. Add one more binder clip across the top if you like, to keep things secure. Then set the notepad aside to dry completely.

    Tip:

    Rinse the brush right away. Dried PVA glue ruins bristles.

    Back to all steps

  10. Step 10: Remove the Clips From Your Finished Personalized Notepad

    Watch this step · 8:20

    Once the glue is fully dry, take off the binder clips and the protective strips. That is it. You have a real tear-off notepad with your own design on every page. Pull a page from the top and it peels away cleanly. Make a few in different designs for your desk, your kitchen or as gifts.

    Tip:

    Leave it overnight before the first tear. The glue keeps curing for hours.

    Back to all steps

How to Make a Paper Dahlia (Easy Cardstock Flower)

Keep going

How to Make a Paper Dahlia (Easy Cardstock Flower)

Keep going with paper crafts

More on this topic, picked for this project.

You reached the last step

Save this project to come back to it

Your ticked steps, the free printable and your other saved makes, together in My Projects. Free, no password.

You tapped Save

Save this project for later

We'll email you a link, no password.

How to Make Personalized Stationery at Home: DIY Notepads

  • Your saved projects in one list
  • Your ticked steps on any device

Check your inbox for an email from us. Not there? Look in your spam folder.

Free printable

Printable sheet and shopping list for this project

The bonus is hidden until you sign up.

Free with a free account, no password. Every step above stays open to everyone.

Products Used

The Checklist

How to Make Personalized Stationery at Home: DIY Notepads

Tools
4
Materials
3
Steps
10
Video
12 min

Tools we recommend

As an Amazon Associate we earn from qualifying purchases. Links on this page may be affiliate links - clicking them and buying doesn't change your price, but helps support Crafting Step by Step.

Tags

The Crafter's Weekly

New paper crafts tutorials, every Sunday

One short email with the week's best step-by-step guides. Free, no spam, unsubscribe anytime.

Did this work for you?

What's next

Related collections

Curated theme pages that include this tutorial.

Similar tutorials

Hand-picked next reads based on the one you just finished.

Liked this paper crafts tutorial?

Pick the crafts you want to hear about. One email every Sunday with new step-by-step tutorials. No spam, easy to unsubscribe.

Get more like this in your inbox

Weekly digest. Pick the categories you want. Unsubscribe anytime.

Send me tutorials about

We only email about new tutorials. Easy unsubscribe anytime.