How to Make a Paper Angel (Easy Pleated Book Page Ornament)

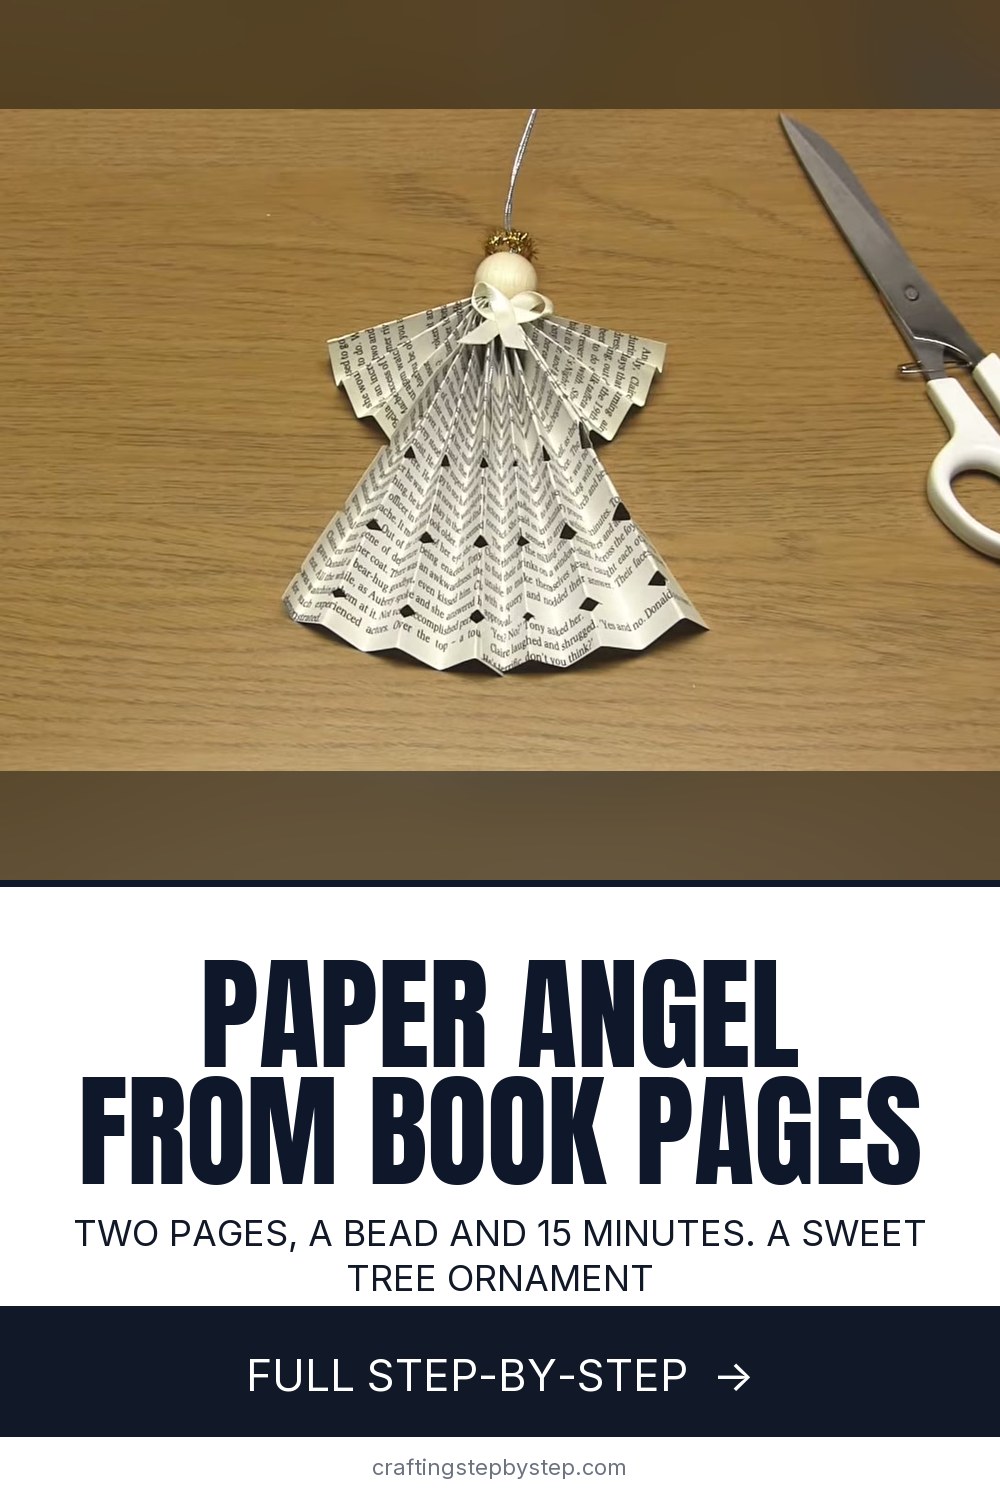
The finished result: How to Make a Paper Angel (Easy Pleated Book Page Ornament)
  • Difficulty: Easy
  • About 20 minutes, plus 15 minutes to dry or set
  • 10 steps

You tapped Save

Save this project for later

We'll email you a link, no password.

How to Make a Paper Angel (Easy Pleated Book Page Ornament)

  • Your saved projects in one list
  • Your ticked steps on any device

Check your inbox for an email from us. Not there? Look in your spam folder.

Print

Steps written out by Crafting Step by Step from Rokolee DIY's video (opens YouTube) (7:25). Published .

This paper angel is two pleated pages and a bead, and it takes about fifteen minutes. The maker behind Rokolee DIY folds hers from old book pages, which gives the angel a soft vintage look with the printed words running down her dress. You pleat each page into a concertina, fold down a sleeve, glue the halves together and add a wooden bead for the head. Then you can dress her up with lace notches, a halo, a bow and a scalloped hem.

How to make a paper angel: the short version

  • Trim two pages to the same size rectangle.
  • Accordion fold each one along the long edge.
  • Fold the top of each strip down for a sleeve.
  • Glue the two halves together, leaving a gap in the middle.
  • Thread a hanging loop through the gap and add a bead head.
  • Decorate with notches, a halo, a bow and a curved hem.

What you need

Two sheets of paper the same size. Book pages, sheet music, scrapbook paper, origami squares or plain printer paper all work, as long as they are square or rectangular. The pages here measured about 4 by 6.5 inches after trimming. You also need scissors, a glue stick, a large wooden bead, metallic thread and a large eye needle. A gold pipe cleaner and a scrap of ribbon are optional.

Getting even pleats

Fold the same width every time, about 3/8 inch for an angel this size. Flip the paper over after each fold so the pleats go back and forth. Run a fingernail along each crease. Sharp creases make the dress fan out evenly. If the last strip is too narrow, trim it off for a neater edge.

Choosing your paper

Thin paper folds the crispest pleats but can tear when you cut notches. Heavier scrapbook paper holds its shape on a tree but is harder to fold small. For a tree topper, use two larger sheets and make the pleats a little wider. For a matching set, cut every pair of pages from the same book.

Storing them for next year

Paper angels crush easily in a box of glass ornaments. Lay them flat between sheets of tissue in a shoebox and they will keep their pleats for many Christmases.

Ways to use your angels

  • Hang a row of them on the Christmas tree.
  • Make one big angel as a tree topper.
  • Tie one to a wrapped gift instead of a bow.
  • String several on twine for a mantel garland.
  • Make them with grandchildren. Kids can fold the pleats while you handle the needle.

Common problems

  • The angel will not lie flat. Put it under a heavy book for a few minutes after gluing.
  • No gap for the thread. Leave about 3/4 inch unglued at the centre top.
  • Uneven notches. Cut one bunch of pleats first and use it as a guide for the rest.

More paper projects

Use the same pleating to make a paper fan. Fill the tree with paper stars and paper snowflakes, or fold a paper Christmas tree. For more ideas, see homemade Christmas ornaments.

Free printable

Print the steps and supply list for this project

One page you can take to the table. Free with a free account, no password.

Get the free printable

What you'll need

Free, for this project

Get this checklist by email

  • All 9 tools and materials, with tick boxes
  • A link to print all 10 steps on paper, to keep by you while you craft

No password. The whole tutorial stays free on this page.

Quick answer

Fold two book pages into a pleated paper angel with a bead head, halo and lace notches. An easy project: about 20 minutes, plus 15 minutes to dry or set. Materials cost about $1 to $3. You need 9 things, including glue stick, large wooden bead and metallic thread. The 10 steps start with trim Two Book Pages Into Matching Rectangles for the Paper Angel, fold Each Paper Angel Page Into an Accordion and fold Down the Paper Angel's Sleeve.

Step-by-step guide

10 steps, about 7 minutes. Tap a picture to jump to that step. Your progress saves automatically.

Tick each step off as you go.

  1. Step 1: Trim Two Book Pages Into Matching Rectangles for the Paper Angel

    Watch this step · 0:33

    Pick two pages from an old book, or any paper you like. Cut off the plain margin around the printed text so you are left with two rectangles the same size. The ones in the video came out about 4 by 6.5 inches. Any size works as long as both sheets match and are square or rectangular. Two origami squares or two sheets of printer paper are fine too.

    Tip:

    Stack the pages and trim them together so they match exactly.

    Back to all steps

  2. Step 2: Fold Each Paper Angel Page Into an Accordion

    Watch this step · 1:06

    Starting on one long edge, fold a narrow strip over and crease it hard. Flip the paper over and fold the same width again. Keep flipping and folding, back and forth, until the whole page is a pleated strip. For a small angel, keep the folds under about 3/8 inch apart. Smaller folds give a finer look. Repeat with the second page.

    Tip:

    If the last strip is very narrow, cut it off to keep the edge neat.

    Back to all steps

  3. Step 3: Fold Down the Paper Angel's Sleeve

    Watch this step · 2:08

    Hold one concertina strip with the pleats closed. Fold the top section down and to the side at an angle. This becomes the sleeve, or the arm, of the angel. Keep the sleeve in proportion to the body: about a quarter of the strip's length looks right. Do the same on the second strip, folding it the opposite way so the two halves mirror each other.

    Tip:

    Hold both strips side by side before you glue to check the sleeves match.

    Back to all steps

  4. Step 4: Glue the Two Halves of the Paper Angel Together

    Watch this step · 2:30

    Run a glue stick down the inside edge of the main body on one strip. Leave about 3/4 inch unglued near the centre top. That small gap is where the hanging thread will go later, so do not skip it. Press the two halves together along the centre line so the pleats fan out into a dress on either side.

    Tip:

    A glue stick is less messy than liquid glue and will not wrinkle thin book pages.

    Back to all steps

  5. Step 5: Glue the Paper Angel's Sleeves to Its Body

    Watch this step · 2:55

    Put a little glue under each folded sleeve and press it down onto the body. Press the whole angel firmly all over. Then set it under something heavy, like a book, for a few minutes while the glue dries. When you lift it off, you will have the full angel shape: a fanned dress with a sleeve on each side. The only thing missing is a head.

    Tip:

    Lay a sheet of scrap paper over the angel before the book so no glue transfers.

    Back to all steps

  6. Step 6: Thread a Hanging Loop Through the Paper Angel

    Watch this step · 4:05

    Cut a long piece of metallic thread, longer than you think you need. Thread it on a needle with an eye big enough for it. Push the needle through the unglued gap at the top of the angel and out the other side. Bring both ends of the thread up so they meet above the centre. You can feed it through by hand, but the needle is much neater.

    Tip:

    Gold or silver thread looks festive. Plain string works if that is what you have.

    Back to all steps

  7. Step 7: Add a Wooden Bead Head to the Paper Angel

    Watch this step · 4:15

    Feed both ends of the thread through a large wooden bead and slide it down onto the top of the angel. Tie a knot right above the bead to hold it in place. Then tie a second knot higher up to make the hanging loop. That is the simplest version of the angel, ready to hang. No bead? Glue on a paper circle or a few paper loops instead.

    Tip:

    A dab of glue under the bead keeps it from spinning.

    Back to all steps

  8. Step 8: Cut Lace Notches Into the Paper Angel's Dress

    Watch this step · 4:52

    For a lacy dress, pinch a few pleats together and snip small notches into the folded edge with scissors. Open the pleats to see the holes. Use those first pleats as a guide and cut notches in the same places on the rest of the dress. You can add them to the sleeves too. Slip coloured paper behind the holes for a different look.

    Tip:

    Small triangle snips look like eyelet lace. Keep them away from the glued centre.

    Back to all steps

  9. Step 9: Add a Pipe Cleaner Halo to the Paper Angel

    Watch this step · 5:40

    Take a sparkly gold pipe cleaner and bend one end into a small hoop, the size you want the halo to be. Bend the rest of the wire down to make a support stem a little taller than the bead. Glue the stem to the back of the head so the halo sits above it. Add a satin ribbon bow at the neck, or a little lace, glitter or rhinestones.

    Tip:

    Use a strong craft glue or superglue on the halo stem. A glue stick will not hold it.

    Back to all steps

  10. Step 10: Shorten the Paper Angel's Hem Into Scallops

    Watch this step · 7:02

    If the dress looks too long, bunch the pleats together at the hem. Cut across them in a rounded curve, not a straight line. When you open the pleats back up, each one has a curved edge, and together they make a scalloped hem. Hang your angel on the tree, or make a few more in different papers.

    Tip:

    Trim a little at a time. You can always cut more, but you cannot add it back.

    Back to all steps

How to Make a Woven Paper Easter Basket

Keep going

How to Make a Woven Paper Easter Basket

Keep going with paper crafts

More on this topic, picked for this paper angel.

You reached the last step

Save this project to come back to it

Your ticked steps, the free printable and your other saved makes, together in My Projects. Free, no password.

You tapped Save

Save this project for later

We'll email you a link, no password.

How to Make a Paper Angel (Easy Pleated Book Page Ornament)

  • Your saved projects in one list
  • Your ticked steps on any device

Check your inbox for an email from us. Not there? Look in your spam folder.

Free printable

Printable sheet and shopping list for this project

The bonus is hidden until you sign up.

Free with a free account, no password. Every step above stays open to everyone.

Products Used

The Checklist

How to Make a Paper Angel (Easy Pleated Book Page Ornament)

Tools
2
Materials
7
Steps
10
Video
7 min

Tools we recommend

As an Amazon Associate we earn from qualifying purchases. Links on this page may be affiliate links - clicking them and buying doesn't change your price, but helps support Crafting Step by Step.

Tags

The Crafter's Weekly

New paper crafts tutorials, every Sunday

One short email with the week's best step-by-step guides. Free, no spam, unsubscribe anytime.

Did this work for you?

What's next

Related collections

Curated theme pages that include this tutorial.

Similar tutorials

Hand-picked next reads based on the one you just finished.

Liked this paper crafts tutorial?

Pick the crafts you want to hear about. One email every Sunday with new step-by-step tutorials. No spam, easy to unsubscribe.

Get more like this in your inbox

Weekly digest. Pick the categories you want. Unsubscribe anytime.

Send me tutorials about

We only email about new tutorials. Easy unsubscribe anytime.