How to Make a Paper Poinsettia (Easy Folded Christmas Flower)

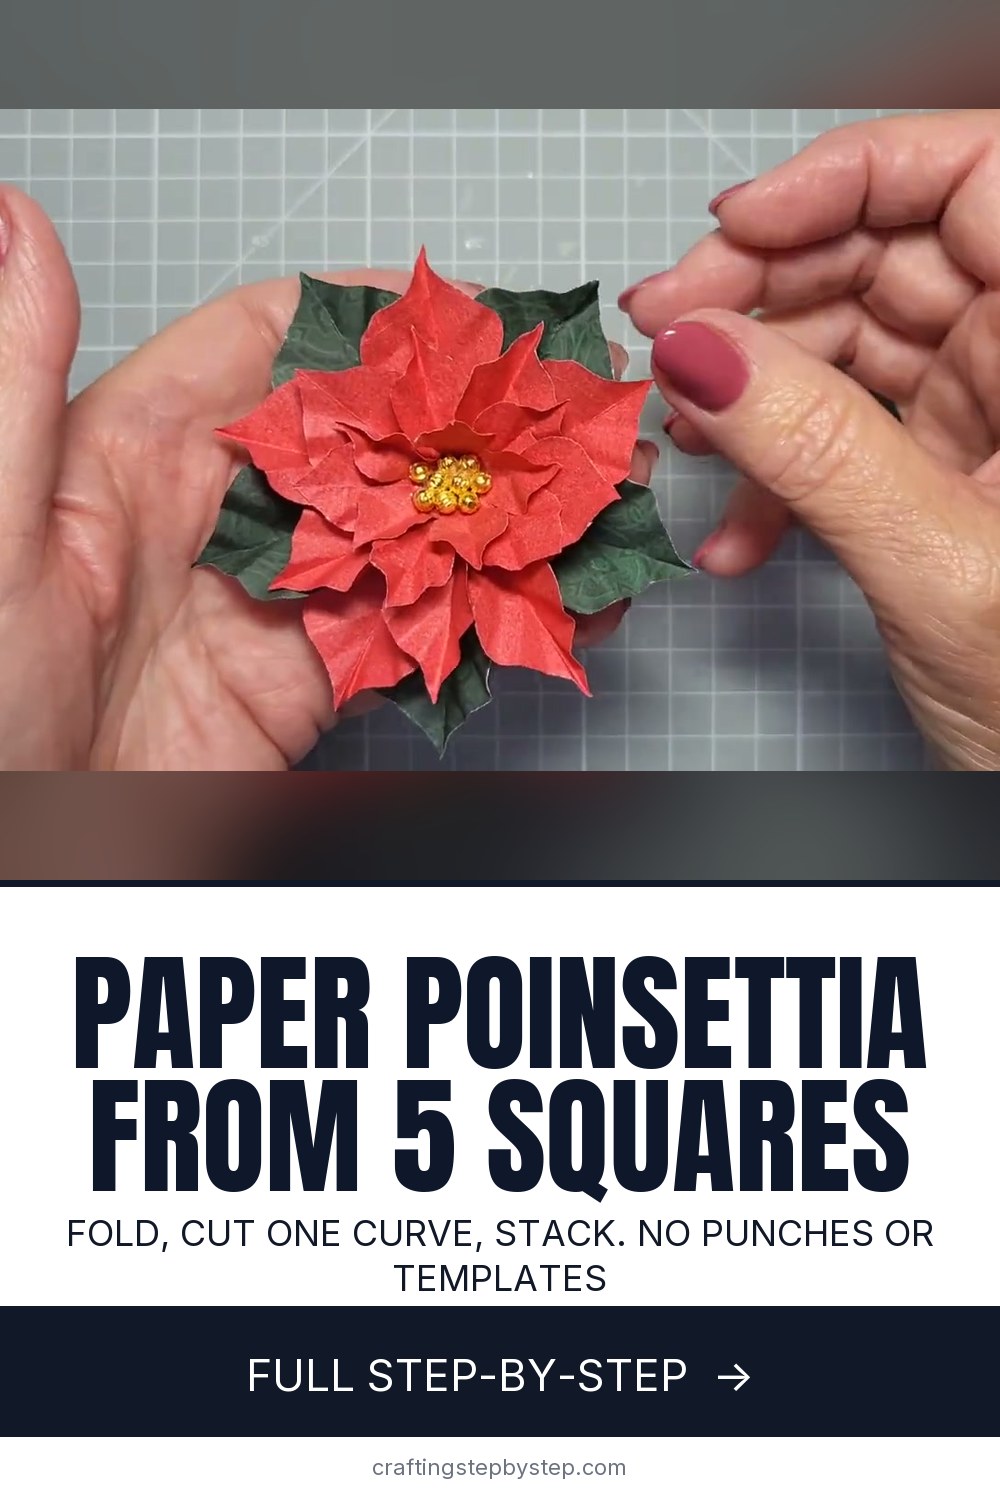
The finished result: How to Make a Paper Poinsettia (Easy Folded Christmas Flower)
  • Difficulty: Easy
  • About 30 minutes
  • 10 steps

You tapped Save

Save this project for later

We'll email you a link, no password.

How to Make a Paper Poinsettia (Easy Folded Christmas Flower)

  • Your saved projects in one list
  • Your ticked steps on any device

Check your inbox for an email from us. Not there? Look in your spam folder.

Print

Steps written out by Crafting Step by Step from Sarah Trebilcock Cardmaking Ideas Tutorials Design's video (opens YouTube) (14:32). Published .

Also in:Card Making

This paper poinsettia is made from five squares of paper, a pair of scissors and a little glue. No punches, no templates and no shaping tools. Cardmaker Sarah Trebilcock folds each square into a wedge, cuts one curved line, and pleats in the veins. When you open it up, the petals already have that ruffled, dimensional look. Stack a green leaf layer and three or four red layers, add a few gold beads to the middle, and you have a flower about 3 1/2 inches across.

How to make a paper poinsettia: the short version

  • Cut squares at 4, 3 1/2, 3, 2 1/2 and 2 inches.
  • Fold each square into a triangle, then into a narrow layered wedge.
  • Snip a guide nick and cut a steep curved petal shape.
  • Pleat the petals with tweezers to make veins.
  • Open the layers, flip the odd folds and pinch every tip.
  • Glue the layers together, largest at the back, and add beads.

What you need

Use paper, not card. Card is too thick to fold into a wedge and cut cleanly. Double sided scrapbook paper works well because the colour shows on both sides of the petals. Green for the bottom layer, red for the rest. Sharp small scissors, tweezers, a strong precision glue and some beads, gems or pearls for the centre are all you need.

Sizing your poinsettia

Each square is half an inch smaller than the one before. That spacing lets every layer peek out from under the next. For a bigger flower to sit on a wreath or a gift, start with a 6 inch square and keep the same half inch steps. For a small one on a card, start at 3 inches.

Why the folding works

Folding the square into a wedge stacks all five petals on top of each other. One cut through the stack shapes every petal at once, the same way you cut a paper snowflake. The pleats you add before opening run through every layer too, so each petal gets its own veins and a gentle cup without curling or ball tools.

Colour ideas

  • Classic red petals with a dark green leaf layer.
  • Cream or white petals for a winter wedding or a soft look.
  • Pink, or red and white stripes, for something playful.
  • Kraft paper with gold centres for a rustic table.

Where to use them

Glue one to the front of a Christmas card. Tuck a few into a wreath or garland. Use them as gift toppers instead of bows, or scatter them down the middle of the holiday table. They are light enough to hang on the tree with a loop of thread glued to the back.

Common problems

  • Petals fall apart. You cut past the guide nick. Keep the base of the wedge whole.
  • Uneven petals. That is fine. Real poinsettias are not even either.
  • Hard to grip. Use tweezers for the pleats. Sarah does, and it is much easier on the hands.

More paper flowers

Try easy paper flowers or paper roses next. Add paper snowflakes to your Christmas decor, put your poinsettia on a Christmas card, or paint a poinsettia.

Free printable

Print the steps and supply list for this project

One page you can take to the table. Free with a free account, no password.

Get the free printable

What you'll need

Free, for this project

Get this checklist by email

  • All 6 tools and materials, with tick boxes
  • A link to print all 10 steps on paper, to keep by you while you craft

No password. The whole tutorial stays free on this page.

Quick answer

Fold five paper squares into a layered 3D poinsettia. An easy project: about 30 minutes. Materials cost about $1 to $2. You need 6 things, including precision craft glue, gold beads, pearls or gems and small sharp scissors. The 10 steps start with cut Graduated Paper Squares for the Paper Poinsettia, fold the Paper Poinsettia Square Into a Triangle, find the Centre Fold Lines on the Paper Poinsettia Triangle and fold the Paper Poinsettia Triangle Into a Narrow Wedge.

Step-by-step guide

10 steps, about 15 minutes. Tap a picture to jump to that step. Your progress saves automatically.

Tick each step off as you go.

  1. Step 1: Cut Graduated Paper Squares for the Paper Poinsettia

    Watch this step · 0:55

    Cut five squares of paper: 4, 3 1/2, 3, 2 1/2 and 2 inches. Make the biggest one green for the leaves and the rest red for the petals. These sizes give a flower about 3 1/2 inches across. For a bigger or smaller poinsettia, change the starting size and keep the half inch steps. Use paper, not card, so it folds cleanly.

    Tip:

    A paper trimmer gives you straighter squares than scissors.

    Back to all steps

  2. Step 2: Fold the Paper Poinsettia Square Into a Triangle

    Watch this step · 1:58

    Start with the biggest square. If your paper has a right side, place it facing up. It goes inside as you fold but ends up on top when you open the flower. Fold the square in half corner to corner to make a triangle. Then bring one point of the long edge over to the other and pinch a tiny crease to mark the centre.

    Tip:

    Only pinch the centre mark. A full fold here leaves an extra line in the petals.

    Back to all steps

  3. Step 3: Find the Centre Fold Lines on the Paper Poinsettia Triangle

    Watch this step · 3:20

    Take the top point of the triangle down to the centre mark and pinch a small crease where it falls. Then fold the straight edge up at a right angle to meet the top point and pinch again. You are only finding lines here, not folding everything flat. These little marks show you where the next folds go.

    Tip:

    Sarah draws on the paper so the camera can see the marks. You do not need to.

    Back to all steps

  4. Step 4: Fold the Paper Poinsettia Triangle Into a Narrow Wedge

    Watch this step · 4:00

    Keep the centre point in place and swing the straight edge across until it meets your marked point. Crease it. Flip the paper over and bring the other edge across to meet the first fold. A little paper can show past the edge. You now have a narrow, layered wedge with three folds on one side and two on the other.

    Tip:

    Keep the side with three folds on your right when you cut.

    Back to all steps

  5. Step 5: Snip a Guide Nick at the Base of the Paper Poinsettia Wedge

    Watch this step · 5:08

    Near the bottom of the wedge, cut a small nick into the side with three folds. This nick is your stop line. The bottom point holds all the petals together, so you must never cut past it. If you do, you end up with loose petals instead of one flower. Trim off any uneven bits at the open top so you know how much room you have.

    Tip:

    Small, sharp scissors make the nick easier to control.

    Back to all steps

  6. Step 6: Cut the Curved Paper Poinsettia Petal Shape

    Watch this step · 6:20

    Start as close to the top as you can. Angle the scissors and cut steeply down in a curve, cutting through all the folded layers. Keep curving round until you reach your nick. Cut away all the fold lines on that side so the petals separate at the tips. Your cut makes a long pointed petal shape. Every one will be a little different, and that is fine.

    Tip:

    Cut freehand. Flowers look more natural when the petals are not identical.

    Back to all steps

  7. Step 7: Pleat Veins Into the Paper Poinsettia Petals With Tweezers

    Watch this step · 8:00

    Before you unfold anything, grip the wedge with tweezers at an angle, running from the base up toward the tip. Bend the paper around the tweezers and squash it flat. Then fold back the other way. Keep folding back and forth like a concertina. These small pleats become the veins and give each petal its ripples without any shaping tools.

    Tip:

    No tweezers? Pinch the pleats with your fingers or a fingernail.

    Back to all steps

  8. Step 8: Open the Green Paper Poinsettia Leaf Layer

    Watch this step · 10:15

    Gently open the layers. Unfold the three sections, then open the remaining piece in half to show the last two petals. Some petals will be folded the wrong way, with a mountain fold instead of a valley. Flip those over. Then pinch the tip of every petal so they come to a point. Your green layer of five veined leaves is done.

    Tip:

    A poking tool or the tip of a pencil helps open the tight inner layers.

    Back to all steps

  9. Step 9: Shape the Red Paper Poinsettia Petal Layers

    Watch this step · 13:40

    Repeat the same folds, cuts and pleats with each red square, from largest to smallest. Open each one, flip any petals folded the wrong way and pinch the tips into points. The red paper is thinner than the green, so it pleats more easily. You should end up with three or four red petal layers in falling sizes.

    Tip:

    Once you have done one, the others go quickly. Sarah talks through the second one faster.

    Back to all steps

  10. Step 10: Glue the Paper Poinsettia Layers Together

    Watch this step · 14:15

    Put a dot of glue in the centre of the green leaf layer and press the largest red layer on top. Turn it so its petals sit between the leaves. Keep stacking the red layers, smallest on top, turning each one a little. Finish by gluing a cluster of gold beads, pearls or gems in the centre for the flower's middle.

    Tip:

    Let the glue grab for a minute before adding the next layer.

    Back to all steps

How to Make Personalized Stationery at Home: DIY Notepads

Keep going

How to Make Personalized Stationery at Home: DIY Notepads

Keep going with paper crafts

More on this topic, picked for this paper poinsettia.

You reached the last step

Save this project to come back to it

Your ticked steps, the free printable and your other saved makes, together in My Projects. Free, no password.

You tapped Save

Save this project for later

We'll email you a link, no password.

How to Make a Paper Poinsettia (Easy Folded Christmas Flower)

  • Your saved projects in one list
  • Your ticked steps on any device

Check your inbox for an email from us. Not there? Look in your spam folder.

Free printable

Printable sheet and shopping list for this project

The bonus is hidden until you sign up.

Free with a free account, no password. Every step above stays open to everyone.

Products Used

The Checklist

How to Make a Paper Poinsettia (Easy Folded Christmas Flower)

Tools
3
Materials
3
Steps
10
Video
15 min

Tools we recommend

As an Amazon Associate we earn from qualifying purchases. Links on this page may be affiliate links - clicking them and buying doesn't change your price, but helps support Crafting Step by Step.

Tags

The Crafter's Weekly

New paper crafts tutorials, every Sunday

One short email with the week's best step-by-step guides. Free, no spam, unsubscribe anytime.

Did this work for you?

What's next

Related collections

Curated theme pages that include this tutorial.

Similar tutorials

Hand-picked next reads based on the one you just finished.

Liked this paper crafts tutorial?

Pick the crafts you want to hear about. One email every Sunday with new step-by-step tutorials. No spam, easy to unsubscribe.

Get more like this in your inbox

Weekly digest. Pick the categories you want. Unsubscribe anytime.

Send me tutorials about

We only email about new tutorials. Easy unsubscribe anytime.