How to Make a Paper Fan

Based on a video by Red Ted Art (Maggy Woodley)

Opens their YouTube channel

Steps written out by CraftingStepByStep · Published · Updated

Watch the original video (opens YouTube)
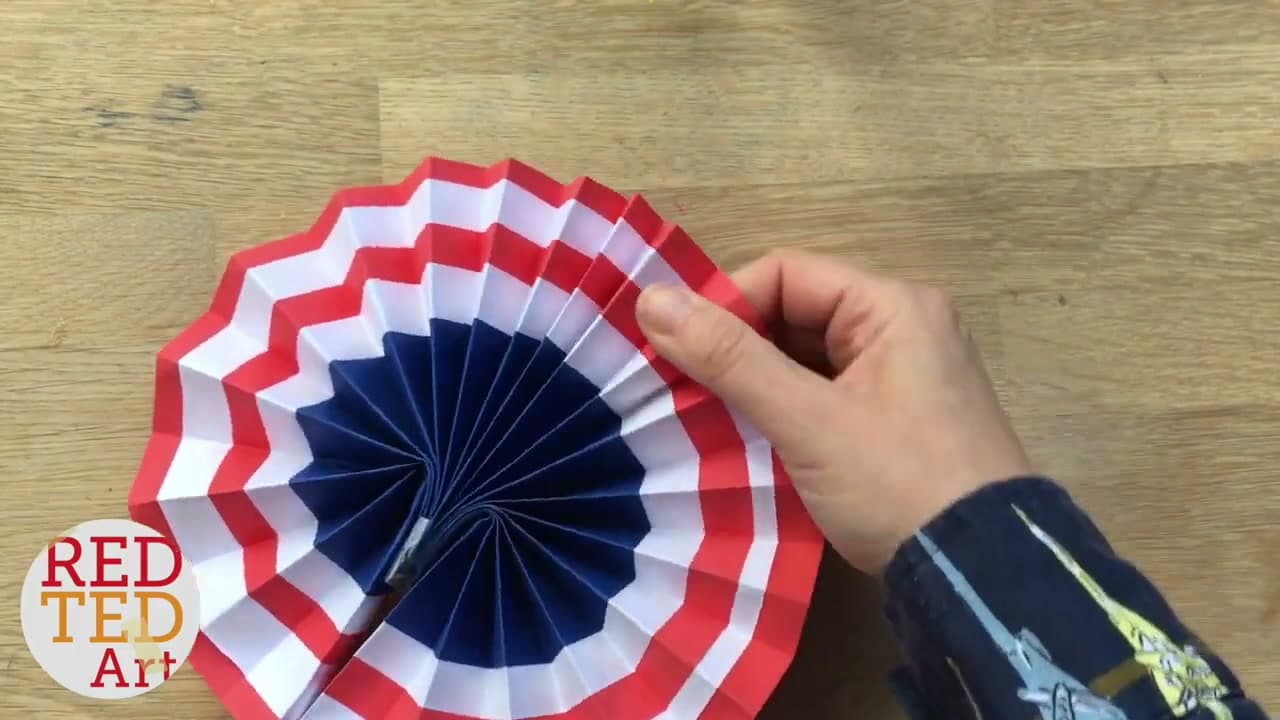
The finished result: How to Make a Paper Fan
Also in:Crafts

A paper fan is one long strip folded back and forth, and what decides whether it comes out crisp or floppy is the paper, not the folding. Maggy Woodley of Red Ted Art builds hers from red, white, and blue strips glued into one band, which is why the finished fan carries stripes around its edge.

The steps below follow her method. What is here is the rest of it: what paper holds a pleat, how to keep the widths even without measuring, the three ways to finish the base, and how to turn two fans into the wall rosettes most people are really after.

Which paper actually holds a pleat

Printer paper is fine for a kid's afternoon fan and not much beyond it. It creases cleanly, then goes soft at the folds the first time someone waves it hard. Heavy cardstock has the opposite fault: at 110 lb it cracks white along every fold line.

The range that works is 65 to 80 lb text weight, which covers most scrapbook paper and most origami pads. It takes a sharp crease and keeps its spring. Double-sided scrapbook paper earns its price here: an open fan shows both faces of the sheet at once.

Size is a ratio, not a measurement. Strip width becomes the radius, so a 4 inch strip gives a fan about 8 inches across. Band length sets pleat density: six to eight times longer than it is wide for a hand fan, twelve times or more for a full circle rosette that does not gap in the middle.

Even pleats without measuring every one

Nobody marks a ruler line every centimeter, and the ones who try get a wobbly fan anyway. Halve the band instead. Fold it end to end, crease, fold in half again, keep going. Each pass doubles your sections and they stay identical, because the paper is doing the measuring. Around the fourth fold the stack gets too thick, so split it and halve each section on its own.

Open the band flat and you have a grid of creases. Concertina along them, flipping the paper over at every fold line so the pleats zigzag instead of rolling. A soft crease is what makes a fan sag two days later.

The three ways to finish the base

The base turns a pleated strip into an object with a job. Pick one before you glue anything.

  • Craft stick handle. Tape the pleats shut a centimeter up, then glue a wooden craft stick along each outer pleat. It opens, closes, and survives a party.
  • Ribbon tie. Staple the base, knot thin ribbon around it, leave a loop. Ten seconds, and it hangs off a chair back or a gift.
  • Glued circle. Glue the two end pleats face to face. No handle, and the fan becomes a full round rosette for the wall.

Making the big wall rosettes

The oversized rosettes on party backdrops are two fans glued back to back, not one giant fan. Pleat two bands of the same length and strip width, close each into a half circle, then glue the flat faces together. Equal length matters more than it sounds: a centimeter of difference leaves the circle lopsided, and no fussing at the middle fixes it.

Glue a paper circle over the join on both sides to hide it and lock the pleats. Hot glue beats a glue stick past about 10 inches across, since the paper's weight pulls the center open. Our paper rosettes tutorial covers the scoring trick for the larger sizes, and giant paper flowers and paper pom poms hang on the same wall without competing.

Storing fans so they keep the pleat

A paper fan dies from being left open. Collapse it, slide a paper clip or small rubber band near the base, and lay it flat inside a large book. Stored shut, the creases stay sharp into next summer. Humidity is the other enemy, so keep them out of the garage.

Rosettes are the exception. They live glued open, so store those flat between sheets of tissue where nothing can dent the pleats. Fans pack flatter than any other party decoration, so they travel well next to a paper crown on a kids' table.
What you'll need

Step-by-step guide

8 steps, about 9 minutes. Tap a picture to jump to that step. Your progress saves automatically.

Tick each step off as you go.

  1. Step 1: Gather Paper, Glue Stick, Tape, and Two Craft Sticks

    Watch this step · 0:50

    Pull together everything before you start folding. You need paper in a few colors (Maggy uses white, blue, and red), a glue stick, some clear tape, scissors, and two wooden craft sticks for the handle. Thinner paper folds up neater than thick cardstock, so reach for that if you have a choice.

    Tip:

    No craft sticks? A folded strip of stiff card or a wooden skewer taped along each side works as a handle too.

    Back to all steps

  2. Step 2: Fold the Blue Paper Into Thirds and Crease the Fold Lines

    Watch this step · 1:20

    Start with the blue paper for the middle of the fan. Fold the sheet into thirds, lining up the edges as you go. You can measure with a ruler for even thirds, or just eyeball it and adjust until the folds sit right. Press each crease flat, then cut along the fold lines to free your three center strips.

    Tip:

    If the thirds keep drifting, curl the sheet into a loose tube first and slide the edges until all three sections look equal, then flatten it and press the creases.

    Back to all steps

  3. Step 3: Cut Red and White Paper Strips Along the Fold Lines

    Watch this step · 2:40

    Now cut the white and red paper into long strips the same width as your blue ones. Fold each sheet in half a few times first so the strips come out even, then cut along the creases. You want six strips of each color in total. Keeping the widths matched here is what makes the stripes line up later.

    Tip:

    Stack two sheets and cut them together to speed this up and keep every strip the same width.

    Back to all steps

  4. Step 4: Glue the Paper Strips End to End Into One Long Length

    Watch this step · 2:55

    Join the strips end to end so each color becomes one long band. Run a thin line of glue along about half a centimeter of the edge, then press the next strip on top. Work in sets of three for each color. Line the edges up carefully as you stick them, because neat joins here keep the stripes straight across the whole fan.

    Back to all steps

  5. Step 5: Glue the Red, White, and Blue Strips Into a Striped Band

    Watch this step · 4:10

    Time to glue the colors together into the stripe order. Lay them out blue, white, red, white, red so the bands repeat evenly. Glue each color to the next along the top edge, then flip and smooth as you build one long striped strip. If one end came out uneven from the earlier gluing, just trim it straight before you move on.

    Tip:

    Lay the whole band out before the glue sets and sight down its length. A stripe that wanders by a couple of millimeters here turns into a visible wobble once the fan is open.

    Back to all steps

  6. Step 6: Accordion Pleat the Striped Paper Strip

    Watch this step · 5:20

    This is the fun part. Fold the striped strip back and forth like a concertina, roughly a centimeter for each fold. Flip the paper over with every crease so the pleats zigzag. Keep the folds lined up and press each one sharp. Take your time here, since even pleats are what give the fan its clean round shape. Trim the last fold so both ends match.

    Tip:

    Crease each accordion pleat with your fingernail or a ruler edge for sharp folds, and flip the band over at every fold line so the pleats zigzag rather than roll.

    Back to all steps

  7. Step 7: Tape the Pleated Base and Glue On the Craft Stick Handles

    Watch this step · 6:40

    Squeeze the pleats together and wrap a bit of tape around the bottom, about a centimeter up, to hold the folds shut. This becomes the center of the fan. Then glue a wooden craft stick to each outer edge with a generous line of glue near the bottom. Press hard and hold. Line the second stick up to the same length so the handle sits even.

    Tip:

    Want a hanging fan instead of a handle? Staple the base, tie a loop of thin ribbon around it, and skip the craft sticks entirely.

    Back to all steps

  8. Step 8: Open the Accordion Pleats Into a Full Paper Fan

    Watch this step · 7:20

    Now the reveal. Bring the two sticks together and let the pleats spread into a full round fan. Give it a gentle squish at the top to open it all the way. There you go, your very own paper fan. Cut out a few little paper stars and stick them on if you want extra flair for the 4th of July.

    Tip:

    Press the finished fan closed between two heavy books overnight. The pleats set hard and it opens the same way next summer.

    Back to all steps

Keep going

How to Make a Paper Christmas Tree

Products Used

The Checklist

How to Make a Paper Fan

Tools
3
Materials
4
Steps
8
Video
9 min

Tools we recommend

As an Amazon Associate we earn from qualifying purchases. Links on this page may be affiliate links - clicking them and buying doesn't change your price, but helps support CraftingStepByStep.

Tags

The Crafter's Weekly

New paper crafts tutorials, every Sunday

One short email with the week's best step-by-step guides. Free, no spam, unsubscribe anytime.

Test your knowledge

Did the lesson stick? Start with this one.

5 questions covering what you just read. No signup, no score saved, and you can stop after this one.

Question 1 of 5

What fold gives the paper fan its pleated shape?

Quick reference

Key takeaways from How to Make a Paper Fan

5 questions, answers, and one-line explanations. Tap to expand.

  1. 1.What fold gives the paper fan its pleated shape?

    Answer: An accordion fold

    Folding the strip back and forth like a concertina creates the pleats.

  2. 2.Why does thinner paper work better for this fan?

    Answer: It pleats more easily

    Thin paper folds and layers cleanly, so the pleats stack without bulk.

  3. 3.After gluing the strips into one long striped band, what comes next?

    Answer: Accordion-fold the band

    The striped band gets accordion-folded to become the body of the fan.

  4. 4.How are the pleats held shut at the base?

    Answer: Tape around the bottom

    Wrapping tape near the bottom squeezes the pleats together into the fan's center.

  5. 5.What do the two wooden craft sticks become?

    Answer: The outer handles

    A stick glued to each outer edge forms the handles you open and close the fan with.

Did this work for you?

What's next

Related collections

Curated theme pages that include this tutorial.

Similar tutorials

Hand-picked next reads based on the one you just finished.

Liked this paper crafts tutorial?

Pick the crafts you want to hear about. One email every Sunday with new step-by-step tutorials. No spam, easy to unsubscribe.

Get more like this in your inbox

Weekly digest. Pick the categories you want. Unsubscribe anytime.

Send me tutorials about

We only email about new tutorials. Easy unsubscribe anytime.