How to Make a Paper Christmas Tree

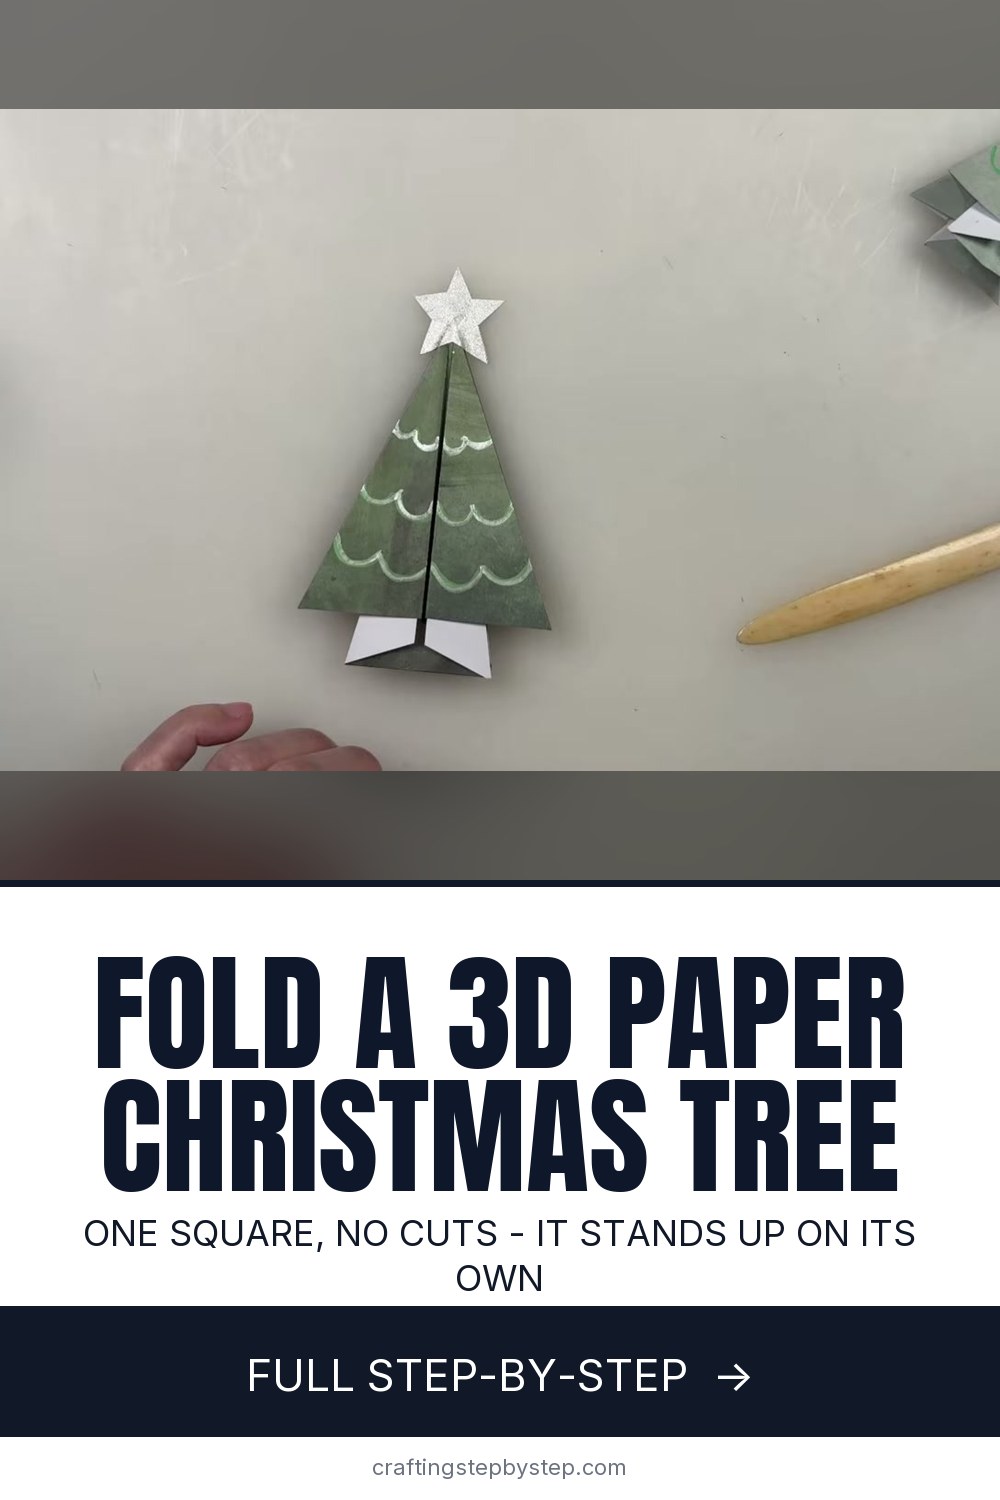
The finished result: How to Make a Paper Christmas Tree
  • Difficulty: Medium
  • About 45 minutes
  • 10 steps

You tapped Save

Save this project for later

We'll email you a link, no password.

How to Make a Paper Christmas Tree

  • Your saved projects in one list
  • Your ticked steps on any device

Check your inbox for an email from us. Not there? Look in your spam folder.

Print

Steps written out by Crafting Step by Step from Create with Karen Elaine's video (opens YouTube) (11:03). Published .

Also in:Crafts

This paper Christmas tree folds from a single square, stands up on the table by itself, and still lies flat enough to slip inside a greeting card. Karen Elaine of Create with Karen Elaine walks through every fold on a larger sheet so you can see what the paper is doing. The design comes from the Craftaholic Witch, whose origami Christmas tree tutorial Karen credits as the original, and it is worth a look if you want a second angle on the tricky middle fold.

You need one square of paper, a scrap of silver or gold paper for the star, a dab of glue, and a marker or two. A bone folder helps a lot. Plan on about fifteen minutes for your first tree and five once the folds make sense.

Picking paper for an origami Christmas tree

Standard 6 inch origami paper makes a tree about 4 inches tall, which is the right size for a card or a place setting. Karen demonstrates with 8.5 inch scrapbook paper so the folds are easy to see. It works, but it gets thick in the later steps. Thin paper folds cleaner, so if you are buying some, get kami or duo paper rather than cardstock.

Colour matters more than you might think. The white back of the sheet becomes the trunk and the little base, so a paper that is green on one side and white on the other gives you a two-tone tree with no extra work. Patterned scrapbook paper in a tiny print looks great too. Big prints get lost in the pleats.

Why it stands on its own

The pleats you make in the middle of the fold give the tree a slight 3D shape, and the two flaps you fold out at the very end act as feet. Open them to about the same angle and the tree stands. Fold them flat and it goes into an envelope. If it tips over, the flaps are uneven. Line them up and give the base another crease.

The hard part, and how to get through it

Karen says it herself: the inside fold in step five is the one that trips people up. You are not making any new creases there. Every fold already exists from the earlier steps, and you are only telling the paper which way to go. Open the layer, find the valley crease, and let the paper fall into it. If you find yourself pressing a new line into the paper, stop, unfold, and look for the existing crease instead.

Sharp creases in the early steps make this part far easier. Run a bone folder or the back of a fingernail along every fold before moving on.

Ways to decorate it

A hand cut star has charm, but a star paper punch gives you a clean one in a second. Try glitter cardstock or foil paper for the star. For the branches, draw small scallops across each pleat to look like garland, or dot the tree with a white paint pen for snow. Write a guest name on the trunk and you have a place card for the holiday table.

More paper projects for December

Pair a few trees with a paper star or a string of paper snowflakes for a table display. Tuck one inside a handmade card, or glue a small one to Christmas gift tags. New to folding? Start with the basics in how to make origami.

Free printable

Print the steps and supply list for this project

One page you can take to the table. Free with a free account, no password.

Get the free printable

What you'll need

Free, for this project

Get this checklist by email

  • All 7 tools and materials, with tick boxes
  • A link to print all 10 steps on paper, to keep by you while you craft

No password. The whole tutorial stays free on this page.

Quick answer

Fold a 3D origami Christmas tree from one square of paper. A medium project: about 45 minutes. Materials cost about $5 to $12. You need 7 things, including 6 inch origami paper, silver or gold paper and craft glue. The 10 steps start with fold the Square of Origami Paper Corner to Corner Into a Triangle, turn the Origami Paper Over and Fold It in Half Both Ways and collapse the Creased Paper Into an Origami Square Base.

Step-by-step guide

10 steps, about 11 minutes. Tap a picture to jump to that step. Your progress saves automatically.

Tick each step off as you go.

  1. Step 1: Fold the Square of Origami Paper Corner to Corner Into a Triangle

    Watch this step · 0:48

    Lay the paper colour side up. Fold one corner over to the opposite corner to make a triangle and crease it hard. Open it, turn the paper a quarter turn, and fold the other two corners together the same way. When you open it up you should see an X of creases across the square.

    Tip:

    Line the points up exactly before you crease. A small miss here turns into a lopsided tree later.

    Back to all steps

  2. Step 2: Turn the Origami Paper Over and Fold It in Half Both Ways

    Watch this step · 1:02

    Flip the sheet so the colour side is down. Fold it in half like a book, making sure the edges meet, and crease. Open it and fold it in half the other direction. You now have a plus sign of creases on top of the X from step one, four crease lines crossing in the middle.

    Tip:

    These two folds go the opposite way to the diagonals. That is what lets the paper collapse in the next step.

    Back to all steps

  3. Step 3: Collapse the Creased Paper Into an Origami Square Base

    Watch this step · 1:24

    Pick the paper up and push the sides in along the creases you made. It folds down into a smaller square with two flaps on each side. No new folds are needed. Press it flat with the open end pointing toward you. It should look like a small diamond once you turn it.

    Tip:

    If it will not collapse, one of the creases is going the wrong way. Refold it in the other direction and try again.

    Back to all steps

  4. Step 4: Fold the Square Base Edges to the Center Line Twice

    Watch this step · 2:16

    Take the folded edge on one side of the top layer and fold it in to the center line. Do the same on the other side. Keep the open edge at the bottom. Then fold each side in to the center once more to make a long, narrow point. It gets thick, so press each crease firmly.

    Tip:

    A bone folder is worth having for this step. Fingers alone leave soft creases that make step five harder.

    Back to all steps

  5. Step 5: Open the Layers and Tuck the Valley Fold Inside to Pleat the Paper Christmas Tree

    Watch this step · 3:34

    Open one side back up. Using the creases already there, fold the outer section over and tuck it in between the layers, then lay it flat. You will see the pleats of the tree start to appear. Repeat on the other side of the front. Karen calls this the hardest part, so go slowly.

    Tip:

    Do not make new creases here. If the paper resists, you are fighting the existing folds. Open it and look again.

    Back to all steps

  6. Step 6: Repeat the Center Folds and Tucks on the Back of the Origami Tree

    Watch this step · 5:24

    Turn the tree over. Fold both edges to the center, then fold them to the center again, the same as the front. Open each side, lift the flap, and tuck it under on the existing creases so the back matches the front. Both sides should now look the same, with matching pleats on each face.

    Tip:

    The back is easier than the front because your hands already know the move.

    Back to all steps

  7. Step 7: Fold the Bottom Point Up to Make the Paper Tree Trunk

    Watch this step · 6:40

    Fold the bottom layer up so it runs straight across and crease it. Repeat on the other side so the two little corners meet at a point. Then reverse both of those folds by folding them back the other way. The white section showing at the bottom is the trunk.

    Tip:

    Get this line as level as you can. A crooked fold here shows as a leaning trunk.

    Back to all steps

  8. Step 8: Fold the Extra Paper Up and Tuck It Inside to Form the Tree Base

    Watch this step · 7:28

    There is still some loose paper below the tree. Fold that raw section up until it lines up with the bottom of the tree, crease it, then reverse the fold and tuck it inside. Do the other side the same way. Fold the two flaps back out so they are even. Those are the feet your tree stands on.

    Tip:

    Open the two feet to the same angle before you stand it up.

    Back to all steps

  9. Step 9: Glue a Paper Star to the Top of the Origami Christmas Tree

    Watch this step · 9:00

    Cut two small stars from silver or gold paper, or punch them out. Put a little glue on the back of one star and press it behind the tip of the tree so it sticks out the top. Glue the second star to the front, lined up with the first, so the star looks right from both sides.

    Tip:

    Use a glue with a fine tip. A thin line holds and does not soak through the paper.

    Back to all steps

  10. Step 10: Draw a Scalloped Garland on the Paper Christmas Tree With a Marker

    Watch this step · 10:03

    Take a green marker and draw rows of small scallops across the tree, using the pleats as your guide. Karen does three little curves per row. Go over them with a silver marker if you want the garland to stand out more. Decorate the back too, since the tree is seen from both sides.

    Tip:

    Acrylic paint markers show up on dark green paper far better than felt tips.

    Back to all steps

How to Make a Pinwheel

Keep going

How to Make a Pinwheel

Keep going with paper crafts

More on this topic, picked for this paper christmas tree.

You reached the last step

Save this project to come back to it

Your ticked steps, the free printable and your other saved makes, together in My Projects. Free, no password.

You tapped Save

Save this project for later

We'll email you a link, no password.

How to Make a Paper Christmas Tree

  • Your saved projects in one list
  • Your ticked steps on any device

Check your inbox for an email from us. Not there? Look in your spam folder.

Free printable

Printable sheet and shopping list for this project

The bonus is hidden until you sign up.

Free with a free account, no password. Every step above stays open to everyone.

Products Used

The Checklist

How to Make a Paper Christmas Tree

Tools
3
Materials
4
Steps
10
Video
11 min

Tools we recommend

As an Amazon Associate we earn from qualifying purchases. Links on this page may be affiliate links - clicking them and buying doesn't change your price, but helps support Crafting Step by Step.

Tags

The Crafter's Weekly

New paper crafts tutorials, every Sunday

One short email with the week's best step-by-step guides. Free, no spam, unsubscribe anytime.

Test your knowledge

Did the lesson stick? Start with this one.

5 questions covering what you just read. No signup, no score saved, and you can stop after this one.

Question 1 of 5

Where does the trunk colour come from?

Quick reference

Key takeaways from How to Make a Paper Christmas Tree

5 questions, answers, and one-line explanations. Tap to expand.

  1. 1.Where does the trunk colour come from?

    Answer: The white back of the sheet

    Two-tone paper gives you a green tree and a pale trunk for free.

  2. 2.Why choose thin origami paper over cardstock?

    Answer: Thin paper folds more cleanly

    Thick paper builds up bulk in the later folds.

  3. 3.Your finished tree keeps tipping over. Why?

    Answer: The foot flaps are uneven

    Open both flaps to the same angle and crease the base again.

  4. 4.How do you get through the tricky inside fold?

    Answer: Follow creases that already exist

    Every fold at that step is already there from earlier steps.

  5. 5.What makes the later steps much easier?

    Answer: Sharpening each crease with a bone folder

    Crisp early creases tell the paper where to go later.

Did this work for you?

What's next

Related collections

Curated theme pages that include this tutorial.

Similar tutorials

Hand-picked next reads based on the one you just finished.

Liked this paper crafts tutorial?

Pick the crafts you want to hear about. One email every Sunday with new step-by-step tutorials. No spam, easy to unsubscribe.

Get more like this in your inbox

Weekly digest. Pick the categories you want. Unsubscribe anytime.

Send me tutorials about

We only email about new tutorials. Easy unsubscribe anytime.