How to Paint a Gourd to Look Like Raku Pottery

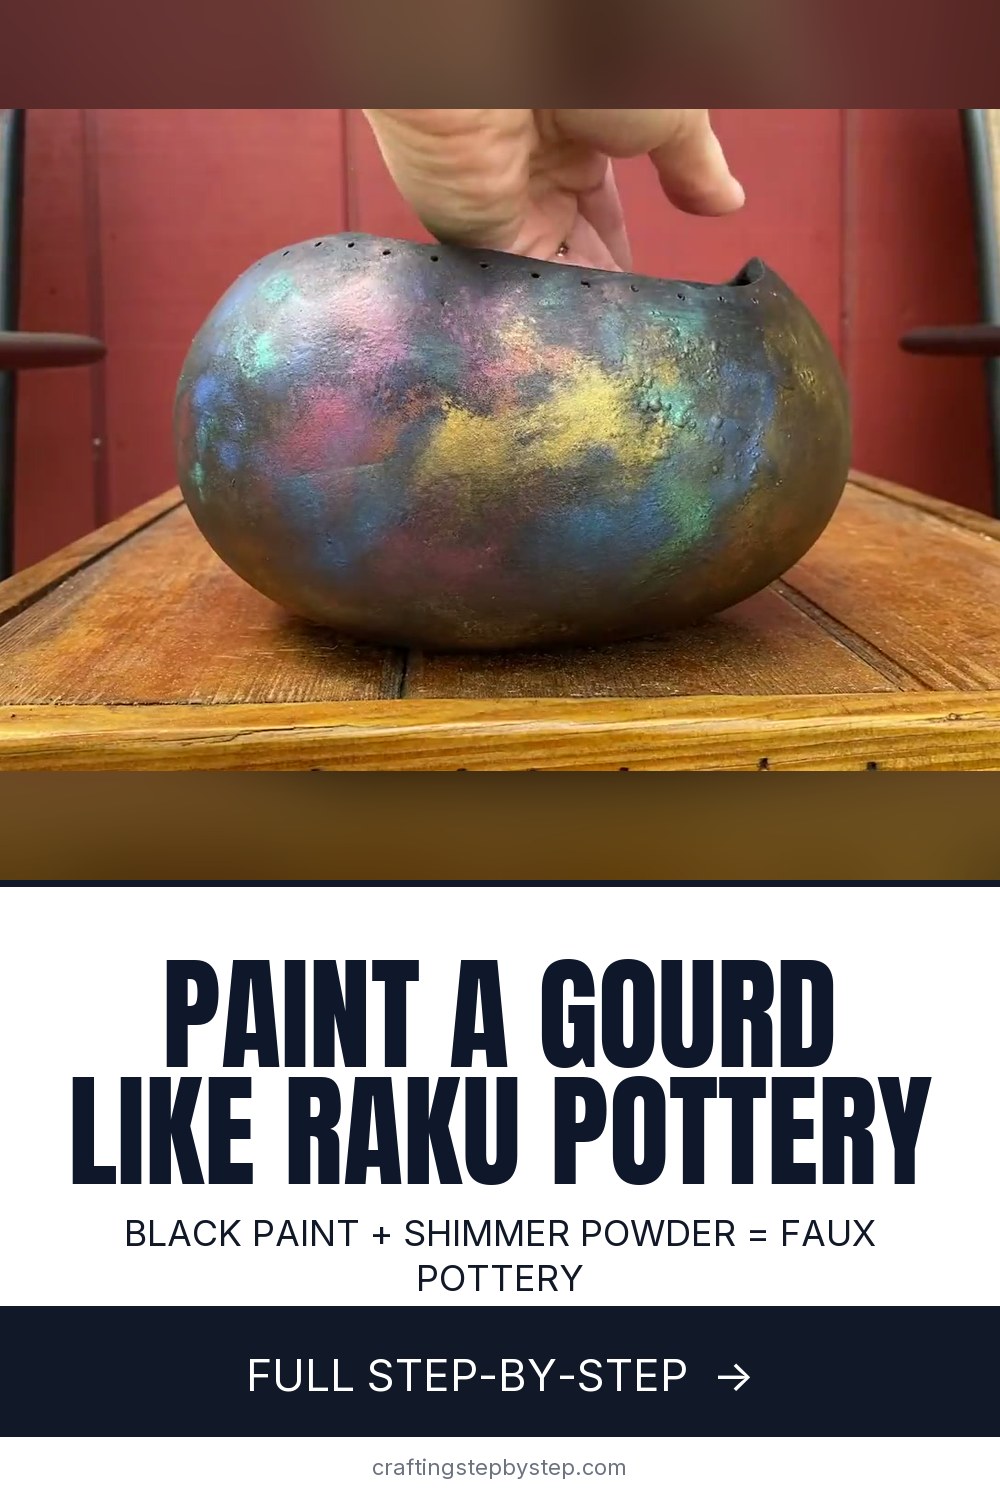
The finished result: How to Paint a Gourd to Look Like Raku Pottery
  • Difficulty: Easy
  • About 1 hour, plus 2 hours to dry or set
  • 9 steps

You tapped Save

Save this project for later

We'll email you a link, no password.

How to Paint a Gourd to Look Like Raku Pottery

  • Your saved projects in one list
  • Your ticked steps on any device

Check your inbox for an email from us. Not there? Look in your spam folder.

Print

Steps written out by Crafting Step by Step from Jenn Avery Gourd Art's video (opens YouTube) (10:24). Published .

A plain dried gourd can pass for a piece of raku pottery with nothing more than black paint and a few jars of shimmer powder. Jenn Avery of Jenn Avery Gourd Art shows the method in her studio: a black base coat, a second coat brushed on in sections, and mica pigments dabbed into that wet paint so they stick and glow. It is forgiving, quick, and it hides a gourd surface that is too scratched or patchy for wood burning.

What raku pottery looks like, and why it works on a gourd

Raku is an old Japanese firing method. The pots come out of the kiln hot and go straight into sawdust or leaves, and the fast cooling leaves random flashes of copper, blue, purple and gold on a dark body. No two pieces match. A gourd has the same round, organic shape as a raku vessel, so a dark base with patchy metallic color fools the eye. Pull up a few photos of real raku before you start and pick three to six colors you like together.

Supplies for painting a gourd

  • A cleaned, dry gourd. Cut, cleaned and sanded if you want a bowl shape. Any drilled holes for a rim go in before you paint.
  • Black acrylic paint. Jenn uses a thick black gesso for its matte finish and good coverage, but any craft acrylic works.
  • Mica pigment powders. Pearl Ex in antique copper, Aztec gold, true blue, blue russet, red russet and duo blue green. A sparkly loose eyeshadow does the same job.
  • Several soft brushes. One per color, so the shades stay clean.
  • A clear UV resistant spray in gloss or matte to seal it.

How to paint a gourd with the faux raku method

Work the second black coat in sections no bigger than your palm. Acrylic dries fast, and the powder only grabs while the paint is tacky. Dab, do not sweep. A dabbing brush leaves soft clouds of color with black showing around them, which is the raku look. Keep each color random in size and placement.

Gloss or matte?

Gloss makes the colors pop in sunlight and looks like a glazed pot. Matte keeps the pearly shimmer but stops the shine from competing with it, and it looks closer to real fired raku. Jenn prefers matte. Seal outside or in a well aired room, in light coats.

Ideas for your painted gourd

  • Add a pine needle rim or coiled edge on a bowl gourd.
  • Paint small egg gourds as a set and group them on a shelf.
  • Try a fall palette of copper, gold and red for a centerpiece.
  • Give one as a gift with a note that it is a gourd, not clay.

Common problems

  • The powder will not stick. The paint dried. Brush a little more black over it and dab again.
  • Colors look muddy. Use a clean brush for each pigment.
  • Too much color, not enough black. Paint black back over a patch. Nothing is ruined.

For a similar dark and shimmer palette on canvas, see how to paint a galaxy. Pick colors that sit well together with mixing acrylic paint colors, try a crackle paint finish on your next piece, or paint a pumpkin for fall. Clean up afterwards with cleaning acrylic paint brushes.

Free printable

Print the steps and supply list for this project

One page you can take to the table. Free with a free account, no password.

Get the free printable

What you'll need

Free, for this project

Get this checklist by email

  • All 7 tools and materials, with tick boxes
  • A link to print all 9 steps on paper, to keep by you while you craft

No password. The whole tutorial stays free on this page.

Quick answer

Turn a dried gourd into faux raku pottery with black acrylic, mica pigment powders and a clear coat. An easy project: about 1 hour, plus 2 hours to dry or set. Materials cost about $8 to $20. You need 7 things, including cleaned dried gourd, Pearl Ex mica pigment powders and soft paint brushes. The 9 steps start with choose Pearl Ex Pigments for a Raku-Look Gourd and base Coat the Cleaned Gourd Black and Set Out Your Pigments.

Step-by-step guide

9 steps, about 10 minutes. Tap a picture to jump to that step. Your progress saves automatically.

Tick each step off as you go.

  1. Step 1: Choose Pearl Ex Pigments for a Raku-Look Gourd

    Watch this step · 1:02

    Look at a few photos of real raku pottery and note the colors that catch your eye. Coppers, blues, purples and a touch of gold are classic. Jenn picks antique copper, Aztec gold, true blue, blue russet, red russet and duo blue green, plus a sparkly loose eyeshadow she had on hand. Three to six colors is plenty for one gourd.

    Tip:

    Loose powdered eyeshadow with fine shimmer works the same way as mica pigment.

    Back to all steps

  2. Step 2: Base Coat the Cleaned Gourd Black and Set Out Your Pigments

    Watch this step · 3:25

    Start with a cut, cleaned gourd and give it a full coat of black acrylic paint. Let it dry completely. Drill any holes for a rim before this coat. Then open every pigment jar and set them on paper next to the gourd with a separate soft brush for each. Once the second coat goes on, you will not have time to hunt for lids.

    Tip:

    A thick black gesso covers in one coat and dries to a matte surface.

    Back to all steps

  3. Step 3: Brush Wet Black Gesso on One Section of the Gourd

    Watch this step · 3:58

    Hold the gourd in one hand and brush a second coat of black onto one area only, about the size of your palm. This wet layer is the glue for the pigments. Acrylic dries quickly, so working in small sections keeps the paint tacky while you add color. You will repeat this coat and color routine around the whole gourd.

    Tip:

    If a section dries before you get to it, brush on a little more black.

    Back to all steps

  4. Step 4: Dab Antique Copper Pigment Into the Wet Black Paint

    Watch this step · 4:22

    Load a soft brush with antique copper pigment and dab it onto the wet black section. Do not brush it around. Short dabs leave a soft cloud of color with black showing at the edges. The powder sticks right to the wet paint, and even a little black on the brush does no harm. Leave some areas black for contrast.

    Tip:

    Tap excess powder off the brush over the jar to waste less pigment.

    Back to all steps

  5. Step 5: Add Blue Russet and Red Tones to the Gourd With a Clean Brush

    Watch this step · 5:45

    Switch to a fresh brush and dab blue russet next to the copper, then a little red russet. Overlap the edges a bit so the colors melt into each other. Keep the placement random. Raku pottery never has neat bands of color, so odd shapes and uneven patches look more convincing than a pattern.

    Tip:

    A new brush for each color keeps every shade clear instead of muddy.

    Back to all steps

  6. Step 6: Dab Aztec Gold Pigment on the Next Wet Section of the Gourd

    Watch this step · 6:35

    Brush black over the next section and dab in Aztec gold while it is wet. Gold reads as the flash of metal you see on fired raku, so small touches go a long way. Add a little true blue beside it. If a patch looks wrong, paint black back over it and try again. This is a very forgiving project.

    Tip:

    Turn the gourd as you go so you always work on the side facing you.

    Back to all steps

  7. Step 7: Cover the Whole Gourd With Duo Blue Green Pigment

    Watch this step · 6:50

    Keep working around the gourd, section by section, adding color as you go. Duo blue green shifts between teal and purple as the light moves, which gives the finish depth. Where a pigment is not sticking, add a touch more black and dab again. Stop when the whole surface is covered and the colors feel balanced, then let it dry.

    Tip:

    Step back and look from a distance. Fill any big plain gaps with a small dab of color.

    Back to all steps

  8. Step 8: Seal the Painted Gourd With a UV Resistant Clear Coat

    Watch this step · 8:25

    Once the paint is fully dry, seal it so the powder does not rub off. Jenn uses Krylon UV resistant clear coating, which also slows fading. Spray light, even coats outside or in a well aired room and let each one dry. A gloss coat makes the metallic colors shine like a glazed pot in the sun.

    Tip:

    Two light coats work better than one heavy coat, which can run.

    Back to all steps

  9. Step 9: Compare Gloss and Matte Finishes on the Faux Raku Gourd

    Watch this step · 9:22

    Spray a matte coat over the gloss if you want a softer look. The pearly shimmer of the pigments still shows, but the shine no longer competes with it. Jenn prefers matte because it looks closer to real fired raku. Take the gourd into daylight and turn it to see the colors shift.

    Tip:

    Not sure which you like? Seal one test gourd in gloss and another in matte.

    Back to all steps

How to Paint a Robin in Watercolor (Easy Wet-on-Wet)

Keep going

How to Paint a Robin in Watercolor (Easy Wet-on-Wet)

Keep going with painting

More on this topic, picked for this gourd to look like raku pottery.

You reached the last step

Save this project to come back to it

Your ticked steps, the free printable and your other saved makes, together in My Projects. Free, no password.

You tapped Save

Save this project for later

We'll email you a link, no password.

How to Paint a Gourd to Look Like Raku Pottery

  • Your saved projects in one list
  • Your ticked steps on any device

Check your inbox for an email from us. Not there? Look in your spam folder.

Free printable

Printable sheet and shopping list for this project

The bonus is hidden until you sign up.

Free with a free account, no password. Every step above stays open to everyone.

Products Used

The Checklist

How to Paint a Gourd to Look Like Raku Pottery

Tools
3
Materials
4
Steps
9
Video
10 min

Tools we recommend

As an Amazon Associate we earn from qualifying purchases. Links on this page may be affiliate links - clicking them and buying doesn't change your price, but helps support Crafting Step by Step.

Tags

The Crafter's Weekly

New painting tutorials, every Sunday

One short email with the week's best step-by-step guides. Free, no spam, unsubscribe anytime.

Did this work for you?

What's next

Related collections

Curated theme pages that include this tutorial.

Similar tutorials

Hand-picked next reads based on the one you just finished.

Liked this painting tutorial?

Pick the crafts you want to hear about. One email every Sunday with new step-by-step tutorials. No spam, easy to unsubscribe.

Get more like this in your inbox

Weekly digest. Pick the categories you want. Unsubscribe anytime.

Send me tutorials about

We only email about new tutorials. Easy unsubscribe anytime.