How to Paint a Robin in Watercolor (Easy Wet-on-Wet)

Video byde Winton Paper Co.Hot this week
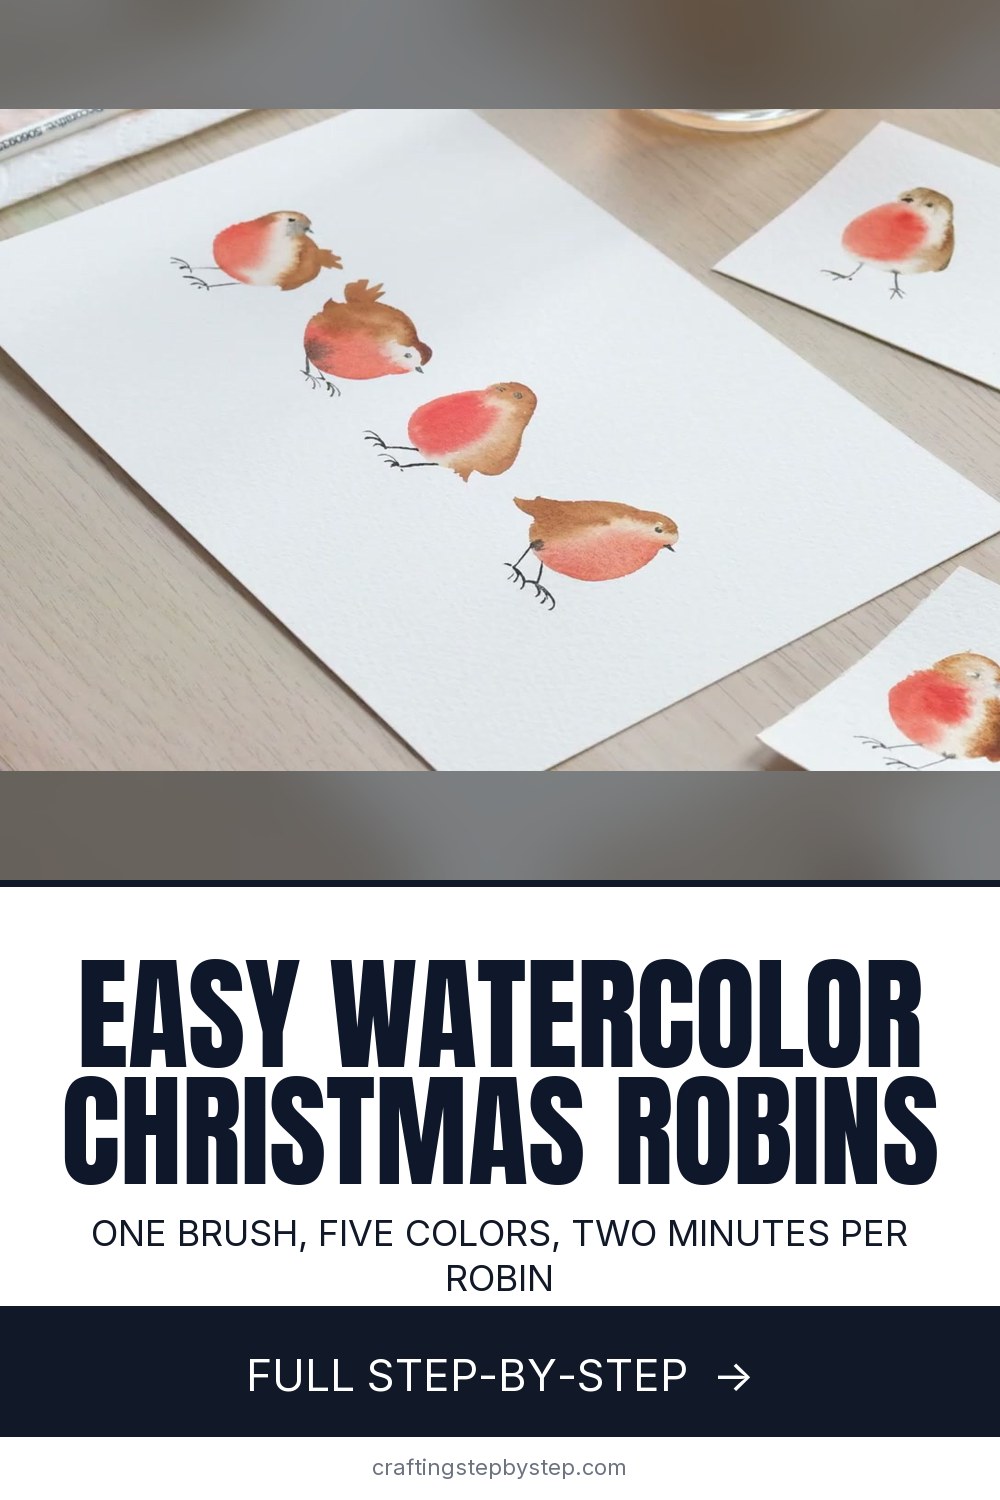
The finished result: How to Paint a Robin in Watercolor (Easy Wet-on-Wet)
  • Difficulty: Easy
  • About 30 minutes, plus 15 minutes to dry or set
  • 10 steps

You tapped Save

Save this project for later

We'll email you a link, no password.

How to Paint a Robin in Watercolor (Easy Wet-on-Wet)

  • Your saved projects in one list
  • Your ticked steps on any device

Check your inbox for an email from us. Not there? Look in your spam folder.

Print

Steps written out by Crafting Step by Step from de Winton Paper Co.'s video (opens YouTube) (11:30). Published .

These little watercolor robins take a couple of minutes each, and they look charming on a Christmas card. The creator of de Winton Paper Co. paints four of them with a single size 6 round brush, using a loose wet-on-wet method: a pale body shape, a drop of red that blends by itself, a touch of dark brown, then tiny legs, a beak and an eye. You need five colors and no drawing skills.

How to paint a robin: the short version

  • Paint a pale, damp brown body with a small bump for the head.
  • Stroke cadmium red and orange down the front and leave it to blend.
  • Edge the head and back with dark brown and add a tail and wing.
  • Paint thin black legs while the body is still slightly damp.
  • Add the beak and a tiny eye once everything is dry.

Colors and supplies

The palette is burnt sienna with a little raw umber for the pale base, cadmium red and cadmium orange for the breast, a dark brown for the back and mars black for the feet, beak and eye. A size 6 round with a good point does everything, even the toes. Use cold pressed watercolor paper of at least 140 lb so it does not buckle when wet. If you only have a student pan set, any warm red plus a little orange gives the right robin red breast.

Damp, not soaking

This is the one thing to get right. The pale body needs to be wet enough for the red to spread, but not a puddle. Too much water and the red runs everywhere and forms blooms, those cauliflower edges. Too dry and the red sits in a hard stripe. Blot your brush on a paper towel before you lay down the body, and you will soon feel the right amount.

Change the pose

Robins look different depending on where you put the head bump. A round body with the head on top is a fat winter robin. A longer potato shape facing the other way shows more breast. Head low reads as a bird pecking for food. Head turned back over the body looks like a robin glancing over its shoulder. Paint a row of them and they start to look like a little story. It is a good project to share with grandchildren, since every wobbly robin still looks like a robin.

Turn them into cards

  • Paint one robin on a folded watercolor card blank and add a short greeting.
  • Paint a row of robins along a strip and trim it to fit a slimline card.
  • Add a branch line with a few holly leaves for a fuller scene.
  • Make gift tags: one small robin per tag, a hole punched at the top.

Common problems

  • The red spreads too far. The body was too wet. Lift some water with a dry brush.
  • The beak merges into the body. Wait until it is fully dry, then paint it.
  • Muddy color. Rinse the brush between the red and the brown.

Want more birds? Try a cardinal or a hummingbird. For more festive pieces, paint a poinsettia or a snowman, or turn your robins into a watercolor Christmas card.

Free printable

Print the steps and supply list for this project

One page you can take to the table. Free with a free account, no password.

Get the free printable

What you'll need

Free, for this project

Get this checklist by email

  • All 10 tools and materials, with tick boxes
  • A link to print all 10 steps on paper, to keep by you while you craft

No password. The whole tutorial stays free on this page.

Quick answer

Paint cute watercolor robins with one brush and five colors. An easy project: about 30 minutes, plus 15 minutes to dry or set. You need 10 things, including cold pressed watercolor paper, burnt sienna watercolor and cadmium red watercolor. The 10 steps start with paint a Pale Robin Body Shape in Watercolor, add a Small Head Bubble to the Robin Shape, drop Red Into the Robin Breast and Let It Blend and edge the Robin Head and Back in Dark Brown.

Step-by-step guide

10 steps, about 12 minutes. Tap a picture to jump to that step. Your progress saves automatically.

Tick each step off as you go.

  1. Step 1: Paint a Pale Robin Body Shape in Watercolor

    Watch this step · 1:44

    Mix a very dilute wash of burnt sienna with a touch of raw umber. It should be pale enough to barely see. With a size 6 round brush, paint a slightly squashed circle for the body. The wash keeps your shape visible and gives the robin a soft brown undertone. Make it wet, but not a puddle, so the next colors can move without flooding.

    Tip:

    Blot the brush on a paper towel first so you do not lay down too much water.

    Back to all steps

  2. Step 2: Add a Small Head Bubble to the Robin Shape

    Watch this step · 1:52

    While the body is still wet, paint a small bump on top for the head. Keep it tiny. A robin's head is only a little extra shape poking out of a round body. Join it to the body so the two blend into one damp shape. Look at the paper from the side; it should shine a little but not have standing water.

    Tip:

    Paint several bodies at once if you are making cards, then work along the row.

    Back to all steps

  3. Step 3: Drop Red Into the Robin Breast and Let It Blend

    Watch this step · 2:30

    Pick up cadmium red with a little cadmium orange, because a robin breast sits between the two. Stroke the color once down the front of the wet shape. Then leave it alone. The red creeps out into the damp body by itself and makes a soft, feathery edge. Fussing with it only makes it muddy, so lift your brush and let the water do the work.

    Tip:

    If the red runs too far, the body was too wet. Use less water on the next one.

    Back to all steps

  4. Step 4: Edge the Robin Head and Back in Dark Brown

    Watch this step · 3:02

    Rinse and blot the brush, then load a strong dark brown. Using only the tip, run it along the top of the head and down the back of the robin. The brown softens into the damp body and gives the bird its shape. If the head is not quite the shape you wanted, the brown edge is your chance to correct it.

    Tip:

    Keep a clean edge between brown and red. Do not paint brown over the breast.

    Back to all steps

  5. Step 5: Add a Tail and Wing to the Watercolor Robin

    Watch this step · 3:30

    With the same dark brown, flick a couple of short strokes out from the back of the body for the tail. Then lay a small curved stroke on the side for the wing. Use very few strokes. The loose style is the charm of this robin. Leave this one to sit while you start your next bird.

    Tip:

    Pull each tail stroke away from the body so it tapers to a point.

    Back to all steps

  6. Step 6: Paint a Second Robin Facing the Other Way

    Watch this step · 4:24

    Paint another pale body, this time more of a potato shape facing the other way, with a small head bump. Load stronger cadmium red and fill the breast in from the side so more of the red shows. Add the brown along the head and back and a short tail. Changing the direction makes a row of robins much more interesting.

    Tip:

    Clean the brush between the red and the brown to keep both colors bright.

    Back to all steps

  7. Step 7: Paint a Pecking Robin With Its Head Down

    Watch this step · 6:06

    For a third pose, set the head low on the front of the body, as if the robin is pecking at the ground. Edge the red along the front and let it bleed in. Add the brown back, a tail and a little wing. For a fourth, put the head on the far side so it looks over its shoulder, and touch a bit of red onto the face.

    Tip:

    A really wet body here gives uneven blooms. Keep it damp, not soaking.

    Back to all steps

  8. Step 8: Paint Black Legs and Feet on the Robin

    Watch this step · 8:18

    Load a little mars black on the same size 6 brush and use only the very tip. Paint two thin legs set a bit toward the back of the body, then three tiny curved toes at the bottom of each. If the body is still slightly damp, the top of the legs softens into it, which looks natural. Do the feet on every robin.

    Tip:

    Practice the toes on scrap paper first. Three quick flicks are all you need.

    Back to all steps

  9. Step 9: Add a Small Black Beak to Each Robin

    Watch this step · 9:28

    Paint a small pointed beak in black on the robins that are dry around the head. For a bird whose beak sits on the body, like the one looking over its shoulder, wait until the paint is completely dry. Otherwise the black bleeds into the red and turns into a smudge. A short wedge shape reads as a beak even at this small size.

    Tip:

    Test dryness with the back of a finger. Cool paper is still damp.

    Back to all steps

  10. Step 10: Dot In the Robin Eyes to Finish

    Watch this step · 10:12

    Place the eye a little above the beak. Paint a tiny loop of black and leave a pinprick of white paper in it so the eye looks like it has a shine. That small highlight brings each robin to life. Step back, look at the row and add an extra tail stroke anywhere one looks thin. Your robins are ready for a card.

    Tip:

    Less is more. One eye dot and a highlight is enough detail.

    Back to all steps

How to Use Oil Pastels

Keep going

How to Use Oil Pastels

Keep going with painting

More on this topic, picked for this robin in watercolor.

You reached the last step

Save this project to come back to it

Your ticked steps, the free printable and your other saved makes, together in My Projects. Free, no password.

You tapped Save

Save this project for later

We'll email you a link, no password.

How to Paint a Robin in Watercolor (Easy Wet-on-Wet)

  • Your saved projects in one list
  • Your ticked steps on any device

Check your inbox for an email from us. Not there? Look in your spam folder.

Free printable

Printable sheet and shopping list for this project

The bonus is hidden until you sign up.

Free with a free account, no password. Every step above stays open to everyone.

Products Used

The Checklist

How to Paint a Robin in Watercolor (Easy Wet-on-Wet)

Tools
4
Materials
6
Steps
10
Video
12 min

Tools we recommend

As an Amazon Associate we earn from qualifying purchases. Links on this page may be affiliate links - clicking them and buying doesn't change your price, but helps support Crafting Step by Step.

Tags

The Crafter's Weekly

New painting tutorials, every Sunday

One short email with the week's best step-by-step guides. Free, no spam, unsubscribe anytime.

Did this work for you?

What's next

Related collections

Curated theme pages that include this tutorial.

Similar tutorials

Hand-picked next reads based on the one you just finished.

Liked this painting tutorial?

Pick the crafts you want to hear about. One email every Sunday with new step-by-step tutorials. No spam, easy to unsubscribe.

Get more like this in your inbox

Weekly digest. Pick the categories you want. Unsubscribe anytime.

Send me tutorials about

We only email about new tutorials. Easy unsubscribe anytime.