How to Crochet a Candy Cane Ornament

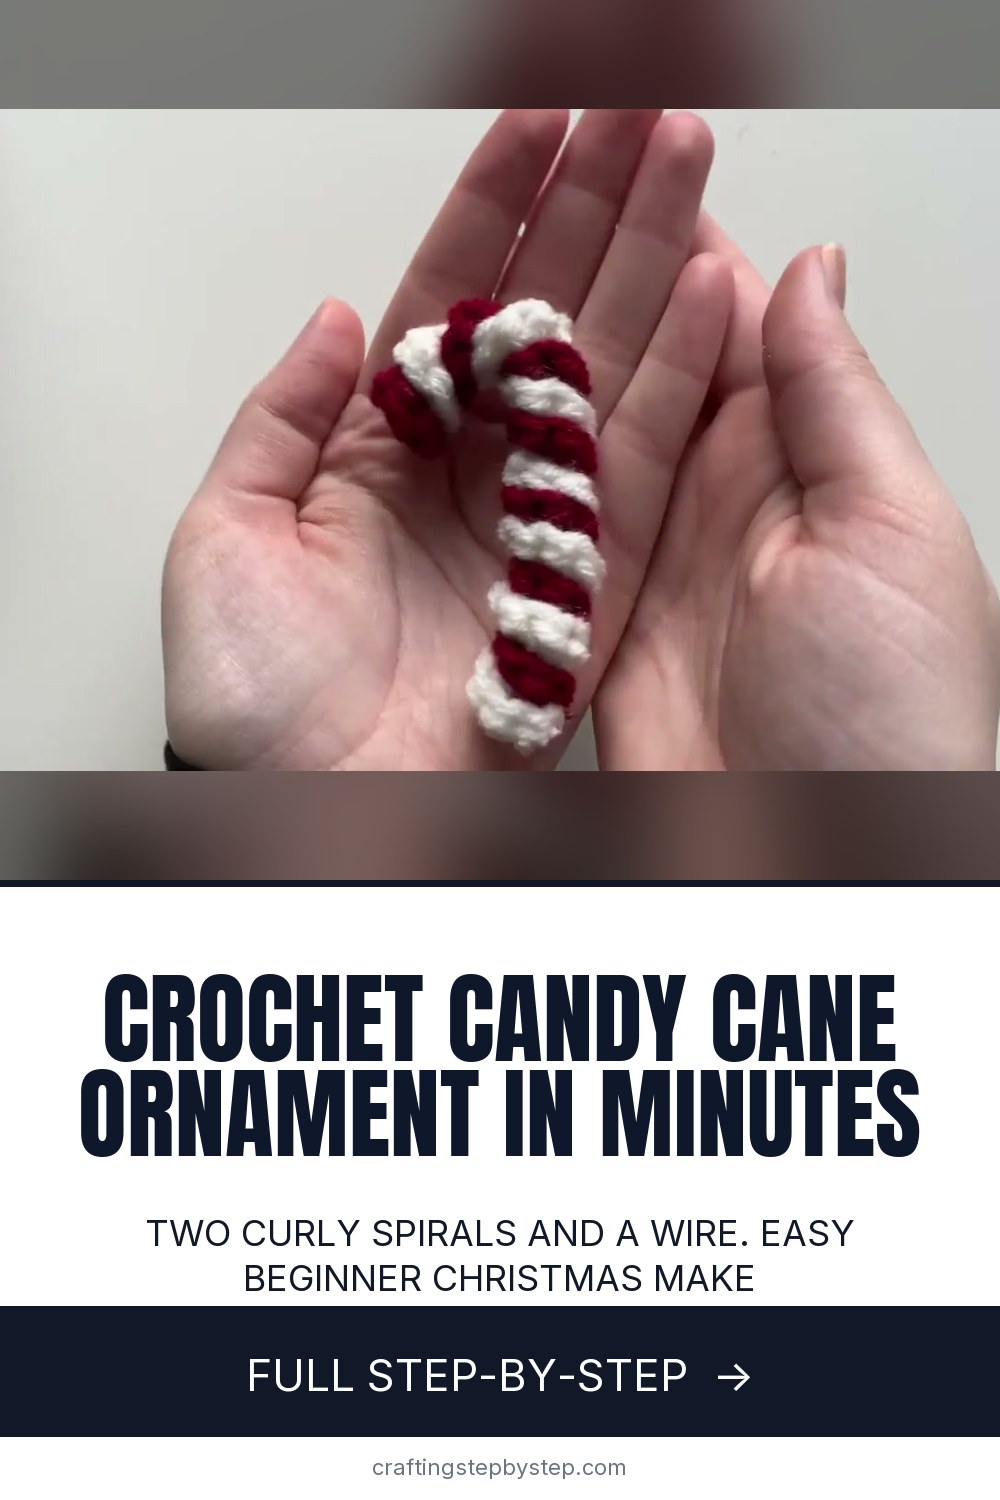
The finished result: How to Crochet a Candy Cane Ornament
  • Difficulty: Easy
  • 10 steps

You tapped Save

Save this project for later

We'll email you a link, no password.

How to Crochet a Candy Cane Ornament

  • Your saved projects in one list
  • Your ticked steps on any device

Check your inbox for an email from us. Not there? Look in your spam folder.

Print

Steps written out by Crafting Step by Step from Ally Newbry's video (opens YouTube) (12:09). Published .

This little candy cane is the fastest crochet Christmas ornament you will make all year. You crochet two short curly spirals, one red and one white, then twist them around a piece of wire and bend the top into a hook. No sewing, no stuffing, no counting rounds. The pattern comes from Ally Newbry on her YouTube channel, Ally Newbry, as part of her Christmas garland series.

Crochet candy cane ornament: what you are making

Each spiral is a chain with two single crochets worked into every chain. All those extra stitches have nowhere to go, so the strip curls up like a corkscrew on its own. Wrap a red one and a white one around a wire and you get the striped twist of a real candy cane. The wire lets you bend the crook and keeps the shape on the tree.

New to the basics? See how to make a slip knot and how to single crochet before you start.

Yarn weight and hook size

Ally uses worsted (weight 4) acrylic in a deep red and a soft white with a 4.5 mm hook. Acrylic curls tighter than cotton, so the twist looks crisper. Cotton still works. If your spiral stays a bit flat, the wire will hold it in place anyway.

Any worsted yarn from your stash will do. With a DK yarn, drop to a 4 mm hook. With chunky yarn, go up to 5.5 or 6 mm and you get a fatter cane.

Finished size, time and yarn

Twenty four chains give a mini cane about 3 to 4 inches tall. Want it bigger? Chain more. Smaller? Chain fewer. Use the same count for both colors. A beginner can make one in 20 to 30 minutes, plus drying time if you use tacky glue. Each spiral takes only a few yards, so one skein of each color makes dozens.

Hanging it on the tree

The crook hooks right over a branch, which is the charm of a candy cane. For a heavier tree or a gift tag, tie a loop of thin gold cord or yarn around the top of the crook before you bend it, or slip an ornament hook through the stitches.

Gift ideas and variations

  • Gift toppers. Tie one onto a wrapped present with the ribbon.
  • Garland. String several along a yarn chain with stars and snowflakes. Our Christmas garland guide shows ways to hang it.
  • A set. Make six in a box with a crochet snowflake or two.
  • Colors. Try green and white, or red and green.
  • Tiny canes. Use fingering yarn and a 2.5 mm hook for card toppers.

For more ideas, browse how to make Christmas ornaments.

Troubleshooting

  • The spiral will not curl. Check that you put two stitches in every chain. Tighter tension helps too.
  • Gaps between the stripes. Twist the spirals snug against each other as you go and press them together.
  • Wire poking out. Fold the wire end back on itself, or cover it with a dot of glue and a yarn tail.
  • A lopsided crook. Bend it slowly around a marker or pencil for an even curve.

Free printable

Print the steps and supply list for this project

One page you can take to the table. Free with a free account, no password.

Get the free printable

What you'll need

Free, for this project

Get this checklist by email

  • All 10 tools and materials, with tick boxes
  • A link to print all 10 steps on paper, to keep by you while you craft

No password. The whole tutorial stays free on this page.

Quick answer

Make a crochet candy cane ornament from two spirals and a wire. An easy project. You need 10 things, including cotton worsted yarn, 4.5 mm crochet hook and small scissors. The 10 steps start with make a Slip Knot in the Red Candy Cane Yarn, chain 24 for the Red Candy Cane Spiral, work Two Single Crochets in the Second Chain of the Candy Cane and finish the Red Candy Cane Spiral and Fasten Off.

Step-by-step guide

10 steps, about 12 minutes. Tap a picture to jump to that step. Your progress saves automatically.

Tick each step off as you go.

  1. Step 1: Make a Slip Knot in the Red Candy Cane Yarn

    Watch this step · 1:38

    Pick a color to start with. Ally starts with red, but both spirals use the same pattern, so it does not matter. Pull out some yarn so you have slack to work with. Make a loop, twist it, and pull a bit of the working yarn through to form a slip knot. Put it on your 4.5 mm hook and snug it up, not too tight.

    Tip:

    Leave a tail of about four inches. This end gets glued at the top of the wire later.

    Back to all steps

  2. Step 2: Chain 24 for the Red Candy Cane Spiral

    Watch this step · 2:26

    Yarn over and pull through the loop on your hook. That is one chain. Keep going until you have 24 chains. This count makes a mini candy cane, but the pattern has no set number. Chain more for a longer cane or fewer for a tiny one. Write your number down so the white spiral matches.

    Tip:

    Count the chains, not the loop on the hook. The loop on the hook does not count.

    Back to all steps

  3. Step 3: Work Two Single Crochets in the Second Chain of the Candy Cane

    Watch this step · 3:14

    Skip the chain closest to the hook. Insert your hook into the second chain from the hook. Yarn over, pull through, then yarn over and pull through both loops. That is one single crochet. Go back into that same chain and make a second one. Two stitches in one chain is an increase, and it is the whole pattern from here on.

    Tip:

    Work into the top loop of each chain. It is easier to see in white yarn if red is hard to read.

    Back to all steps

  4. Step 4: Finish the Red Candy Cane Spiral and Fasten Off

    Watch this step · 4:26

    Put two single crochets in every chain all the way down. The strip will start to twist into a curl, and that is what you want. Keep your tension even. When you reach the last chain, work your two stitches, then fasten off, leaving a tail of about 4 inches for tying at the bottom. Pull the tail through the loop on your hook. You now have a curly red spiral.

    Tip:

    Keep that 4-inch tail. It gets tied around the wire at the bottom of the cane.

    Back to all steps

  5. Step 5: Crochet the White Candy Cane Spiral the Same Way

    Watch this step · 6:52

    Make a slip knot in the white yarn and chain the same number you did for the red. Ally chains 24 again. Skip the first chain, then work two single crochets into every chain to the end. You will see it start to curl after a few stitches. Fasten off with a short tail. Both spirals should be close to the same length.

    Tip:

    If the white spiral comes out a little longer, that is fine. Trim the wire to match later.

    Back to all steps

  6. Step 6: Glue the Red and White Candy Cane Spirals Together

    Watch this step · 8:18

    Find the starting ends of both spirals, the ends without the loose tails. Lay one on top of the other. Dab a small amount of tacky glue onto the white end and press the red end on top. This holds the two spirals together while you twist them around the wire. Hot glue works too and sets much faster.

    Tip:

    Squeeze the tacky glue bottle with the tip pointed down for a minute before you need it. It flows more easily.

    Back to all steps

  7. Step 7: Thread the Wire Through the Top of the Candy Cane

    Watch this step · 9:26

    Take a piece of craft wire a bit longer than your spirals. Ally's wire was very thin, so she folded it over twice to make it stiffer. Push the wire through the glued ends at the top so the yarn is anchored to it. A single strand of thicker wire is easier and needs no folding.

    Tip:

    Around 18 to 20 gauge wire is stiff enough to hold the crook and still bends by hand.

    Back to all steps

  8. Step 8: Twist the Spirals Around the Wire to Make Candy Cane Stripes

    Watch this step · 9:52

    Spread a little glue along a short section of the wire. Wrap the red and white spirals around the wire together, so the colors sit side by side like stripes. Give them a gentle twist to tighten the coils so they look even. Work down the wire one small section at a time, gluing and twisting as you go.

    Tip:

    Small sections of glue keep your fingers clean and stop the glue drying before you get there.

    Back to all steps

  9. Step 9: Tie Off the Yarn Tails at the Bottom of the Candy Cane

    Watch this step · 10:34

    When you reach the end of the wire, tie the yarn tails around it to hold the stripes in place. Add a dab of glue over the knot. Tacky glue needs time to dry, so let it sit before you shape the cane. Once it is dry, trim the extra yarn and snip the extra wire with wire cutters. Tuck or glue any loose ends to the wire.

    Tip:

    Do not cut the wire with your good yarn scissors. It dulls the blades fast.

    Back to all steps

  10. Step 10: Bend the Top Into a Candy Cane Hook

    Watch this step · 11:12

    Hold the straight stick in one hand and bend the top over with the other to form the crook. Because there is wire inside, the shape stays where you put it. Make the curve as round or as tight as you like. Lay it down, check that it looks like a candy cane, and adjust. Your mini crochet candy cane is ready to hang.

    Tip:

    Bend the crook around a marker or pencil for a smooth, even curve.

    Back to all steps

How to Crochet a Gingerbread Man Ornament

Keep going

How to Crochet a Gingerbread Man Ornament

Keep going with crochet

More on this topic, picked for this candy cane ornament.

You reached the last step

Save this project to come back to it

Your ticked steps, the free printable and your other saved makes, together in My Projects. Free, no password.

You tapped Save

Save this project for later

We'll email you a link, no password.

How to Crochet a Candy Cane Ornament

  • Your saved projects in one list
  • Your ticked steps on any device

Check your inbox for an email from us. Not there? Look in your spam folder.

Free printable

Printable sheet and shopping list for this project

The bonus is hidden until you sign up.

Free with a free account, no password. Every step above stays open to everyone.

Products Used

The Checklist

How to Crochet a Candy Cane Ornament

Tools
4
Materials
6
Steps
10
Video
12 min

Tools we recommend

As an Amazon Associate we earn from qualifying purchases. Links on this page may be affiliate links - clicking them and buying doesn't change your price, but helps support Crafting Step by Step.

Tags

The Crafter's Weekly

New crochet tutorials, every Sunday

One short email with the week's best step-by-step guides. Free, no spam, unsubscribe anytime.

Did this work for you?

What's next

Related collections

Curated theme pages that include this tutorial.

Similar tutorials

Hand-picked next reads based on the one you just finished.

Liked this crochet tutorial?

Pick the crafts you want to hear about. One email every Sunday with new step-by-step tutorials. No spam, easy to unsubscribe.

Get more like this in your inbox

Weekly digest. Pick the categories you want. Unsubscribe anytime.

Send me tutorials about

We only email about new tutorials. Easy unsubscribe anytime.