How to Crochet a Christmas Tree Ornament

The finished result: How to Crochet a Christmas Tree Ornament
  • Difficulty: Easy
  • 10 steps

You tapped Save

Save this project for later

We'll email you a link, no password.

How to Crochet a Christmas Tree Ornament

  • Your saved projects in one list
  • Your ticked steps on any device

Check your inbox for an email from us. Not there? Look in your spam folder.

Print

Steps written out by Crafting Step by Step from Desert Blossom Crafts' video (opens YouTube) (15:01). Published .

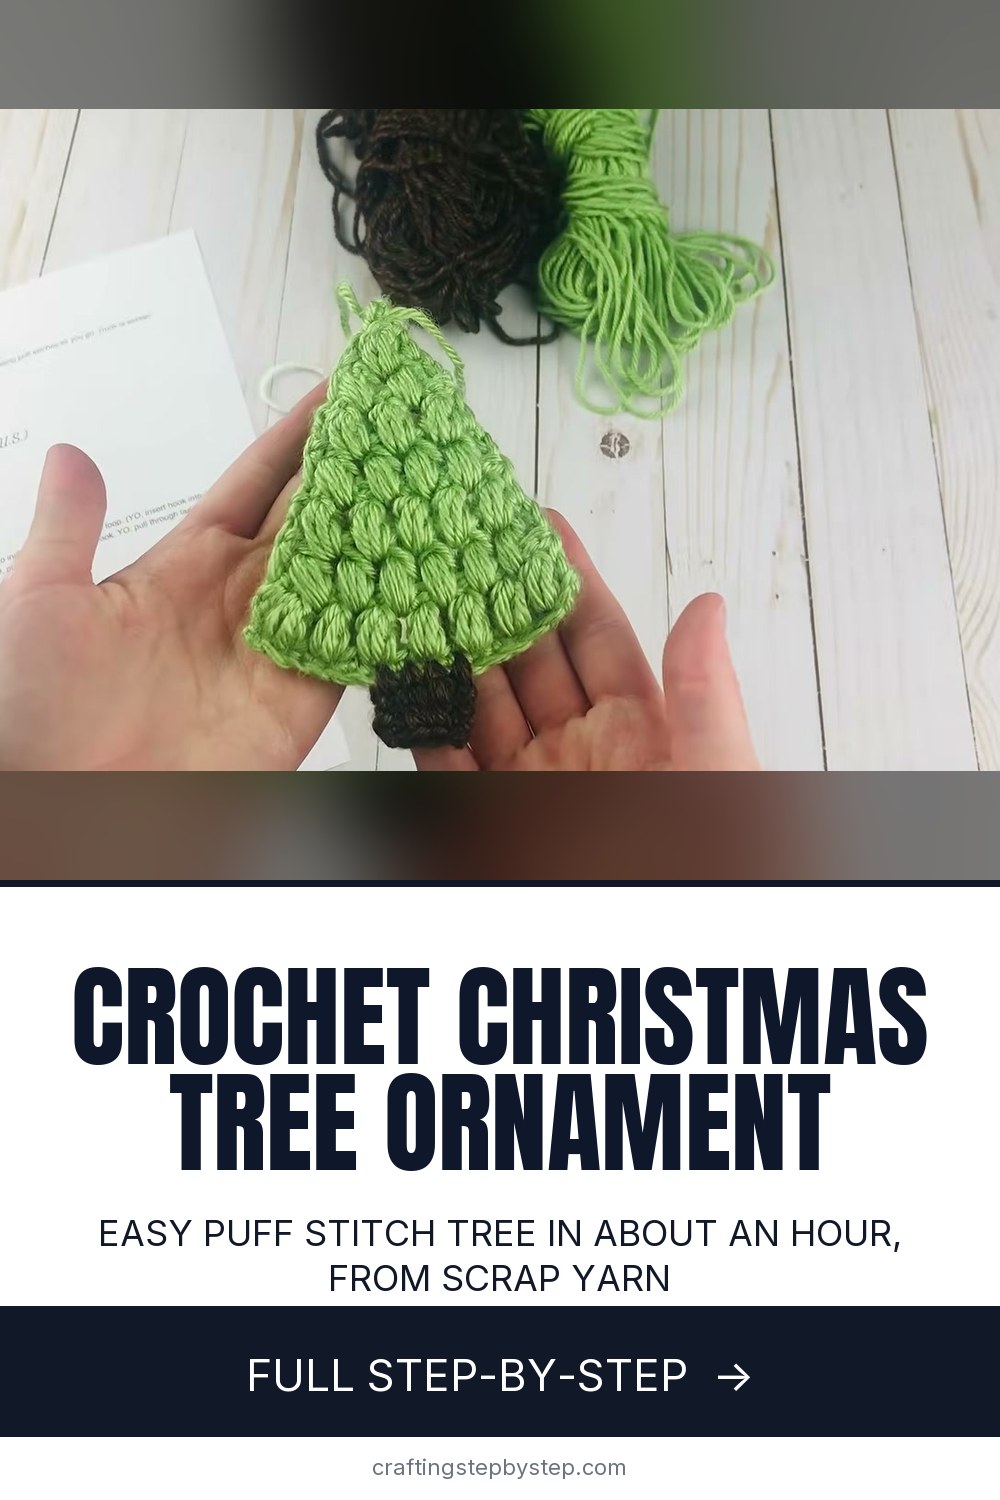
This little tree is one of the quickest Christmas ornaments you can crochet. It lies flat, it has a bumpy puff stitch texture that looks like branches, and a short brown trunk finishes it off. The design is by Rachel of the Desert Blossom Crafts channel on YouTube. She also has a free written version of the pattern on her blog, desertblossomcrafts.com, if you like to follow along on paper.

Crochet Christmas tree ornament: what you are making

You start at the bottom with a row of 15 single crochet. Then you work rows of puff stitches, one fewer puff in each row, so the piece narrows into a triangle on its own. A single crochet on top makes the point. The trunk is worked last, in brown yarn, right over the bottom row. If you need a refresher on the basic stitches, see how to single crochet and how to half double crochet.

Yarn weight and hook size

Rachel uses worsted weight yarn (a number 4, medium) with a 4 mm hook. Her green is Caron Simply Soft, and the trunk is Lion Brand Heartland, which has a marbled look like bark. She also made one in off white for a snowy tree.

Any worsted yarn from your stash will do. Scraps are perfect. A 4 mm hook is a bit small for worsted, and that is on purpose. It keeps the puffs firm and the tree stiff enough to hang well. If your yarn is on the thick side, a 4.5 mm or 5 mm hook is fine.

Finished size and how long it takes

In worsted yarn the tree comes out roughly 4 inches across the bottom and about 5 inches tall with the trunk. Your size will vary with your tension. A beginner should plan on 45 minutes to an hour for the first one. Once the puff stitch feels natural, they go much faster. Each tree uses only a small amount of yarn, so one skein of green will make a whole set.

Adding a hanging loop

The video ends with the trunk. To turn the tree into an ornament, leave a long tail when you fasten off at the point. Fold the tail into a loop about 3 inches long, then thread it on a yarn needle and stitch the end back into the top of the tree a few times so it holds. Thin gold cord or narrow ribbon also works if you want a little sparkle.

Blocking the tree flat

Rachel strongly recommends blocking, and it makes a real difference. Pin the tree to a foam board, shape the sides into a straight triangle, mist it with water and let it dry. The edges settle and the puffs line up. See how to block crochet for the method.

Gift ideas and variations

  • Gift toppers. Tie a tree onto a wrapped present in place of a bow.
  • A garland. Make five or six and string them along a length of yarn for a mantel.
  • Colors. Try cream for snow, a darker green, or red.
  • Smaller trees. Use sport weight yarn and a 3 mm hook.

For more to hang beside it, try a crochet snowflake.

Troubleshooting

  • Lopsided puffs. Pull every loop up to the same height. Uneven loops make uneven puffs.
  • A crooked edge. End each row in the top of the last puff, not in the turning chain.
  • The tree curls. Block it. Puff stitch pulls a little, and blocking flattens it.
  • The trunk is off center. Pull it out and start again closer to the middle puffs.

Free printable

Print the steps and supply list for this project

One page you can take to the table. Free with a free account, no password.

Get the free printable

What you'll need

Free, for this project

Get this checklist by email

  • All 9 tools and materials, with tick boxes
  • A link to print all 10 steps on paper, to keep by you while you craft

No password. The whole tutorial stays free on this page.

Quick answer

Crochet a Christmas tree ornament with puff stitches and a brown trunk. An easy project. You need 9 things, including any worsted weight scrap yarn, 4 mm crochet hook and yarn needle. The 10 steps start with chain 16 to Start the Crochet Christmas Tree, single Crochet Across the Bottom Row of the Tree, make the First Puff Stitch of the Tree, finish Row 2 of Puff Stitches Across the Tree and crochet Row 3 Puff Stitches Into the Tree's Chain Spaces.

Step-by-step guide

10 steps, about 15 minutes. Tap a picture to jump to that step. Your progress saves automatically.

Tick each step off as you go.

  1. Step 1: Chain 16 to Start the Crochet Christmas Tree

    Watch this step · 2:04

    Make a slip knot with your green yarn and put it on the 4 mm hook. Now chain 16. These chains become the bottom edge of the tree, so keep them even and not too tight. A tight chain makes the first row hard to work into and pulls the base of the tree in. Count your chains before you go on. You need all 16.

    Tip:

    If your chains always come out tight, make them with a hook one size larger and switch back for row 1.

    Back to all steps

  2. Step 2: Single Crochet Across the Bottom Row of the Tree

    Watch this step · 2:18

    Skip the first chain next to your hook. Single crochet into the second chain from the hook, then single crochet into every chain across. At the end you should have 15 single crochet. This flat row is the base of the tree, and later the trunk gets worked right over it. It is also the right side of the tree, so remember which side faced you here.

    Tip:

    Clip a stitch marker on this row so you can find the right side later.

    Back to all steps

  3. Step 3: Make the First Puff Stitch of the Tree

    Watch this step · 3:28

    Chain 1 and turn. The chain does not count as a stitch. Half double crochet in the first stitch. In the next stitch, yarn over, insert the hook and pull up a loop a little taller than usual. Do that two more times in the same stitch. You now have seven loops on the hook. Yarn over and pull through six loops, then yarn over and pull through the last two.

    Tip:

    Pull every loop up to the same height. Even loops give you neat, matching puffs.

    Back to all steps

  4. Step 4: Finish Row 2 of Puff Stitches Across the Tree

    Watch this step · 3:56

    Chain 1, skip the next single crochet, and make a puff stitch in the stitch after it. Keep going that way across the row: chain 1, skip one, puff. When you reach the end you will have seven puff stitches with six chain spaces between them. Do not chain at the end. Make a half double crochet in the last stitch, and row 2 is done.

    Tip:

    Count your puffs before you turn. Seven is the number that sets up the rest of the tree.

    Back to all steps

  5. Step 5: Crochet Row 3 Puff Stitches Into the Tree's Chain Spaces

    Watch this step · 5:48

    Chain 2 and turn. This chain counts as a half double crochet. Skip the first stitch and the first puff, and make your puff stitch into the first chain space. Chain 1 and put the next puff in the next chain space. Repeat across. Because the puffs sit in the gaps, they land between the puffs below, and the rows stagger like branches. You should have six puffs.

    Tip:

    Look for the small holes between the puffs. Those are the chain spaces you work into.

    Back to all steps

  6. Step 6: End Row 3 With a Half Double Crochet to Shape the Tree

    Watch this step · 6:44

    At the end of row 3, skip the last puff stitch and make a half double crochet in the half double crochet from the row before. Already the sides start to lean in. Each row has one fewer puff than the row below it, and that is all the shaping this tree needs. No counting increases, no decreases to learn.

    Tip:

    Lay the piece flat after this row. It should look like the bottom of a wide triangle.

    Back to all steps

  7. Step 7: Repeat the Puff Stitch Rows to Taper the Tree

    Watch this step · 8:28

    For rows 4, 5 and 6, chain 2, turn, and make a puff in each chain space with a chain 1 between. Row 4 has five puffs, row 5 has four, and row 6 has three. There is one change at the end of these rows. Skip the chain 2 from the row before and make your last half double crochet in the top of the end puff instead. That keeps the sides straight.

    Tip:

    Working into the chain 2 makes a loose, wavy edge. The top of the puff gives a cleaner line.

    Back to all steps

  8. Step 8: Crochet the Top Rows and the Point of the Tree

    Watch this step · 10:09

    Row 7 has two puffs and row 8 has one, each ending with a half double crochet in the top of the end puff. For row 9, chain 1 and make one single crochet in the top of the last puff. That single stitch gives the tree its little point. Cut the yarn and pull it through. If you want a hanger made from this tail, leave it long.

    Tip:

    Leave about 10 inches of tail at the point if you plan to make the hanging loop from it.

    Back to all steps

  9. Step 9: Start the Brown Trunk With Standing Single Crochets

    Watch this step · 12:02

    Turn the tree upside down with the right side, the single crochet row, facing you. Make a slip knot in the brown yarn and keep it on the hook. Aim for the middle three puffs. Insert the hook around the bottom row and make a single crochet. Make three more, spaced out evenly, for four in all. Step back and check that the trunk sits in the center.

    Tip:

    If the trunk looks off to one side, pull the stitches out and try again. It takes seconds.

    Back to all steps

  10. Step 10: Crochet the Tree Trunk Rows Between the Stitch Legs

    Watch this step · 13:22

    Chain 1 and turn. Single crochet in the first stitch. For the next two, push the hook between the two legs of the stitch below instead of under the top loops. This gives the trunk a neat, knitted look. Single crochet in the last stitch as usual. Repeat this row one more time. Fasten off, weave in the ends, and block the tree flat. Thread the 10-inch tail you left at the top into a loop and knot it to hang.

    Tip:

    Good light helps. The gap between the stitch legs is easier to see with a lamp on your work.

    Back to all steps

How to Crochet a Snowman Ornament

Keep going

How to Crochet a Snowman Ornament

Keep going with crochet

More on this topic, picked for this christmas tree ornament.

You reached the last step

Save this project to come back to it

Your ticked steps, the free printable and your other saved makes, together in My Projects. Free, no password.

You tapped Save

Save this project for later

We'll email you a link, no password.

How to Crochet a Christmas Tree Ornament

  • Your saved projects in one list
  • Your ticked steps on any device

Check your inbox for an email from us. Not there? Look in your spam folder.

Free printable

Printable sheet and shopping list for this project

The bonus is hidden until you sign up.

Free with a free account, no password. Every step above stays open to everyone.

Products Used

The Checklist

How to Crochet a Christmas Tree Ornament

Tools
4
Materials
5
Steps
10
Video
15 min

Tools we recommend

As an Amazon Associate we earn from qualifying purchases. Links on this page may be affiliate links - clicking them and buying doesn't change your price, but helps support Crafting Step by Step.

Tags

The Crafter's Weekly

New crochet tutorials, every Sunday

One short email with the week's best step-by-step guides. Free, no spam, unsubscribe anytime.

Did this work for you?

What's next

Related collections

Curated theme pages that include this tutorial.

Similar tutorials

Hand-picked next reads based on the one you just finished.

Liked this crochet tutorial?

Pick the crafts you want to hear about. One email every Sunday with new step-by-step tutorials. No spam, easy to unsubscribe.

Get more like this in your inbox

Weekly digest. Pick the categories you want. Unsubscribe anytime.

Send me tutorials about

We only email about new tutorials. Easy unsubscribe anytime.