How to Stencil on Wood (3 Ways to Get Crisp Wood Sign Letters)

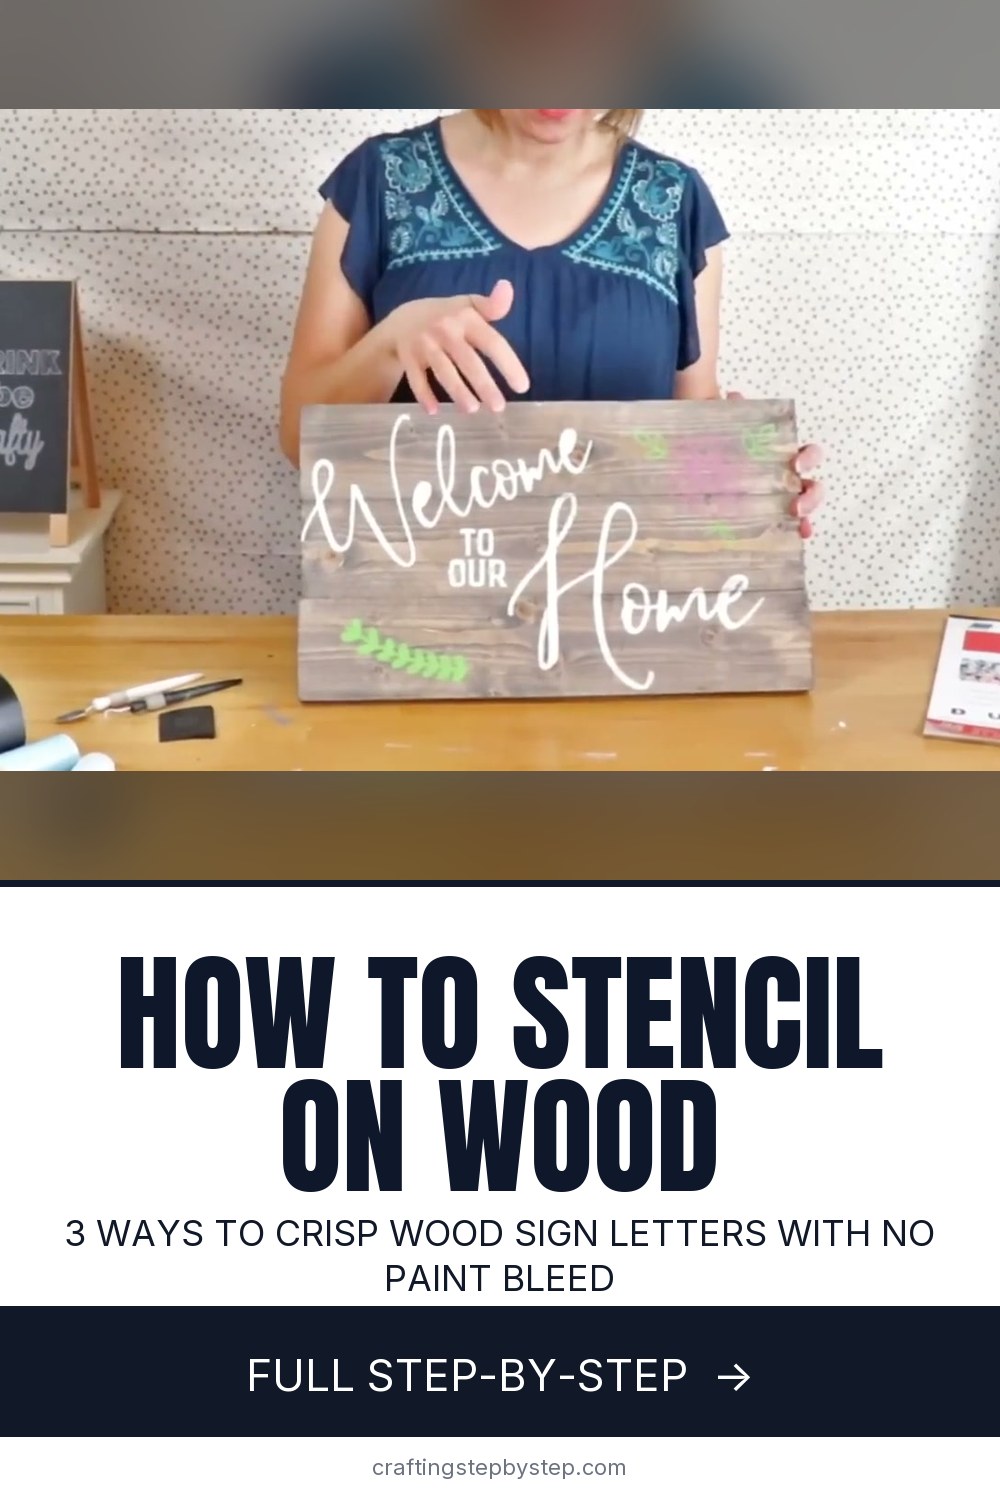
The finished result: How to Stencil on Wood (3 Ways to Get Crisp Wood Sign Letters)
  • Difficulty: Easy
  • About 1 hour, plus 1 hour to dry or set
  • 10 steps

You tapped Save

Save this project for later

We'll email you a link, no password.

How to Stencil on Wood (3 Ways to Get Crisp Wood Sign Letters)

  • Your saved projects in one list
  • Your ticked steps on any device

Check your inbox for an email from us. Not there? Look in your spam folder.

Print

Steps written out by Crafting Step by Step from Creative Ramblings' video (opens YouTube) (9:49). Published .

Also in:Painting

A painted wood sign looks store bought when the letters are crisp, and blotchy when paint creeps under the stencil. Sarah from Creative Ramblings shows three ways to stencil on wood and keep the edges clean: a reusable stencil cut from Dura-Lar, a one-time adhesive vinyl stencil and a thin translucent stencil film. All three go on the same stained pallet sign, so you can see how each one behaves on real wood grain.

How to stencil on wood: the short version

  • Let the stain or base coat dry overnight.
  • Stick the stencil down hard, with spray adhesive or its own sticky back.
  • Load a sponge with very little paint and blot it.
  • Pounce straight up and down. Never brush sideways.
  • Peel the stencil while the paint is still a little wet.

Which stencil should you use?

Dura-Lar is a stiff clear film. Cut it once and wash it under cold water, and you can use the same stencil on sign after sign. It does not stick by itself, so you need a temporary spray. Adhesive vinyl sticks tight to the wood and gives the sharpest edges, but it is single use. Save your scraps for small accents like a flower. Stencil film is thinner and cheaper than vinyl and you can see through it, which makes it the easiest to line up with lettering that is already on the board.

Designing a stencil that holds together

Letters like O, A and e have middles that fall out when you cut them. You have two fixes. Use a stencil font with small bridges, or do what Sarah does: cut the loose centers on a separate sheet and spray them into place before you paint. Script fonts with joined letters are the easiest place to start, because the whole word cuts as one connected shape.

Stopping paint from bleeding

Bleed is almost always too much paint or a stencil that is not pressed down. Dab the sponge on a paper towel until it feels close to dry. Burnish vinyl and film with a scraper so no bubbles are left. On rough or knotty wood, a thin coat of the base color over the stencil edge first seals the gaps; any bleed then matches the background.

Can you stencil fabric the same way?

This video stays on wood, but the reusable stencil and the pouncing motion carry over. Use fabric paint, or acrylic mixed with fabric medium, and slide cardboard inside a shirt or tote so paint does not soak through. Iron the design once it is dry to set it. Skip vinyl on fabric; it does not grip a weave well.

Gift and party ideas

A family name sign, a porch sign for the seasons or a set of signs for a craft fair all use the same method. Sarah also runs sign painting parties. Cut a stack of reusable stencils, stain the boards a day ahead and let everyone pick a word.

More wood sign projects

New to cutting machines? Start with how to use a Cricut and cutting SVG files. For a softer background, try whitewashing wood, or skip the stencil and transfer an image to wood. A wooden door hanger is a good small project for your first stencil.

Free printable

Print the steps and supply list for this project

One page you can take to the table. Free with a free account, no password.

Get the free printable

What you'll need

Free, for this project

Get this checklist by email

  • All 16 tools and materials, with tick boxes
  • A link to print all 10 steps on paper, to keep by you while you craft

No password. The whole tutorial stays free on this page.

Quick answer

Stencil a wood sign with a reusable Dura-Lar stencil, adhesive vinyl or stencil film. An easy project: about 1 hour, plus 1 hour to dry or set. Materials cost about $10 to $25. You need 16 things, including stained wood sign board, Dura-Lar clear film and adhesive vinyl. The 10 steps start with line Up the Reusable Stencil on the Wood Sign, spray Basting Spray on the Back of the Stencil and dab White Paint Through the Wood Sign Stencil.

Step-by-step guide

10 steps, about 10 minutes. Tap a picture to jump to that step. Your progress saves automatically.

Tick each step off as you go.

  1. Step 1: Line Up the Reusable Stencil on the Wood Sign

    Watch this step · 2:13

    Start with a stained board that has dried overnight. Damp stain is the main reason a stencil will not stick. Lay your clear Dura-Lar stencil on the board and slide it around until the word sits where you want it. Sarah cuts her sign wording in two pieces because Dura-Lar comes in 9 x 12 inch sheets, so she places Home first and leaves room for the rest above it.

    Tip:

    Mark the corners with a pencil dot so you can put it back in the same spot after spraying.

    Back to all steps

  2. Step 2: Spray Basting Spray on the Back of the Stencil

    Watch this step · 2:21

    Dura-Lar has no sticky back, so it needs help. Shake a can of basting spray, the temporary adhesive sold in the quilting aisle, and give the back of the stencil a light, even coat. Wait a few seconds for it to turn tacky, then press the stencil down on the board. Run your fingers along every letter so the edges sit tight against the wood. It holds well and lifts off without leaving residue.

    Tip:

    Spray outdoors or over scrap paper. Overspray makes your table sticky.

    Back to all steps

  3. Step 3: Dab White Paint Through the Wood Sign Stencil

    Watch this step · 3:06

    Pour a little white acrylic craft paint into a dish. Dip a sponge brush, then blot most of it off on the edge. Pounce the sponge straight up and down over the open letters. Do not swipe, since that pushes paint under the edges. Build the color in two or three light passes instead of one heavy one. Peel the stencil off, rinse it in cold water while the paint is still wet, and it is ready to use again.

    Tip:

    If the sponge leaves a wet shine on the wood, it is carrying too much paint.

    Back to all steps

  4. Step 4: Paint the Second Stencil With the Letter Centers in Place

    Watch this step · 4:26

    Once the first word is dry, spray the back of the second stencil and press it on. Sarah's Welcome stencil has loose pieces, like the middles of the o and e. She cut those centers on a separate sheet, so she sprays their backs and sets each one inside its letter. Then she dabs white paint through the whole word the same way, lifts the stencil and picks the small centers out with a craft tool.

    Tip:

    Tweezers lift the little centers without smudging the wet letters.

    Back to all steps

  5. Step 5: Weed the Adhesive Vinyl Stencil

    Watch this step · 5:52

    For a one-time stencil, cut your design from adhesive vinyl. Sarah uses scraps for small accents like this flower. With vinyl, the rule flips from normal decals: you pull out the pieces where you want the paint to go. Use a weeding hook to lift each shape and leave the rest of the vinyl on its backing. Check every petal and leaf before you move on, since a missed piece shows up as a bare spot.

    Tip:

    Hold the sheet up to a window to spot pieces you missed.

    Back to all steps

  6. Step 6: Lift the Vinyl Stencil With Contact Paper

    Watch this step · 6:18

    To move the stencil from its backing to the sign, lay a piece of clear contact paper over the weeded vinyl, sticky side down. Rub over it firmly with a scraper so the vinyl grabs the contact paper and any bubbles are pushed out. Trim the extra contact paper around the design so it fits the space on your sign. Contact paper is cheaper than transfer tape and works fine for stencils.

    Tip:

    Peel the backing away at a sharp angle so the small pieces stay on the contact paper.

    Back to all steps

  7. Step 7: Burnish the Vinyl Stencil Onto the Wood Sign

    Watch this step · 6:50

    Peel the paper backing off the vinyl, then set the stencil on the sign. Press it down in the middle and smooth outward. Go over the whole design with the scraper, working hard into the wood grain so every edge is sealed. Then peel the contact paper back slowly, leaving the vinyl stuck to the board. If a bit of vinyl lifts with it, lay it back down and burnish again.

    Tip:

    Run a fingernail around each small edge after burnishing for extra grip on rough grain.

    Back to all steps

  8. Step 8: Peel the Vinyl Stencil Off the Painted Flower

    Watch this step · 7:30

    Dab your colors into the open shapes with a sponge, using the same light up and down motion. Sarah fills the flower pink and the leaves green. While the paint is still slightly wet, lift the vinyl from one corner and peel it back low and slow. Wet paint breaks cleanly at the edge. Dry paint can tear and lift with the vinyl. Use a weeding tool or tweezers for tiny pieces left in the middle.

    Tip:

    Let each color dry before you stencil a second color right next to it.

    Back to all steps

  9. Step 9: Paint Through the Translucent Stencil Film

    Watch this step · 9:00

    Stencil film is a third option. It is thinner than vinyl, costs less and is see-through, so you can line it up against lettering already on the board. Cut and weed it the same way, then move it to the sign with transfer tape or contact paper. Burnish it down and pounce green paint into the leaf vine with a small dauber. Keep the other hand flat on the film so it does not shift.

    Tip:

    A small round dauber fits tight shapes like leaves better than a wide sponge brush.

    Back to all steps

  10. Step 10: Peel the Stencil Film Off the Painted Leaves

    Watch this step · 9:08

    Peel the film away while the green is still a little wet, pulling it back over itself close to the board. The leaf edges should come out crisp with no fuzzy halo. Touch up any small gaps with a fine brush. Let the whole sign dry, and your Welcome to Our Home sign is finished. A clear matte sealer protects it if it will hang near a door.

    Tip:

    Wait a full day before sealing so the paint is cured under the topcoat.

    Back to all steps

How to Make a Valentine's Day Box

Keep going

How to Make a Valentine's Day Box

Keep going with crafts

More on this topic, picked for this project.

You reached the last step

Save this project to come back to it

Your ticked steps, the free printable and your other saved makes, together in My Projects. Free, no password.

You tapped Save

Save this project for later

We'll email you a link, no password.

How to Stencil on Wood (3 Ways to Get Crisp Wood Sign Letters)

  • Your saved projects in one list
  • Your ticked steps on any device

Check your inbox for an email from us. Not there? Look in your spam folder.

Free printable

Printable sheet and shopping list for this project

The bonus is hidden until you sign up.

Free with a free account, no password. Every step above stays open to everyone.

Products Used

The Checklist

How to Stencil on Wood (3 Ways to Get Crisp Wood Sign Letters)

Tools
9
Materials
7
Steps
10
Video
10 min

Tools we recommend

As an Amazon Associate we earn from qualifying purchases. Links on this page may be affiliate links - clicking them and buying doesn't change your price, but helps support Crafting Step by Step.

Tags

The Crafter's Weekly

New crafts tutorials, every Sunday

One short email with the week's best step-by-step guides. Free, no spam, unsubscribe anytime.

Did this work for you?

What's next

Related collections

Curated theme pages that include this tutorial.

Similar tutorials

Hand-picked next reads based on the one you just finished.

Liked this crafts tutorial?

Pick the crafts you want to hear about. One email every Sunday with new step-by-step tutorials. No spam, easy to unsubscribe.

Get more like this in your inbox

Weekly digest. Pick the categories you want. Unsubscribe anytime.

Send me tutorials about

We only email about new tutorials. Easy unsubscribe anytime.