How to Make a Valentine's Day Box

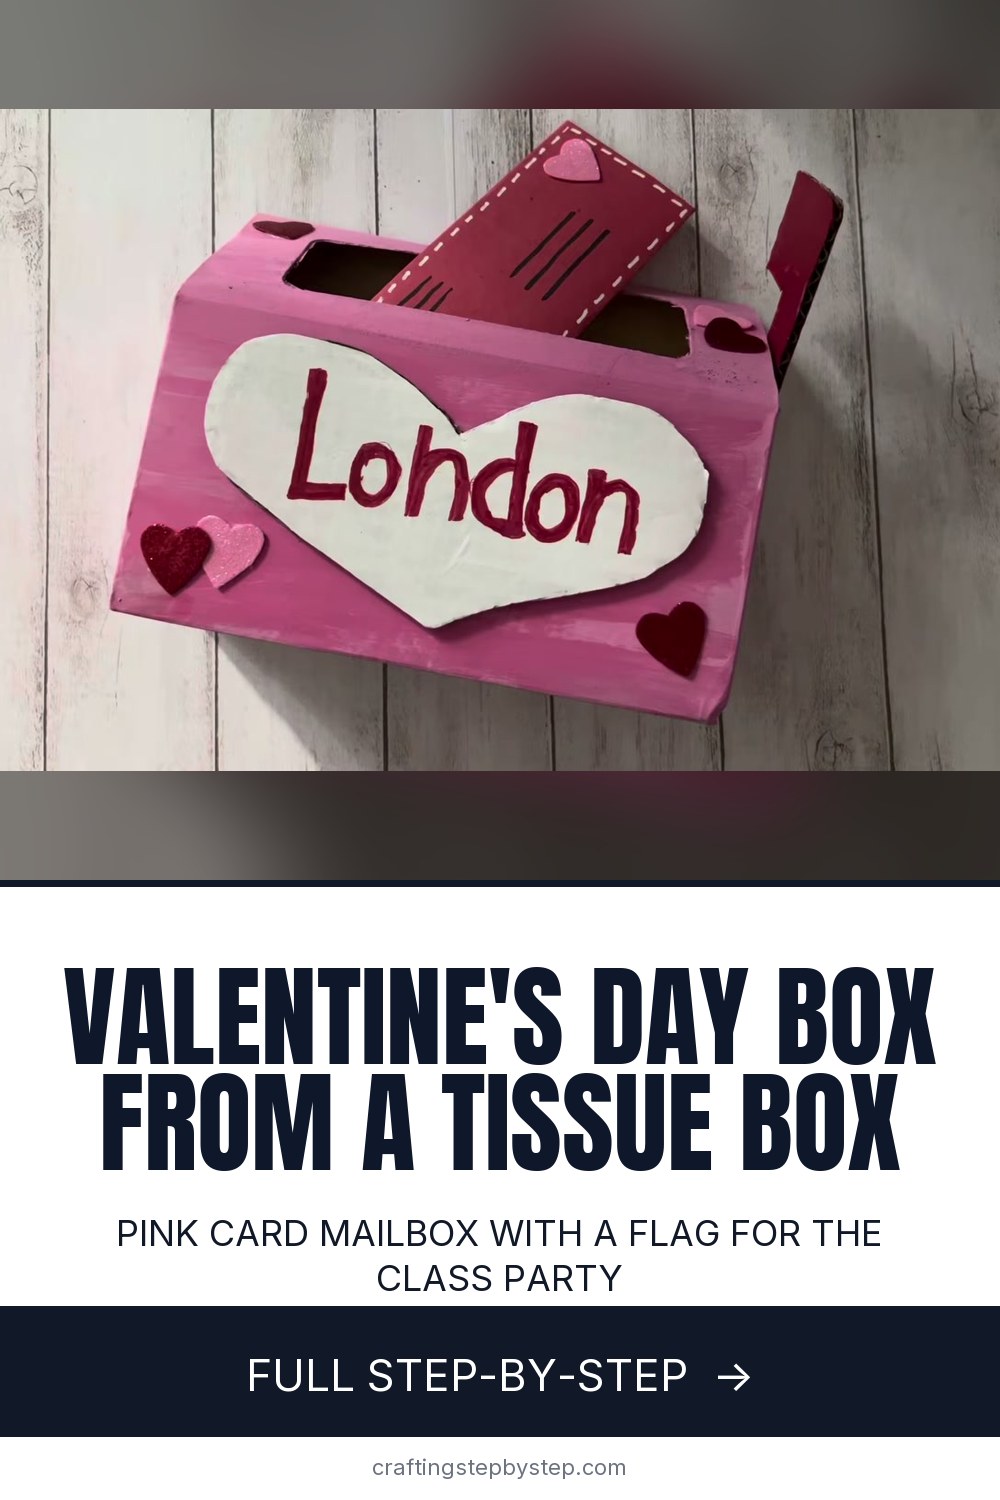
The finished result: How to Make a Valentine's Day Box
  • Difficulty: Easy
  • 10 steps

You tapped Save

Save this project for later

We'll email you a link, no password.

How to Make a Valentine's Day Box

  • Your saved projects in one list
  • Your ticked steps on any device

Check your inbox for an email from us. Not there? Look in your spam folder.

Print

Steps written out by Crafting Step by Step from Happy Crafty's video (opens YouTube) (7:13). Published .

Also in:Paper Crafts

This Valentine card mailbox starts life as an empty tissue box. Paint it pink, add a cardboard flag that swings up and down, and glue a big white heart with your child's name on the front. The idea comes from the Happy Crafty channel, where a mom and her daughter make one together for school. It is cheap, it uses things you already have, and little hands can do most of it.

A Valentine's Day box for the class party

Many schools ask each child to bring a box for the Valentine card swap. The tissue box opening becomes the mail slot, so there is nothing to cut on top. Classmates drop their cards in, and your child carries the whole thing home on the bus. It makes a sweet project for a grandparent and grandchild on a weekend afternoon, too.

Materials and swaps from around the house

  • The box. Any rectangular tissue box works. A cereal box or shoebox gives more room for a big class. Cut a slot in the top with a craft knife.
  • Paint. Mix red and white acrylic to get pink, or buy pink. Kids' washable paint works but may need a third coat.
  • Cardboard. Cut the flag and heart from a shipping box or the back of a cereal box.
  • The fastener. One brass brad lets the flag move. No brad? Glue the flag on so it stands up.

Sizes, measurements and time

A standard tissue box is about 9 inches long, 4.5 inches wide and 3.5 inches tall. Make the flag an L shape about 1 inch wide, with a tall arm of 4 to 5 inches. Draw the heart close to the length of the box front, about 7 inches across, so the name can be written big.

Plan on about an hour of hands-on time. Most of the afternoon is waiting for paint to dry. Do the painting in the morning and the decorating after lunch.

Valentine mailbox variations

  • Red or white box. Paint the box red with a pink heart, or white with red hearts.
  • Monster mailbox. Turn the slot into a mouth. Add googly eyes and paper teeth.
  • Bigger box. A cereal box stands upright like a real mailbox post.
  • Extra hearts. Fold an origami heart for the top, or hang a crochet heart from the flag.

Troubleshooting

  • The tissue box print shows through. Let the first coat dry fully, then add a second. Pale pink needs two coats over a busy pattern.
  • The flag flops down. Push the brad legs out flat inside the box and squeeze the hole closed a little.
  • The heart curls. Paint both sides of the cardboard, or press it under a book while it dries.

Storing it and using it again

After the party, the box makes a keepsake. Leave the cards inside and tape a date to the bottom. It stores flat-ish on a closet shelf. Next year, glue a new heart over the old one or let your child paint a fresh coat. For more Valentine making, try a pop up card to drop in a friend's box, or a heart friendship bracelet to tuck inside.

Free printable

Print the steps and supply list for this project

One page you can take to the table. Free with a free account, no password.

Get the free printable

What you'll need

Free, for this project

Get this checklist by email

  • All 12 tools and materials, with tick boxes
  • A link to print all 10 steps on paper, to keep by you while you craft

No password. The whole tutorial stays free on this page.

Quick answer

Make a Valentine's Day box from a tissue box: paint it pink, add a swinging flag and a heart nameplate. An easy project. You need 12 things, including empty tissue box, corrugated cardboard and red acrylic paint. The 10 steps start with empty and Open Up the Tissue Box for the Valentine Mailbox, paint the Tissue Box Pink for the Valentine's Day Box and draw and Cut the Cardboard Mailbox Flag in an L Shape.

Step-by-step guide

10 steps, about 7 minutes. Tap a picture to jump to that step. Your progress saves automatically.

Tick each step off as you go.

  1. Step 1: Empty and Open Up the Tissue Box for the Valentine Mailbox

    Watch this step · 1:04

    Pull the perforated top off the tissue box and take out every tissue. Save them for a runny nose later. Then cut away the clear plastic film around the opening with scissors. Trim close to the edge so nothing catches when cards slide in. This opening becomes the mail slot for your Valentine's Day box, so neaten any ragged cardboard while you are here.

    Tip:

    Let your child pull out the tissues. Little ones love that part.

    Back to all steps

  2. Step 2: Paint the Tissue Box Pink for the Valentine's Day Box

    Watch this step · 1:53

    Mix red and white acrylic paint in a cup until you get a pink you both like. Cover the table with paper. Paint the whole box, sides and ends included, with a wide flat brush. Two people can paint at once. Let the first coat dry, then add a second coat so the old tissue box print disappears. Leave it to dry fully.

    Tip:

    Paint the top edges of the slot too, so no plain cardboard peeks out.

    Back to all steps

  3. Step 3: Draw and Cut the Cardboard Mailbox Flag in an L Shape

    Watch this step · 3:11

    On a flat piece of cardboard, draw an L shape for the mailbox flag. Make it about 1 inch wide with a tall arm of 4 to 5 inches and a short arm at the top. Cut it out with sharp scissors. Cardboard is tough, so an adult should do the cutting. Make small snips into the inside corner rather than one big cut.

    Tip:

    Thin cereal box card bends too easily. Use corrugated shipping box cardboard for a stiff flag.

    Back to all steps

  4. Step 4: Cut a Large Cardboard Heart for the Valentine Box Nameplate

    Watch this step · 3:24

    Draw a large heart on the same cardboard, about as wide as the front of your box. Fold a paper heart first and trace it if you want both sides to match. Cut slowly around the curves, turning the cardboard as you go instead of twisting the scissors. This heart becomes the nameplate on the front of the Valentine mailbox.

    Tip:

    Keep the heart a little smaller than the box front so the pink shows around it.

    Back to all steps

  5. Step 5: Paint the Cardboard Heart White and the Mailbox Flag Red

    Watch this step · 3:46

    Lay the heart and the flag on scrap paper. Paint the heart white so the name will stand out. Paint the flag a deep red, like a real mailbox flag. Your child can paint one while you do the other. Cover the edges as well as the front. Let both pieces dry, then add a second coat if the brown cardboard still shows through.

    Tip:

    A hair dryer on low speeds up drying between coats.

    Back to all steps

  6. Step 6: Poke a Hole in the Valentine Box and the Flag With a Craft Knife

    Watch this step · 4:12

    Hold the flag against one short end of the box, near the top, to see where it will sit. Carefully poke a small hole through the box at that spot with the point of a craft knife. Poke a second hole near the bottom of the flag. Keep the holes small. A snug hole holds the flag in place better.

    Tip:

    This is a grown-up job. A sharp pencil or a skewer also works for the holes.

    Back to all steps

  7. Step 7: Attach the Red Flag to the Valentine Mailbox With a Brad

    Watch this step · 5:11

    Push a brass brad through the hole in the flag, then through the hole in the box. Reach inside the box through the slot and spread the two brad legs flat against the wall. Now the flag swings up and down like a real mailbox flag. Your child can raise it when cards arrive.

    Tip:

    If the flag swings too freely, press the brad legs down harder.

    Back to all steps

  8. Step 8: Write Your Child's Name on the White Heart Nameplate

    Watch this step · 5:45

    Once the white paint is dry, write your child's name across the heart with a red permanent marker. Big, clear letters are easy to read from across a classroom. Let your child write it if they can. A slightly wobbly name has its own charm. Pencil the letters lightly first if you are worried about spacing.

    Tip:

    Go over the letters twice for a bold line.

    Back to all steps

  9. Step 9: Glue the Name Heart to the Front of the Valentine's Day Box

    Watch this step · 6:08

    Turn the box so the slot is at the top and the flag is on the side. Spread school glue on the back of the heart, mostly near the edges. Center it on the front of the box and press it down with flat hands for a minute. Little helpers can press too. Wipe away any glue that squeezes out.

    Tip:

    Lay a heavy book on top while the glue sets so the heart dries flat.

    Back to all steps

  10. Step 10: Decorate the Valentine Mailbox With Small Hearts

    Watch this step · 6:37

    Now the fun part. Glue small felt or glitter foam hearts around the box. Put a couple beside the slot, one or two in the corners of the front, and one on the flag. Stacking a pink heart over a red one adds depth. Let the glue dry, then drop in a card to test the slot.

    Tip:

    Peel-and-stick foam hearts skip the glue and suit young children.

    Back to all steps

How to Layer SVG Files in Cricut

Keep going

How to Layer SVG Files in Cricut

Keep going with crafts

More on this topic, picked for this valentine's day box.

You reached the last step

Save this project to come back to it

Your ticked steps, the free printable and your other saved makes, together in My Projects. Free, no password.

You tapped Save

Save this project for later

We'll email you a link, no password.

How to Make a Valentine's Day Box

  • Your saved projects in one list
  • Your ticked steps on any device

Check your inbox for an email from us. Not there? Look in your spam folder.

Free printable

Printable sheet and shopping list for this project

The bonus is hidden until you sign up.

Free with a free account, no password. Every step above stays open to everyone.

Products Used

The Checklist

How to Make a Valentine's Day Box

Tools
4
Materials
8
Steps
10
Video
7 min

Tools we recommend

As an Amazon Associate we earn from qualifying purchases. Links on this page may be affiliate links - clicking them and buying doesn't change your price, but helps support Crafting Step by Step.

Tags

The Crafter's Weekly

New crafts tutorials, every Sunday

One short email with the week's best step-by-step guides. Free, no spam, unsubscribe anytime.

Did this work for you?

What's next

Related collections

Curated theme pages that include this tutorial.

Similar tutorials

Hand-picked next reads based on the one you just finished.

Liked this crafts tutorial?

Pick the crafts you want to hear about. One email every Sunday with new step-by-step tutorials. No spam, easy to unsubscribe.

Get more like this in your inbox

Weekly digest. Pick the categories you want. Unsubscribe anytime.

Send me tutorials about

We only email about new tutorials. Easy unsubscribe anytime.