How to Cut SVG Files with Cricut (Upload + Cut Tutorial)

CraftsMedium15:1210 steps5-question quiz at endBrowse more →
The finished result: How to Cut SVG Files with Cricut (Upload + Cut Tutorial)

By CraftingStepByStepPublished Updated

Based on a video by Colleen Pastoor.

You found a cut file on Etsy. You downloaded the zip. You unzipped it and now there's an SVG sitting in your Downloads folder, staring at you. So how do you actually get that thing onto vinyl and onto a t-shirt or a mug or a notebook? That's this tutorial.

Colleen Pastoor from Lemon Thistle walks through the upload-and-cut workflow inside Cricut Design Space. She covers the three file types Design Space accepts (SVG, PNG, JPEG), the two-button decision that trips up almost every beginner (Upload Image vs Upload Pattern), the layers trap with multi-piece SVGs, and the difference between Attach and Weld that decides whether your design cuts as one piece or rockets across three separate mats.

This is the specific workflow for crafters who already have a cut file. If you're brand new to the machine itself, start with the how to use a Cricut for beginners overview first, then come back here. For another beginner-friendly Cricut-adjacent project, the mosaic coaster tutorial is a fun second crafting win.

Have your downloaded SVG ready in a folder you can find. Have a sheet of vinyl or cardstock loaded on a 12x12 mat. Open Design Space in a browser tab. Let's get the file onto the machine.

Step-by-Step Guide

10 steps · about 15 minutes.Check off each step as you go and your progress saves automatically.

1

Step 1: Open Design Space and Start a New Canvas

3:06
Step 1: Open Design Space and Start a New Canvas - How to Cut SVG Files with Cricut (Upload + Cut Tutorial)

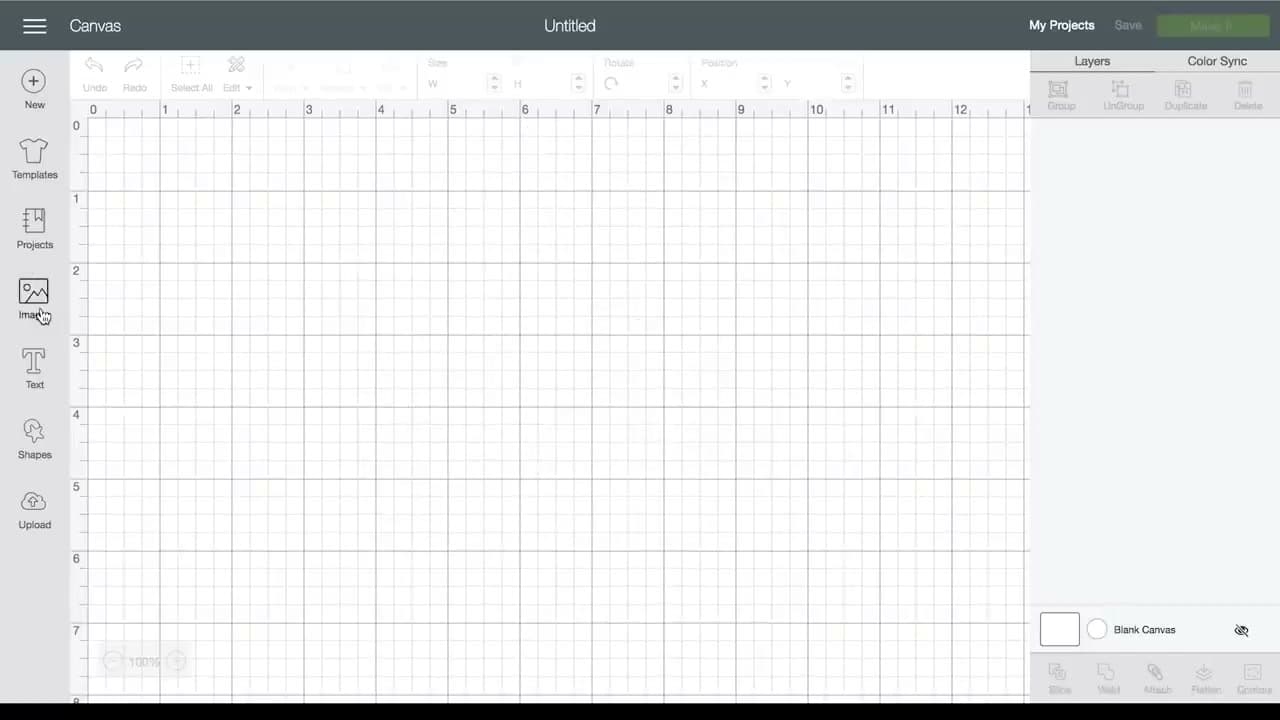
Go to design.cricut.com in your browser and sign in. Click the green New Project button to open a fresh canvas. The canvas is your workspace, the grid where everything happens before you hit Make It. Down the left edge you'll see the toolbar: Templates, Projects, Images, Text, Shapes, and at the bottom, Upload. That bottom button is where everything in this tutorial happens. You can save a canvas at any time and come back to it later, so don't worry about losing your work as you experiment.

Tip

Design Space runs in Chrome on a laptop or as the iOS/Android app on a tablet. The desktop app is faster for upload work because dragging files from a folder is more reliable than tapping through the iPad picker.
Used in this step: Cricut Maker 3, Cricut Explore Air 2, Cricut Design Space subscription

2

Step 2: Know Which File Types Design Space Accepts

3:50
Step 2: Know Which File Types Design Space Accepts - How to Cut SVG Files with Cricut (Upload + Cut Tutorial)

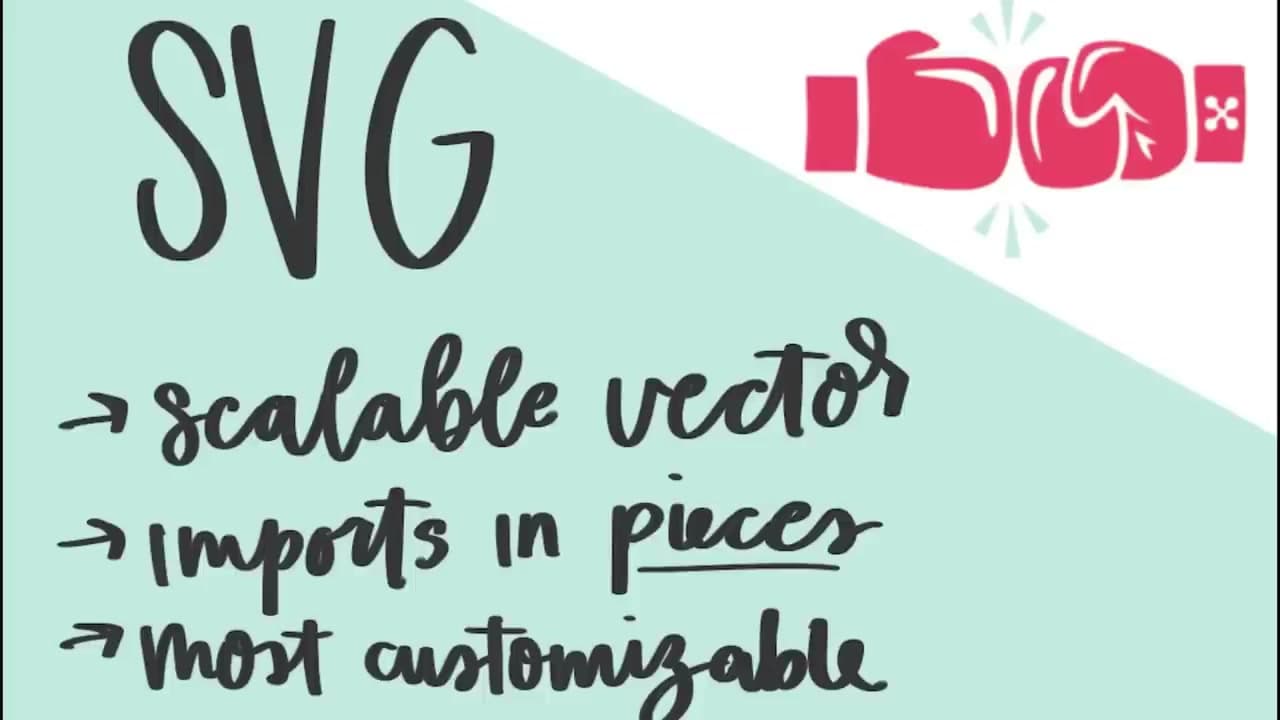
Three file types matter for cutting: SVG, PNG, and JPEG. An SVG is a scalable vector and the cleanest input - it imports straight into Design Space with no cleanup needed, and it scales to any size without going fuzzy. PNG files can have a transparent background, which means Design Space can pull the design out as a single layer without you erasing anything. JPEG files have a solid background and need the most work - you'll have to erase the background by hand with the Magic Wand. If the seller gives you a choice, take the SVG. If not, PNG is the next best thing.

Tip

If your file is in a .zip archive (Etsy and Creative Fabrica always zip), unzip it first by right-clicking the file and choosing Extract All. Design Space won't read inside a zip.

Used in this step: Creative Fabrica SVG bundle subscription, Design Bundles SVG library

3

Step 3: Click Upload and Pick 'Upload Image'

4:57
Step 3: Click Upload and Pick 'Upload Image' - How to Cut SVG Files with Cricut (Upload + Cut Tutorial)

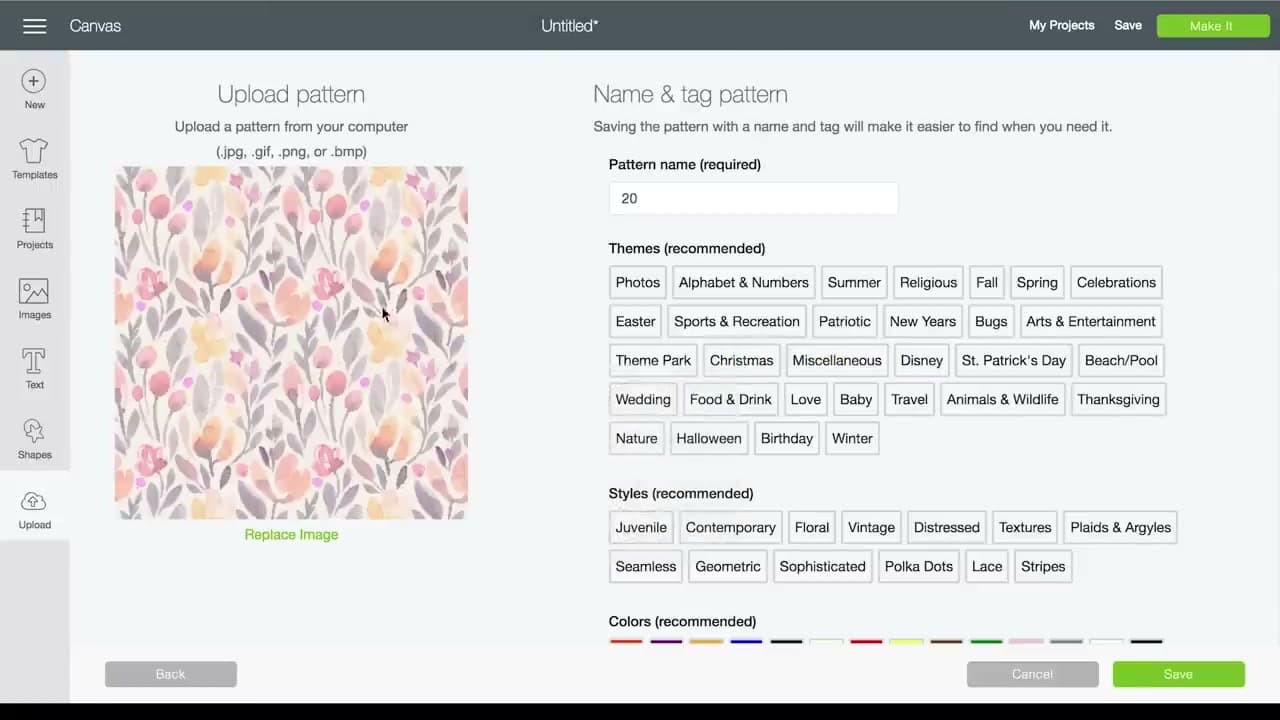
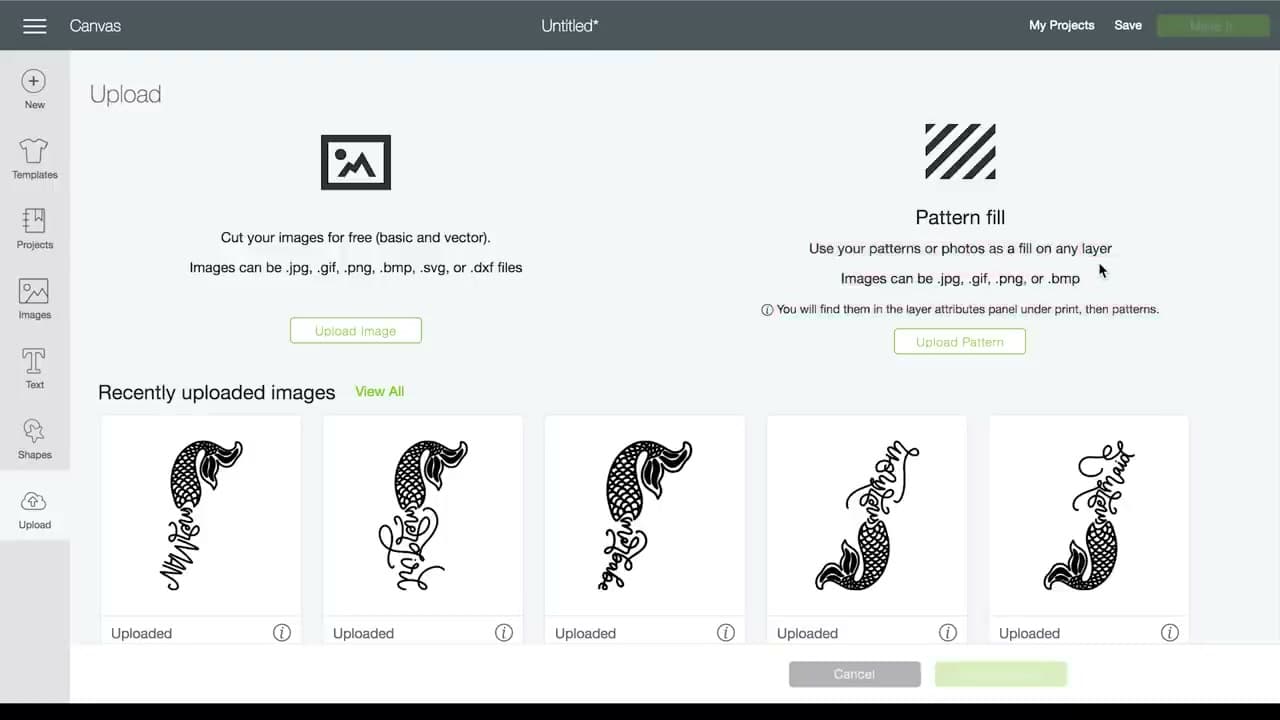
Click the Upload icon at the bottom of the left toolbar - the small cloud with an arrow inside. You'll land on a page with two big boxes side by side: Upload Image on the left, Upload Pattern on the right. Almost always pick Upload Image. The Upload Pattern path is for filling shapes with a repeating pattern fill, which is a niche use case. Even when you eventually want to use a design as a pattern fill, Colleen still uses Upload Image first and adjusts later. So click the Upload Image button under the picture icon.

Tip

The Upload screen also shows your Recently Uploaded Images grid. Anything you've imported in the past sits there ready to drag onto a new canvas, so you only have to upload each file once.

Used in this step: Cricut BrightPad for tracing and weeding

4

Step 4: Browse to Your SVG File and Insert It

5:20
Step 4: Browse to Your SVG File and Insert It - How to Cut SVG Files with Cricut (Upload + Cut Tutorial)

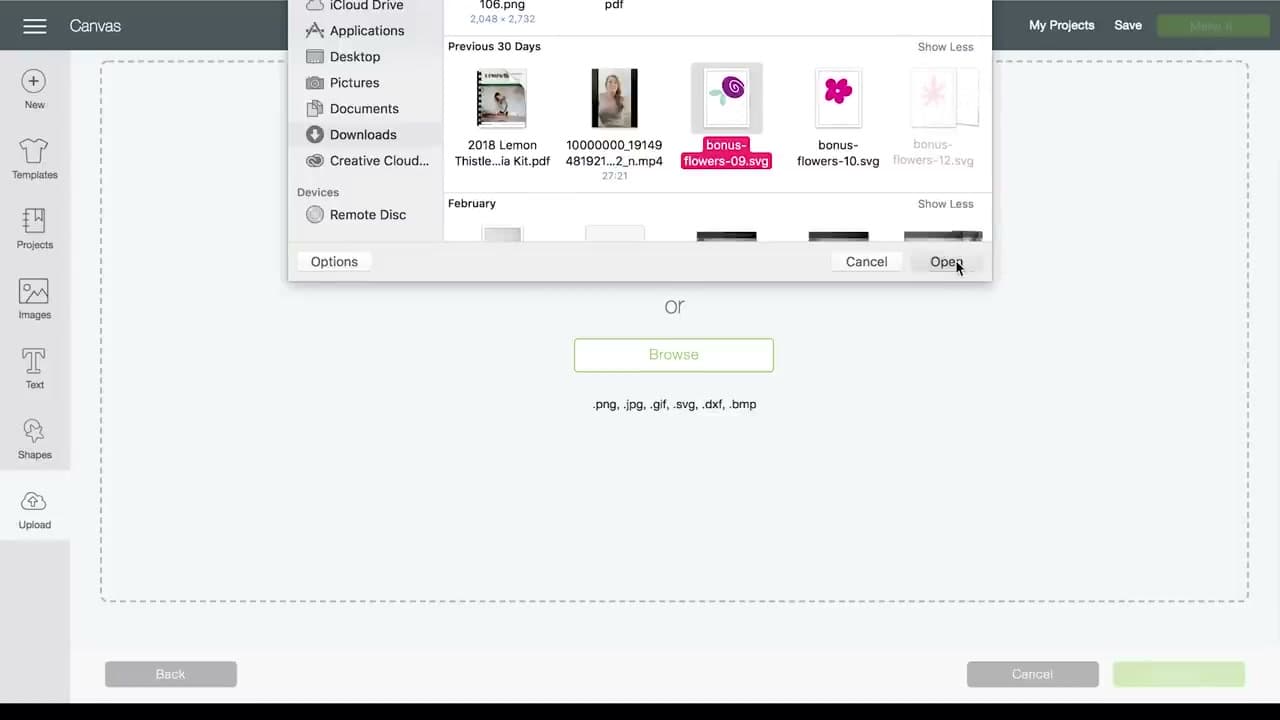
Click Browse and a file picker opens. Navigate to wherever you saved the SVG - usually the Downloads folder if it just came off Etsy. Select the file and click Open. Design Space will load it and show you a preview with a Name field and a Tags field. The name is what shows up in your image library, so use something you'll recognize later - the seller's filename like 'bonus-flowers-09.svg' is fine for one-offs, but for a design you'll reuse, retype it as something like 'mermaid handlettered'. Click Upload, then click the green Insert button on the next screen.

Tip

If the file doesn't show up in the browser, check the file extension. Design Space takes .svg, .png, .jpg, .gif, .dxf, and .bmp. Anything else (like a Photoshop .psd or a raw .ai Illustrator file) needs converting first.

Used in this step: Cricut StandardGrip 12x12 cutting mat, Cricut LightGrip 12x12 cutting mat

5

Step 5: Check the Layers Panel for Multiple Pieces

5:42
Step 5: Check the Layers Panel for Multiple Pieces - How to Cut SVG Files with Cricut (Upload + Cut Tutorial)

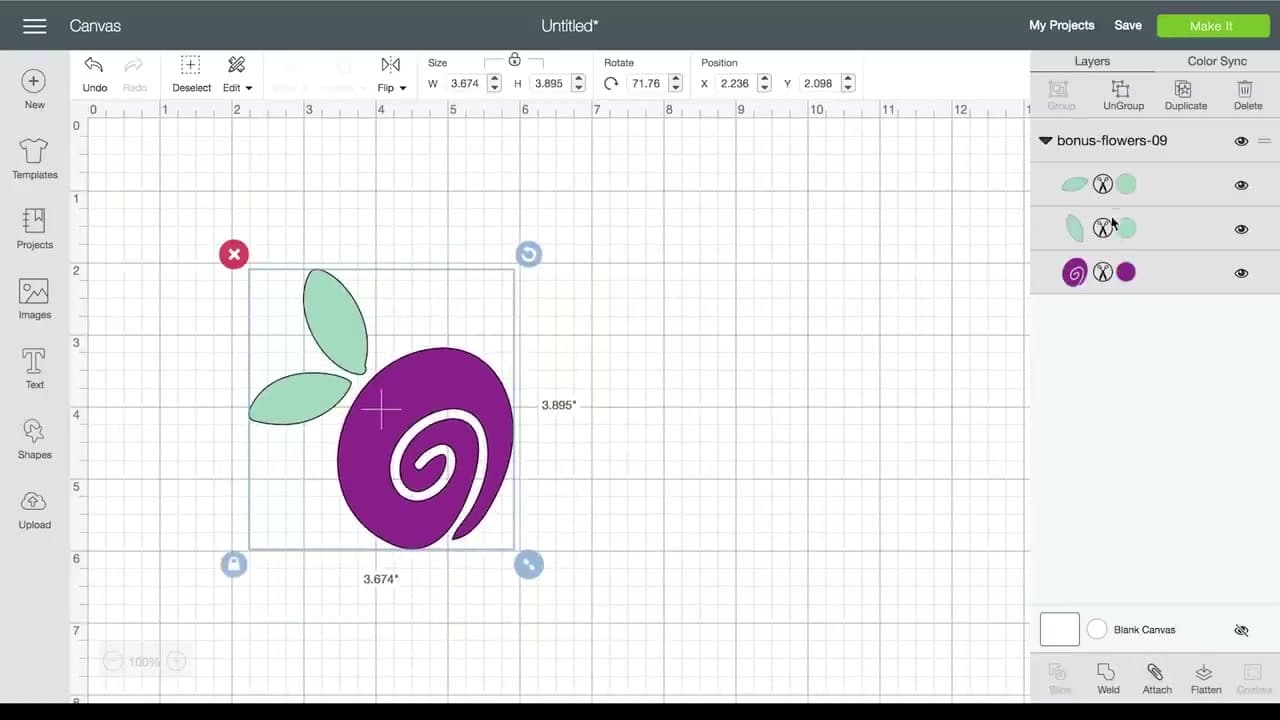
The design lands on your canvas with resize handles around it. Drag a corner to size it up or down, and use the rotate handle at the top right to spin it. Now look at the Layers panel on the right side of the screen. An SVG looks like one image on the canvas, but in the Layers panel you'll usually see it as three or four or even ten separate elements stacked on top of each other. Each color and each individual shape is its own layer. That matters because in the next step you'll have to deal with what happens when Design Space tries to cut a multi-layer design.

Tip

Click any layer in the Layers panel to highlight just that piece on the canvas. That's how you confirm what the layer actually is when the thumbnail in the panel is tiny.

Used in this step: Oracal 651 permanent adhesive vinyl, Cricut adhesive vinyl sampler pack

6

Step 6: Select Everything and Click Attach

6:03
Step 6: Select Everything and Click Attach - How to Cut SVG Files with Cricut (Upload + Cut Tutorial)

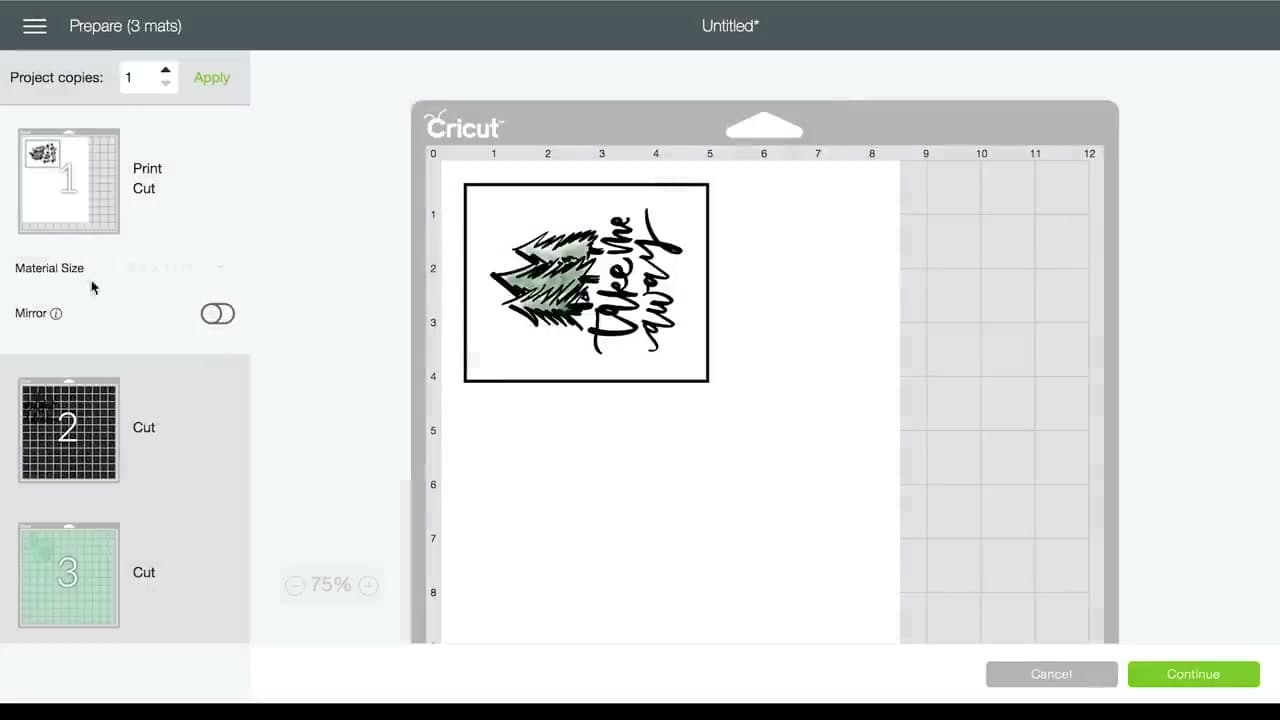
If you click Make It right now with a multi-layer SVG, Design Space will spread the pieces across multiple mats - one mat per color, with each piece shuffled to wherever it fits best. That destroys your layout. To fix it, drag a box around all the pieces on the canvas to select them, or hit Select All in the top toolbar. Then look at the bottom of the Layers panel and click Attach. The pieces lock together as a group. Now when you click Make It, everything stays in the exact arrangement you designed, on a single mat.

Tip

Attach is layout-only. If your pieces are different colors, Design Space still respects that and creates a separate mat per color - it just keeps each color's pieces in the right positions.

Used in this step: Cricut weeding tool kit, weeding tweezers for vinyl

7

Step 7: Use Attach, Not Weld - Keep Your Design Editable

6:37
Step 7: Use Attach, Not Weld - Keep Your Design Editable - How to Cut SVG Files with Cricut (Upload + Cut Tutorial)

Right next to Attach in the bottom panel is a button called Weld. Don't confuse them. Weld permanently fuses your pieces into a single shape - you can never go back and resize one leaf separately, or change the color of one petal. Attach holds the layout together but keeps every piece editable. If you later decide to recolor the rose, or scale up just the lettering, you can hit Detach, make the change, and re-Attach. Weld is for when you want overlapping letters to truly merge into one continuous cut path. For 95% of beginner uploads, Attach is the right call.

Tip

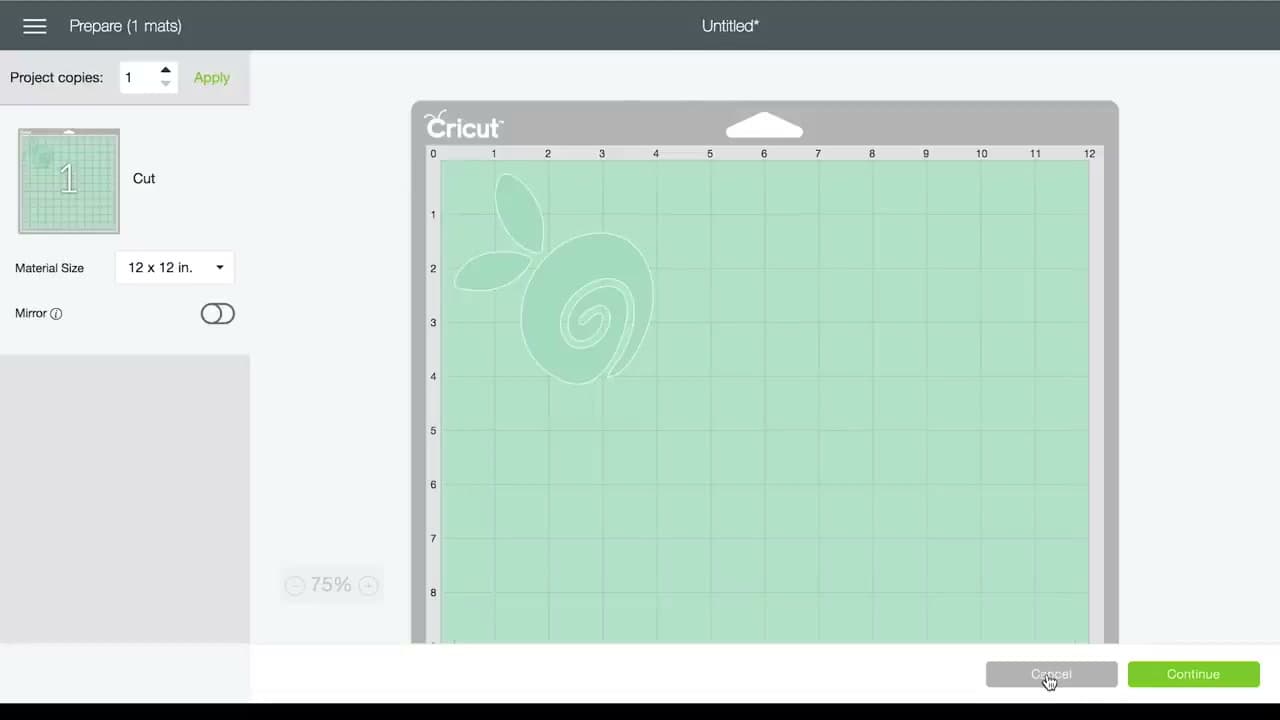
The Prepare screen will tell you instantly if Attach worked. It should say 'Prepare (1 mat)' for a single-color design. If it still says 'Prepare (3 mats)' or more, hit cancel, re-select everything, and click Attach again.

Used in this step: Cricut scraper and burnisher tool, transfer tape for vinyl

8

Step 8: Handle PNG Files - Choose Simple Image

7:01
Step 8: Handle PNG Files - Choose Simple Image - How to Cut SVG Files with Cricut (Upload + Cut Tutorial)

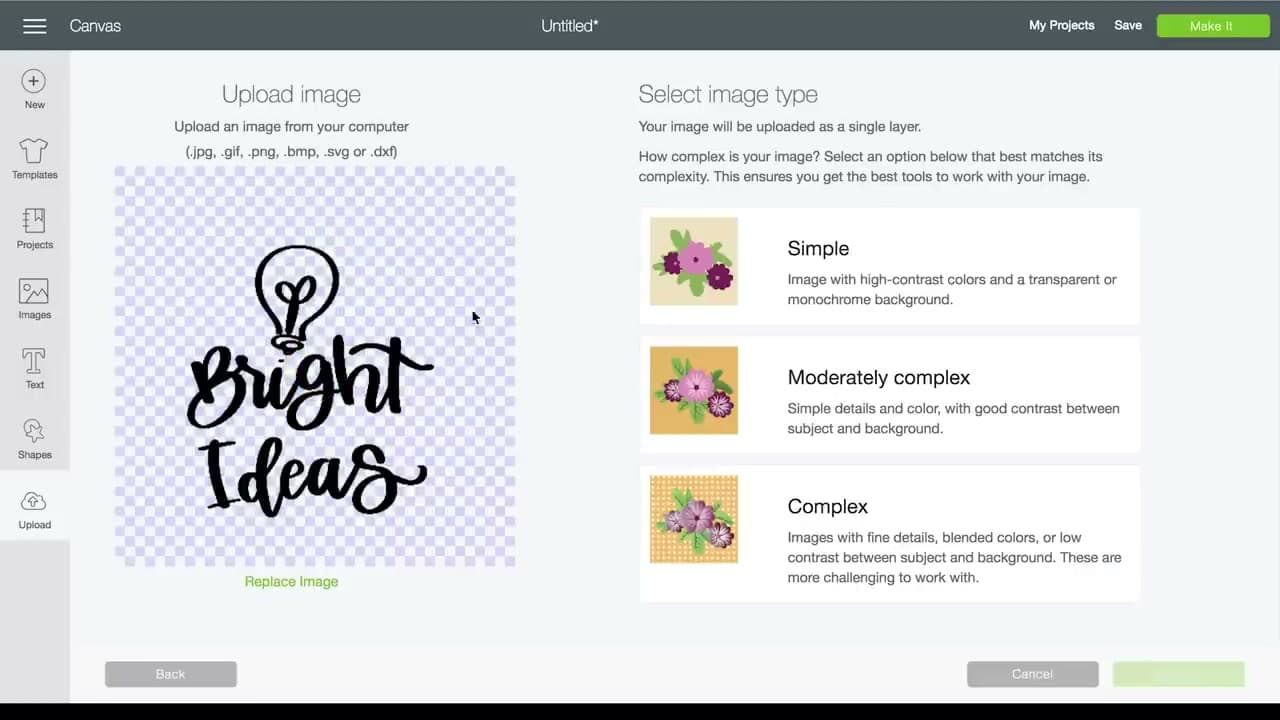
If your file is a PNG with a transparent background (lots of free hand-lettering downloads come this way), the upload flow is slightly different. You still click Upload Image, browse to the file, and open it. Design Space then asks if the image is Simple, Moderately Complex, or Complex. For a clean PNG with a transparent background, pick Simple Image. You'll see a Select and Erase screen next - skip it, because there's nothing to erase. Click Continue, then choose Save as a Cut Image (not Print Then Cut, unless you actually want it printed in color first). Insert it onto the canvas and it behaves as one single layer, ready to cut.

Tip

To check if a PNG truly has a transparent background, open it in your file browser. The checkerboard pattern behind the design means transparent. A solid white background means the background is white pixels, not transparent - treat it like a JPEG instead.

Used in this step: Cricut Premium Vinyl glossy permanent, Siser EasyWeed HTV iron-on vinyl

9

Step 9: Handle JPEG Files - Erase the Background with Magic Wand

8:58
Step 9: Handle JPEG Files - Erase the Background with Magic Wand - How to Cut SVG Files with Cricut (Upload + Cut Tutorial)

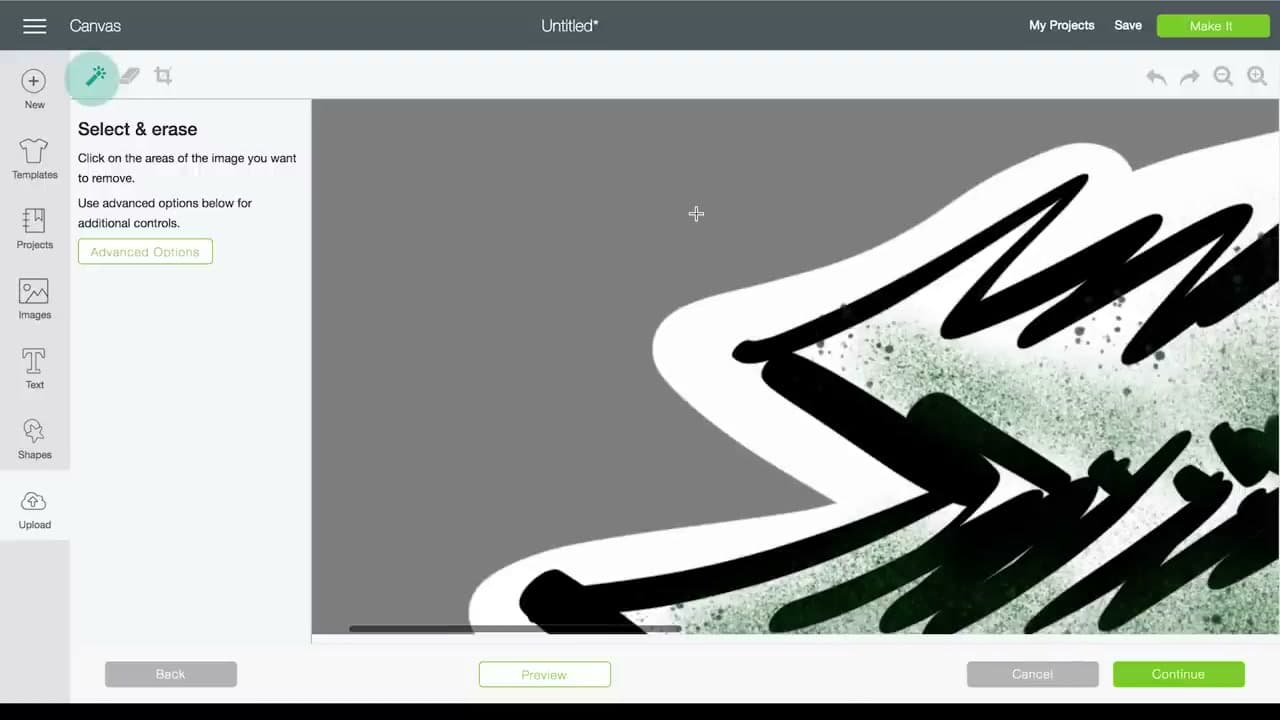
JPEGs always have a solid background, so this path takes more work. Click Upload Image, pick the file, and choose Moderately Complex or Complex. The Select and Erase screen opens with a Magic Wand tool already active. Click anywhere on the background and Design Space erases all the connected pixels of that color. If little bits remain around the edges, click them too. Hit Preview to see what will actually cut - the outline turns into a solid black silhouette. Toggle between Preview and Erase until the silhouette looks right. Save as a Cut Image and insert. If you want to print the design in color and then cut around it, save as Print Then Cut instead - that's how you get a printed sticker.

Tip

The Advanced Options panel on the left has a Color Tolerance slider. Lower numbers (like 2) erase less and keep the brushy edges of hand lettering. Higher numbers erase more and give you a cleaner solid shape.

Used in this step: Cricut Printable Sticker Paper, HP Sprocket portable printer for stickers

10

Step 10: Click Make It and Cut

9:35
Step 10: Click Make It and Cut - How to Cut SVG Files with Cricut (Upload + Cut Tutorial)

Hit the green Make It button in the top right. The Prepare screen shows you a preview of how the design will land on the mat. If you're cutting vinyl, leave Mirror off. If you're cutting iron-on HTV, toggle Mirror on for every mat - the design needs to flip so the adhesive side ends up facing the right way after pressing. Click Continue, then pick your material from the list (Vinyl, Iron-On, Cardstock, Cricut's recommended setting for the brand you're using). Place a sheet of vinyl on a 12x12 StandardGrip mat, smooth it down, and load the mat into the machine - press the arrow button so it pulls in. The Cricut button starts flashing. Press it and the blade goes to work. When it finishes, unload the mat, weed away the negative vinyl with your weeding tool, lay transfer tape over the design, and stick it on your project.

Tip

If the cut looks too shallow (vinyl tears when you weed) or too deep (the blade cuts through the carrier backing), check your Material setting first - 90% of cut problems are the wrong material preset, not the blade.

Used in this step: Cricut Maker 3, Cricut Explore Air 2, Cricut StandardGrip 12x12 cutting mat, Cricut transfer tape with grid

Keep going

How to Make a Mosaic Coaster (Beginner Tile Craft)

Products Used

The Checklist

How to Cut SVG Files with Cricut (Upload + Cut Tutorial)

Tools
6
Materials
4
Steps
10
Video
15 min

Tools we recommend

Your Guide

Colleen Pastoor

As an Amazon Associate we earn from qualifying purchases. Links on this page may be affiliate links - clicking them and buying doesn't change your price, but helps support CraftingStepByStep.

Tags

Sunday How-To

New crafts tutorials, every Sunday

One short email with the week's best step-by-step guides. Free, no spam, unsubscribe anytime.

Test your knowledge

Did the lesson stick? Start with this one.

5 questions covering what you just read. No signup, no score saved, and you can stop after this one.

Question 1 of 5

Which file type imports cleanest into Design Space with no cleanup needed?

Quick reference

Key takeaways from How to Cut SVG Files with Cricut (Upload + Cut Tutorial)

5 questions, answers, and one-line explanations. Tap to expand.

  1. 1.Which file type imports cleanest into Design Space with no cleanup needed?

    Answer: SVG, because it is a true scalable vector

    An SVG is a scalable vector and imports straight in without erasing backgrounds or losing sharpness.

  2. 2.On the Upload screen, which option should you almost always pick?

    Answer: Upload Image, the standard path for SVG and PNG files

    Upload Image is the standard path; Upload Pattern is only for repeating fill patterns.

  3. 3.What happens if you hit Make It on a multi-layer SVG without using Attach?

    Answer: Pieces spread across multiple mats and the layout breaks

    Without Attach, Design Space splits each color onto its own mat and shuffles the pieces.

  4. 4.Why use Attach rather than Weld to hold multi-layer pieces together?

    Answer: Attach keeps every piece individually editable

    Attach locks the layout but keeps each piece resizable and recolorable; Weld permanently fuses them.

  5. 5.When cutting iron-on HTV, what should the Mirror setting be?

    Answer: On for every mat so the adhesive side ends up correct after pressing

    HTV is cut from the back, so mirroring every mat puts the adhesive side facing the right way after pressing.

Did this work for you?

What's next

Related collections

Curated theme pages that include this tutorial.

Weekly Digest

Liked this crafts tutorial?

Pick the categories you want to hear about. Weekly digest of new step-by-step tutorials. No spam, easy unsubscribe.

Send me tutorials about

We only email about new tutorials. Easy unsubscribe anytime.