How to Make a Paper Dahlia (Easy Cardstock Flower)

Save it for later. We'll email you a link, no password.

Find it again on your phone or computer, with your finished steps ticked.

You tapped Save

Save this project for later

We'll email you a link, no password.

How to Make a Paper Dahlia (Easy Cardstock Flower)

  • Your saved projects in one list
  • Your ticked steps on any device

Check your inbox for an email from us. Not there? Look in your spam folder.

  • 9 steps
  • 14:36 video
  • Difficulty: Easy
  • About 2 hours
  • Materials about $3 to $10
  • Paper Crafts

Based on a video by Pearl's Crafts

Opens their YouTube channel

Steps written out by Crafting Step by Step · Published

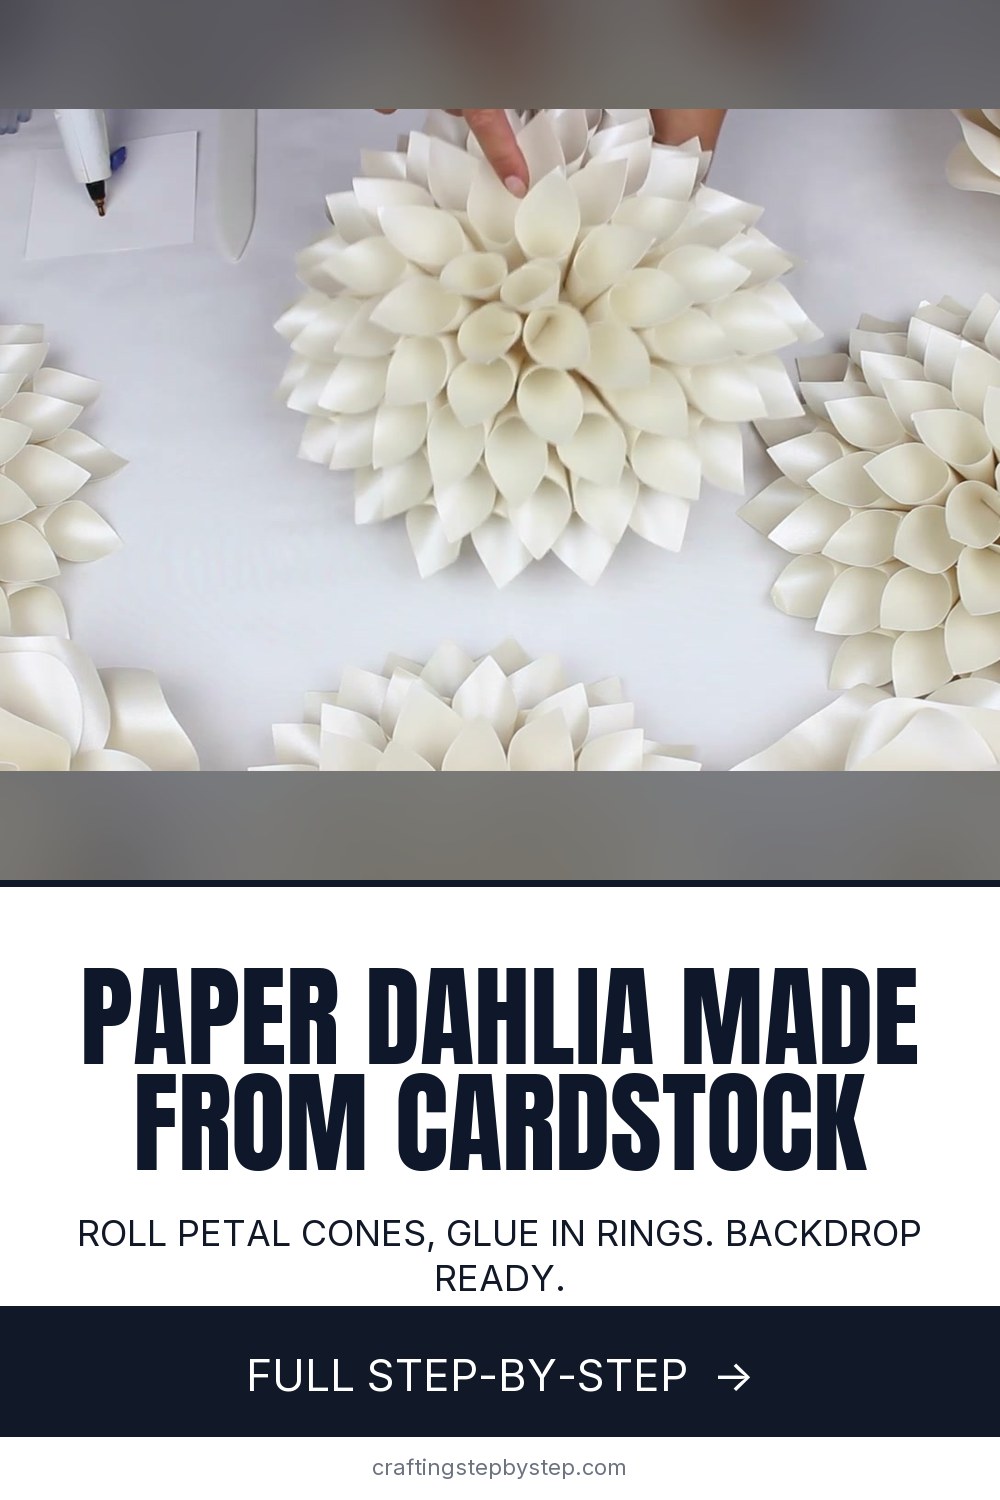
The finished result: How to Make a Paper Dahlia (Easy Cardstock Flower)

A paper dahlia looks complicated, but every petal is the same small cone. Roll a stack of them, glue them around a paper circle in rings, and the flower builds itself. In this tutorial Pearl of Pearl's Crafts shows how she makes the cream dahlias for her wedding flower backdrop. They look lovely on a wall, a mantel or a party table, and they cost very little to make.

How to make a paper dahlia: the short version

  • Cut a 7 inch base circle and about 64 to 72 petal squares, 3 x 3 inches.
  • Curl each square, glue two dots, and roll it into a cone.
  • Flatten the base of each cone and glue a ring of 16 around the edge of the circle.
  • Add rings inside the first, each one a little more upright, until the center closes.

Choosing your paper

Cardstock in the 65 to 80 lb range holds a crisp cone and does not droop on a wall. Pearl uses a shimmery champagne pearl cardstock, which catches the light along every petal edge. Plain matte cardstock works too and is cheaper. Thin paper is easier to roll, so you can skip the curling step, but the flower will be softer and less sturdy. One 12 x 12 sheet gives 16 petal squares.

Squares or kite-shaped petals?

Pearl cuts her petals in a kite shape from a 3 inch square on a cutting machine. Gluing the shorter sides together gives each petal a deeper V, so you see further into the flower. If you cut by hand, plain 3 inch squares work well and are much faster. Placed side by side, the two flowers look very similar.

Sizing your dahlia

The base circle sets the size. A 7 inch circle with 3 inch petals makes a flower roughly 10 to 12 inches across. For a small dahlia, use a 4 inch circle and 2 inch squares. For a giant backdrop flower, try a 12 inch circle and 5 or 6 inch squares. Keep the petals about a finger width apart on the first ring, whatever the size.

Save time by working in batches

Rolling the petals is the slow part. Pearl cuts a big stack, curls them all, then glues them all, and only assembles once she has enough for four flowers. It feels far quicker than making one flower start to finish, and the petals come out more even.

Hanging your dahlias

Hot glue a loop of ribbon or a sawtooth hanger to the back of the base circle. For a backdrop, attach flowers to foam board or a sheet of cardboard with glue dots so you can rearrange them.

Common mistakes

  • Gluing before laying out. Lay the whole first ring dry, check the spacing, then glue. Pulling petals off later tears the base.
  • Too much hot glue. A small dab under each flattened cone is enough.
  • Hot glue burns. Keep fingers clear of the nozzle. A cup of cold water nearby helps.
  • Petals that spring open. Two dots of glue, one at the tip and one at the inner corner, keep cones closed and neat.

More paper flowers

Mix dahlias with paper roses and giant paper flowers for a full backdrop, or start with our guide to easy paper flowers. For a rounder, folded look, try paper rosettes.

Free printable

Print the steps and supply list for this project

One page you can take to the table. Free with a free account, no password.

Get the free printable

What you'll need

Free, for this project

Get this checklist by email

  • All 7 tools and materials, with tick boxes
  • A link to print all 9 steps on paper, to keep by you while you craft

No password. The whole tutorial stays free on this page.

Quick answer

How to make a paper dahlia step by step: roll cardstock petal cones, glue them in rings around a base circle, and build a full flower for a backdrop. An easy project: about 2 hours. Materials cost about $3 to $10. You need 7 things, including cardstock, hot glue sticks and paper trimmer or scissors. The 9 steps start with cut the Paper Dahlia Petals and Base Circle and curl the Edges of Each Dahlia Petal With a Bone Folder.

Step-by-step guide

9 steps, about 15 minutes. Tap a picture to jump to that step. Your progress saves automatically.

Tick each step off as you go.

  1. Step 1: Cut the Paper Dahlia Petals and Base Circle

    Watch this step · 1:12

    Cut a 7 inch circle from plain paper or cardstock for the base. It sits underneath the flower, so any color is fine. Then cut 64 to 72 petal pieces from your cardstock. Pearl cuts kite shapes on a cutting machine, but 3 inch squares give almost the same flower and are quick with a paper trimmer. Cut a few extra.

    Tip:

    A paper trimmer gives straighter, faster squares than scissors.

    Back to all steps

  2. Step 2: Curl the Edges of Each Dahlia Petal With a Bone Folder

    Watch this step · 2:02

    Cardstock is stiff, so curl it before you roll. Hold a petal square and draw the bone folder along the two edges that will meet, the way you would curl ribbon with scissors. The paper relaxes into a gentle curve. That makes rolling easier and stops the cone from creasing or showing hard lines.

    Tip:

    Using thin paper? You can skip this step.

    Back to all steps

  3. Step 3: Add Two Dots of Glue to the Dahlia Petal

    Watch this step · 2:30

    Hold the petal with the two short sides pointing toward you and line up the point at the bottom. Put one small dot of glue near the tip and a second dot at the inner corner. The second dot keeps the inside corner from popping out once the flower is assembled, which keeps every petal looking neat.

    Tip:

    A liquid glue pen gives tidy dots and a few seconds to adjust.

    Back to all steps

  4. Step 4: Roll the Cardstock Into a Pointed Petal Cone

    Watch this step · 2:42

    Roll one side over the other, keeping a finger inside, and press the glued edges together. Hold for a few seconds until it grips. Check that the tip comes to a sharp point. The bottom half gets glued down later, so it does not need to be perfect. Repeat until you have a full stack of cones.

    Tip:

    Stack finished cones inside each other to keep them tidy while the glue sets.

    Back to all steps

  5. Step 5: Lay Out the First Ring of Petals Around the Base Circle

    Watch this step · 5:30

    Before gluing anything, arrange petal cones around the edge of the base circle, points facing out. Place them a little over halfway onto the circle and about a finger width apart. Pearl's flower takes 16 petals in this first ring. Move them until the spacing looks even all the way round.

    Tip:

    Laying out first saves you ripping off petals that ended up crooked.

    Back to all steps

  6. Step 6: Flatten and Glue the First Ring of Dahlia Petals

    Watch this step · 7:17

    Pick up one petal, pinch the bottom of the cone flat, and add a small line of hot glue to the flattened part. Press it onto the base circle where it sat in your layout. Work your way round the ring the same way, keeping that finger width gap between each petal for the next layer.

    Tip:

    Watch your fingers. Hot glue sticks to skin and burns fast.

    Back to all steps

  7. Step 7: Glue the Second Layer of Petals Between the First

    Watch this step · 10:45

    Lay out the second ring inside the first, setting each new petal in the gap between two petals below. Flatten the base of each cone and glue it down. Tilt this layer up a little more than the first so the flower starts to rise. The staggered placement is what gives a dahlia its tight, layered look.

    Tip:

    Flatten several cones at once while you lay out the ring.

    Back to all steps

  8. Step 8: Build the Inner Layers of the Paper Dahlia

    Watch this step · 12:15

    Keep adding rings, each one smaller and set further toward the middle. Stand the petals more upright with every layer so they point up and out. Fill gaps as you go. It is fine if the spacing is not perfect. You can see some uneven gaps on Pearl's flower and it still looks full once it is done.

    Tip:

    Step back now and then to check the flower looks round from above.

    Back to all steps

  9. Step 9: Tuck the Last Petals Into the Center of the Dahlia

    Watch this step · 13:04

    Close the middle with a few final petals standing almost straight up. Tuck them between the inner ring and glue at the base so no paper circle shows. Fluff and nudge any petals that lean the wrong way. Your paper dahlia is done. Make a few in different sizes and group them for a backdrop.

    Tip:

    Slightly smaller cones fit the center more neatly.

    Back to all steps

How to Make a Paper Pumpkin

Keep going

How to Make a Paper Pumpkin

You reached the last step

Save this project to come back to it

Your ticked steps, the free printable and your other saved makes, together in My Projects. Free, no password.

You tapped Save

Save this project for later

We'll email you a link, no password.

How to Make a Paper Dahlia (Easy Cardstock Flower)

  • Your saved projects in one list
  • Your ticked steps on any device

Check your inbox for an email from us. Not there? Look in your spam folder.

Free printable

Printable sheet for this project

The bonus is hidden until you sign up.

Free with a free account, no password. Every step above stays open to everyone.

Products Used

The Checklist

How to Make a Paper Dahlia (Easy Cardstock Flower)

Tools
4
Materials
3
Steps
9
Video
15 min

Tools we recommend

As an Amazon Associate we earn from qualifying purchases. Links on this page may be affiliate links - clicking them and buying doesn't change your price, but helps support Crafting Step by Step.

Tags

The Crafter's Weekly

New paper crafts tutorials, every Sunday

One short email with the week's best step-by-step guides. Free, no spam, unsubscribe anytime.

Did this work for you?

What's next

Related collections

Curated theme pages that include this tutorial.

Similar tutorials

Hand-picked next reads based on the one you just finished.

Liked this paper crafts tutorial?

Pick the crafts you want to hear about. One email every Sunday with new step-by-step tutorials. No spam, easy to unsubscribe.

Get more like this in your inbox

Weekly digest. Pick the categories you want. Unsubscribe anytime.

Send me tutorials about

We only email about new tutorials. Easy unsubscribe anytime.