How to Paint a Poinsettia

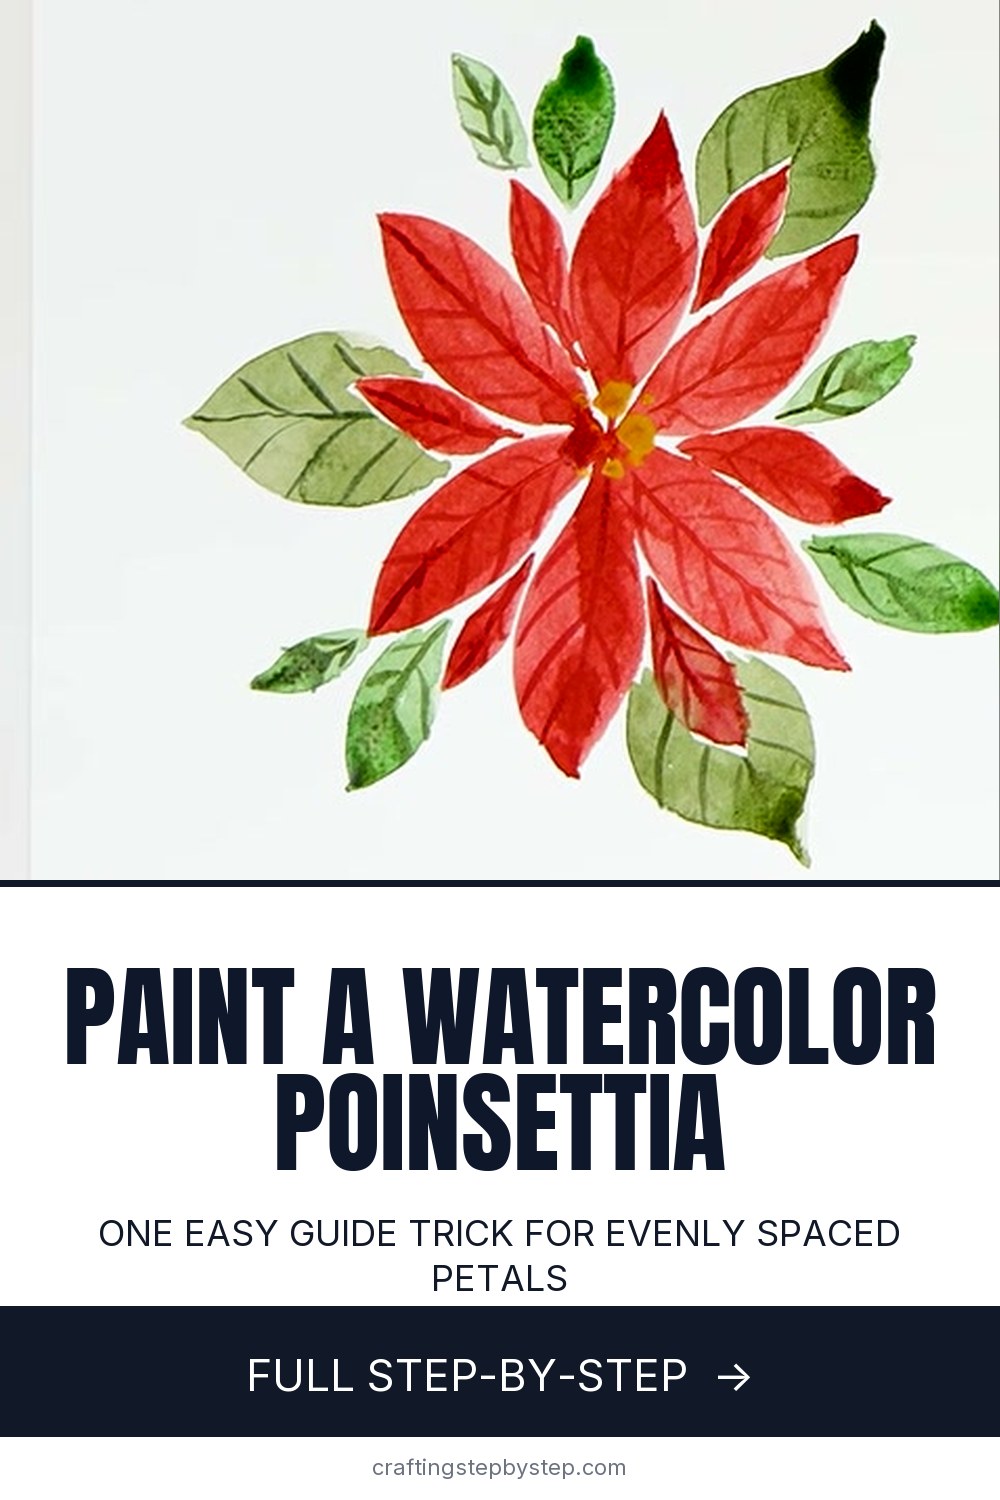
The finished result: How to Paint a Poinsettia
  • Difficulty: Easy
  • About 25 minutes, plus 15 minutes to dry or set
  • 8 steps

You tapped Save

Save this project for later

We'll email you a link, no password.

How to Paint a Poinsettia

  • Your saved projects in one list
  • Your ticked steps on any device

Check your inbox for an email from us. Not there? Look in your spam folder.

Print

Steps written out by Crafting Step by Step from Erin (Snowberry Design Co)'s video (opens YouTube) (6:41). Published .

Also in:Crafts

A poinsettia is the perfect flower for holiday cards, and in watercolor it is easier than it looks. Erin of Snowberry Design Co uses one simple trick: paint a small X with a line through it first, and use those six marks as guides so the petals come out evenly spaced. After that it is two layers of red petals, a few leaves, a touch of gold and some fine detail lines.

How to paint a poinsettia: the short version

  • Paint a small red X with a straight line through the middle.
  • Paint a long petal over each guide line.
  • Add a second, shorter layer of petals in the gaps.
  • Tuck green leaves behind the petals, then a few small filler leaves.
  • Dot gold in the center and add dark red and dark green vein lines.

Why the guide works

Poinsettia bracts radiate from the center like a star. Getting them evenly spaced freehand is the hard part. Six guide lines split the circle for you, so every first-layer petal lands in the right place. The second layer then fills the gaps. You paint right over the guides, so they disappear into the petals.

Paint and paper

Erin uses a size 16 round brush and Daniel Smith scarlet red, with a size 0 round for details. Any warm, bright red works. Pick a sap or olive green for the leaves, and a gold metallic watercolor or gold gel pen for the center. Use 100 percent cotton cold press paper if you can. It lets the paint flow without blotchy edges.

Keeping petals and leaves apart

Paint each leaf right up close to a petal without touching it. If wet green meets wet red, the colors bleed into a muddy brown. If that happens, rinse your brush, dry it on a paper towel, and touch it to the bleed to lift the extra paint out.

Size and time

One poinsettia about four inches across fits a standard 5 by 7 inch card with room for a greeting. Painting takes around twenty minutes, plus a few minutes of drying between the petals, the leaves and the detail lines. A hair dryer on low speeds that up if you are making a stack of cards.

Common problems

  • Petals look flat. Let some areas stay lighter where the paint thins. Variation reads as light hitting the petal.
  • Uneven star. Check your guide is centered before you start petals.
  • Muddy leaves. Wait for the petals to dry before adding leaves beside them.
  • Vein lines too heavy. Use the tip of a small brush and a lighter touch.

Ideas for your poinsettias

Paint a row of them on folded cardstock for Christmas cards, add one to gift tags, or group three for a framed winter print. A sprig of holly or a few red berries around the edge finishes a card nicely.

More flowers and holiday painting

New to the medium? Start with how to paint with watercolors. Then try painting a flower or painting roses. Turn your poinsettia into a watercolor Christmas card, or sketch some holly to sit beside it.

Free printable

Print the steps and supply list for this project

One page you can take to the table. Free with a free account, no password.

Get the free printable

What you'll need

Free, for this project

Get this checklist by email

  • All 9 tools and materials, with tick boxes
  • A link to print all 8 steps on paper, to keep by you while you craft

No password. The whole tutorial stays free on this page.

Quick answer

Paint a watercolor poinsettia with one guide trick for evenly spaced petals. An easy project: about 25 minutes, plus 15 minutes to dry or set. Materials cost about $1 to $3. You need 9 things, including cold press watercolor paper, scarlet red watercolor and green watercolor. The 8 steps start with paint an X Guide for the Watercolor Poinsettia, paint the First Poinsettia Petals Over the Guide Lines, add a Second Layer of Poinsettia Petals and paint Green Leaves Behind the Poinsettia.

Step-by-step guide

8 steps, about 7 minutes. Tap a picture to jump to that step. Your progress saves automatically.

Tick each step off as you go.

  1. Step 1: Paint an X Guide for the Watercolor Poinsettia

    Watch this step · 0:31

    Load a size 16 round brush with red and paint a small X where you want the center of your poinsettia. Then paint a straight line through the middle of the X. Those six short marks are your guide lines. They split the circle evenly, so the first petals will be spaced out the right way without any measuring.

    Tip:

    Keep the guide small. The petals will grow well past it.

    Back to all steps

  2. Step 2: Paint the First Poinsettia Petals Over the Guide Lines

    Watch this step · 0:44

    Paint one long, pointed petal over each guide line, starting at the center and pulling out. Press the brush down to widen the middle of the petal, then lift as you reach the tip so it comes to a point. Paint right over the guide so it disappears. Six petals give you the first layer of the star.

    Tip:

    Let some patches stay lighter. It makes the petals look natural.

    Back to all steps

  3. Step 3: Add a Second Layer of Poinsettia Petals

    Watch this step · 1:20

    Paint a second set of petals in the gaps between the first ones. Make these a little shorter so the flower looks layered. Leave a hair of white paper where petals meet so they stay separate. Now the poinsettia has twelve points and starts to look full, layered and realistic.

    Tip:

    Work around the flower so the petals stay evenly spaced.

    Back to all steps

  4. Step 4: Paint Green Leaves Behind the Poinsettia

    Watch this step · 1:52

    Switch to green and paint a leaf peeking out over one of the smaller petals. Get really close to the red without touching it. If the green does touch wet red, rinse and dry your brush and lift the bleed out with the clean, dry tip. Add three larger leaves spaced evenly around the flower.

    Tip:

    Waiting for the petals to dry first makes this much easier.

    Back to all steps

  5. Step 5: Fill White Space With Small Poinsettia Leaves

    Watch this step · 3:24

    Add a few small leaves in the gaps around the poinsettia. They fill out the white space and make the bloom look lush. Vary their size and angle so they look natural rather than stamped. A slightly lighter or darker green adds depth next to the larger leaves, and a couple of tiny ones near the tips balance the shape.

    Tip:

    Odd numbers of filler leaves usually look best.

    Back to all steps

  6. Step 6: Dot Gold Into the Poinsettia Center

    Watch this step · 4:10

    Once the petals are dry, dot gold paint into the center of the flower. Real poinsettias have small yellow buds in the middle, and a cluster of gold dots gives that look with a bit of holiday sparkle. A gold metallic watercolor or a gold gel pen both work. Use the tip of a small brush for neat dots.

    Tip:

    Keep the gold to a small cluster. It is an accent, not a fill.

    Back to all steps

  7. Step 7: Add Dark Red Vein Details to the Poinsettia Petals

    Watch this step · 5:10

    Mix a darker red and switch to a size 0 round brush. Paint a fine line down the middle of each petal, then a few small lines branching out from it. These veins give the petals shape and make the flower look more realistic. Keep your hand light so the lines stay thin.

    Tip:

    Not every petal needs every vein. A few is enough.

    Back to all steps

How to Paint Snow in Watercolor: Snowy Evergreen Branches

Keep going

How to Paint Snow in Watercolor: Snowy Evergreen Branches

Keep going with painting

More on this topic, picked for this poinsettia.

You reached the last step

Save this project to come back to it

Your ticked steps, the free printable and your other saved makes, together in My Projects. Free, no password.

You tapped Save

Save this project for later

We'll email you a link, no password.

How to Paint a Poinsettia

  • Your saved projects in one list
  • Your ticked steps on any device

Check your inbox for an email from us. Not there? Look in your spam folder.

Free printable

Printable sheet and shopping list for this project

The bonus is hidden until you sign up.

Free with a free account, no password. Every step above stays open to everyone.

Products Used

The Checklist

How to Paint a Poinsettia

Tools
5
Materials
4
Steps
8
Video
7 min

Tools we recommend

As an Amazon Associate we earn from qualifying purchases. Links on this page may be affiliate links - clicking them and buying doesn't change your price, but helps support Crafting Step by Step.

Tags

The Crafter's Weekly

New painting tutorials, every Sunday

One short email with the week's best step-by-step guides. Free, no spam, unsubscribe anytime.

Did this work for you?

What's next

Related collections

Curated theme pages that include this tutorial.

Similar tutorials

Hand-picked next reads based on the one you just finished.

Liked this painting tutorial?

Pick the crafts you want to hear about. One email every Sunday with new step-by-step tutorials. No spam, easy to unsubscribe.

Get more like this in your inbox

Weekly digest. Pick the categories you want. Unsubscribe anytime.

Send me tutorials about

We only email about new tutorials. Easy unsubscribe anytime.