How to Embroider a Snowflake (Felt Ornament for Beginners)

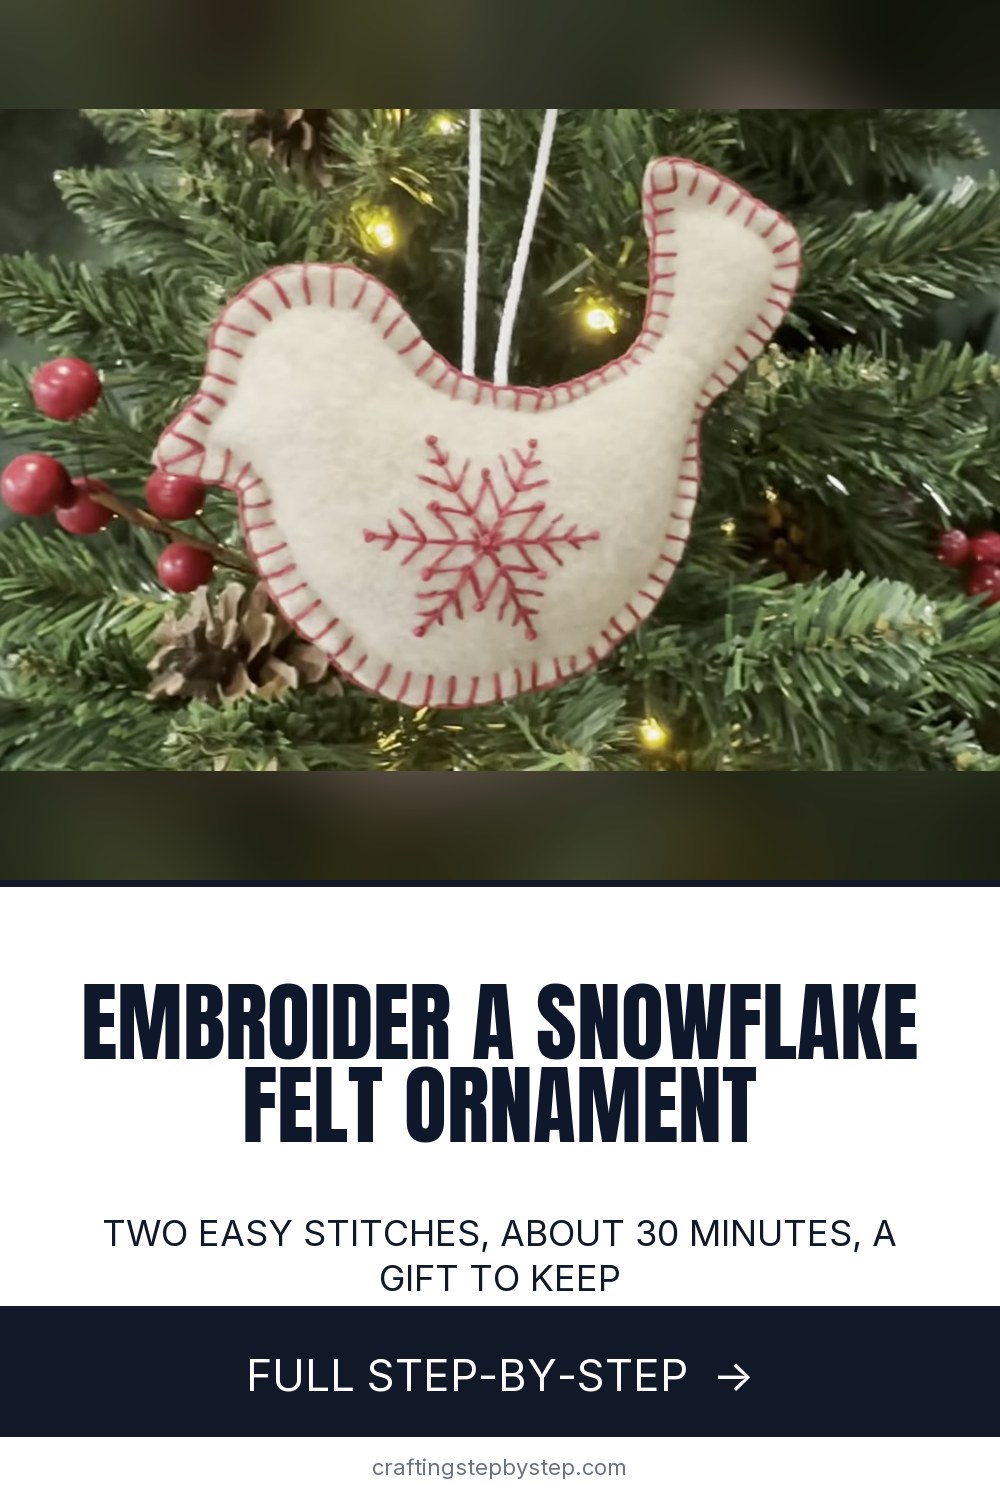
The finished result: How to Embroider a Snowflake (Felt Ornament for Beginners)
  • Difficulty: Easy
  • About 1 hour 15 minutes, plus 1 hour to dry or set
  • 10 steps

You tapped Save

Save this project for later

We'll email you a link, no password.

How to Embroider a Snowflake (Felt Ornament for Beginners)

  • Your saved projects in one list
  • Your ticked steps on any device

Check your inbox for an email from us. Not there? Look in your spam folder.

Print

Steps written out by Crafting Step by Step from Valeri Lewman's video (opens YouTube) (15:52). Published .

A snowflake is one of the easiest things to embroider, because it is mostly straight lines. Valeri Lewman shows how to stitch a red snowflake onto felt with a printed stick and stitch pattern, then turn it into a soft stuffed bird ornament. The snowflake itself takes about 30 minutes. You only need two stitches, plus a knot if you want one, and every part works for a first embroidery project.

How to embroider a snowflake: the short version

  • Stick a printed snowflake pattern onto felt and put it in a small hoop.
  • Back stitch along every line of the snowflake in red floss.
  • Add a knot at the tips and center if you like.
  • Rinse the pattern paper away in warm water and let it dry.
  • Sew it to a felt backing with blanket stitch, add a hanger and stuff it.

Why stick and stitch works so well

Felt is fuzzy and dark lines do not show well on it, so tracing a fine snowflake is hard. Stick and stitch is a printed sticker that you stitch straight through. Afterward, warm water dissolves it and only your thread is left. You can print your own patterns on the printable sheets or buy packs of ready made snowflake designs. It also works on sweatshirts, tea towels and denim.

Thread, needle and felt

Valeri uses four strands of DMC cotton floss for the snowflake and two strands doubled (four again) for the edge. Four strands give bold lines that show on textured felt. A size 24 chenille needle has a sharp point and a big eye, so it pierces felt and threads easily. Wool blend felt is thicker and softer than craft acrylic felt and holds stitches better, but either will do. Classic red on oatmeal looks Scandinavian; white on navy or gray reads like real snow.

Back stitch and the knots, in plain words

Back stitch: come up a stitch length ahead, go down where the last stitch ended, and repeat. On a snowflake, most straight sections can be one stitch the length of that section. French knot: come up, wrap the needle twice, go down right beside the hole while you hold the thread taut. Colonial knot: come up, make a backward C with the thread, go under it, wrap and go down beside the hole. Pick whichever knot feels easier. If you dislike knots, leave them out.

Ideas beyond the ornament

  • Stitch a row of snowflakes along a tea towel or napkin.
  • Make a set of round ornaments in different snowflake designs as gifts.
  • Stitch one on a hat or mitten cuff.
  • Frame a single snowflake in its hoop as winter wall decor.

Common problems

  • Paper left in the stitches. Soak longer and rub gently.
  • The thread tangles. Work with shorter lengths.
  • Uneven blanket stitches. Mark two lines on your thumb as a spacing guide.

New to the stitches? See how to backstitch, how to do a French knot and how to do a blanket stitch. For more holiday stitching, embroider a Christmas tree or make a felt owl ornament.

Free printable

Print the steps and supply list for this project

One page you can take to the table. Free with a free account, no password.

Get the free printable

What you'll need

Free, for this project

Get this checklist by email

  • All 10 tools and materials, with tick boxes
  • A link to print all 10 steps on paper, to keep by you while you craft

No password. The whole tutorial stays free on this page.

Quick answer

Stitch a red snowflake on felt with a stick and stitch pattern and back stitch, then turn it into a stuffed Christmas ornament. An easy project: about 1 hour 15 minutes, plus 1 hour to dry or set. Materials cost about $3 to $8. You need 10 things, including felt sheets, stick and stitch snowflake pattern and red embroidery floss. The 10 steps start with trace the Ornament Template Onto Felt and stick the Snowflake Embroidery Pattern on the Felt.

Step-by-step guide

10 steps, about 16 minutes. Tap a picture to jump to that step. Your progress saves automatically.

Tick each step off as you go.

  1. Step 1: Trace the Ornament Template Onto Felt

    Watch this step · 0:58

    Print a simple ornament template and cut out the shape you want. Valeri picks a bird, but a circle, heart or mitten works too. Lay the template on your felt and trace around it with a heat erasable pen. Leave plenty of felt around the outline, because you will cut it out after the snowflake is stitched, not before.

    Tip:

    Heat erasable pen lines vanish with an iron or a hair dryer.

    Back to all steps

  2. Step 2: Stick the Snowflake Embroidery Pattern on the Felt

    Watch this step · 1:22

    Choose a snowflake from your stick and stitch sheet and cut around it. Peel off the backing and press the sticky pattern onto the felt, centered inside your traced outline. Smooth it flat with your fingers so there are no bubbles. This sticker is your stitching guide, and it washes away once you are done.

    Tip:

    Check the snowflake is straight before you press it down. It is hard to reposition.

    Back to all steps

  3. Step 3: Put the Felt Snowflake Pattern in an Embroidery Hoop

    Watch this step · 1:30

    Open a small embroidery hoop, about 3 inches, and lay the felt over the inner ring with the snowflake centered. Press the outer ring on and tighten the screw. Thick felt can be stitched without a hoop, but a hoop keeps the felt flat and your stitches even. It also gives you something steady to hold.

    Tip:

    Do not pull the felt drum tight. Felt stretches and will distort the snowflake.

    Back to all steps

  4. Step 4: Practice the Colonial Knot for the Snowflake Tips

    Watch this step · 2:30

    Thread four strands of red floss. Come up where you want a knot. Make a backward C with the thread, bring the needle up through the C, wrap it and go down right next to the hole. Hold the working thread taut as you pull through. A French knot works the same way: wrap twice and go down beside the hole.

    Tip:

    Not a fan of knots? Skip them. Back stitch alone still looks great.

    Back to all steps

  5. Step 5: Back Stitch the Snowflake Arms in Red Floss

    Watch this step · 5:40

    Work along each arm of the snowflake with back stitch. Come up a stitch length ahead, go back down into the end of the last stitch, and repeat. Short sections can be a single straight stitch. Stop each arm a little short of the center to leave room for a decorative knot there. Add knots at the tips if your pattern has them.

    Tip:

    Finish one arm before starting the next so the thread on the back stays tidy.

    Back to all steps

  6. Step 6: Cut Out the Felt and Dissolve the Snowflake Pattern Paper

    Watch this step · 6:28

    Take the felt out of the hoop and cut out your ornament shape on the traced line. Then soak it in warm water, or hold it under the tap. The stick and stitch paper melts away and leaves only your red stitches. Rub gently to lift any last bits. Lay it flat to air dry, or set it near a heater vent.

    Tip:

    Press out the water with a towel instead of wringing the felt.

    Back to all steps

  7. Step 7: Cut a Plain Felt Backing for the Snowflake Ornament

    Watch this step · 6:58

    While the front dries, trace the same template onto a second piece of felt and cut it out. This plain shape is the back of your ornament. Line the two pieces up to check they match. Trim any edge that sticks out so the two layers sit even all the way around.

    Tip:

    Flip the template over for the back so any lopsided edges still line up.

    Back to all steps

  8. Step 8: Blanket Stitch the Two Felt Ornament Layers Together

    Watch this step · 9:25

    Separate two strands of floss, fold them in half and thread the folded end so you have a loop at the tail. Start at the bottom. Go through both layers from the back, catch the loop and pull to lock it. Then go through both layers a stitch length along, wrap the thread under the needle and pull snug. Repeat around the edge.

    Tip:

    Draw two small lines on your thumb with the erasable pen as a spacing guide.

    Back to all steps

  9. Step 9: Stitch a Cord Hanger Into the Felt Ornament Edge

    Watch this step · 13:40

    Cut about 13 inches of cotton cord and knot the ends together. Slip the knot between the two felt layers at the top. Make a blanket stitch right up against one side of the cord, then one stitch between the strands, and one on the other side. Go around the cord, not through it, so it stays firm.

    Tip:

    Start a fresh thread a few stitches before the hanger so you do not run short.

    Back to all steps

  10. Step 10: Stuff the Felt Snowflake Ornament and Finish the Edge

    Watch this step · 15:15

    Stop stitching with a gap of an inch or two. Push small bits of fiber fill into the ornament, starting with the narrow parts like the tail. A chopstick helps. Stuff it softly so it stays flat enough to hang. Then finish the blanket stitch, knot it on the back and tuck the tail between the layers.

    Tip:

    Small tufts of stuffing give a smoother shape than one big wad.

    Back to all steps

How to Punch Needle for Beginners

Keep going

How to Punch Needle for Beginners

Keep going with embroidery

More on this topic, picked for this snowflake.

You reached the last step

Save this project to come back to it

Your ticked steps, the free printable and your other saved makes, together in My Projects. Free, no password.

You tapped Save

Save this project for later

We'll email you a link, no password.

How to Embroider a Snowflake (Felt Ornament for Beginners)

  • Your saved projects in one list
  • Your ticked steps on any device

Check your inbox for an email from us. Not there? Look in your spam folder.

Free printable

Printable sheet and shopping list for this project

The bonus is hidden until you sign up.

Free with a free account, no password. Every step above stays open to everyone.

Products Used

The Checklist

How to Embroider a Snowflake (Felt Ornament for Beginners)

Tools
5
Materials
5
Steps
10
Video
16 min

Tools we recommend

As an Amazon Associate we earn from qualifying purchases. Links on this page may be affiliate links - clicking them and buying doesn't change your price, but helps support Crafting Step by Step.

Tags

The Crafter's Weekly

New embroidery tutorials, every Sunday

One short email with the week's best step-by-step guides. Free, no spam, unsubscribe anytime.

Did this work for you?

What's next

Related collections

Curated theme pages that include this tutorial.

Similar tutorials

Hand-picked next reads based on the one you just finished.

Liked this embroidery tutorial?

Pick the crafts you want to hear about. One email every Sunday with new step-by-step tutorials. No spam, easy to unsubscribe.

Get more like this in your inbox

Weekly digest. Pick the categories you want. Unsubscribe anytime.

Send me tutorials about

We only email about new tutorials. Easy unsubscribe anytime.