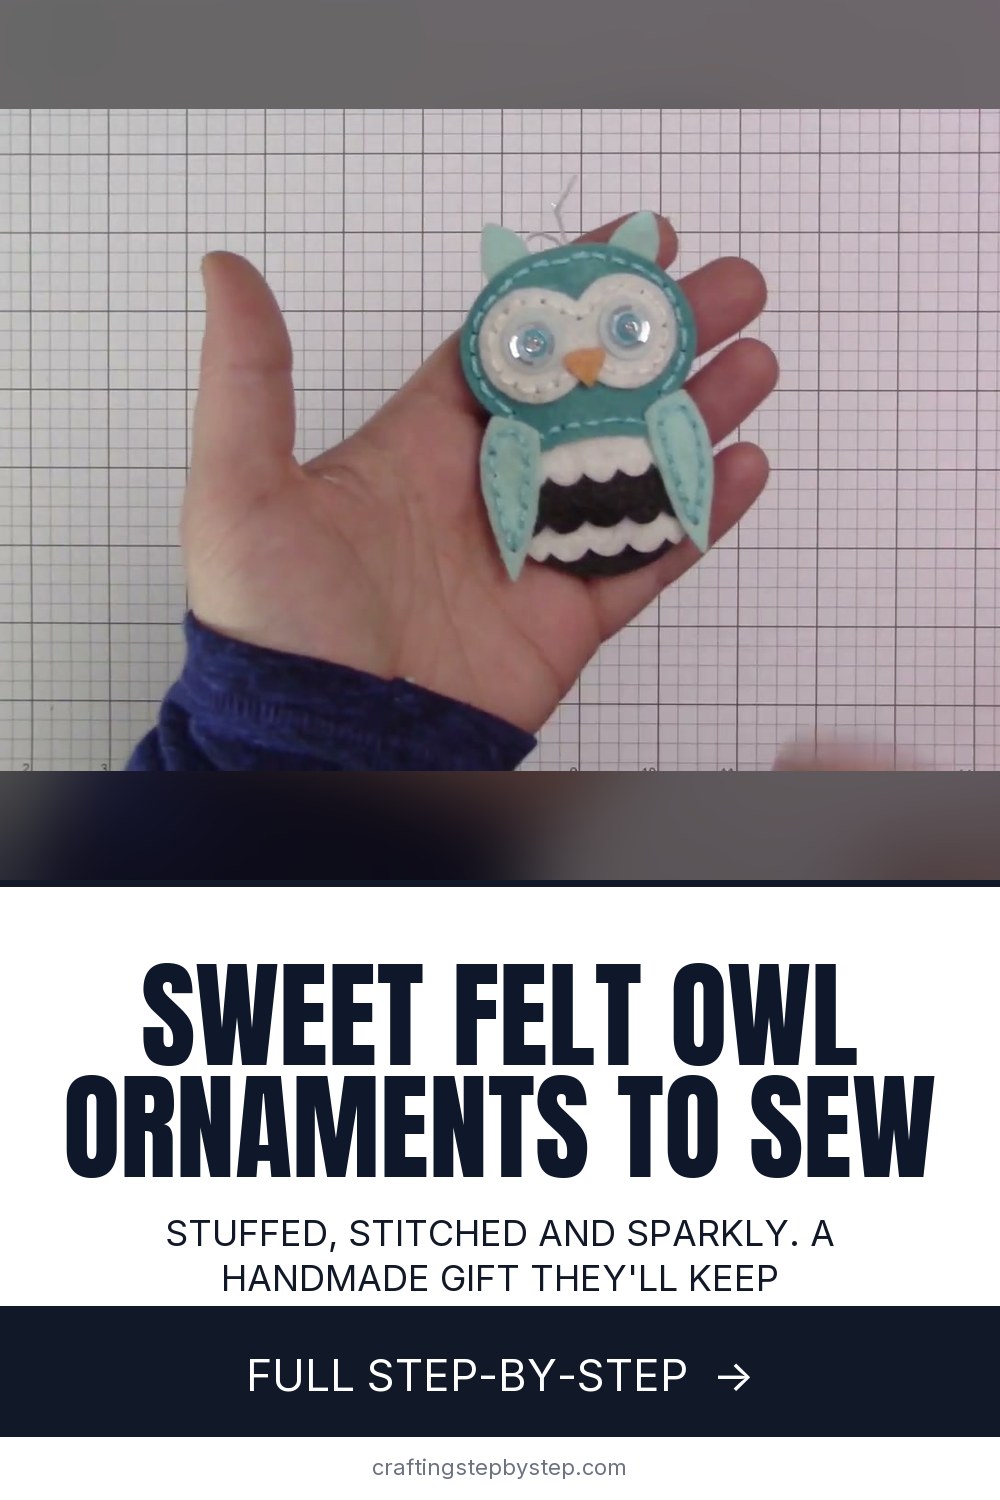
How to Make a Felt Owl Ornament With Sequin Eyes

The finished result: How to Make a Felt Owl Ornament With Sequin Eyes
  • Difficulty: Easy
  • About 1 hour, plus 1 hour to dry or set
  • 10 steps

You tapped Save

Save this project for later

We'll email you a link, no password.

How to Make a Felt Owl Ornament With Sequin Eyes

  • Your saved projects in one list
  • Your ticked steps on any device

Check your inbox for an email from us. Not there? Look in your spam folder.

Print

Steps written out by Crafting Step by Step from Stephanie Klauck's video (opens YouTube) (12:47). Published .

Also in:Sewing

A felt owl ornament is a small, squishy keepsake that looks great on a tree and even better as a gift. This one comes from Stephanie Klauck on YouTube. She made a set of twelve in soft aqua and grey for her sister, who loves owls as much as she does. Each owl has a stuffed body, scalloped feather layers, felt wings and layered sequin eyes that catch the light.

How to make a felt owl ornament: the short version

  • Cut every owl piece from felt, two bodies and two wings.
  • Backstitch the two bodies together, stuff them and tie off.
  • Stitch around the face, eye piece and wings.
  • Glue on the feather layers, hanging loop, ears, face, eyes, wings and beak.
  • Finish the eyes with stacked sequins and a dot of glitter glue.

Die or no die?

Stephanie uses the Memory Box Plush Wise Owl die. It cuts every piece and punches the stitch holes in one pass, which makes sewing fast and tidy. It also makes this a good project to share with a grandchild, since a blunt needle finds the holes on its own. No die cutting machine? Draw an owl on paper, about 3 inches tall, and use it as a template. Cut the felt with sharp scissors and sew a small running stitch or blanket stitch around the edge instead.

Picking the felt

Wool blend felt cuts cleaner and holds its shape better than thin craft felt. It also pills less when the ornament gets handled every December. Pick three or four colors that go together: a dark body, a white or cream for the feathers and eyes, and one or two shades of a bright accent. Stephanie made half the set in a lighter aqua so no two owls look quite alike.

How much stuffing?

Less than you think. The owl should feel plump, not hard. Overstuffing pulls the stitches and makes the glued layers bow away from the body. Pull the fiberfill into thin wisps before you push it in. Clumps show through felt as lumps.

Glue tips

  • Thick tacky glue grips felt without soaking through. Thin white school glue does not.
  • Decant it into a small fine-tip bottle. The big bottle is hard to control.
  • Press every edge down after you place a piece. You have a few minutes to slide it.
  • Let the owl dry fully before the sequins go on.

Common problems

  • Stuffing pokes out the gap. Pinch the opening shut with your thumb while you sew the last few holes.
  • The knot shows. Bring the needle up between the two body layers for the last stitch, then tie off inside the seam.
  • Scallops do not line up. Flip the owl upside down to place them. It is easier to see both edges.
  • Sequins slide. Use a matte gel medium and tweezers, not tacky glue.

Gifting and display

Stephanie packed her dozen owls into a gridded box lined with white tissue, one owl per square. It stores them for next year too. Skip the scarf if you want the owls to work all year on a garland, a wreath or a gift tag. Add a little felt scarf if they are only for the tree.

More handmade ornaments

Brush up on the seam with how to backstitch. Make a matching batch of felt acorns, browse more Christmas ornament ideas, or try a yarn version with how to crochet an owl. Like soft little animals? See how to needle felt a small animal.

Free printable

Print the steps and supply list for this project

One page you can take to the table. Free with a free account, no password.

Get the free printable

What you'll need

Free, for this project

Get this checklist by email

  • All 16 tools and materials, with tick boxes
  • A link to print all 10 steps on paper, to keep by you while you craft

No password. The whole tutorial stays free on this page.

Quick answer

Make a stuffed felt owl ornament step by step: backstitch the body, glue on scalloped feathers and wings, and add sparkly sequin eyes. An easy project: about 1 hour, plus 1 hour to dry or set. Materials cost about $2 to $5. You need 16 things, including black embroidery floss, polyester fiberfill and tacky glue. The 10 steps start with cut Out the Felt Owl Ornament Pieces and backstitch the Two Felt Owl Body Pieces Together.

Step-by-step guide

10 steps, about 13 minutes. Tap a picture to jump to that step. Your progress saves automatically.

Tick each step off as you go.

  1. Step 1: Cut Out the Felt Owl Ornament Pieces

    Watch this step · 1:25

    Run your felt through the die cutting machine with the owl die. You need two of the large body shape and two wings. Everything else gets cut once: the face, the eye piece, two small eye circles, two ears, the beak and four scalloped feather strips. Lay the pieces out by color so you can see that nothing is missing before you start sewing.

    Tip:

    Cut a few extra feather strips. They are tiny and easy to lose.

    Back to all steps

  2. Step 2: Backstitch the Two Felt Owl Body Pieces Together

    Watch this step · 2:52

    Stack the two grey body pieces so the punched holes line up. Thread a blunt needle with black embroidery floss and leave a tail at the bottom. Come up through one hole, go back down through the hole behind it, then come up two holes ahead. That backstitch gives a solid line of stitching with no gaps. Work around the owl, stopping a little short of where you began.

    Tip:

    Leave a gap about the width of two fingers for the stuffing.

    Back to all steps

  3. Step 3: Pull Apart the Fiberfill Before Stuffing the Felt Owl

    Watch this step · 4:22

    Take a small pinch of fiberfill and pull it apart between your fingers until it is light and wispy. Tuck it into the gap one bit at a time. Use your thumbs to work each piece up into the head and out to the sides. Small pieces spread evenly, so the body comes out smooth and plump with no lumps showing through the felt.

    Tip:

    Stop while the owl still feels soft. It flattens a little under the glued layers.

    Back to all steps

  4. Step 4: Sew the Felt Owl Body Closed and Tie Off the Thread

    Watch this step · 5:35

    Pinch the opening shut with your thumb and finger so the stuffing stays in. Keep stitching until you reach the starting tail. On the last stitch, bring the needle up between the two felt layers instead of through the front. Both thread ends now sit inside the seam. Tie two or three snug knots without puckering the felt, then trim the ends close.

    Tip:

    Pull the knots firm, not tight. Too tight buckles the bottom edge.

    Back to all steps

  5. Step 5: Stitch Around the Felt Owl Face, Eyes and Wings

    Watch this step · 6:52

    The face, the eye piece and the second wing get a decorative stitch too. Use a thread color a shade lighter than the felt so the stitching shows. Work the same backstitch through the punched holes. On the face piece, skip the long side tabs. The wings hide them later, so there is no reason to sew them. Jump across and keep going around.

    Tip:

    Do all your sewing before you open the glue.

    Back to all steps

  6. Step 6: Glue the Scalloped Feather Layers on the Felt Owl

    Watch this step · 8:27

    Dab tacky glue onto the smallest grey feather strip and press it across the bottom of the body. Add a white strip above it, then grey, then the last white. Flip the owl upside down to line each one up. It is easier to see that both ends reach the edges. The top strip should end right at the waist where the body narrows into the head.

    Tip:

    A small fine-tip glue bottle gives far better control than the big one.

    Back to all steps

  7. Step 7: Add the Hanging Loop and Ears to the Felt Owl

    Watch this step · 9:12

    Fold a length of cord into a loop. Put a dot of glue in the center of the head and another near the top, then lay the cord ends into it. Glue the two small ear pieces at the top corners of the head. The face piece goes on next and covers the cord ends, so the loop ends up sandwiched and hard to pull out.

    Tip:

    Make the loop long enough to slip over a branch.

    Back to all steps

  8. Step 8: Glue the Face and Eye Pieces on the Felt Owl

    Watch this step · 9:42

    Spread glue over the back of the face piece, heaviest along the stitching where the felt sits highest. Lay it over the head and press all around the edges. Then glue on the white eye piece and the two small eye circles. The glue stays wet for a few minutes, so nudge anything that sits crooked before it grabs.

    Tip:

    Press with your fingertips around every edge, not only the middle.

    Back to all steps

  9. Step 9: Attach the Wings and Beak to the Felt Owl

    Watch this step · 10:05

    Dab glue down the inside edge of each wing and press one to each side of the body. They cover the unsewn face tabs. Add a drop of glue in the middle of the face and set the little orange beak between the eyes. Go around the whole owl once more, pressing each piece. Then let it sit until the glue dries completely.

    Tip:

    Lay the owl flat while it dries so the wings do not slide.

    Back to all steps

  10. Step 10: Layer Sequin Eyes on the Felt Owl Ornament

    Watch this step · 10:52

    Brush a small dot of matte gel medium in the center of each eye. Place a large clear sequin with tweezers. Stack a 6mm turquoise sequin on top, then a tiny 4mm clear one in the middle. The layers give the eyes depth and a little sparkle. Finish each eye with a dot of silver glitter glue in the center.

    Tip:

    Gel medium dries clear and gives more control than tacky glue for sequins.

    Back to all steps

How to Apply Mosaic Tile Adhesive (Weldbond and E6000)

Keep going

How to Apply Mosaic Tile Adhesive (Weldbond and E6000)

Keep going with crafts

More on this topic, picked for this felt owl ornament with sequin eyes.

You reached the last step

Save this project to come back to it

Your ticked steps, the free printable and your other saved makes, together in My Projects. Free, no password.

You tapped Save

Save this project for later

We'll email you a link, no password.

How to Make a Felt Owl Ornament With Sequin Eyes

  • Your saved projects in one list
  • Your ticked steps on any device

Check your inbox for an email from us. Not there? Look in your spam folder.

Free printable

Printable sheet for this project

The bonus is hidden until you sign up.

Free with a free account, no password. Every step above stays open to everyone.

Products Used

The Checklist

How to Make a Felt Owl Ornament With Sequin Eyes

Tools
5
Materials
11
Steps
10
Video
13 min

Tools we recommend

As an Amazon Associate we earn from qualifying purchases. Links on this page may be affiliate links - clicking them and buying doesn't change your price, but helps support Crafting Step by Step.

Tags

The Crafter's Weekly

New crafts tutorials, every Sunday

One short email with the week's best step-by-step guides. Free, no spam, unsubscribe anytime.

Did this work for you?

What's next

Related collections

Curated theme pages that include this tutorial.

Similar tutorials

Hand-picked next reads based on the one you just finished.

Liked this crafts tutorial?

Pick the crafts you want to hear about. One email every Sunday with new step-by-step tutorials. No spam, easy to unsubscribe.

Get more like this in your inbox

Weekly digest. Pick the categories you want. Unsubscribe anytime.

Send me tutorials about

We only email about new tutorials. Easy unsubscribe anytime.