How to Do a Bullion Knot (Plus an Easy Bullion Rose)

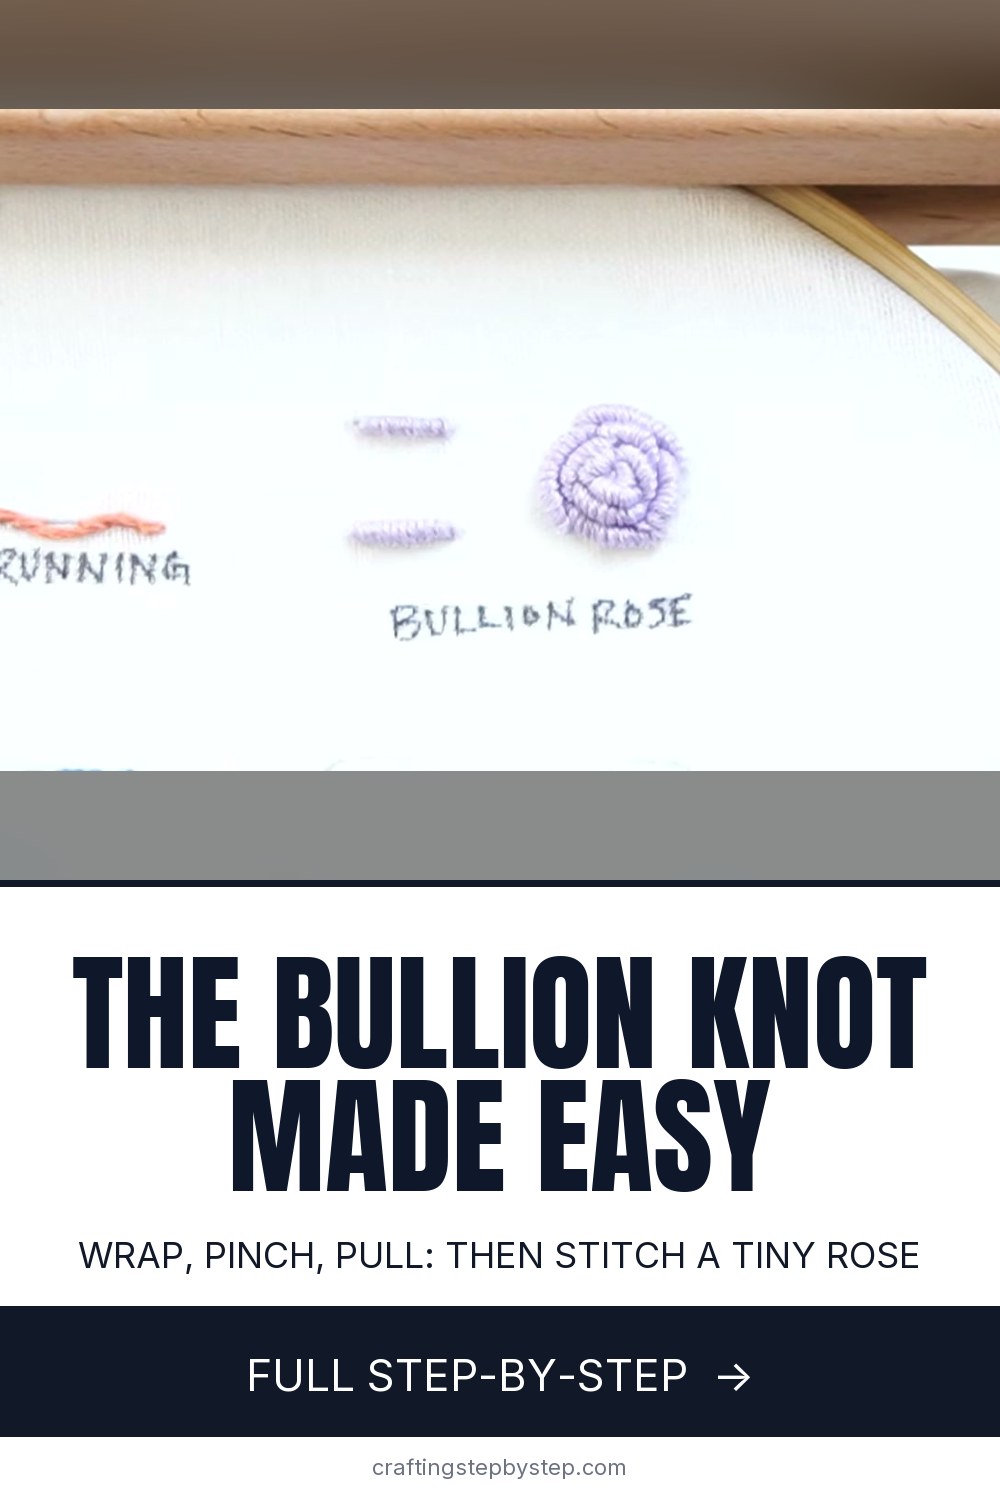
The finished result: How to Do a Bullion Knot (Plus an Easy Bullion Rose)
  • Difficulty: Medium
  • About 30 minutes
  • 10 steps

You tapped Save

Save this project for later

We'll email you a link, no password.

How to Do a Bullion Knot (Plus an Easy Bullion Rose)

  • Your saved projects in one list
  • Your ticked steps on any device

Check your inbox for an email from us. Not there? Look in your spam folder.

Print

Steps written out by Crafting Step by Step from Cutesy Crafts' video (opens YouTube) (6:28). Published .

A bullion knot is a long, coiled stitch that sits up off the fabric like a tiny caterpillar. It looks hard. It is mostly patience. Cutesy Crafts walks through two straight practice knots and then uses the same move to build a small lavender bullion rose, so you learn the stitch and get a flower out of it.

How to do a bullion knot: the short version

  • Come up at the start of your line and go down at the end, leaving a loop.
  • Bring the needle back up at the start, halfway through.
  • Wrap the thread around the needle until the coil matches the line.
  • Pinch the wraps and pull the needle through.
  • Lay the coil down and anchor it at the end.

Why the needle matters so much

A regular embroidery needle has an eye wider than its shaft. That bump has to squeeze through every wrap, and it drags the coil apart. A milliner needle (sometimes sold as a straw needle) is the same width from end to end, so it slides out of the wraps cleanly. It is also long, which gives you room for 15 or 20 wraps. You can practice with what you have, but buy a pack of milliners before you start a real project.

Thread and fabric

Cotton floss is the easy choice. Use all six strands for fat, bold knots like the ones in the video, or split it to two or three strands for fine, delicate work. Floss that is too thick for the needle is the most common reason a knot jams. A firm, tightly woven fabric in a hoop helps too. Keep the fabric drum tight so the wraps have something to push against.

How many wraps?

There is no magic number. Wrap until the coil, pushed snug against the fabric, is the same length as the gap between your two holes. Too few wraps and the thread shows between the coils. Too many and the knot humps up and curls. Add two or three extra wraps on purpose when you want a curved knot, as you do for the outer petals of a rose.

Ways to use bullion knots

  • Roses: a center knot with curved bullions spiraling around it. See the full embroidered rose tutorial.
  • Lavender buds and wheat heads, stacked in pairs up a stem. Try embroidered lavender.
  • Tiny caterpillars, fur on animals, or a textured border on a hoop gift.
  • Raised lettering on a baby blanket or tea towel.

Common mistakes

  • The needle will not come out. The wraps are too tight or the eye is too big. Loosen the wraps a touch and switch to a milliner needle.
  • A loose, messy coil. Hold the wraps between thumb and finger the whole time you pull, and pull in the direction the knot will lie.
  • Thread showing at the ends. Add a wrap or two, or shorten the gap.
  • A twisted floss. Let the needle hang and spin free now and then.

Bullions sit well next to other raised stitches. Learn the French knot for the rose center, and if you are starting a new piece, see how to transfer an embroidery pattern onto fabric first.

Free printable

Print the steps and supply list for this project

One page you can take to the table. Free with a free account, no password.

Get the free printable

What you'll need

Free, for this project

Get this checklist by email

  • All 6 tools and materials, with tick boxes
  • A link to print all 10 steps on paper, to keep by you while you craft

No password. The whole tutorial stays free on this page.

Quick answer

How to do a bullion knot: wrap floss around a milliner needle, pinch and pull it through, then anchor it. A medium project: about 30 minutes. You need 6 things, including 6-strand cotton embroidery floss, cotton or linen blend fabric and milliner needle. The 10 steps start with pick a Long Milliner Needle for Bullion Knots and go Down at the End of the Bullion Knot Line and Leave a Loop.

Step-by-step guide

10 steps, about 6 minutes. Tap a picture to jump to that step. Your progress saves automatically.

Tick each step off as you go.

  1. Step 1: Pick a Long Milliner Needle for Bullion Knots

    Watch this step · 0:12

    Start with the right needle. A milliner needle has an eye the same width as the rest of the shaft, so it slides out of the wraps without dragging them apart. It is also long enough to hold a lot of wraps. A regular embroidery needle works for a practice knot or two, but the milliner makes the whole stitch a lot easier and saves you from fighting every coil.

    Tip:

    Size 3 to 5 milliners suit six-strand floss. Go finer for two or three strands.

    Back to all steps

  2. Step 2: Go Down at the End of the Bullion Knot Line and Leave a Loop

    Watch this step · 0:58

    Draw a short line where you want the knot. Bring the needle up from the back at the start of the line. Then go down at the far end, but do not pull the thread all the way through. Leave a good sized loop of floss on top of the fabric. That loop becomes the wraps, so give yourself plenty to work with.

    Tip:

    Mark the line with a water soluble pen so the guide rinses away later.

    Back to all steps

  3. Step 3: Bring the Needle Back Up at the Start of the Bullion Knot

    Watch this step · 1:18

    From the back, bring the needle up again at the very start of the line, right next to where the thread first came out. Stop when the needle is about halfway through the fabric. Leave it standing there. The loop should still be lying on top, and the needle point is now where you will wrap the thread.

    Tip:

    Coming up a hair away from the first hole keeps the knot from pulling back through.

    Back to all steps

  4. Step 4: Wrap the Floss Around the Needle for the Bullion Coil

    Watch this step · 1:35

    Take the loop of thread and wind it around the needle, close to the fabric. Push each wrap down so they stack neatly side by side. Keep going until the coil of wraps, pressed snug, is about as long as your drawn line. For a straight knot like this one, that might be 15 to 20 wraps with six strands of floss.

    Tip:

    Wrap firmly but not tight. Very tight wraps grip the needle and refuse to slide.

    Back to all steps

  5. Step 5: Pinch the Bullion Wraps and Pull the Needle Through

    Watch this step · 1:58

    Hold the wraps lightly between your thumb and pointer finger. Push the needle up from the back as far as it will go, then pull it out through the top, still pinching. The thread slides through the middle of the coil. Keep your grip on the wraps the whole time so they do not unravel or bunch.

    Tip:

    If the needle sticks, wiggle it gently instead of yanking.

    Back to all steps

  6. Step 6: Lay the Bullion Knot Flat and Anchor the End

    Watch this step · 2:22

    Keep pulling the thread off to the side the knot will lie, here to the right. The coil tightens and settles onto the line. Use a fingertip to smooth the wraps straight. Then take the needle back down in the hole at the end of the line to lock the knot in place. That is one bullion knot. Make a second one to practice.

    Tip:

    Pull slowly at the end. A sharp tug can twist the coil out of line.

    Back to all steps

  7. Step 7: Stitch a French Knot in the Center of the Bullion Rose

    Watch this step · 2:46

    Once the straight knots feel comfortable, try a rose. Cutesy Crafts starts it with a French knot in the middle of the drawn circle. Bring the needle up at the center, wrap the thread around it a couple of times, and go back down right next to the same hole. This little bump is the bud that the bullion petals curl around.

    Tip:

    Two wraps make a neat, small center. Three gives a bigger, puffier bud.

    Back to all steps

  8. Step 8: Add the First Short Bullion Knots Around the Rose Center

    Watch this step · 3:46

    Bring the needle up near the top of the French knot and down near the bottom, leaving a loop. Come back up at the first point and wrap. These first knots are short, so they need fewer wraps. Pinch, pull the needle out, and pull the thread in the direction the knot should lie. Then go down at its end.

    Tip:

    Pulling toward where the knot will rest keeps it hugging the center.

    Back to all steps

  9. Step 9: Work the Bullion Knots in a Pinwheel to Build the Rose

    Watch this step · 4:52

    Rather than start each new knot in a fresh spot, start it near the end of the last one, slightly to the outside. Each knot overlaps the one before, so they spiral around the center like a pinwheel. As the rose grows, make the knots longer and add a few more wraps so they curve. Skip over small ones when you need to widen the circle.

    Tip:

    Extra wraps on a knot make it bow outward, which is what forms a petal.

    Back to all steps

  10. Step 10: Finish the Bullion Rose and Check Its Shape

    Watch this step · 5:56

    Keep adding knots until the rose fills your drawn circle, then tie off on the back. Here is the finished lavender rose beside the two straight practice knots. Do not worry if yours is a little lopsided. The creator redid hers about three times. Bullion roses take practice, and you can make them as small or as large as you like.

    Tip:

    Snip the tail on the back close to the knot so it cannot pull loose.

    Back to all steps

How to Do a Feather Stitch in Hand Embroidery

Keep going

How to Do a Feather Stitch in Hand Embroidery

Keep going with embroidery

More on this topic, picked for this bullion knot.

You reached the last step

Save this project to come back to it

Your ticked steps, the free printable and your other saved makes, together in My Projects. Free, no password.

You tapped Save

Save this project for later

We'll email you a link, no password.

How to Do a Bullion Knot (Plus an Easy Bullion Rose)

  • Your saved projects in one list
  • Your ticked steps on any device

Check your inbox for an email from us. Not there? Look in your spam folder.

Free printable

Printable sheet and shopping list for this project

The bonus is hidden until you sign up.

Free with a free account, no password. Every step above stays open to everyone.

Products Used

The Checklist

How to Do a Bullion Knot (Plus an Easy Bullion Rose)

Tools
4
Materials
2
Steps
10
Video
6 min

Tools we recommend

As an Amazon Associate we earn from qualifying purchases. Links on this page may be affiliate links - clicking them and buying doesn't change your price, but helps support Crafting Step by Step.

Tags

The Crafter's Weekly

New embroidery tutorials, every Sunday

One short email with the week's best step-by-step guides. Free, no spam, unsubscribe anytime.

Did this work for you?

What's next

Related collections

Curated theme pages that include this tutorial.

Similar tutorials

Hand-picked next reads based on the one you just finished.

Liked this embroidery tutorial?

Pick the crafts you want to hear about. One email every Sunday with new step-by-step tutorials. No spam, easy to unsubscribe.

Get more like this in your inbox

Weekly digest. Pick the categories you want. Unsubscribe anytime.

Send me tutorials about

We only email about new tutorials. Easy unsubscribe anytime.