How to Do the Continental (Tent) Stitch in Needlepoint

The finished result: How to Do the Continental (Tent) Stitch in Needlepoint
  • Difficulty: Easy
  • About 30 minutes
  • 9 steps

You tapped Save

Save this project for later

We'll email you a link, no password.

How to Do the Continental (Tent) Stitch in Needlepoint

  • Your saved projects in one list
  • Your ticked steps on any device

Check your inbox for an email from us. Not there? Look in your spam folder.

Print

Steps written out by Crafting Step by Step from KC Needlepoint's video (opens YouTube) (4:33). Published .

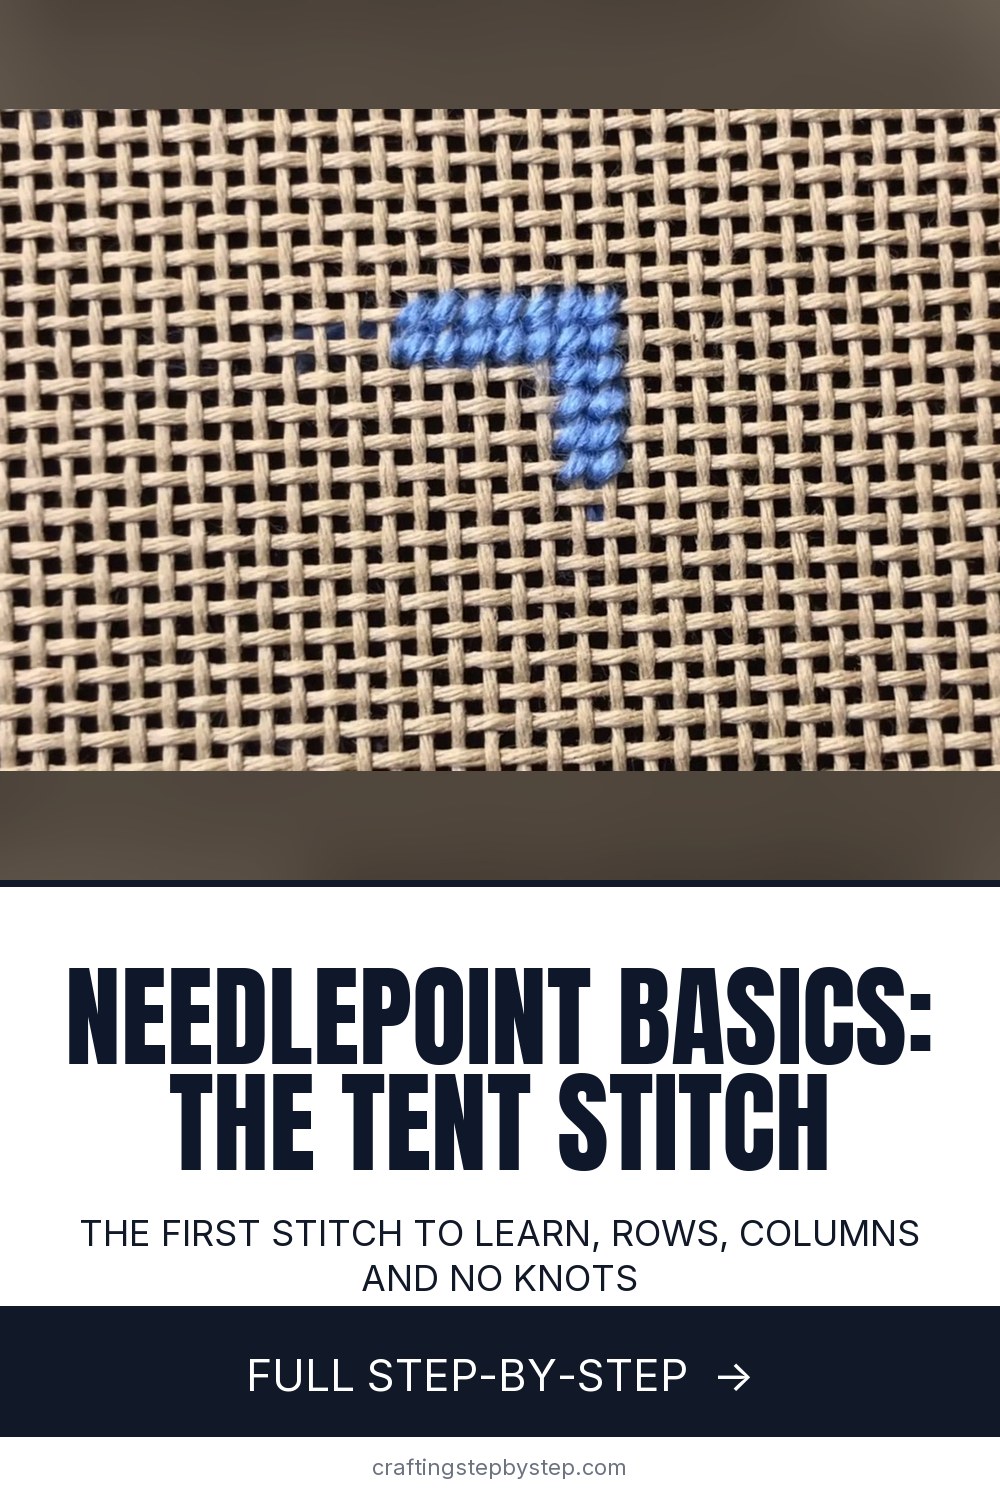
The continental stitch, also called the tent stitch, is the first stitch most people learn in needlepoint. Each stitch is one small slant that covers a single crossing of the canvas threads. Brigid from KC Needlepoint shows it in under five minutes: rows going left, rows going right, and columns going up and down. By the end you will have a neat little block of stitches and know how to start and finish a thread without a single knot left behind.

How to do the continental stitch: the short version

  • Every stitch covers one canvas intersection on a slant.
  • Working left, come up bottom left and go down top right.
  • Working right, come up top right and go down bottom left.
  • The back should show long slanted stitches. That is your check.

Continental stitch vs basketweave

Both make the same tent stitch on the front. The difference is the path. Basketweave works in diagonal rows and leaves a woven pattern on the back that keeps the canvas square. Continental works in straight lines, so it pulls the canvas on the bias over a big area. Brigid's advice: learn both. Use basketweave for backgrounds and large areas. Use continental for single lines, outlines, letters and tight spots where basketweave has no room to move.

Choosing canvas and thread

A 13 mesh canvas (13 holes to the inch) is a friendly size to start. The holes are easy to see and each stitch fills in quickly. 18 mesh gives finer detail but is harder on the eyes. For thread, pick something that covers the canvas without being so fat it drags. Pearl cotton size 5, Persian wool split to two strands, or stranded cotton doubled up all work on 13 mesh. If canvas peeks through between stitches, your thread is too thin. If it scrapes and frays, it is too thick.

The waste knot

A waste knot holds the thread while you start. It sits on top of the canvas about an inch away, in the direction you are stitching. Your first stitches cover the thread on the back and lock it in. Once they do, you snip the knot off the front. Nothing lumpy is left behind to show through when the piece is framed or made into a pillow.

Keeping your tension even

Pull each stitch until it lies flat on the canvas, then stop. Pull too hard and the canvas threads bunch up and the holes go crooked. Too loose and the stitches look loopy. Let your needle dangle now and then so the thread untwists. Work with a piece about 18 inches long. Longer threads wear thin from passing through the canvas so many times.

Fixing common problems

  • Stitches slant two ways. You came up in the wrong corner. Every stitch on the front has to lean the same way, from bottom left to top right.
  • Canvas warped into a diamond. Continental does this on big areas. Block the piece damp on a board when you finish, and switch to basketweave for backgrounds.
  • Short straight stitches on the back. That is a half cross stitch, not a continental. It covers less and wears faster.

What to stitch first

A small ornament, a coaster, a bookmark or your initials make good first pieces. A painted canvas with simple shapes is another easy start. You stitch right over the paint and the design is already there.

If you like counted work, try cross stitch next, and learn how to read a cross stitch pattern to follow a charted design. For freehand embroidery on fabric, start with backstitch and satin stitch.

Free printable

Print the steps and supply list for this project

One page you can take to the table. Free with a free account, no password.

Get the free printable

What you'll need

Free, for this project

Get this checklist by email

  • All 5 tools and materials, with tick boxes
  • A link to print all 9 steps on paper, to keep by you while you craft

No password. The whole tutorial stays free on this page.

Quick answer

Learn the continental tent stitch in needlepoint: rows left and right, columns up and down, plus how to start and end your thread with no knots. An easy project: about 30 minutes. Materials cost about $8 to $20. You need 5 things, including 13 mesh mono needlepoint canvas, tapestry needle and small embroidery scissors. The 9 steps start with tie a Waste Knot in the End of the Needlepoint Thread and lay the Waste Knot on Top of the Needlepoint Canvas.

Step-by-step guide

9 steps, about 5 minutes. Tap a picture to jump to that step. Your progress saves automatically.

Tick each step off as you go.

  1. Step 1: Tie a Waste Knot in the End of the Needlepoint Thread

    Watch this step · 0:36

    Thread your tapestry needle. Then go to the far end of the thread, the end opposite the needle, and tie a plain overhand knot. That is your waste knot. It will anchor the thread on the front of the canvas while you make the first few stitches, and it comes off later. A blunt tapestry needle slides through the canvas holes without splitting the threads.

    Tip:

    Cut a working length of about 18 inches so the thread does not wear thin.

    Back to all steps

  2. Step 2: Lay the Waste Knot on Top of the Needlepoint Canvas

    Watch this step · 0:48

    Push the needle down from the front about an inch away from where your first stitch will go. Pull until the knot sits on top of the canvas. Place it in the path you are about to stitch. As you work toward it, the thread running along the back gets trapped under your new stitches and holds tight without any knot on the back.

    Tip:

    Keep the knot in line with your row so the stitches cover the tail.

    Back to all steps

  3. Step 3: Make the First Continental Stitch From Bottom Left to Top Right

    Watch this step · 1:22

    Each continental stitch covers one canvas intersection, the spot where a vertical and a horizontal thread cross. Four holes surround it. When you are working to the left, bring the needle up through the bottom left hole and take it down through the top right hole. Pull until the stitch lies flat. That one slant is the whole stitch.

    Tip:

    Count the holes around the intersection out loud the first few times: one, two, three, four.

    Back to all steps

  4. Step 4: Work a Row of Continental Stitches to the Left

    Watch this step · 1:50

    Come up again in the hole directly to the left of where your last stitch started. Go down top right, which is the hole your last stitch came up from. Keep repeating. Every stitch sits right beside the one before, all leaning the same way, and the row grows to the left. Your waste knot tail gets caught under the stitches on the back as you go.

    Tip:

    If a stitch leans the other way, pull it out. You came up in the wrong corner.

    Back to all steps

  5. Step 5: Turn and Stitch the Next Continental Row to the Right

    Watch this step · 2:26

    At the end of the row, drop down to the intersection right below your last stitch. Now you are working to the right, so the direction flips. Come up through the top right hole and go down through the bottom left hole. The front looks the same as before. The back gets a long slanted stitch, which gives you good coverage and something to weave through later.

    Tip:

    Turning the canvas upside down for every return row is another way to keep the motion the same.

    Back to all steps

  6. Step 6: Work the Continental Stitch Down a Canvas Column

    Watch this step · 2:32

    Columns follow the same idea as rows. When you are stitching downward, come up in the bottom left hole and go down in the top right hole. Your next stitch sits directly below the last one. Single columns like this are where continental shines: letters, outlines, borders and narrow stems that basketweave cannot reach.

    Tip:

    Use continental for lines and outlines, basketweave for big background areas.

    Back to all steps

  7. Step 7: Work the Continental Stitch Up a Canvas Column

    Watch this step · 3:00

    Going up a column, reverse it. Come up in the top right hole and go down in the bottom left. Then turn the canvas over and look at the back. Each stitch should leave a long, slanted thread behind it. If you see short straight stitches instead, you have made a half cross stitch, which covers less and wears through sooner.

    Tip:

    Check the back every few stitches while you are learning. It tells you more than the front.

    Back to all steps

  8. Step 8: Weave the Thread Under the Stitches on the Back of the Canvas

    Watch this step · 3:56

    When your thread runs short, or you want to change colors, flip the canvas to the back. Run the needle under the slanted back stitches of four or five stitches nearby. Slide it along the surface and do not poke through to the front, or the thread will show. The tight back stitches grip the tail so it cannot work loose.

    Tip:

    Weave through stitches of the same color so a dark thread does not shadow a light area.

    Back to all steps

  9. Step 9: Trim the Thread Tail and Waste Knot on the Needlepoint

    Watch this step · 4:26

    Snip the woven tail close to the back of the canvas. Then turn back to the front and find your waste knot. The stitches you made over its thread now hold it in place, so you can cut the knot off right at the canvas. Small sharp scissors make this easy. That is the whole continental stitch, start to finish, with no knots left anywhere.

    Tip:

    Pull the knot up a little before you cut so the blade does not catch a stitch.

    Back to all steps

How to Do a Split Stitch

Keep going

How to Do a Split Stitch

Keep going with embroidery

More on this topic, picked for this continental (tent) stitch in needlepoint.

You reached the last step

Save this project to come back to it

Your ticked steps, the free printable and your other saved makes, together in My Projects. Free, no password.

You tapped Save

Save this project for later

We'll email you a link, no password.

How to Do the Continental (Tent) Stitch in Needlepoint

  • Your saved projects in one list
  • Your ticked steps on any device

Check your inbox for an email from us. Not there? Look in your spam folder.

Free printable

Printable sheet for this project

The bonus is hidden until you sign up.

Free with a free account, no password. Every step above stays open to everyone.

Products Used

The Checklist

How to Do the Continental (Tent) Stitch in Needlepoint

Tools
3
Materials
2
Steps
9
Video
5 min

Tools we recommend

As an Amazon Associate we earn from qualifying purchases. Links on this page may be affiliate links - clicking them and buying doesn't change your price, but helps support Crafting Step by Step.

Tags

The Crafter's Weekly

New embroidery tutorials, every Sunday

One short email with the week's best step-by-step guides. Free, no spam, unsubscribe anytime.

Did this work for you?

What's next

Related collections

Curated theme pages that include this tutorial.

Similar tutorials

Hand-picked next reads based on the one you just finished.

Liked this embroidery tutorial?

Pick the crafts you want to hear about. One email every Sunday with new step-by-step tutorials. No spam, easy to unsubscribe.

Get more like this in your inbox

Weekly digest. Pick the categories you want. Unsubscribe anytime.

Send me tutorials about

We only email about new tutorials. Easy unsubscribe anytime.