How to Crochet a Farmhouse Pumpkin (Fall Decor)

CrochetEasy24:599 stepsBrowse more →
Also in:Crafts

By CraftingStepByStepPublished Updated

Based on a video by MJ's Off The Hook Designs.

This is the canonical farmhouse pumpkin - chunky bulky yarn, knit-look ribs, a real cinnamon-stick stem, and a twine bow at the base. It looks like something off a Magnolia shelf and it works up in about an afternoon. Pile a few of them on the mantel, line them up the porch steps, or set one as a centerpiece. The cinnamon stem smells faintly of cinnamon for a couple of weeks. Bonus.

The trick is that this is not amigurumi worked in the round. It is a flat rectangle - 19 rows of half double crochet, with every row after the first worked into the third loop of the previous row. The third loop is the horizontal bar tucked behind the V at the back of the HDC stitch. Most beginners only know front-loop and back-loop, so the technique is going to feel weird for the first two stitches. After that it locks in and the ribs grow visibly in front of you.

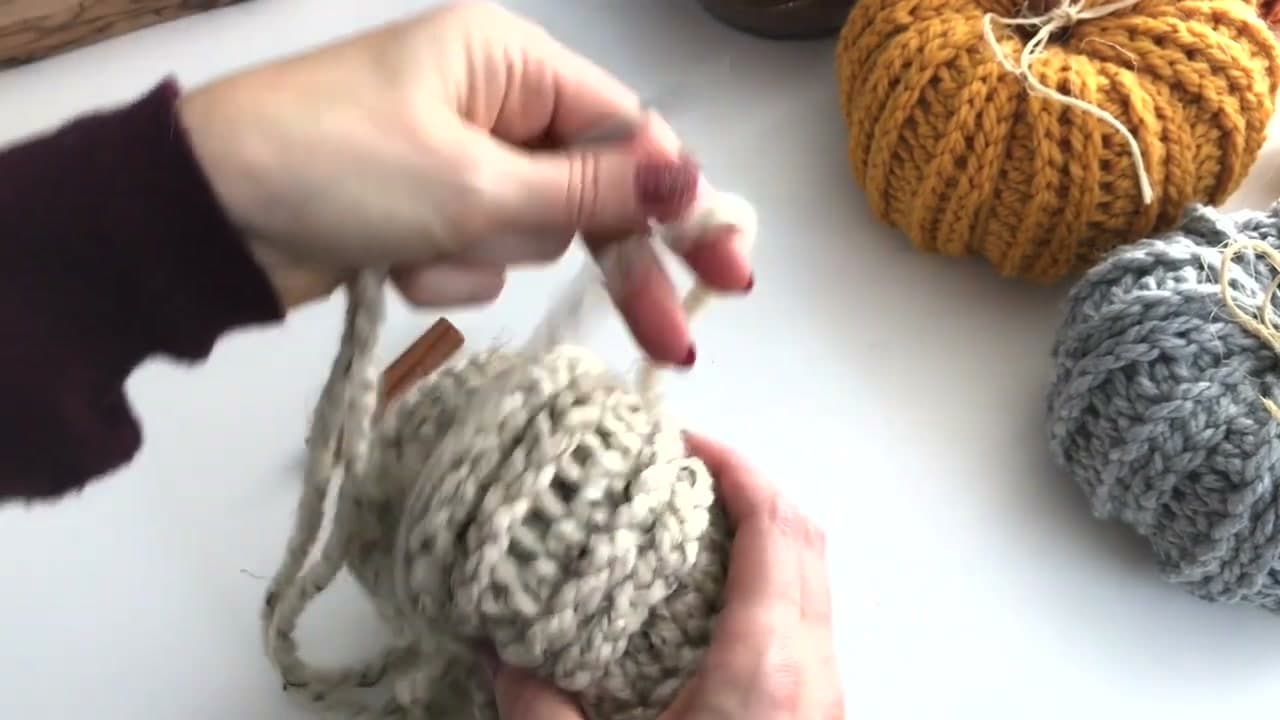
The rectangle gets folded in half, seamed up the side into a tube, cinched closed at one end, stuffed, cinched again at the top, and then a couple of long stitches through the center pull the segmented ribs into shape. The cinnamon stick goes into the cinched hole at the top with a dab of hot glue if it wobbles. A piece of twine tied in a small bow at the base hides the join. Add a faux leaf or a snip of plaid ribbon if that is your aesthetic.

Bulky yarn matters. Lion Brand Wool-Ease Thick & Quick in Fisherman (cream), Pumpkin (orange), or Mustard is the classic farmhouse trio, and one ball makes two small pumpkins or one large. Bernat Blanket also works and is easier to find at Michaels. Worsted yarn does not work - the ribs will not pop the same way. Either go super bulky or hold two strands of worsted together.

This is MJ from MJ's Off The Hook Designs, and her bulky pumpkin pattern is the one half the crochet internet has copied for the last five years. The original is still the best.

New to half double crochet? Brush up on how to half double crochet first - that single stitch is the entire pattern. The foundation chain is also worth a quick refresher if it has been a while. When the pumpkin is finished, fasten off cleanly and weave in your ends so it holds together on the shelf.

Want a coordinating pile? Pair this pumpkin with a chunky crochet mushroom or a strawberry for an autumn produce vignette. If this is your first amigurumi-adjacent project, easy crochet projects for beginners has more options at the same skill level, and essential crochet supplies lists everything you would actually use.

Step-by-Step Guide

1

Step 1: Gather Your Supplies

0:35
Step 1: Step 1: Gather Your Supplies

Lay out an 8 mm (US L/11) crochet hook, one ball of super bulky yarn in the fall color you want, polyester fiberfill stuffing, a 3-inch cinnamon stick for the stem, twine or jute cord for the bow, a yarn needle with a large eye, sharp scissors, and a hot glue gun if you want to anchor the stem.

Lion Brand Wool-Ease Thick & Quick is what MJ uses in the video. One ball makes two small pumpkins (about 3 by 5 inches) or one large (5 by 7 inches). Fisherman is the classic cream, Pumpkin is the orange, Mustard is the yellow. For a farmhouse color story, make all three.

Tip

If you do not have super bulky yarn, hold two strands of worsted weight together. Skip the hot glue gun if you are gifting the pumpkin to anyone with allergies to glue fumes - the cinnamon stick wedges in tight enough that glue is optional.

2

Step 2: Slip Knot, Chain 16, and Row 1 in Half Double Crochet

1:50
Step 2: Step 2: Slip Knot, Chain 16, and Row 1 in Half Double Crochet

Make a slip knot on the hook. Chain 16 for a small pumpkin (about 3 by 5 inches finished) or chain 22 for a large pumpkin (5 by 7 inches finished).

Skip the first 2 chains - those count as the turning chain, not a stitch. Half double crochet in the 3rd chain from the hook: yarn over, insert the hook, pull up a loop (three loops on the hook), yarn over, pull through all three. Work one HDC in every remaining chain across. You should end with 14 stitches for the small size. The starting chain does not count as a stitch in this pattern.

Tip

Count your stitches at the end of row 1. If you do not have exactly 14 (small) or 20 (large), it is faster to frog and restart than to fudge it on row 2. The third-loop rows in row 2 onward will not line up if the stitch count is wrong.

3

Step 3: Row 2 - Half Double Crochet in the Third Loop

3:50
Step 3: Step 3: Row 2 - Half Double Crochet in the Third Loop

Turn the work. Chain 2 (does not count as a stitch). Now look at the top of your row 1 stitches from behind - the V of each HDC is visible on the front, but there is a third horizontal loop tucked underneath, behind the V. That is the third loop, and that is where every stitch from row 2 forward goes.

Yarn over, insert your hook down into that third loop on the first stitch, pull up a loop, yarn over, and pull through all three. Repeat across the row. You should end with 14 HDC in the third loop.

The third loop is what makes this pumpkin look like it was knit instead of crocheted. As you work into it, the V of the previous row pops forward and creates the visible rib. That rib is the whole pumpkin aesthetic.

Tip

The third loop is not the front loop and not the back loop. It is a separate horizontal bar tucked behind the V at the back of the stitch. Feel for it with your fingers - it is the loop that runs parallel to the row, sitting just under the stitch top. Once you find it on the first stitch of row 2, the rest go quickly.

4

Step 4: Continue Third-Loop HDC for 19 Rows Total

8:50
Step 4: Step 4: Continue Third-Loop HDC for 19 Rows Total

Keep going. At the end of each row, turn, chain 2, and work HDC in the third loop of each stitch across. Every row from here is the same - just the third-loop HDC.

You are aiming for 19 rows total. Count by looking at the visible ridges on the right side of the work - each pair of rows forms two ridges, so count 2, 4, 6, 8, 10, 12, 14, 16, 18, then the 19th row is the last one. The finished rectangle should measure about 6 by 10 inches for the small pumpkin. If you are testing a different yarn weight or hook size, aim for that 6-by-10 ratio.

Tip

If the rectangle is shorter than 6 by 10 inches when you hit row 19, add two more rows to keep it an odd number. Odd row counts make the next step (slip-stitching the seam) easier because you end on the correct side of the fabric to join straight across.

5

Step 5: Fold and Slip Stitch the Side Seam

9:50
Step 5: Step 5: Fold and Slip Stitch the Side Seam

With the right sides facing each other (the side with the prominent ridges on the inside), fold the rectangle in half so the two short edges line up. Chain 1 to start. Insert your hook through the first stitch on the top edge and the first stitch on the bottom edge at the same time, yarn over, and pull through all three loops on the hook - that is a slip stitch joining the two edges.

Continue slip stitching the seam closed all the way across. Keep the tension loose - if you pull tight, the seam will pucker and the pumpkin will look pinched. Chain 1 at the end to secure, then flip the tube right-side out so the ribs face outward.

Tip

If you ended on an odd row, you may need to slip stitch a couple of stitches across the top edge first to get to the right starting position. MJ does this in the video around the 9:48 mark - you can hear her say "because we've ended on an odd number." Just match her motion if your fold lines up the same way.

6

Step 6: Cinch the First End Closed

12:20
Step 6: Step 6: Cinch the First End Closed

Fasten off with a long tail - at least 18 inches of yarn so you do not run out partway through. Thread the tail onto a yarn needle with a large eye.

Weave a running stitch around one open end of the tube, catching only the bulky ridge stitches and skipping the spaces between them. Work all the way around the end. Then pull the tail tight - the fabric gathers into a tight cinch. This is the bottom of the pumpkin. Anchor the tail by passing the needle back through in the opposite direction once or twice so the cinch holds.

Tip

Grab the chunky ridges, not the gaps. If you stitch through the gaps too, the pumpkin base looks puckered instead of cleanly gathered. The ridges give the cinch a natural rosette shape.

7

Step 7: Stuff with Polyester Fiberfill

18:00
Step 7: Step 7: Stuff with Polyester Fiberfill

Push polyester fiberfill into the open top of the pumpkin. Use small handfuls at a time and work the stuffing all the way down into the cinched base before adding more.

For a plump, round pumpkin that holds its shape on a shelf, stuff firmly. For a slouchier, more rustic farmhouse look, stuff lightly so the body has a little give. Either reads as farmhouse - go with whichever you prefer.

Tip

Do not over-stuff. The cinching steps that come next pull the body into the segmented pumpkin shape, and if it is rock-hard with stuffing, those center stitches will not pull tight enough to create the ribs.

8

Step 8: Cinch the Top and Create the Pumpkin Ribs

21:50
Step 8: Step 8: Cinch the Top and Create the Pumpkin Ribs

Single crochet around the top opening, catching only the bulky ridge stitches like you did on the bottom. Slip stitch to join the round. Fasten off with another long tail.

Thread the tail and pull the top closed. Then to create the segmented ribs that give the pumpkin its shape, send the needle from the cinched top straight down through the center of the body and out the bottom. Pull the yarn tight. Bring the needle back up through the body to the top, exit between two ridges, pull tight, and repeat. Four passes around the pumpkin gives you the four classic rib indentations.

Tip

Pull each pass tight before moving to the next. The indent forms because the yarn is pulling the top and bottom toward each other through the center. If the indents look shallow after the first try, go back through one more time and pull tighter - the ribs deepen with each pass.

9

Step 9: Attach the Cinnamon Stick Stem and Twine Bow

23:50
Step 9: Step 9: Attach the Cinnamon Stick Stem and Twine Bow

Weave in any loose ends with the yarn needle so nothing pokes out later.

Push a 3-inch cinnamon stick straight down into the cinched hole at the top of the pumpkin. If it wobbles, add a small dab of hot glue around the base before pushing it in - the glue grabs the yarn and holds the stem upright. Cut a 10-inch piece of twine, wrap it once around the base of the stem where it meets the body, and tie it in a small bow. Add a small wired faux leaf tucked under the bow if you want that extra touch, or swap the twine for a snip of plaid ribbon for a fall color pop.

Fluff the ribs with your fingers - the segments smooth out and the pumpkin sits properly once the yarn relaxes. That is the whole pumpkin. Make a coordinating pile in cream, orange, and mustard for the mantel, or pair this one with a chunky mushroom for a fall vignette. If this is your first finished crochet object, browse easy crochet projects for beginners or check essential crochet supplies for what to stock next.

Tip

Cinnamon sticks vary in diameter. If yours is too thin and sits loose in the hole, wrap a thin strip of fiberfill around the base before pushing it in - the extra bulk wedges it tight. If it is too thick, pinch the cinched yarn open a little more with the yarn needle.

Products Used

☐ The Checklist

How to Crochet a Farmhouse Pumpkin (Fall Decor)

Tools
5
Materials
6
Steps
9
Video
25 min

Your Guide

MJ's Off The Hook Designs

As an Amazon Associate we earn from qualifying purchases. Links on this page may be affiliate links - clicking them and buying doesn't change your price, but helps support ShowMeStepByStep.

Tags

What's next

Related collections

Curated theme pages that include this tutorial.

Weekly Digest

Liked this crochet tutorial?

Pick the categories you want to hear about. Weekly digest of new step-by-step tutorials. No spam, easy unsubscribe.

Send me tutorials about

We only email about new tutorials. Easy unsubscribe anytime.