How to Crochet a Bow Headband (Beginner Ear Warmer)

CrochetEasy22:598 stepsBrowse more →
Also in:Crafts

By CraftingStepByStepPublished Updated

Based on a video by Blue Star Crochet | Veronika Cromwell.

A crochet bow headband is the kind of project that pays you back fast. One skein of worsted-weight yarn, an afternoon, and you have a wearable gift that looks far fancier than the time you put in. Make three in the same weekend - one for each granddaughter, or stack them all in your own drawer.

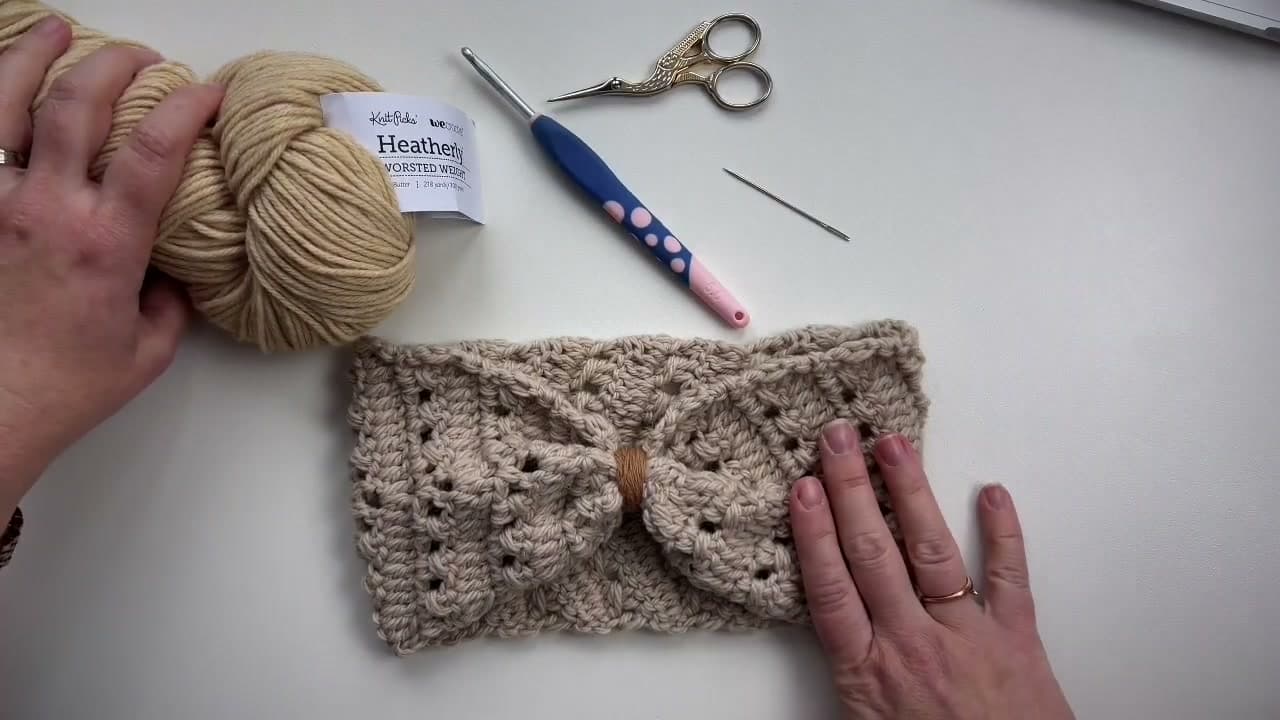
This pattern, designed by Veronika Cromwell of Blue Star Crochet, uses a chevron base with a special textured post stitch that gives the fabric a quilted look. You will work the same two rows over and over until the band fits your head, then choose how to finish it. There are three options - a flat seam, a ruffled gather, or a full bow detail wrapped at the join. The bow is the upgrade variant and the one that makes the headband Pinterest-worthy.

You need basic double crochet, half double crochet, and a mattress stitch to seam the ends. If you are new to those, our double crochet and half double crochet guides cover them in under five minutes each.

Step-by-Step Guide

1

Gather your supplies and measure

0:58
Step 1: Gather your supplies and measure

Set out one skein of worsted-weight yarn (around 218 yards is plenty), a 5 mm crochet hook, a yarn needle, scissors, and a measuring tape. Veronika uses a soft worsted-weight wool, but any worsted yarn works - cotton-acrylic blends are nice for spring and pure wool wears warmer for winter.

Measure the head you are making this for. A standard adult is about 20.5 inches around. For kids, drop to 18-19 inches. You will crochet the band about 1.5 inches shorter than your measurement so it sits snug without slipping. Skim our essential crochet supplies guide if you are still building out your kit.

Tip

Pick a yarn label that says "worsted weight" or has a 4 inside the symbol. Lighter yarns will give you a floppy band, heavier yarns will fight the 5 mm hook.

2

Slip knot and chain 21

1:57
Step 2: Slip knot and chain 21

Make a slip knot and slide it onto your hook. Snug it down so it sits firm against the hook but still slides. Then chain 21. Pull each loop with even tension - if your chains are too tight, the first row will fight you when you try to work into the back bumps.

This count of 21 gives the headband its width once the textured pattern is set. If you want a wider band, add 9 chains at a time so the stitch pattern still lines up. Our foundation chain tutorial walks through the back-bump technique that gives this band its clean lower edge.

Tip

Count out loud as you chain. Off by one and the whole pattern shifts.

3

Row 1 - work the chevron base

2:18
Step 3: Row 1 - work the chevron base

Work into the back bumps of the chain. Skip the first three chains (those three count as your first double crochet) and double crochet into the fourth chain from the hook. Work eight more double crochets so you have nine total along the first half. In the next chain, work a double crochet, chain 2, then a double crochet in the same chain. That double-crochet, chain-2, double-crochet group is the center V of the chevron.

Now double crochet into each remaining chain across to the end. You should finish with the chevron taking shape and the same number of stitches on each side of the center V. New to double crochet? Watch our how to double crochet tutorial first.

Tip

Drop a stitch marker into the chain-2 space of the center V. It saves you from hunting for it on every row.

4

Row 2 - the special textured stitch

4:06
Step 4: Row 2 - the special textured stitch

Turn your work. Start with a standing double crochet into the first stitch, then work two regular double crochets into the next two stitches. Yarn over and work a half double crochet around the posts of those last two double crochets - this is the wrap that gives the fabric its quilted texture. Pull through all three loops on your hook to close.

Skip the next stitch, work two more double crochets, and wrap them with another post half double crochet. Repeat that rhythm up to the center, work dc-ch2-dc in the chain-2 space, then mirror the pattern back down the other side. Finish with a double crochet into the top of the beginning chain from the previous row. If half double crochet still feels unfamiliar, our half double crochet guide is a quick refresher.

Tip

The post half double crochet feels weird the first time. Keep tension loose so you can fit your hook around two double-crochet posts at once.

5

Row 3 - decrease at both edges

8:10
Step 5: Row 3 - decrease at both edges

Row 3 keeps your stitch count steady by tucking a double crochet 3 together at each end. Turn your work. Chain 2 - this counts as the first leg of the dc3tog. Yarn over, insert into the next stitch, pull through, yarn over, pull through two, and leave that loop on your hook. Repeat into the next stitch. You now have three loops on your hook. Yarn over and pull through all three.

Double crochet across to the center, work dc-ch2-dc in the chain space, then double crochet across until you have three stitches left. Finish with another dc3tog over those last three stitches. Want a deeper dive? See our how to decrease in crochet tutorial.

Tip

Mark the top of each dc3tog with a stitch marker the first few rows. It is easy to miss the closing loop if your chain-2 sits too tight.

6

Repeat rows 2 and 3 until the band fits

11:11
Step 6: Repeat rows 2 and 3 until the band fits

Alternate Row 2 and Row 3 over and over until the band wraps around the head with the short ends just touching. Stretch the fabric a little as you measure - crochet relaxes a bit once it is worn, so you want it taut at rest. For a 20.5-inch adult head, expect roughly 22 to 26 rows depending on how snug you like your headbands.

Finish on a Row 3 so both short ends have the clean dc3tog edge. Cut your yarn, leaving a 30-inch tail - you will need it for the seam and the bow. Fasten off cleanly with our fasten off tutorial.

Tip

Leave a 30-inch yarn tail before you cut. A short tail means cutting fresh yarn for the seam, and the seam will show.

7

Seam the ends with mattress stitch

13:06
Step 7: Seam the ends with mattress stitch

Turn the strip into a loop. Fold it so the right sides face each other - Row 1 (the chevron side) is the right side - and line up the two short ends. Thread your long tail onto a yarn needle.

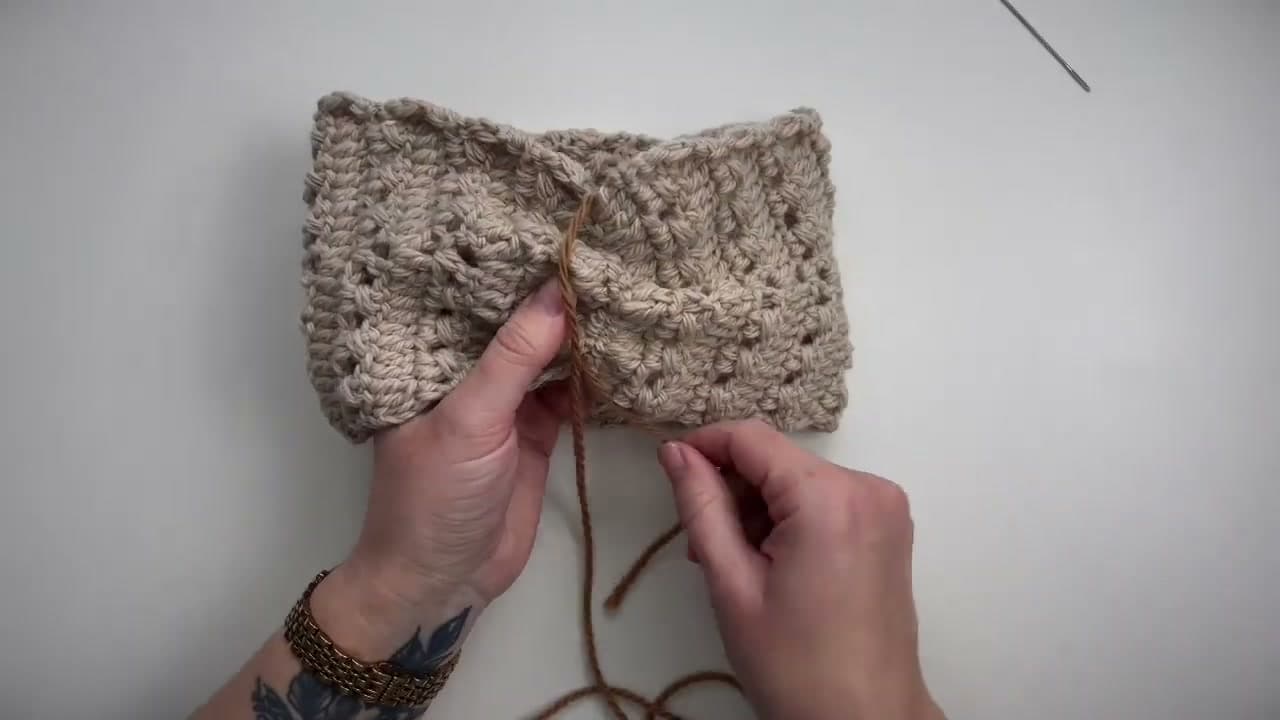
Join with the mattress stitch by going from inside to outside on one edge, then crossing to the other edge and going inside to outside again. Keep alternating, like lacing a shoelace. For a flat seam (option 1), keep even tension as you go. For a ruffled headband (option 2), pull the yarn tail tighter as you stitch so the fabric gathers in the middle. The center will scrunch into a soft cinch that you wear toward the front.

Tip

Be careful not to snap the yarn when you pull tight for the ruffled finish. If you feel resistance, ease off - snapping mid-seam means starting over.

8

Wrap the bow and weave in ends

20:07
Step 8: Wrap the bow and weave in ends

For the full bow finish (option 3), take the long yarn tail that is still attached at the seam and wrap it tightly around the gathered middle five or six times. Pull each wrap snug so the bow shape stays defined. Tie the two yarn tails together on the back side with a firm double knot.

Thread each remaining tail onto your needle and weave the ends into the wrong side of the fabric, going through several stitches in different directions so they lock in place. Trim what is left. Done. Try it on. For a polished finish on every project you make from here, bookmark our how to weave in ends guide. If you are hungry for the next quick wearable, our crochet fingerless gloves use the same skein, same hook, and the same evening.

Want more 1-skein crochet ideas? Browse our easy crochet projects for beginners roundup.

Tip

For a contrast bow, use a different color yarn for the wrap instead of the working tail. It is what turns a plain headband into a hostess gift.

Products Used

☐ The Checklist

How to Crochet a Bow Headband (Beginner Ear Warmer)

Tools
4
Materials
2
Steps
8
Video
23 min

Your Guide

Blue Star Crochet | Veronika Cromwell

As an Amazon Associate we earn from qualifying purchases. Links on this page may be affiliate links - clicking them and buying doesn't change your price, but helps support ShowMeStepByStep.

Tags

What's next

Related collections

Curated theme pages that include this tutorial.

Weekly Digest

Liked this crochet tutorial?

Pick the categories you want to hear about. Weekly digest of new step-by-step tutorials. No spam, easy unsubscribe.

Send me tutorials about

We only email about new tutorials. Easy unsubscribe anytime.