How to Make a Dream Catcher - Easy Step by Step DIY

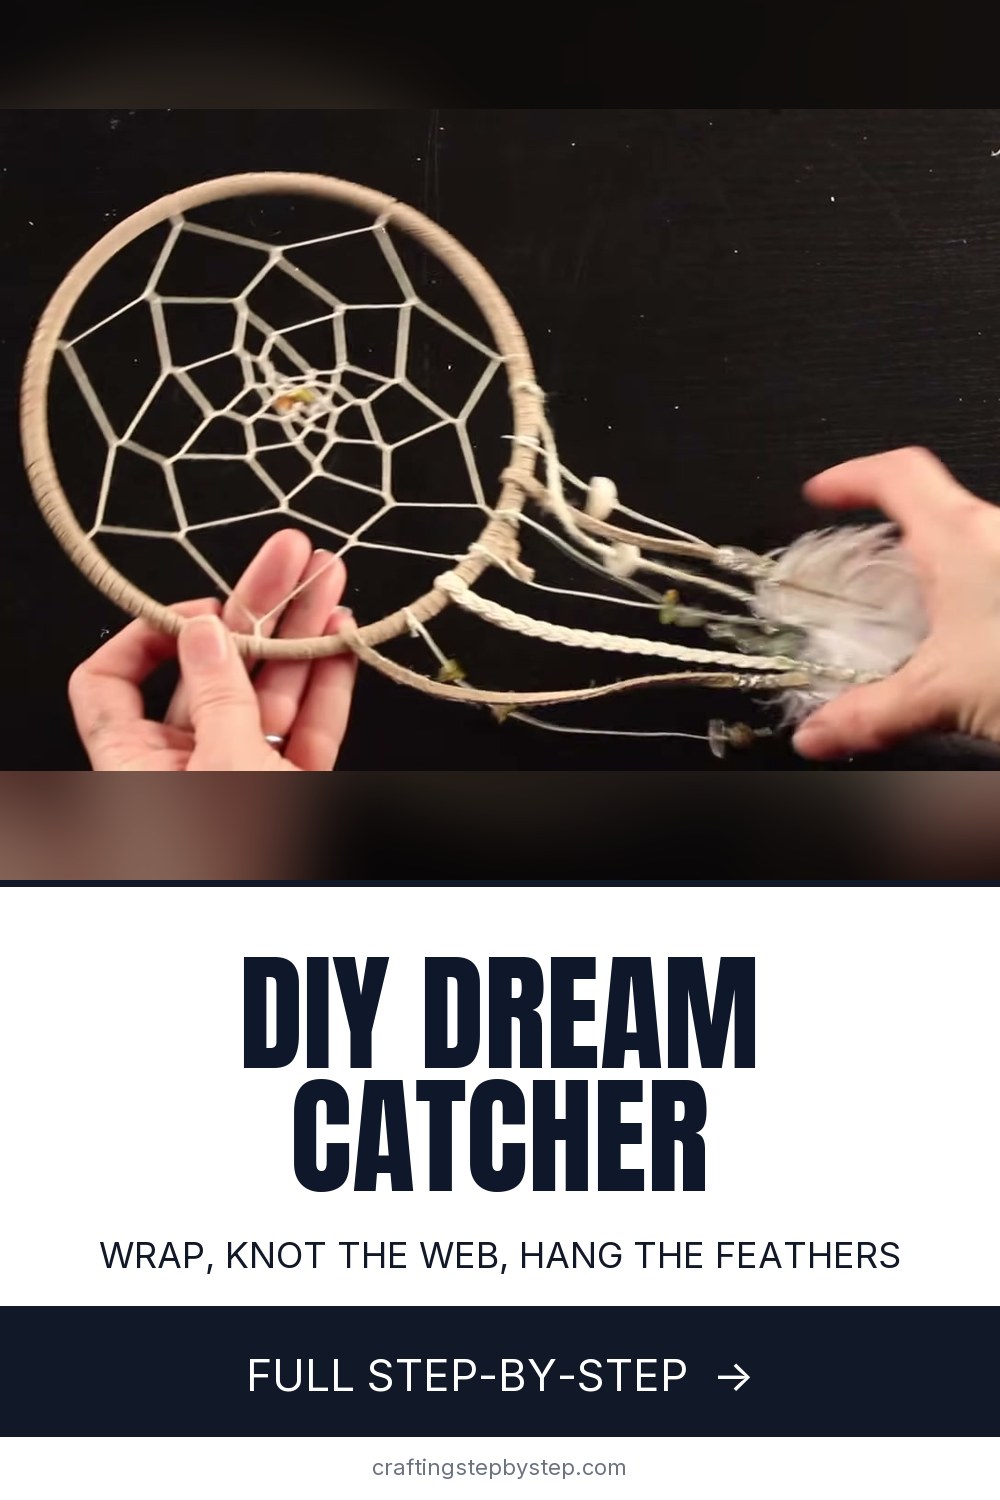
The finished result: How to Make a Dream Catcher - Easy Step by Step DIY
  • Difficulty: Easy
  • About 1 hour 30 minutes
  • 10 steps

You tapped Save

Save this project for later

We'll email you a link, no password.

How to Make a Dream Catcher - Easy Step by Step DIY

  • Your saved projects in one list
  • Your ticked steps on any device

Check your inbox for an email from us. Not there? Look in your spam folder.

Print

Steps written out by Crafting Step by Step from Emilie Lefler's video (opens YouTube) (12:36). Published .

Also in:Other Crafts

A dream catcher is a hoop with a woven web across it and feathers hanging below. The old story says bad dreams get caught in the web and good ones slide down the feathers to whoever sleeps underneath. Emilie Lefler of the Untidy Artist channel made this one with her daughter Sydney, and it takes an afternoon with supplies from any craft store.

How to make a dream catcher: the short version

  • Wrap a metal hoop in suede lace and tie it off.
  • Knot waxed cord around the hoop in even loops to make the first round.
  • Work each new round into the middle of the loops before it, toward the center.
  • Add a few beads near the middle and knot off.
  • Tint feathers if you like, wire them to cords and tie them to the bottom.

Choosing a hoop and cord

A 6 inch metal ring is a good first size. Smaller hoops make the web fiddly, and bigger ones need a lot of cord and patience. The inner ring of a wooden embroidery hoop works too. For the web, waxed cord is the easy choice for a beginner because it grips itself and the knots stay where you put them. Plain cotton string slides around and the web goes lopsided.

Cut about 10 feet of cord for a 6 inch hoop. It is better to end with extra than to run out halfway, and you can wind it around your fingers into a small ball so it does not tangle.

Getting an even web

The whole web uses one knot. Take the cord over the hoop or the cord in front of you, then back through the loop you made, and pull it snug. Spacing is what makes it look neat. Emilie used seven knots in the first round, about two inches apart. Each round after that sits in the middle of the loops from the round before, so the openings shrink as you work in.

Keep the tension the same all the way round. A loose loop sags and a tight one pulls the shape out of line. If a round goes wrong, it is easier to undo a few knots now than to fix it later.

Ideas to make it your own

  • Colour. Swap the suede and cord for coloured ones, or tint the feathers with a little food colouring, as Sydney did.
  • Beads. Thread a bead on every other knot near the center, or scatter them through the whole web.
  • Trim. Hang braided cord, lace or bead strings between the feathers.
  • Size. Make a set of three hoops in different sizes and hang them together.

The same knotting skills show up in a macrame wall hanging, and a dream catcher hangs well beside a homemade wind chime or a suncatcher in a window. If you use an embroidery hoop as the frame, see how to finish an embroidery hoop for neat tie-off ideas.

Common mistakes

  • Gaps in the suede. Wrap tightly and push the turns together as you go.
  • Uneven first round. Mark the hoop lightly with a pencil before you start.
  • Feathers slipping. Wrap the wire firmly and add a dab of glue if needed.

It makes a lovely afternoon project with a grandchild. They can pick the beads and feathers while you handle the knots.

Free printable

Print the steps and supply list for this project

One page you can take to the table. Free with a free account, no password.

Get the free printable

What you'll need

Free, for this project

Get this checklist by email

  • All 12 tools and materials, with tick boxes
  • A link to print all 10 steps on paper, to keep by you while you craft

No password. The whole tutorial stays free on this page.

Quick answer

How to make a dream catcher: wrap a hoop in suede, knot an even web with waxed cord, add beads and hang tinted feathers. An easy project: about 1 hour 30 minutes. Materials cost about $6 to $12. You need 12 things, including 6 inch metal hoop, suede lace and waxed cord. The 10 steps start with wrap Suede Lace Around the Dream Catcher Hoop and tie the Suede Lace Ends in a Double Knot on the Hoop.

Step-by-step guide

10 steps, about 13 minutes. Tap a picture to jump to that step. Your progress saves automatically.

Tick each step off as you go.

  1. Step 1: Wrap Suede Lace Around the Dream Catcher Hoop

    Watch this step · 2:10

    Loop the end of the suede lace around the metal hoop a few times and hold it in place with a small clip. Then wrap the lace around the whole hoop in one even layer. Pull each turn tight and push it up against the one before so no metal shows through. When you get back to the start, trim the lace to about 10 inches so there is enough left to tie off.

    Tip:

    Lay the lace flat as you wrap. A twisted strip leaves lumps and gaps.

    Back to all steps

  2. Step 2: Tie the Suede Lace Ends in a Double Knot on the Hoop

    Watch this step · 3:02

    Take off the clip and check the wrap. Slide any loose turns together so the hoop is covered evenly and tightly. Then tie the two ends of the suede in a double knot, left over right and then right over left. Trim the tails close. Turn the hoop so this knot sits at the bottom, where the feathers will hide it later.

    Tip:

    Keep the trimmed tails if you like. They make good hanging loops.

    Back to all steps

  3. Step 3: Tie the Waxed Cord Onto the Dream Catcher Hoop

    Watch this step · 3:40

    Measure out about 10 feet of waxed cord and wind it around your fingers into a small ball so it is easy to handle. Tie one end to the hoop in a tight knot, right next to the knot in the suede. This is where the web starts. Leave a short tail that you can trim once the first round is done.

    Tip:

    The amount of cord depends on how tight you weave. Too much is better than too little.

    Back to all steps

  4. Step 4: Knot the First Round of the Dream Catcher Web

    Watch this step · 4:50

    Measure out a couple of inches of cord along the hoop. Take the cord around the hoop and back through the loop you made, then pull it snug. That is the only knot you need for the whole web. Repeat it every two inches or so, keeping the spaces equal. Emilie's hoop took seven knots to go all the way round.

    Tip:

    Count your knots as you go and keep the gaps the same length each time.

    Back to all steps

  5. Step 5: Weave the Second Round of the Dream Catcher Web

    Watch this step · 6:06

    Now work toward the middle. Find the halfway point of the first loop, between two knots. Take the cord around that loop of cord instead of the hoop, then back through the opening you made, and pull it tight. Do the same in the middle of every loop around the circle. You should start to see the web taking shape.

    Tip:

    Pull each knot the same amount so the loops stay even.

    Back to all steps

  6. Step 6: Keep Weaving the Dream Catcher Web Toward the Center

    Watch this step · 7:30

    Carry on the same way, round after round. Each new knot goes in the middle of a loop from the round before. The openings get smaller as you go, and the web pulls itself into shape. Stop when there is a small hole left in the center, about the size of a fingertip. Keep the tension steady so the web sits flat across the hoop.

    Tip:

    Hold the hoop up to the light now and then to check the shape.

    Back to all steps

  7. Step 7: Add Beads to the Center of the Dream Catcher

    Watch this step · 9:23

    Before the last round, thread a bead or a small stone onto the cord. Slide it up and tie the next knot so the bead sits in the loop. Emilie did a bead on every other knot near the center. Finish the last round, tie a firm knot, and trim the cord close. That completes the inside of the dream catcher.

    Tip:

    Pick beads with holes big enough for the waxed cord to pass through.

    Back to all steps

  8. Step 8: Tint the Dream Catcher Feathers With Food Colouring

    Watch this step · 9:48

    This step is optional. Wet your fingers in a little water, add a drop of food colouring, and rub it into the tip of a white feather. Build the colour slowly until you like it. Sydney used blue and green, which gave the feathers soft depth. Lay the feathers flat to dry before you hang them.

    Tip:

    Wear gloves or expect blue fingers for a day.

    Back to all steps

  9. Step 9: Wire the Feathers to the Dream Catcher Hanging Cords

    Watch this step · 10:27

    Decide where each feather will hang along the bottom of the hoop. Cut about five inches of floral wire for each one. Line up the end of the feather quill with the end of a cord or trim, then wrap the wire around both until they feel firm. Add a few shells or beads to some cords so they hang over the feathers.

    Tip:

    Tuck the sharp wire end in so it does not snag the feathers.

    Back to all steps

  10. Step 10: Tie the Feather Strands to the Bottom of the Dream Catcher

    Watch this step · 11:58

    Tie each feather cord to the bottom of the hoop with a knot, spacing them around the suede knot. Emilie tried hot glue first and found knots easier and neater. Add a few extra bead strings between the feathers for more movement. Finish each one with a knot and trim the ends. Hang the dream catcher above a bed or in a window.

    Tip:

    Hang it where it can turn a little. The feathers catch the light as it moves.

    Back to all steps

How to Etch Glass With Etching Cream (Easy Vinyl Stencil Method)

Keep going

How to Etch Glass With Etching Cream (Easy Vinyl Stencil Method)

Keep going with crafts

More on this topic, picked for this dream catcher.

You reached the last step

Save this project to come back to it

Your ticked steps, the free printable and your other saved makes, together in My Projects. Free, no password.

You tapped Save

Save this project for later

We'll email you a link, no password.

How to Make a Dream Catcher - Easy Step by Step DIY

  • Your saved projects in one list
  • Your ticked steps on any device

Check your inbox for an email from us. Not there? Look in your spam folder.

Free printable

Printable sheet for this project

The bonus is hidden until you sign up.

Free with a free account, no password. Every step above stays open to everyone.

Products Used

The Checklist

How to Make a Dream Catcher - Easy Step by Step DIY

Tools
4
Materials
8
Steps
10
Video
13 min

Tools we recommend

As an Amazon Associate we earn from qualifying purchases. Links on this page may be affiliate links - clicking them and buying doesn't change your price, but helps support Crafting Step by Step.

Tags

The Crafter's Weekly

New crafts tutorials, every Sunday

One short email with the week's best step-by-step guides. Free, no spam, unsubscribe anytime.

Did this work for you?

What's next

Related collections

Curated theme pages that include this tutorial.

Similar tutorials

Hand-picked next reads based on the one you just finished.

Liked this crafts tutorial?

Pick the crafts you want to hear about. One email every Sunday with new step-by-step tutorials. No spam, easy to unsubscribe.

Get more like this in your inbox

Weekly digest. Pick the categories you want. Unsubscribe anytime.

Send me tutorials about

We only email about new tutorials. Easy unsubscribe anytime.