How to Make a Mosaic Garden Stake

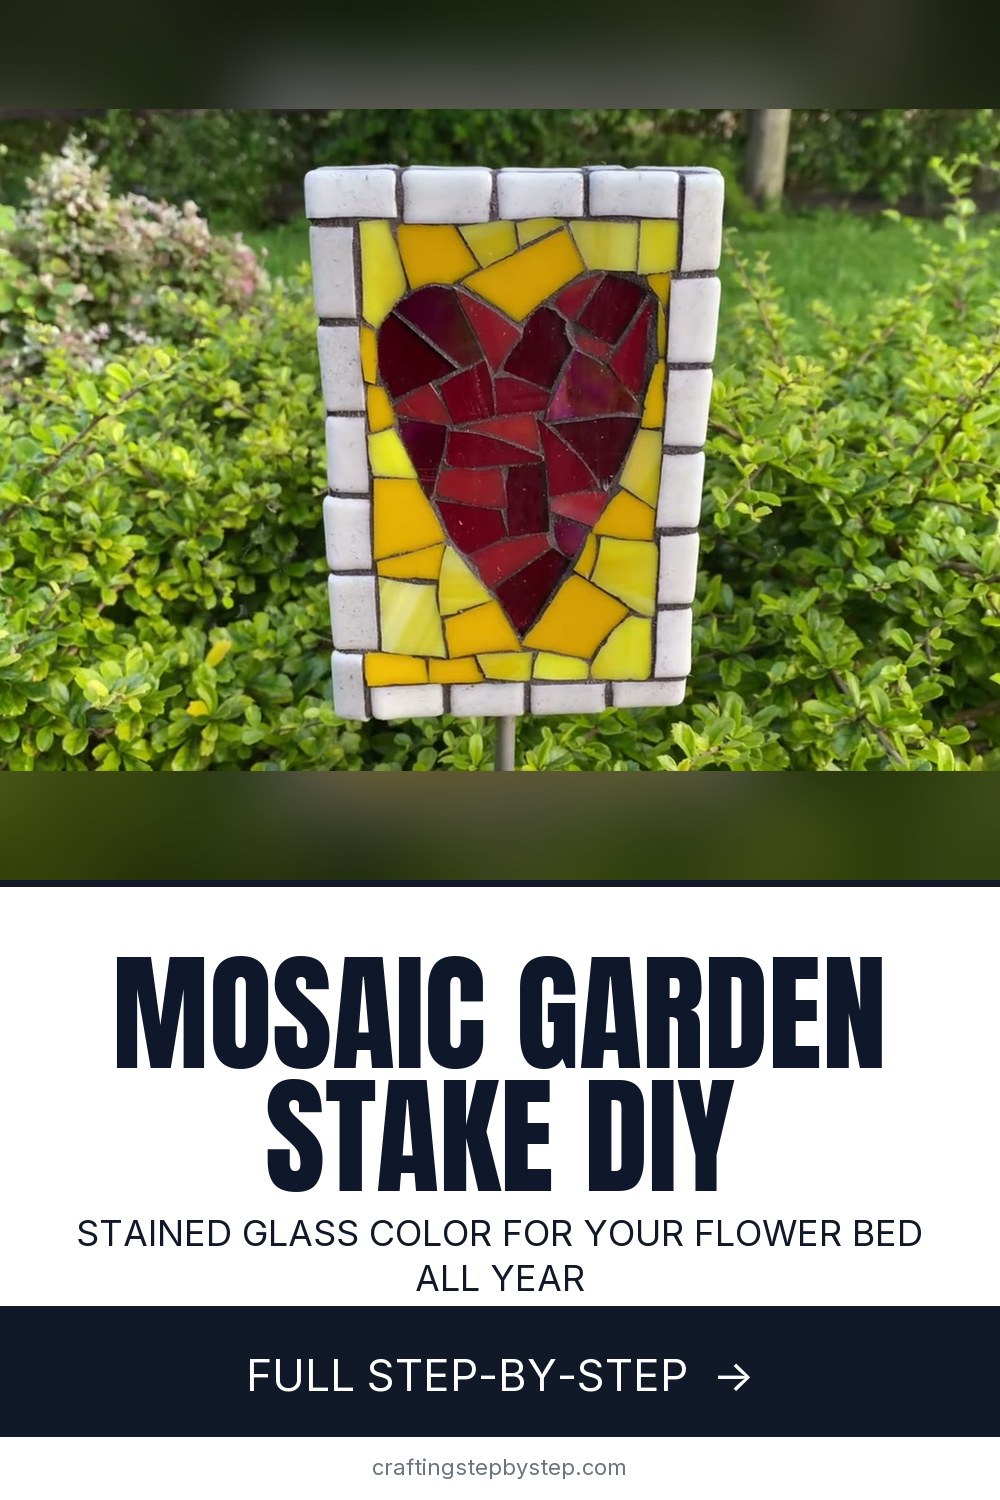
The finished result: How to Make a Mosaic Garden Stake
  • Difficulty: Medium
  • About 2 hours 30 minutes, plus 48 hours to dry or set
  • 10 steps

You tapped Save

Save this project for later

We'll email you a link, no password.

How to Make a Mosaic Garden Stake

  • Your saved projects in one list
  • Your ticked steps on any device

Check your inbox for an email from us. Not there? Look in your spam folder.

Print

Steps written out by Crafting Step by Step from Julie Weilbacher's video (opens YouTube) (14:48). Published .

A mosaic garden stake is a small tiled panel on a metal rod that you push into a flower bed or a big planter. It is a fun first outdoor mosaic because it is small, so you can finish it over a weekend, and it adds color to the garden even when nothing is blooming. Julie Weilbacher builds two heart stakes from stained glass and white glass tile on a foam backer board, then grouts them in charcoal.

How to make a mosaic garden stake: the short version

  • Cut a waterproof foam backer board to size and tape the foam edges.
  • Push a metal rod into the foam core.
  • Skim the board with thin-set mortar and let it cure 24 hours.
  • Sketch a design in chalk, then tile the border and the design.
  • Let it set 24 hours, then grout with fortified grout and wipe clean.

Why the substrate matters outdoors

Plywood and MDF swell and rot once rain gets in, and the tiles pop off. A foam core backer board (Wedi board or a similar foam tile backer) is waterproof and very light, which matters when the whole thing balances on one rod. It comes from 1/8 inch to 2 inches thick. Julie uses 1/2 inch board, which takes a sturdy rod and is plenty strong for a stake this size.

Picking the size and the rod

Think about where the stake will live. A planter wants a small panel on a short rod. A deep flower bed can take a bigger panel up higher. The heavier the panel, the thicker the rod needs to be, and a big panel may need to sit lower to the ground so it does not lean. Aluminum rod from the hardware store is a good choice because it does not rust and does not bend easily. Match the rod diameter to the board thickness so it fits snugly in the foam.

Use fortified products

Everything on an outdoor mosaic should be rated for wet conditions. Julie uses fortified thin-set mortar both to seal the board and as the tile adhesive. For grout, use a fortified grout, or mix a latex grout additive in place of the water. It keeps the color strong and helps the grout hold up through wet and dry spells. Wait at least three days, then add a grout sealer for more protection. See how to seal a mosaic for outdoor use.

Design ideas

  • A heart, a flower, a sun or a ladybug read well from across the yard.
  • House numbers or a family name for the front bed.
  • A grandchild's initial or handprint shape for a gift.
  • Plain tile on the back is fine. Nobody sees it, but it seals the board.
  • Broken china works too. See how to cut plates for mosaic.

Caring for your stake

Bring the stake indoors for harsh winters, especially where freeze and thaw cycles are common. Water that gets into a hairline crack expands when it freezes and can pry tiles loose. A quick wipe with a damp cloth in spring brings the glass back to full shine.

New to mosaics? Learn how to grout a mosaic before you start, and when you are ready for a bigger outdoor piece, try a mosaic stepping stone or a mosaic bird bath.

Free printable

Print the steps and supply list for this project

One page you can take to the table. Free with a free account, no password.

Get the free printable

What you'll need

Free, for this project

Get this checklist by email

  • All 15 tools and materials, with tick boxes
  • A link to print all 10 steps on paper, to keep by you while you craft

No password. The whole tutorial stays free on this page.

Quick answer

How to make a mosaic garden stake: tape and mortar a foam board, add a metal rod, tile a stained glass design and grout it for outdoors. A medium project: about 2 hours 30 minutes, plus 48 hours to dry or set. Materials cost about $15 to $30. You need 15 things, including foam core backer board, self-adhesive fiberglass mesh tape and aluminum rod. The 10 steps start with tape the Foam Edges of the Mosaic Garden Stake Board.

Step-by-step guide

10 steps, about 15 minutes. Tap a picture to jump to that step. Your progress saves automatically.

Tick each step off as you go.

  1. Step 1: Tape the Foam Edges of the Mosaic Garden Stake Board

    Watch this step · 4:02

    Start with your backer board cut to size. The cut edges show bare blue foam, and those need covering. Center self-adhesive fiberglass mesh tape over each exposed edge and fold it down onto both faces. Press it flat and wrap the corners too. Wear disposable gloves if the fiberglass makes your hands itch. The tape gives the mortar something to grip.

    Tip:

    Cut the tape a little long and trim the overhang so the corners stay neat.

    Back to all steps

  2. Step 2: Push the Metal Rod Into the Garden Stake Foam Core

    Watch this step · 4:44

    Push the rod into the foam core at the bottom edge, or the side, depending on your design. You may need to snip a small hole in the mesh tape first because its adhesive grips the foam hard. Go in about halfway up the board at most. Push too far and the foam can split. Mark the rod with a marker if you want every stake the same.

    Tip:

    Twist the rod gently as you push. It slides in more easily than a straight shove.

    Back to all steps

  3. Step 3: Coat the Garden Stake Board With Thin-Set Mortar

    Watch this step · 5:10

    Spread a thin coat of thin-set mortar over the front, back and sides of the board with a plastic putty knife. Cover the mesh tape and the spot where the rod enters the foam. Julie pulls the rod out, adds a dab of mortar into the hole, and pushes it back in for extra hold. Let the board cure for at least 24 hours.

    Tip:

    Match the thin-set color to your grout. Use gray under dark grout, white under light.

    Back to all steps

  4. Step 4: Nip the White Border Tiles for the Mosaic Garden Stake

    Watch this step · 7:12

    Sketch your design straight onto the cured board with chalk. Then prepare the border. Julie edges her stakes with white glass tiles and uses nippers to trim pieces to fit the corners and the short ends. Lay the tiles out on the table first so you can see how many full tiles fit along each side before you cut.

    Tip:

    Nip over a tray or a paper bag. Glass chips fly farther than you expect.

    Back to all steps

  5. Step 5: Set the White Tile Border Around the Garden Stake

    Watch this step · 7:42

    Butter the back of each tile with a little thin-set and press it in place around the edge of the board. Keep the gaps between tiles even so the grout lines look tidy. Julie holds the stake up by its rod to check the edges and the sides as she goes. The border frames the design and protects the board's corners.

    Tip:

    Wipe any mortar that squeezes up onto the tile face before it hardens.

    Back to all steps

  6. Step 6: Fill the Chalk Heart With Red Stained Glass

    Watch this step · 8:26

    Now the fun part. Work inside the chalk outline with red stained glass pieces. Dab mortar on the board or the glass and set each piece with tweezers. Leave small, even gaps for grout. Mixing a couple of shades of red makes the heart look richer and more like stained glass in a window.

    Tip:

    Tweezers help you place small pieces without smearing mortar across the glass.

    Back to all steps

  7. Step 7: Add the Yellow Background Around the Mosaic Heart

    Watch this step · 8:50

    Once the heart is filled, cut yellow stained glass to fill the space between the heart and the white border. Fit the pieces like a puzzle, keeping the gaps about the same width. Tile the back and sides too so the whole board is sealed. Let the finished stake sit for at least 24 hours before grouting.

    Tip:

    A wheeled glass nipper gives cleaner curves along the heart's edge than tile nippers.

    Back to all steps

  8. Step 8: Grout the Mosaic Garden Stake

    Watch this step · 10:12

    Mix fortified grout, or use a latex additive instead of water, and let it rest a few minutes. Wearing gloves, spread it over the tiled face and push it into every gap with small clockwise and counterclockwise circles. Work around the rod too. Julie rests the rod against her forearm to hold the stake steady while she grouts. Let it sit about 10 minutes.

    Tip:

    Do the sides last. They are easier once the face is grouted and you can tip the stake.

    Back to all steps

  9. Step 9: Wipe the Grout Off the Mosaic Heart With a Dry Paper Towel

    Watch this step · 11:56

    Once the grout firms up, wipe the face with a dry paper towel, using the same circular motions. Dry towels pull off the haze without adding water that can weaken the grout lines. The colors come back as you go. Use a damp sponge only for the stubborn spots, then go back over everything once more to polish.

    Tip:

    Keep turning the towel to a clean side so you do not smear grout back on.

    Back to all steps

  10. Step 10: Clean the Edges and Seal the Mosaic Garden Stake

    Watch this step · 12:08

    Stand the stake on its edge and wipe the side tiles the same way, then the back. Check the corners and around the rod for any gaps you missed. Let the grout cure. After at least three days, you can add a grout sealer for longer life outdoors. Then push the rod into a bed or planter and enjoy it.

    Tip:

    Bring the stake inside before a hard freeze to keep the tiles tight for years.

    Back to all steps

How to Make a Coiled Rope Basket With a Sewing Machine

Keep going

How to Make a Coiled Rope Basket With a Sewing Machine

Keep going with crafts

More on this topic, picked for this mosaic garden stake.

You reached the last step

Save this project to come back to it

Your ticked steps, the free printable and your other saved makes, together in My Projects. Free, no password.

You tapped Save

Save this project for later

We'll email you a link, no password.

How to Make a Mosaic Garden Stake

  • Your saved projects in one list
  • Your ticked steps on any device

Check your inbox for an email from us. Not there? Look in your spam folder.

Free printable

Printable sheet and shopping list for this project

The bonus is hidden until you sign up.

Free with a free account, no password. Every step above stays open to everyone.

Products Used

The Checklist

How to Make a Mosaic Garden Stake

Tools
7
Materials
8
Steps
10
Video
15 min

Tools we recommend

As an Amazon Associate we earn from qualifying purchases. Links on this page may be affiliate links - clicking them and buying doesn't change your price, but helps support Crafting Step by Step.

Tags

The Crafter's Weekly

New crafts tutorials, every Sunday

One short email with the week's best step-by-step guides. Free, no spam, unsubscribe anytime.

Did this work for you?

What's next

Related collections

Curated theme pages that include this tutorial.

Similar tutorials

Hand-picked next reads based on the one you just finished.

Liked this crafts tutorial?

Pick the crafts you want to hear about. One email every Sunday with new step-by-step tutorials. No spam, easy to unsubscribe.

Get more like this in your inbox

Weekly digest. Pick the categories you want. Unsubscribe anytime.

Send me tutorials about

We only email about new tutorials. Easy unsubscribe anytime.