How to Make a Coiled Rope Basket With a Sewing Machine

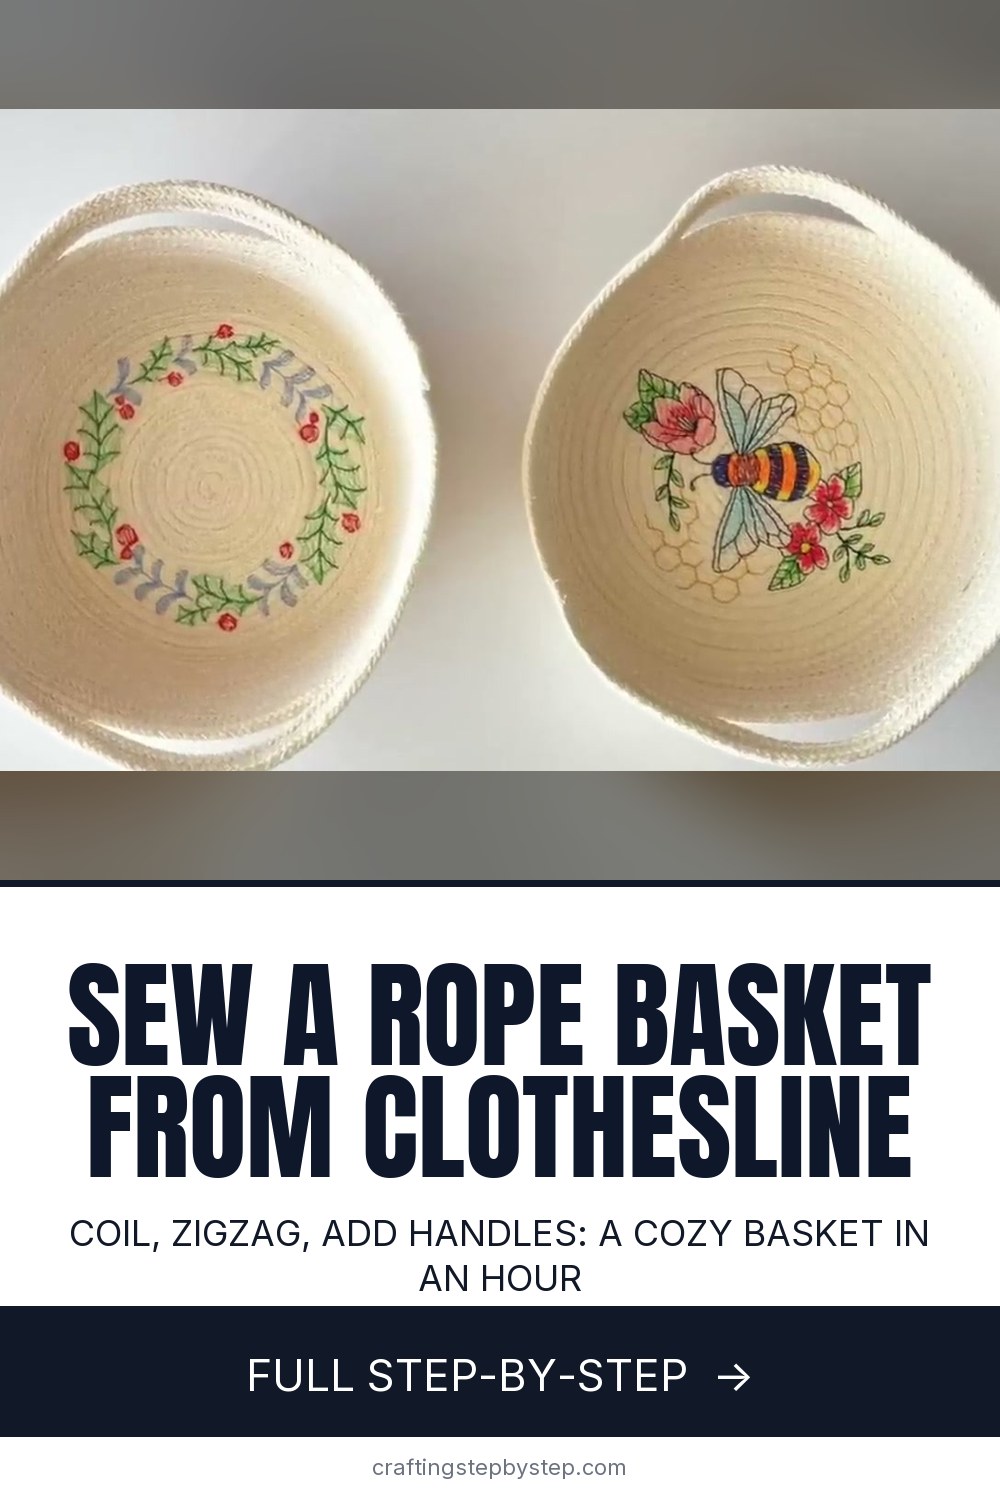
The finished result: How to Make a Coiled Rope Basket With a Sewing Machine
  • Difficulty: Easy
  • About 1 hour
  • 10 steps

You tapped Save

Save this project for later

We'll email you a link, no password.

How to Make a Coiled Rope Basket With a Sewing Machine

  • Your saved projects in one list
  • Your ticked steps on any device

Check your inbox for an email from us. Not there? Look in your spam folder.

Print

Steps written out by Crafting Step by Step from The Birch Cottage's video (opens YouTube) (6:50). Published .

Also in:Sewing

A coiled rope basket is one of the most satisfying things you can make on a home sewing machine. You wind soft cotton clothesline into a spiral and zigzag it together, and in under an hour you have a sturdy bowl with handles. Pam from The Birch Cottage shows the whole method, from the first tight coil to stitching down the final end.

How to make a coiled rope basket: the short version

  • Unwind the rope and cut the end at an angle.
  • Coil the end three or four turns and zigzag across it to lock it.
  • Zigzag round and round, keeping the rope flat, until the base is the size you want.
  • Tilt the base up against the machine to build the sides.
  • Leave loops of slack for handles, then trim and stitch the end down.

Choosing rope

Look for 100 percent cotton clothesline about 7/32 to 1/4 inch thick. It is soft enough for a home machine and stiff enough to hold a shape. Skip rope with a plastic core or a nylon wrap. A small bowl takes 50 to 80 feet. A larger storage basket can use 150 feet or more, so buy extra. Some rope sheds lint, so clean out the bobbin area after each project.

Machine settings and needle

Set your machine to its widest zigzag, with a medium stitch length. The stitch should catch the rope on both sides of the seam. Use a heavy needle, a jeans or denim needle in size 90 or 100, so it does not bend in the thick rope. A zigzag foot or an open toe foot gives you a clear view of the join. Wind two or three bobbins before you start, because a basket eats thread.

How the sides form

The angle you hold the base at decides the shape. Lift it a little and you get a shallow, flared bowl. Hold it nearly upright against the side of the machine and the walls go straight up. Keep the same angle all the way around, or the sides will wobble. Pam stops at a height she likes and moves on to the handles.

Colored thread and decorations

Matching thread disappears into the rope. Contrasting or variegated thread turns every round into a stripe. Pam stitched an embroidery design into the flat base on her embroidery machine before building the sides. You can also wrap fabric scraps around the rope as you go, or add a band of dyed rope near the top.

Ways to use a rope basket

Small bowls hold keys, jewelry or sewing notions by the machine. Larger ones store yarn, toys or towels. Stop at the flat base stage and you have a coaster, a trivet or a mug rug. A set of three in graduated sizes makes a lovely gift.

Common problems

  • Gaps between rounds. Push the new round snug against the last one as it goes under the foot.
  • Base cups up too early. You were lifting the coil. Keep it flat on the bed of the machine until you want sides.
  • Broken needles. Pull pins out before they reach the foot, and use a heavier needle.

More easy sewing: start with how to sew, then try a drawstring bag. Prefer a hook? See how to crochet a basket, or build a clay coil pot the same spiral way.

Free printable

Print the steps and supply list for this project

One page you can take to the table. Free with a free account, no password.

Get the free printable

What you'll need

Free, for this project

Get this checklist by email

  • All 9 tools and materials, with tick boxes
  • A link to print all 10 steps on paper, to keep by you while you craft

No password. The whole tutorial stays free on this page.

Quick answer

How to make a coiled rope basket from cotton clothesline: coil, zigzag, lift the sides and add handles. An easy project: about 1 hour. Materials cost about $8 to $15. You need 9 things, including 7/32 inch cotton clothesline rope, matching all-purpose thread and clear tape. The 10 steps start with unwind the Cotton Clothesline Rope for the Basket, cut the Rope End at an Angle and Tape It and coil the Rope Center Into a Tight Spiral.

Step-by-step guide

10 steps, about 7 minutes. Tap a picture to jump to that step. Your progress saves automatically.

Tick each step off as you go.

  1. Step 1: Unwind the Cotton Clothesline Rope for the Basket

    Watch this step · 0:27

    Gather cotton clothesline rope, thread that matches it, pins or clips, scissors and your sewing machine. Find the loose end of the rope and unwind the whole hank. Pam drops the loose rope into a basket on the floor to her right, so it feeds smoothly to the machine without tangling or pulling on the work as the basket grows.

    Tip:

    Unwound rope feeds evenly. A tight hank tugs and twists the coil.

    Back to all steps

  2. Step 2: Cut the Rope End at an Angle and Tape It

    Watch this step · 0:56

    Snip off any tape the rope came with, then cut the end at a long slant. The taper lets the very center of the coil roll up tight with no lump in the middle. To stop the end fraying, wrap a small piece of clear tape firmly around it and trim the tape to the same angle. The tape is optional but makes the start much neater.

    Tip:

    Sharp fabric scissors give a clean slanted cut through thick cotton rope.

    Back to all steps

  3. Step 3: Coil the Rope Center Into a Tight Spiral

    Watch this step · 2:14

    Take the tapered end and roll it toward itself, around and around, three or four times. Keep it flat and tight, like a snail shell. Hold the little spiral together with a couple of pins pushed through the rope, or with sewing clips. This tiny coil is the center of the basket base, so keep it as round as you can.

    Tip:

    Clips are easier to grab and remove than pins on thick rope.

    Back to all steps

  4. Step 4: Zigzag an X Across the Rope Coil Center

    Watch this step · 2:42

    Set your machine to a wide zigzag stitch. Put the coil under the presser foot and stitch straight across the middle, pulling the pins out before they reach the needle. Turn the coil a quarter turn and stitch across again so you make an X. That locks the spiral together so it cannot spring apart when you start sewing around it.

    Tip:

    A heavy jeans needle copes with the thick rope much better than a standard one.

    Back to all steps

  5. Step 5: Zigzag the Rope Around to Build a Flat Basket Base

    Watch this step · 3:04

    Now stitch the rope round and round. The zigzag should land half on the coil and half on the new rope, joining them. Rotate the coil slowly with your left hand and guide the rope in with your right. Keep everything flat against the bed of the machine. Do not lift it yet. Keep going until the base is as wide as you want the bottom of your basket.

    Tip:

    Stop with the needle down whenever you reposition your hands.

    Back to all steps

  6. Step 6: Tilt the Rope Base Up to Start the Basket Sides

    Watch this step · 3:32

    To start the sides, slide your left hand under the base and lift it up against the side of the machine while you keep stitching. The rope now stacks on top of the last round instead of beside it, and the walls start to rise. The more you lift, the steeper the sides. Hold the same angle all the way around for an even shape.

    Tip:

    A slight tilt makes a shallow bowl. Nearly upright makes a tall basket.

    Back to all steps

  7. Step 7: Keep Stitching Until the Rope Basket Sides Are Tall Enough

    Watch this step · 3:48

    Keep zigzagging round after round, guiding the rope with your right hand and holding the angle with your left. As the basket gets bigger it will bump into the machine, so let it turn on its side or lean it away from you. Stop now and then to check the height. Pam builds her sides a few inches tall before adding handles.

    Tip:

    Wind a spare bobbin before you start the sides so you do not run out mid-round.

    Back to all steps

  8. Step 8: Mark the Rope Basket Handle Spots With Pins

    Watch this step · 4:04

    Find the center of each side of the basket and mark it with a pin. Then measure an inch and a half to the left and right of each center and pin those spots too. That gives a three inch opening on each side for the handles. Zigzag up to the first pin on one side and stop with the needle down.

    Tip:

    Measure both sides the same way so the handles match.

    Back to all steps

  9. Step 9: Leave Rope Slack for Each Basket Handle

    Watch this step · 5:08

    At the first pin, stop joining the rope to the basket. Pull out a loop of loose rope, about three and a half inches, to form the handle and pin it down so it cannot slip. Then start stitching the rope back onto the basket at the second pin. Measure the loop so the handle on the other side matches, and repeat there.

    Tip:

    Do not catch the handle loop to the basket until you reach the far pin.

    Back to all steps

  10. Step 10: Trim and Stitch Down the Rope End to Finish the Basket

    Watch this step · 6:04

    Go around at least one more time so each handle is two layers of rope thick and strong. When you reach the end of your final round, trim the rope at a long angle, pin it flat against the side of the basket and zigzag over it a few times. The taper hides the end. Your rope basket is done. Make another in a new size or shape.

    Tip:

    Finish the tail on the side, not the top edge, so it is barely noticeable.

    Back to all steps

How to Make a Dried Flower Wreath

Keep going

How to Make a Dried Flower Wreath

Keep going with crafts

More on this topic, picked for this coiled rope basket with a sewing machine.

You reached the last step

Save this project to come back to it

Your ticked steps, the free printable and your other saved makes, together in My Projects. Free, no password.

You tapped Save

Save this project for later

We'll email you a link, no password.

How to Make a Coiled Rope Basket With a Sewing Machine

  • Your saved projects in one list
  • Your ticked steps on any device

Check your inbox for an email from us. Not there? Look in your spam folder.

Free printable

Printable sheet for this project

The bonus is hidden until you sign up.

Free with a free account, no password. Every step above stays open to everyone.

Products Used

The Checklist

How to Make a Coiled Rope Basket With a Sewing Machine

Tools
6
Materials
3
Steps
10
Video
7 min

Tools we recommend

As an Amazon Associate we earn from qualifying purchases. Links on this page may be affiliate links - clicking them and buying doesn't change your price, but helps support Crafting Step by Step.

Tags

The Crafter's Weekly

New crafts tutorials, every Sunday

One short email with the week's best step-by-step guides. Free, no spam, unsubscribe anytime.

Did this work for you?

What's next

Related collections

Curated theme pages that include this tutorial.

Similar tutorials

Hand-picked next reads based on the one you just finished.

Liked this crafts tutorial?

Pick the crafts you want to hear about. One email every Sunday with new step-by-step tutorials. No spam, easy to unsubscribe.

Get more like this in your inbox

Weekly digest. Pick the categories you want. Unsubscribe anytime.

Send me tutorials about

We only email about new tutorials. Easy unsubscribe anytime.