How to Etch Glass With Etching Cream (Easy Vinyl Stencil Method)

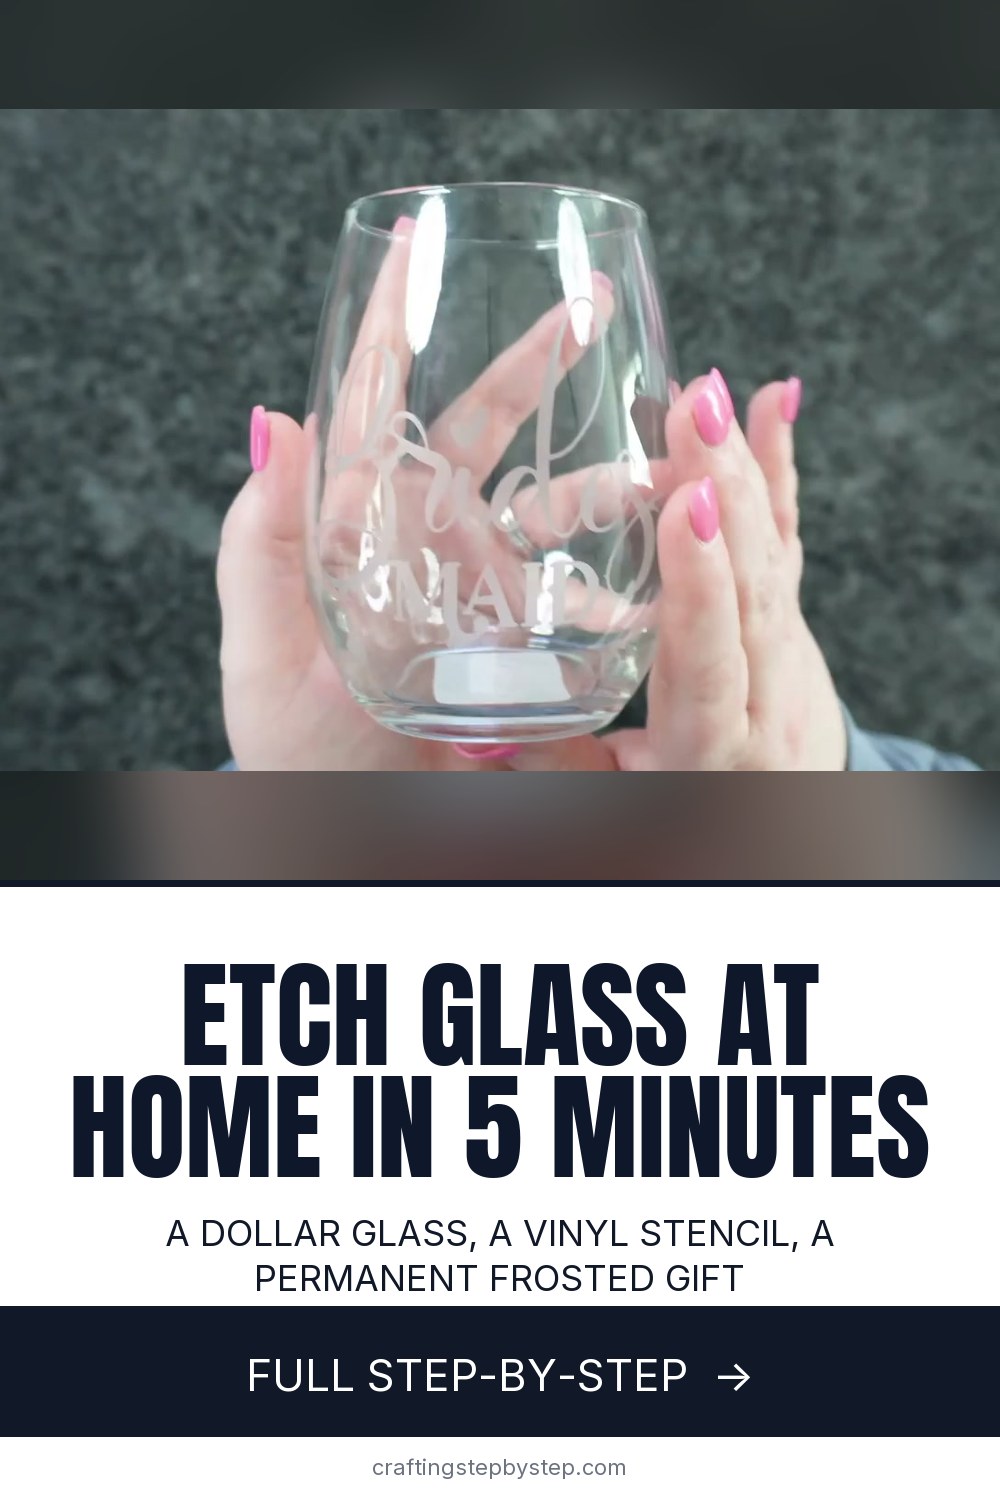
The finished result: How to Etch Glass With Etching Cream (Easy Vinyl Stencil Method)
  • Difficulty: Easy
  • About 30 minutes, plus 15 minutes to dry or set
  • 10 steps

You tapped Save

Save this project for later

We'll email you a link, no password.

How to Etch Glass With Etching Cream (Easy Vinyl Stencil Method)

  • Your saved projects in one list
  • Your ticked steps on any device

Check your inbox for an email from us. Not there? Look in your spam folder.

Print

Steps written out by Crafting Step by Step from Design Bundles' video (opens YouTube) (17:10). Published .

Etching cream turns plain glass into a frosted, permanent design in about five minutes. No special machine required for the etching itself, and the finish will not peel or wash off like vinyl. Crystal from Design Bundles shows the whole process on a one dollar stemless wine glass, turning it into a Brides Maid gift with a vinyl stencil and a jar of Armour Etch.

How to etch glass with etching cream: the short version

  • Cut and weed a reverse stencil, so the design is open and the vinyl around it stays.
  • Stick the stencil flat on clean glass with no gaps around the letters.
  • Dab on a thick layer of cream, wait 5 to 10 minutes, moving it once or twice.
  • Scrape the cream back into the jar, rinse, peel and wash.

Safety first

Etching cream works because it eats into the surface of glass, so treat it with respect. Wear gloves and work in a room with good airflow. Keep it away from kids and pets, and do not let it touch your skin or eyes. Rinse the glass under running water before you handle it bare handed, and peel the stencil off at the sink. Crystal skipped gloves on camera and says plainly that you should not.

What glass works

Ordinary soda lime glass etches well: dollar store wine glasses, mason jars, mugs, Pyrex dishes, mirrors and glass blocks. Some tempered or coated glass and anything labeled lead crystal can resist the cream or etch unevenly, so test a hidden spot. Clean the glass with rubbing alcohol first. Fingerprints and dish soap film keep the cream from biting evenly.

Choosing the stencil

Any adhesive vinyl works as a stencil, even scraps in colors you never use. Pick a dark color so you can see the white cream against it. Leave a border of a quarter to half an inch of vinyl around the design so cream does not creep onto bare glass. Bold fonts etch more cleanly than thin script lines. No cutting machine? Pre-cut etching stencils and alphabet sheets work the same way.

Why it comes out blotchy

  • Patchy frosting means the cream went on too thin. Pile it on.
  • Fuzzy edges mean the stencil lifted. Burnish every edge before the cream goes on.
  • Faint result means too short a wait or a cold room. Move the cream around and give it a few more minutes.

Can you undo a mistake?

No. Etching is permanent, so the only fix is a new glass. That is why the stencil step matters most. Practice on a cheap jar first, and check every edge of the vinyl before any cream goes on.

Gift ideas

Wedding party glasses for the bride, groom and bridesmaids. Family names on a casserole dish. Monograms on a set of jars for the pantry. A grandchild's handprint traced and etched onto a picture frame glass. Etched pieces are dishwasher safe, so they hold up to daily use.

To cut your own stencils, see how to use a Cricut and cutting SVG files. For more glass projects, try cutting a glass bottle or a stained glass suncatcher.

Free printable

Print the steps and supply list for this project

One page you can take to the table. Free with a free account, no password.

Get the free printable

What you'll need

Free, for this project

Get this checklist by email

  • All 11 tools and materials, with tick boxes
  • A link to print all 10 steps on paper, to keep by you while you craft

No password. The whole tutorial stays free on this page.

Quick answer

How to etch glass with etching cream: weed a vinyl stencil, dab on the cream, wait five minutes and rinse. An easy project: about 30 minutes, plus 15 minutes to dry or set. Materials cost about $1 to $5. You need 11 things, including glass etching cream, adhesive vinyl and transfer tape. The 10 steps start with weed a Reverse Vinyl Stencil for Glass Etching, check the Border Around the Etching Stencil and pick Up the Etching Stencil With Transfer Tape.

Step-by-step guide

10 steps, about 17 minutes. Tap a picture to jump to that step. Your progress saves automatically.

Tick each step off as you go.

  1. Step 1: Weed a Reverse Vinyl Stencil for Glass Etching

    Watch this step · 2:45

    Cut your design from adhesive vinyl with a Cricut, Silhouette or similar machine. Now weed it backwards. Normally you pull away the background and keep the letters. For etching you pull out the letters and keep the background, because the open spaces are where the cream will frost the glass. A pin pen weeding tool lifts the small pieces out without stretching the vinyl.

    Tip:

    Press any piece that lifts by mistake straight back down before it loses its stick.

    Back to all steps

  2. Step 2: Check the Border Around the Etching Stencil

    Watch this step · 4:40

    Hold the finished stencil up and look it over. Every letter and every inside piece, like the middle of an a or e, should be where it belongs. Check the border too. You want at least a quarter inch, and up to half an inch, of vinyl all the way around the design. A thin border lets cream slip onto bare glass and leaves a frosted smudge you cannot undo.

    Tip:

    When you cut, nudge the design in from the corner of the mat to leave room for a border.

    Back to all steps

  3. Step 3: Pick Up the Etching Stencil With Transfer Tape

    Watch this step · 5:34

    Lay a piece of transfer tape over the stencil and rub it down so every part sticks to the tape. Then peel the tape up slowly at an angle. The stencil comes off the backing in one piece, small inside bits included. If your design has no loose pieces, you can skip the tape and stick the vinyl straight onto the glass.

    Tip:

    Regular strength transfer tape lets go of the vinyl more easily on glass than strong grip tape.

    Back to all steps

  4. Step 4: Press the Stencil Onto the Wine Glass, Center First

    Watch this step · 7:08

    Make sure the glass is clean and dry. Rest it on a folded t-shirt or old hand towel so it cannot roll. Decide where the design should sit, then press the center of the stencil down first. Work slowly out toward the sides. A round glass wants to make the vinyl buckle, so smooth a little at a time rather than pressing the whole piece at once.

    Tip:

    The wet method, a light mist of soapy water under the vinyl, helps on very curved glass.

    Back to all steps

  5. Step 5: Smooth the Vinyl Stencil Flat on the Curved Glass

    Watch this step · 9:22

    Peel the transfer tape away at a sharp angle, leaving the vinyl on the glass. Now go around every letter with your finger or a squeegee and press the edges flat. The outer corners can wrinkle a little and that is fine. What matters is that the vinyl touching the letters has no gaps or bubbles, or the cream will seep underneath.

    Tip:

    Run a fingernail along every edge right before the cream goes on.

    Back to all steps

  6. Step 6: Dab Glass Etching Cream Over the Stencil

    Watch this step · 10:40

    Put on gloves. Stir the cream in the jar, then scoop some out with a wooden craft stick. Dab it over the open letters in a thick layer. You are not painting it on in thin strokes. Pile it up so no glass shows through. Stay on top of the stencil and keep the cream off the bare glass outside it.

    Tip:

    A thick layer gives an even frost. Thin spots come out blotchy.

    Back to all steps

  7. Step 7: Let the Etching Cream Sit, Then Pounce It Around

    Watch this step · 12:32

    Set the glass down and wait. The Armour Etch jar says one to three minutes. Crystal waits about two minutes, then pounces the cream around with the stick to bring fresh cream onto the glass and catch any spot she missed. Then she waits two or three minutes more, about five in total. For a deeper frost, go up to ten minutes, moving the cream every few minutes.

    Tip:

    Pounce straight up and down so you do not push cream under the stencil edges.

    Back to all steps

  8. Step 8: Scrape the Etching Cream Back Into the Jar

    Watch this step · 13:28

    Do not wash the cream down the drain. Scrape it off the glass with the craft stick and put it back in the jar. It still works, so one small jar lasts a long time. Get off as much as you can, then wipe the last bits away with a damp paper towel and throw the towel out.

    Tip:

    Use paper towels, not your dish towels, for anything that touched the cream.

    Back to all steps

  9. Step 9: Rinse and Peel the Stencil Off the Etched Glass

    Watch this step · 15:30

    Take the glass to the sink and rinse it well with soapy running water while the stencil is still on. Only then peel the vinyl away, under the water if you can. Pick out small inside pieces with your weeding tool. Under running water the stencil slides off easily and no cream touches your hands.

    Tip:

    Keep your gloves on until every trace of cream is rinsed away.

    Back to all steps

  10. Step 10: Wash and Buff the Etched Wine Glass

    Watch this step · 16:28

    Give the glass one more wash with soap and water, then dry it and buff it with a paper towel. The frosted design shows up clearly once the glass is dry. It is permanent and safe in the dishwasher. Make a whole set at once: the stencil step takes the longest, and every glass etches in the same five minutes.

    Tip:

    Hold the glass against a dark background to check the frost is even.

    Back to all steps

How to Do an Image Transfer Onto Wood (Easy Label Paper Method)

Keep going

How to Do an Image Transfer Onto Wood (Easy Label Paper Method)

Keep going with crafts

More on this topic, picked for this project.

You reached the last step

Save this project to come back to it

Your ticked steps, the free printable and your other saved makes, together in My Projects. Free, no password.

You tapped Save

Save this project for later

We'll email you a link, no password.

How to Etch Glass With Etching Cream (Easy Vinyl Stencil Method)

  • Your saved projects in one list
  • Your ticked steps on any device

Check your inbox for an email from us. Not there? Look in your spam folder.

Free printable

Printable sheet for this project

The bonus is hidden until you sign up.

Free with a free account, no password. Every step above stays open to everyone.

Products Used

The Checklist

How to Etch Glass With Etching Cream (Easy Vinyl Stencil Method)

Tools
5
Materials
6
Steps
10
Video
17 min

Tools we recommend

As an Amazon Associate we earn from qualifying purchases. Links on this page may be affiliate links - clicking them and buying doesn't change your price, but helps support Crafting Step by Step.

Tags

The Crafter's Weekly

New crafts tutorials, every Sunday

One short email with the week's best step-by-step guides. Free, no spam, unsubscribe anytime.

Did this work for you?

What's next

Related collections

Curated theme pages that include this tutorial.

Similar tutorials

Hand-picked next reads based on the one you just finished.

Liked this crafts tutorial?

Pick the crafts you want to hear about. One email every Sunday with new step-by-step tutorials. No spam, easy to unsubscribe.

Get more like this in your inbox

Weekly digest. Pick the categories you want. Unsubscribe anytime.

Send me tutorials about

We only email about new tutorials. Easy unsubscribe anytime.