How to Apply Mosaic Tile Adhesive (Weldbond and E6000)

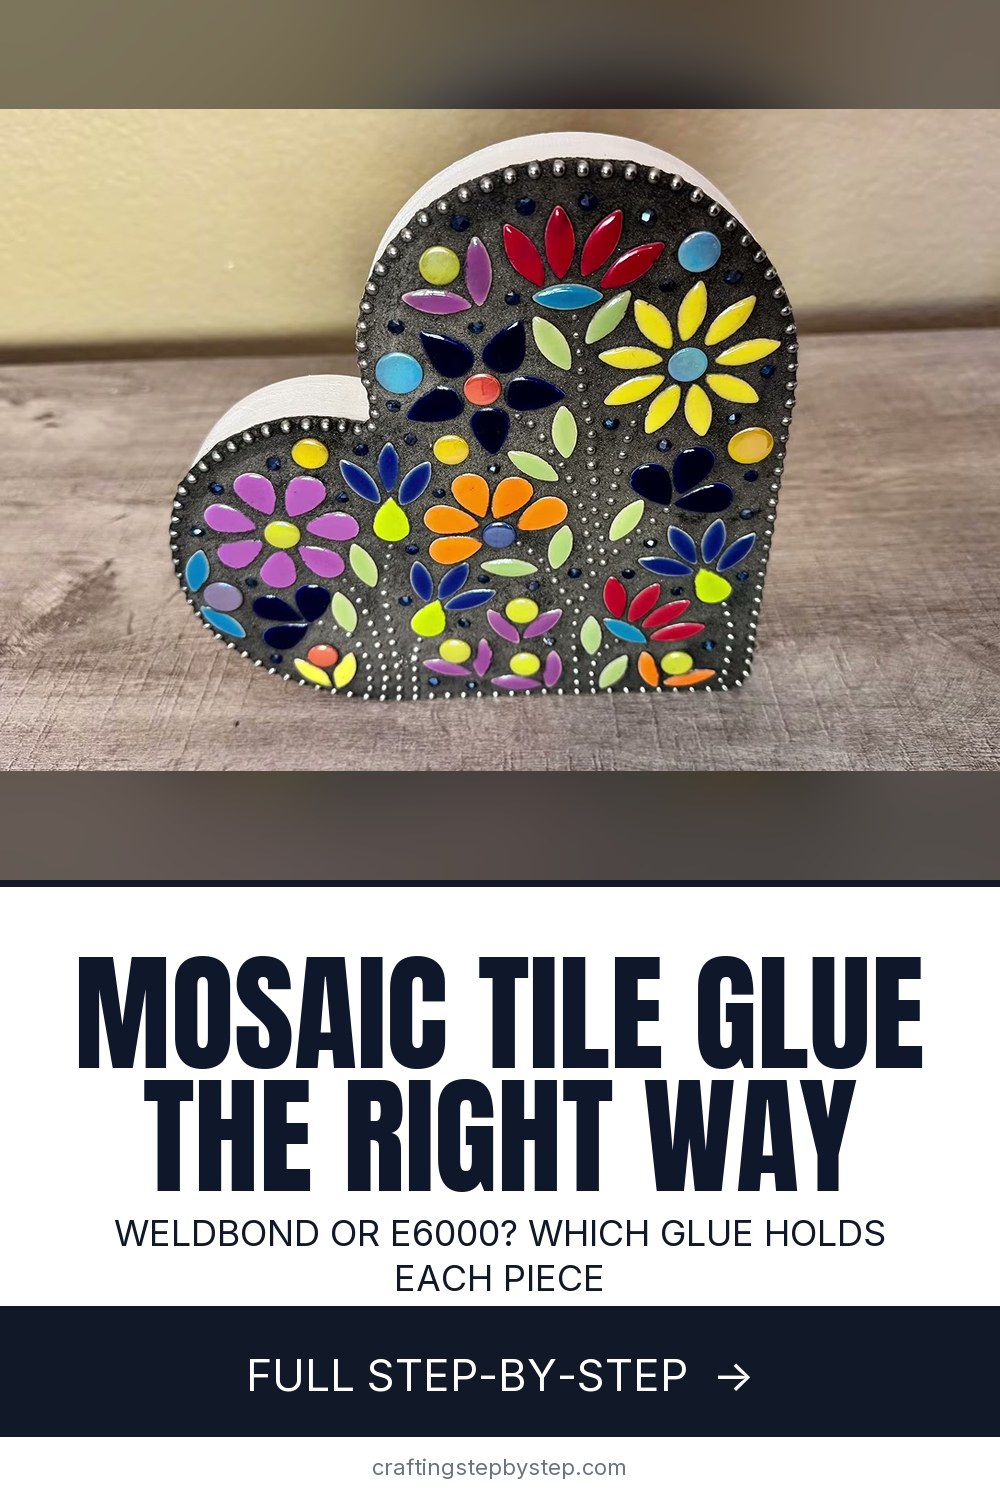
The finished result: How to Apply Mosaic Tile Adhesive (Weldbond and E6000)
  • Difficulty: Easy
  • About 2 hours 30 minutes, plus 25 hours to dry or set
  • 8 steps

You tapped Save

Save this project for later

We'll email you a link, no password.

How to Apply Mosaic Tile Adhesive (Weldbond and E6000)

  • Your saved projects in one list
  • Your ticked steps on any device

Check your inbox for an email from us. Not there? Look in your spam folder.

Print

Steps written out by Crafting Step by Step from mosaicsbymaricela's video (opens YouTube) (11:02). Published .

Glue is the part of mosaic that nobody shows you properly. Pick the wrong one or put it on too thick and tiles pop off a month later, or glue oozes up between them and blocks the grout. Maricela of Mosaics by Maricela walks through how she applies mosaic tile adhesive on a wooden heart, from prepping the wood to the last bead. She uses two glues, and she tells you exactly why each one gets its job.

Which mosaic adhesive to use

AdhesiveBest forNotes
Weldbond (PVA)Ceramic or glass tiles on wood, indoorsGoes on white, dries clear. Thin it with water to seal wood.
E6000Metal chain, glass beads, odd shapesThick and grabby, so small pieces stay put. Strong smell, use it with a window open.
Thinset mortarOutdoor pieces, concrete, stepping stonesCement based and weatherproof. Mix small batches.

Maricela learned the outdoor lesson the hard way. Her first project was a wooden table left outside, and it fell apart. Weldbond on wood is an indoor combination. For anything that sees rain or frost, use a cement board or concrete base with thinset.

How much glue is enough

Aim for a thin, even layer that covers the whole back of each tile. Gaps under a tile trap air and water, and that is where cracks start. Too much is its own problem. Glue squeezes up into the joints and the grout has nowhere to go. If you see glue rising between tiles, wipe it out with a damp brush or a toothpick while it is wet.

For glass beads, Maricela's rule is glue up to about half the bead's height. That is enough to lock it in without leaving a visible blob.

Spread the board or butter the tile?

Both work. Brushing glue onto a small patch of the board is faster for big areas of similar tiles. Buttering the back of each tile gives you more control over tiny or curved pieces. Many people switch between the two in one project. Only spread as much board as you can cover in a few minutes, because PVA starts to skin over.

Drying and curing times

  • Weldbond sealer coat: about an hour, faster with a hair dryer.
  • Tiles and beads: 24 hours, or at least overnight, before grout.
  • Grout: wipe after about 10 minutes, buff after about 20.

Common adhesive mistakes

  • Skipping the sealer. Raw wood soaks up the glue and swells.
  • Grouting too soon. Tiles shift and the bond breaks.
  • Letting the brush dry out. Park it in a cup of water and blot it on a paper towel before each use.
  • Gaps wider than the grout allows. Maricela keeps hers under half an inch.

Keep going with your mosaic

Plan the pattern first with how to lay out a mosaic design, and shape pieces with how to use tile nippers. Once the glue cures, move on to how to grout a mosaic. Building for the garden? See how to make a mosaic stepping stone and how to seal a mosaic for outdoor use.

Free printable

Print the steps and supply list for this project

One page you can take to the table. Free with a free account, no password.

Get the free printable

What you'll need

Free, for this project

Get this checklist by email

  • All 19 tools and materials, with tick boxes
  • A link to print all 8 steps on paper, to keep by you while you craft

No password. The whole tutorial stays free on this page.

Quick answer

How to apply mosaic tile adhesive: seal the wood, brush on Weldbond for tiles, use E6000 for chain and beads, then cure before grout. An easy project: about 2 hours 30 minutes, plus 25 hours to dry or set. Materials cost about $25 to $45. You need 19 things, including wooden heart blank, Weldbond adhesive and E6000 adhesive. The 8 steps start with score the Wooden Heart Substrate With a Utility Knife and seal the Wood Substrate With Watered-Down Weldbond.

Step-by-step guide

8 steps, about 11 minutes. Tap a picture to jump to that step. Your progress saves automatically.

Tick each step off as you go.

  1. Step 1: Score the Wooden Heart Substrate With a Utility Knife

    Watch this step · 2:20

    Smooth wood gives glue nothing to hold. Take a utility knife and drag shallow lines diagonally across the face of the board, then cross them the other way to make a crisscross pattern. You only need light scratches, not deep cuts. Give the surface a quick pass with fine sandpaper afterward to knock off loose splinters, and brush away the dust.

    Tip:

    Score only the face that gets tiles. Leave the sides and back smooth for painting.

    Back to all steps

  2. Step 2: Seal the Wood Substrate With Watered-Down Weldbond

    Watch this step · 2:48

    Mix Weldbond with water in a small bowl until it is thin and milky. Brush one even coat over the scored face of the wood. This sealer stops the bare wood from drinking up the glue later and helps keep it from warping. One coat is enough. Let it dry for about an hour, or speed it up with a hair dryer.

    Tip:

    Use the drying time to sketch or transfer your design onto the board.

    Back to all steps

  3. Step 3: Run a Bead of E6000 Around the Heart Edge for the Ball Chain

    Watch this step · 4:24

    Measure around the edge of the board and cut the ball chain to length with jewelry pliers. Squeeze a thin, steady line of E6000 along the rim, working a short section at a time. Press the chain into it as you go. Maricela likes E6000 here because it is thick and holds metal to wood without the chain sliding around.

    Tip:

    Work in a ventilated room. E6000 has a strong smell until it cures.

    Back to all steps

  4. Step 4: Brush Weldbond Onto the Substrate and Set the Ceramic Petals

    Watch this step · 4:50

    Pour a little Weldbond into a small dish. Sort your tiles by color and shape so you are not hunting for pieces with glue drying. Brush a thin layer onto a small patch of the board, then press each petal into it with a slight wiggle. The whole underside of the tile should sit in glue. Build one flower at a time.

    Tip:

    Pre-arrange a few flowers on paper so you can lift them straight onto the glue.

    Back to all steps

  5. Step 5: Butter the Back of Each Mosaic Tile With Glue

    Watch this step · 5:23

    The other way to apply mosaic tile adhesive is to put it on the tile. Hold the piece and brush a thin coat of Weldbond across its back, edge to edge, then set it on your guideline. This gives you more control with small or curved pieces. Rest the brush in a cup of water between tiles and blot it on a paper towel before the next one.

    Tip:

    Wipe away any glue that squeezes up between tiles before it dries.

    Back to all steps

  6. Step 6: Press Ball Chain Flower Stems Into E6000 With Tweezers

    Watch this step · 6:11

    Measure each stem against your drawing and cut the ball chain to length. Lay a thin line of E6000 along the stem line, then lower the chain onto it and nudge it into place with tweezers. Tweezers keep your fingers out of the glue and let you bend the chain around curves. After the stems, fill in the leaves and round tiles.

    Tip:

    Cut chain a bead or two long. You can trim it, but you cannot add length.

    Back to all steps

  7. Step 7: Dab E6000 to Set Glass Beads in the Mosaic Gaps

    Watch this step · 6:44

    Glass beads fill the empty spots and add sparkle. Put a small dot of E6000 in a gap and seat a bead in it. Use enough glue to come up about halfway on the bead so it stays locked in. Keep the spaces between tiles and beads under half an inch, the most the grout can fill. Then let everything cure for 24 hours.

    Tip:

    Pick up tiny beads with the tip of a damp toothpick.

    Back to all steps

  8. Step 8: Spread Premixed Grout Once the Mosaic Adhesive Has Cured

    Watch this step · 8:02

    After a full day of drying, tape off the edges and back with painter's tape. Put on gloves and spread premixed grout over the tiles with a spatula, pushing it into every gap. Let it sit about 10 minutes, then wipe the surface with a damp, well wrung sponge in soft circles. Buff off the haze with a cotton cloth about 20 minutes later.

    Tip:

    If a tile wiggles while you grout, the glue needed more time. Stop and let it cure.

    Back to all steps

How to Seal a Letter With Wax: Two Easy Methods

Keep going

How to Seal a Letter With Wax: Two Easy Methods

Keep going with crafts

More on this topic, picked for this project.

You reached the last step

Save this project to come back to it

Your ticked steps, the free printable and your other saved makes, together in My Projects. Free, no password.

You tapped Save

Save this project for later

We'll email you a link, no password.

How to Apply Mosaic Tile Adhesive (Weldbond and E6000)

  • Your saved projects in one list
  • Your ticked steps on any device

Check your inbox for an email from us. Not there? Look in your spam folder.

Free printable

Printable sheet and shopping list for this project

The bonus is hidden until you sign up.

Free with a free account, no password. Every step above stays open to everyone.

Products Used

The Checklist

How to Apply Mosaic Tile Adhesive (Weldbond and E6000)

Tools
9
Materials
10
Steps
8
Video
11 min

Tools we recommend

As an Amazon Associate we earn from qualifying purchases. Links on this page may be affiliate links - clicking them and buying doesn't change your price, but helps support Crafting Step by Step.

Tags

The Crafter's Weekly

New crafts tutorials, every Sunday

One short email with the week's best step-by-step guides. Free, no spam, unsubscribe anytime.

Did this work for you?

What's next

Related collections

Curated theme pages that include this tutorial.

Similar tutorials

Hand-picked next reads based on the one you just finished.

Liked this crafts tutorial?

Pick the crafts you want to hear about. One email every Sunday with new step-by-step tutorials. No spam, easy to unsubscribe.

Get more like this in your inbox

Weekly digest. Pick the categories you want. Unsubscribe anytime.

Send me tutorials about

We only email about new tutorials. Easy unsubscribe anytime.