How to Seal a Letter With Wax: Two Easy Methods

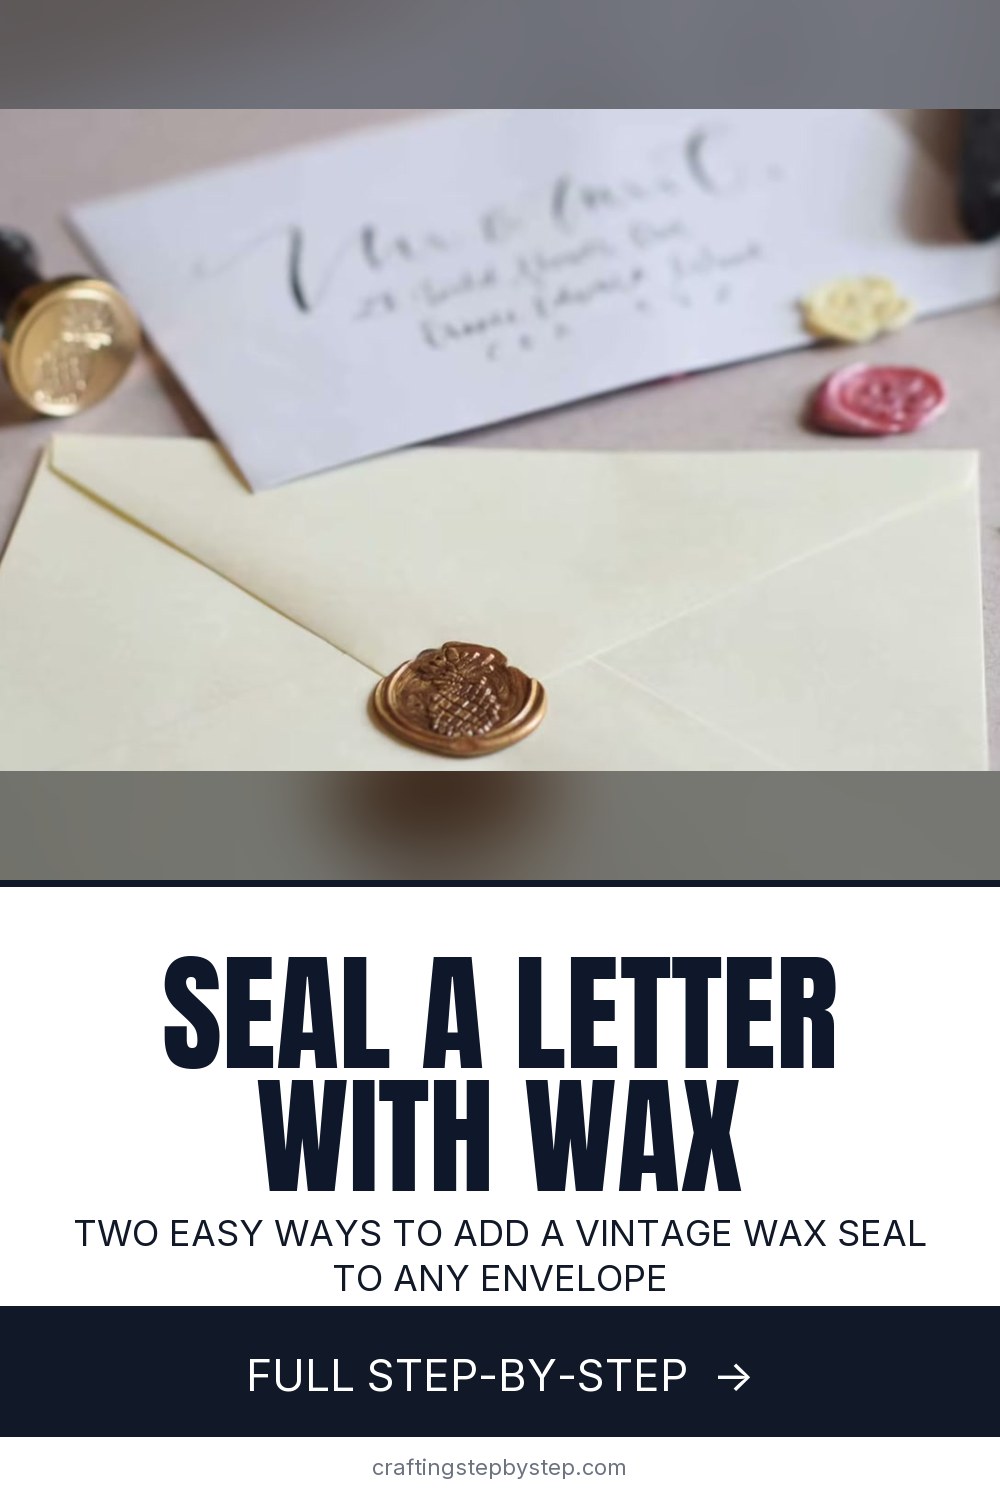
The finished result: How to Seal a Letter With Wax: Two Easy Methods
  • Difficulty: Easy
  • About 5 minutes
  • 9 steps

You tapped Save

Save this project for later

We'll email you a link, no password.

How to Seal a Letter With Wax: Two Easy Methods

  • Your saved projects in one list
  • Your ticked steps on any device

Check your inbox for an email from us. Not there? Look in your spam folder.

Print

Steps written out by Crafting Step by Step from Shayda Campbell's video (opens YouTube) (7:51). Published .

Also in:Paper Crafts

A wax seal turns an ordinary envelope into something people keep. Shayda Campbell shows two ways to make one: a wax stick with a wick that you light like a candle, and wax melted in a small spoon over a tea light and poured. Both end the same way. You press a brass stamp into the warm wax, wait a moment and lift. Each seal comes out a little different, and that is part of the charm.

How to seal a letter with wax: what you need

  • A wax seal stamp. A brass head on a wooden handle. Initials, bees, flowers and snowflakes are popular.
  • Sealing wax. Wick sticks, plain sticks or beads. Glue gun sticks work too.
  • A heat source. A tea light for the spoon method or for relighting a stick.
  • A melting spoon if you use beads or plain sticks.
  • Scrap paper to practice on before the real envelope.

Which method should you use?

MethodGood forWatch out for
Wick stickA few seals, a slow and relaxing sessionSoot and drips, harder to control size
Melting spoonEven, round seals, mixing colorsCleaning the spoon after
Glue gun sticksWedding invitations and big batchesNeeds a glue gun kept for wax

Getting a clean impression

Pour a puddle a little bigger than the stamp face so the edge looks soft and round. Wait a few seconds after pouring, until the shine starts to dull, then press. Too soon and the wax sticks to the stamp. Too late and the design comes out faint. Hold the stamp still and straight until the wax firms up, then lift. If it sticks, chill the stamp head on an ice cube between seals.

Will it survive the mail?

Traditional brittle wax can crack in postal machines. Flexible sealing wax, sold for mailing, bends instead. For anything going through the post, use flexible wax and ask the post office to hand cancel it. Keep seals near the center of the flap and away from the edges. For invitations you hand deliver, any wax works.

Common problems

  • Black specks in the wax. Soot from the wick. Trim the wick short or switch to the spoon.
  • Bubbles on the surface. The wax got too hot. Pull the spoon higher above the flame.
  • Seal is lopsided. The stamp went in at an angle. Hold it upright and press straight down.
  • Seal pops off. Glossy paper. Matte paper and envelopes hold wax better.

Ideas for wax seals

Seal wedding and party invitations, thank you notes, gift tags or the ribbon on a wrapped gift. A monogram stamp makes a lovely personal touch for family letters, and grandchildren love choosing the wax color.

Pair it with lettering

A seal looks best on a hand addressed envelope. Try envelope calligraphy, or start with faux calligraphy. You can also make a paper envelope or personalized stationery to go with it.

Free printable

Print the steps and supply list for this project

One page you can take to the table. Free with a free account, no password.

Get the free printable

What you'll need

Free, for this project

Get this checklist by email

  • All 7 tools and materials, with tick boxes
  • A link to print all 9 steps on paper, to keep by you while you craft

No password. The whole tutorial stays free on this page.

Quick answer

How to seal a letter with wax: drip from a wick stick or pour from a melting spoon, then press a stamp for a crisp wax seal. An easy project: about 5 minutes. You need 7 things, including sealing wax sticks or beads, envelopes and scrap paper. The 9 steps start with light the Wick on a Sealing Wax Stick, drip Sealing Wax Onto the Paper and shape the Sealing Wax Into a Round Pool.

Step-by-step guide

9 steps, about 8 minutes. Tap a picture to jump to that step. Your progress saves automatically.

Tick each step off as you go.

  1. Step 1: Light the Wick on a Sealing Wax Stick

    Watch this step · 1:15

    Set a tea light on the table so you always have a flame nearby. Pick up a sealing wax stick that has a wick inside, and light the wick from the candle. Hold the stick over a sheet of scrap paper, not your envelope. The first few seals are practice. You will learn how fast the wax drips before you try it for real.

    Tip:

    Keep a damp paper towel nearby to pinch out the wick when you finish.

    Back to all steps

  2. Step 2: Drip Sealing Wax Onto the Paper

    Watch this step · 1:30

    Tilt the lit stick down toward the paper and slowly turn it in your fingers. The flame heats the wax and it begins to drip. Keep the tip low and let the drops land in one spot. It is a slow, calm process. Be patient and let the wax build up rather than rushing it.

    Tip:

    Hold the stick at a steep angle so the drips fall in one place.

    Back to all steps

  3. Step 3: Shape the Sealing Wax Into a Round Pool

    Watch this step · 2:05

    Use the tip of the wax stick to rub the warm drips and coax them outward into a circle. Aim for a pool about the size of your stamp head or a little bigger. It does not need to be perfect. Once the puddle is round enough, set the stick aside on a heatproof spot and pick up your stamp.

    Tip:

    A slightly larger pool gives the seal a soft, rounded edge.

    Back to all steps

  4. Step 4: Press the Wax Seal Stamp Into the Wax

    Watch this step · 2:30

    Hold the stamp upright over the wax and press it straight down. Firm, steady pressure is enough. You do not need to push hard. Keep the stamp still while the wax cools against the brass for a few seconds. Rocking or twisting smears the design. Shayda uses her bumblebee stamp, a classic design that suits almost any letter.

    Tip:

    Check which way the design faces before you press so it is not upside down.

    Back to all steps

  5. Step 5: Lift the Stamp to Reveal the Wax Seal

    Watch this step · 2:40

    When the wax has firmed, lift the stamp straight up. You should see a crisp design with a soft border. Shayda loves that no two come out alike, and every seal will look a bit different. Make a few more on scrap paper with other stamps until you like how they turn out.

    Tip:

    If the wax pulls up with the stamp, wait a few more seconds next time.

    Back to all steps

  6. Step 6: Seal a Real Envelope Flap With Wax

    Watch this step · 3:15

    Close your envelope first. Drip wax right over the point of the flap so the seal holds it shut. Shayda uses gold wax and a pineapple stamp here. Let the puddle settle for a moment, then press gently and lift. Even if you miss the edge a little, the result still looks lovely.

    Tip:

    Slide a scrap card inside the envelope so wax cannot seep through to the letter.

    Back to all steps

  7. Step 7: Melt Sealing Wax in a Spoon Over a Tea Light

    Watch this step · 3:49

    For the second method, use wax without a wick. Cut a small chunk from a plain stick with a craft knife, or use a few wax beads. Drop it into a wax melting spoon and hold the spoon over the tea light. Wait until the wax is completely liquid with no lumps.

    Tip:

    Rest the spoon handle on the table edge so your hand does not tire.

    Back to all steps

  8. Step 8: Pour the Melted Wax in a Circle

    Watch this step · 4:00

    Tip the spoon and pour the wax onto the paper in a small circular motion. That builds a round puddle. Drips at the edge are fine. The stamp pulls the shape together. Then press the stamp, hold for a few seconds and lift, the same as before. The spoon gives you more control over size.

    Tip:

    Reheat the spoon and wipe it with a paper towel to clean it between colors.

    Back to all steps

  9. Step 9: Seal the Envelope With Poured Wax

    Watch this step · 5:05

    Melt a fresh batch, gray this time, and pour it in a circle over the flap of a sealed envelope. Press the stamp straight down, wait for the wax to firm and lift. Now you have both methods. Use the wick stick for a slow, cozy session, and the spoon when you want even, round seals.

    Tip:

    Let seals cool fully before stacking envelopes, or they can stick together.

    Back to all steps

How to Make Felt Acorns With Real Acorn Caps

Keep going

How to Make Felt Acorns With Real Acorn Caps

Keep going with crafts

More on this topic, picked for this letter with wax.

You reached the last step

Save this project to come back to it

Your ticked steps, the free printable and your other saved makes, together in My Projects. Free, no password.

You tapped Save

Save this project for later

We'll email you a link, no password.

How to Seal a Letter With Wax: Two Easy Methods

  • Your saved projects in one list
  • Your ticked steps on any device

Check your inbox for an email from us. Not there? Look in your spam folder.

Free printable

Printable sheet and shopping list for this project

The bonus is hidden until you sign up.

Free with a free account, no password. Every step above stays open to everyone.

Products Used

The Checklist

How to Seal a Letter With Wax: Two Easy Methods

Tools
4
Materials
3
Steps
9
Video
8 min

Tools we recommend

As an Amazon Associate we earn from qualifying purchases. Links on this page may be affiliate links - clicking them and buying doesn't change your price, but helps support Crafting Step by Step.

Tags

The Crafter's Weekly

New crafts tutorials, every Sunday

One short email with the week's best step-by-step guides. Free, no spam, unsubscribe anytime.

Did this work for you?

What's next

Related collections

Curated theme pages that include this tutorial.

Similar tutorials

Hand-picked next reads based on the one you just finished.

Liked this crafts tutorial?

Pick the crafts you want to hear about. One email every Sunday with new step-by-step tutorials. No spam, easy to unsubscribe.

Get more like this in your inbox

Weekly digest. Pick the categories you want. Unsubscribe anytime.

Send me tutorials about

We only email about new tutorials. Easy unsubscribe anytime.