How to Make a Pop Up Christmas Tree Card

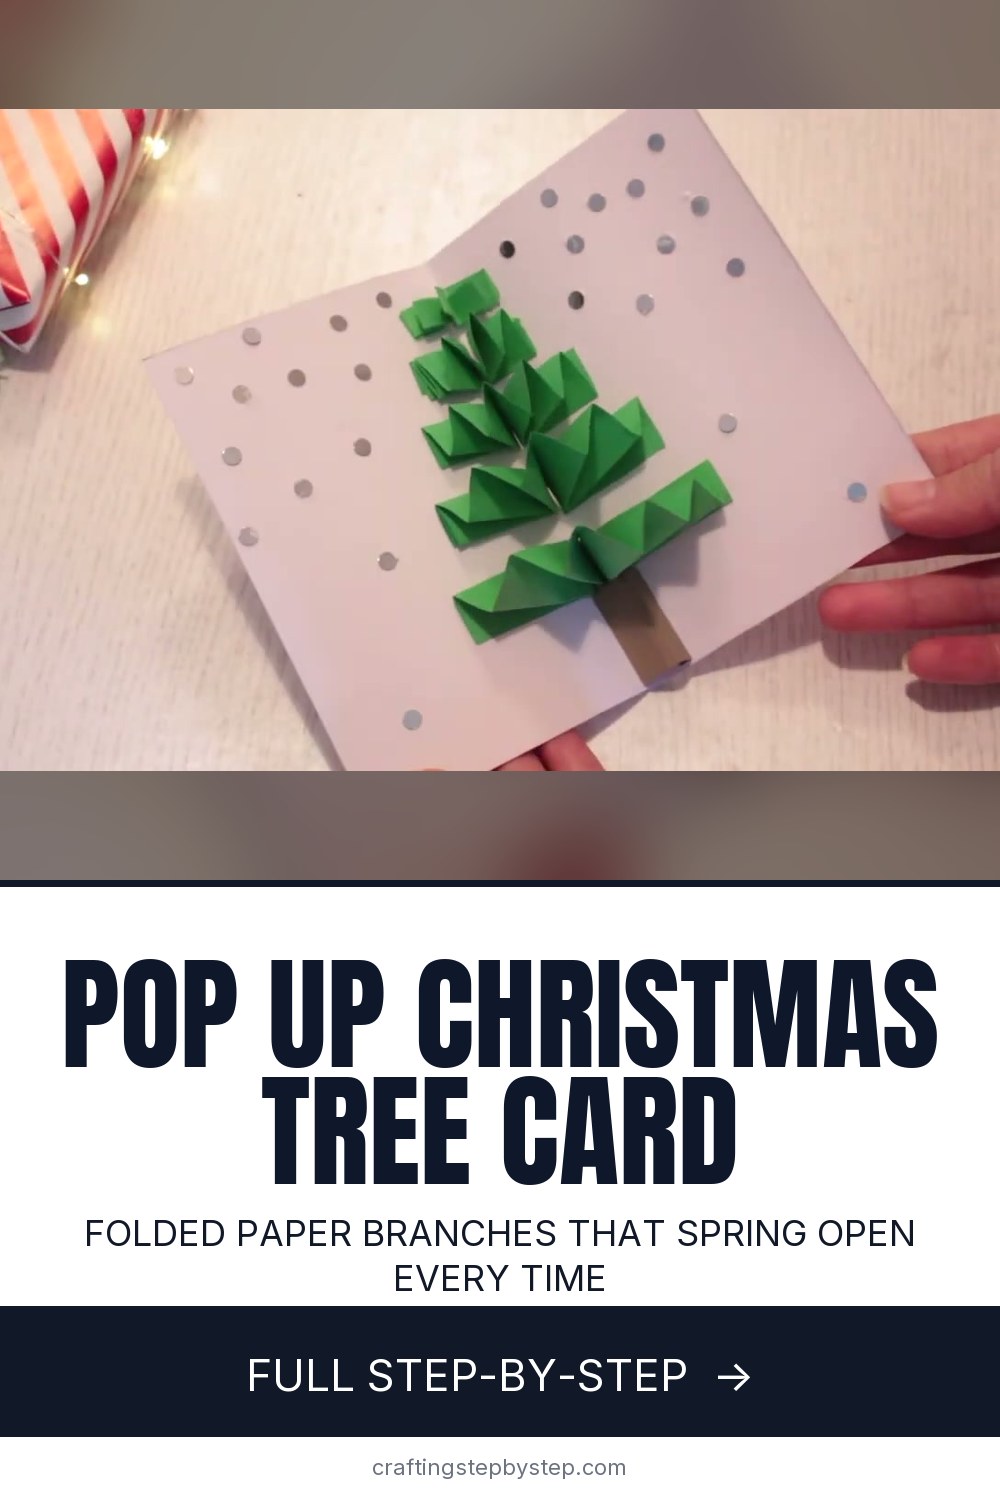
The finished result: How to Make a Pop Up Christmas Tree Card
  • Difficulty: Easy
  • 9 steps

You tapped Save

Save this project for later

We'll email you a link, no password.

How to Make a Pop Up Christmas Tree Card

  • Your saved projects in one list
  • Your ticked steps on any device

Check your inbox for an email from us. Not there? Look in your spam folder.

Print

Steps written out by Crafting Step by Step from Natalia's Toolbox's video (opens YouTube) (4:57). Published .

Also in:Paper Crafts

This pop up Christmas tree card looks hard and is not. A strip of green paper folded like a fan turns into stacked branches, and a little brown tab holds the whole tree up off the page when the card opens. The design comes from Natalia of the Natalia's Toolbox channel. Her video shows two pop up Christmas cards: a stack of presents first, then the tree. This page covers the tree card only. If you want the cut-and-push pop up method from the first half, see how to make a pop up card.

Pop up Christmas tree card: what you are making

The tree is five or so tiers of accordion-folded green paper, small at the top and wide at the bottom. Each tier is glued to the one below it, and the bottom tier sits on a folded brown trunk that is glued across the center fold. Close the card and the tree folds flat. Open it, and the trunk pushes the tree forward and the branches fan out.

Card size, card base and paper weight

An A2 card (4.25 x 5.5 in folded, from half a letter sheet) works, but a 5 x 7 card gives the tree more room to stand. Use white cardstock around 65 to 80 lb for the base so it stays stiff when it opens. For the tree, use thinner green paper, about 20 to 24 lb or a light 65 lb cardstock. Heavy cardstock fights the folds and the branches spring open.

Natalia used an A5 green sheet (about 6 x 8 1/4 in). Half a sheet of letter paper is close enough.

The envelope and mailing

A 5 x 7 card fits an A7 envelope, and an A2 card fits an A2 envelope. The tree folds flat, but it still adds thickness, so press the card under a heavy book overnight before you post it. If the envelope bulges or feels stiff and uneven, the post office treats it as a non-machinable letter and it needs extra postage. Ask at the counter the first time. Need an envelope for an odd size? Here is how to make a paper envelope.

Ideas to change it up

  • Colours. Try a dark green tree on kraft card, or a white tree on a red or navy base for a snowy look.
  • Kid-friendly. Pre-cut the green strips and let a grandchild do the folding and the sequins. Use a glue stick, not liquid glue.
  • Quicker. Make three tiers instead of five. It still pops.
  • Trims. A small paper star on top, tiny pom poms, or a stamped greeting inside.

For a fuller paper tree to set on a mantel, try how to make a paper Christmas tree. For other ways to lift paper off the page, see how to make a 3D card.

Making a batch for your Christmas card list

Work in stages, like an assembly line. Fold and cut all the card bases. Fold every green strip, then cut all the tiers and keep each card's set in a small pile. Fold all the trunks. Only then glue. Ten cards take one evening this way. Matching Christmas gift tags are a good use for the green scraps.

Troubleshooting

  • The card will not close. The trunk is too far from the fold. Glue it closer to the center line.
  • The tree leans. The trunk was glued crooked. Line it up with the fold before the glue sets.
  • Branches pop open. Press each tier for a few seconds and give it time to dry.

Free printable

Print the steps and supply list for this project

One page you can take to the table. Free with a free account, no password.

Get the free printable

What you'll need

Free, for this project

Get this checklist by email

  • All 10 tools and materials, with tick boxes
  • A link to print all 9 steps on paper, to keep by you while you craft

No password. The whole tutorial stays free on this page.

Quick answer

Make a pop up Christmas tree card with folded green paper and a brown trunk. An easy project. You need 10 things, including white cardstock, green paper and brown kraft paper. The 9 steps start with fold the Green Paper Into a Christmas Tree Accordion, measure the Folded Green Strip for the Tree Tiers, cut the Green Accordion Strip Into Christmas Tree Tiers and fold the Brown Paper Square Into the Tree Trunk.

Step-by-step guide

9 steps, about 5 minutes. Tap a picture to jump to that step. Your progress saves automatically.

Tick each step off as you go.

  1. Step 1: Fold the Green Paper Into a Christmas Tree Accordion

    Watch this step · 2:41

    Lay your green sheet flat with a long edge toward you. Fold a narrow strip along the edge, about a centimeter wide. Turn the paper over and fold the same width again. Keep folding and turning until you reach the other side. You end up with a tight paper fan. These folds become the branches, so keep them even and crease each one firmly with your fingernail.

    Tip:

    A bone folder gives sharper creases than fingers, and sharp creases make neater branches.

    Back to all steps

  2. Step 2: Measure the Folded Green Strip for the Tree Tiers

    Watch this step · 2:52

    Keep the green paper folded so it stays a narrow strip. Lay your ruler along it and make small pencil marks at 1, 3, 6 and 10 centimeters. In inches that is about 3/8, 1 1/4, 2 3/8 and 4. The gaps between the marks get bigger as you go, which gives you small tiers for the top of the tree and wide ones for the bottom.

    Tip:

    Mark on the side you will not see, so the pencil does not show on the finished tree.

    Back to all steps

  3. Step 3: Cut the Green Accordion Strip Into Christmas Tree Tiers

    Watch this step · 2:58

    Hold the strip folded tight and cut straight across at each pencil mark. Sharp scissors matter here because you are cutting through many layers at once. You will have a set of pleated pieces in different lengths. Line them up from smallest to largest so you know which tier goes where when you start gluing.

    Tip:

    If the layers shift as you cut, put a paper clip at one end to hold them.

    Back to all steps

  4. Step 4: Fold the Brown Paper Square Into the Tree Trunk

    Watch this step · 3:09

    Take a small square of brown paper, about 3 centimeters across. Fold it in half. Fold each outer edge back toward the center line, then open it up and fold the two edges inwards. You get a small folded tab with a flap on each side. The flaps get glued into the card, and the middle part stands up as the trunk.

    Tip:

    Kraft cardstock makes a sturdier trunk than thin brown paper.

    Back to all steps

  5. Step 5: Glue the Brown Trunk Into the Pop Up Christmas Card

    Watch this step · 3:24

    Fold your white card base in half and open it. Put glue on one folded flap of the trunk and press it near the bottom of the card, close to the center fold but not right on it. Add glue to the other flap and stick it to the other side of the card. Close the card gently and press, so the trunk folds flat with it.

    Tip:

    White tacky glue holds the trunk better than a glue stick. Let it set before you add branches.

    Back to all steps

  6. Step 6: Attach the Largest Green Tier to the Christmas Tree Trunk

    Watch this step · 3:35

    Pick up the biggest green tier. Put glue along the bottom of it and set it on top of the trunk, as close to the center fold as you can. Hold it for a few seconds so it grabs. This bottom tier is the widest part of the tree, so take a moment to center it over the trunk before the glue dries.

    Tip:

    Check that the folds of the tier run the same way as the card fold.

    Back to all steps

  7. Step 7: Stack the Smaller Green Tiers Up the Christmas Tree

    Watch this step · 3:45

    Glue the next largest tier on top. Keep it close to the center fold and snug against the tier below. Carry on with each smaller piece until the little one sits at the top. Press each tier down as you go. Step back now and then to check the tree is straight and getting narrower toward the top.

    Tip:

    Leave a tiny gap between tiers if you want the branches to look more separate.

    Back to all steps

  8. Step 8: Glue the Tops of the Christmas Tree Tiers and Close the Card

    Watch this step · 3:56

    Now put glue on the top side of the branch tiers. Hold them down as best you can, then close the card over them and press down firmly all over. This sticks the other side of the tree to the card. Wait a minute, then open the card slowly. The branches should fan out as the card opens.

    Tip:

    Open it gently the first time. If a tier sticks, ease it free before the glue sets.

    Back to all steps

  9. Step 9: Add Silver Sequins Around the Pop Up Christmas Tree

    Watch this step · 4:11

    Finish the card with a little snow. Put tiny dots of glue around the tree and press a silver sequin onto each one. Natalia scattered them across the whole inside of the card. You could also add a short poem, a greeting, or small stickers. Let the glue dry with the card open before you close it for good.

    Tip:

    A damp toothpick picks up one sequin at a time with no fuss.

    Back to all steps

How to Make a Thank You Card by Hand

Keep going

How to Make a Thank You Card by Hand

Keep going with card making

More on this topic, picked for this pop up christmas tree card.

You reached the last step

Save this project to come back to it

Your ticked steps, the free printable and your other saved makes, together in My Projects. Free, no password.

You tapped Save

Save this project for later

We'll email you a link, no password.

How to Make a Pop Up Christmas Tree Card

  • Your saved projects in one list
  • Your ticked steps on any device

Check your inbox for an email from us. Not there? Look in your spam folder.

Free printable

Printable sheet for this project

The bonus is hidden until you sign up.

Free with a free account, no password. Every step above stays open to everyone.

Products Used

The Checklist

How to Make a Pop Up Christmas Tree Card

Tools
4
Materials
6
Steps
9
Video
5 min

Tools we recommend

As an Amazon Associate we earn from qualifying purchases. Links on this page may be affiliate links - clicking them and buying doesn't change your price, but helps support Crafting Step by Step.

Tags

The Crafter's Weekly

New card making tutorials, every Sunday

One short email with the week's best step-by-step guides. Free, no spam, unsubscribe anytime.

Did this work for you?

What's next

Related collections

Curated theme pages that include this tutorial.

Similar tutorials

Hand-picked next reads based on the one you just finished.

Liked this card making tutorial?

Pick the crafts you want to hear about. One email every Sunday with new step-by-step tutorials. No spam, easy to unsubscribe.

Get more like this in your inbox

Weekly digest. Pick the categories you want. Unsubscribe anytime.

Send me tutorials about

We only email about new tutorials. Easy unsubscribe anytime.