How to Make a Bendi Card (Bendy Fold Card Tutorial)

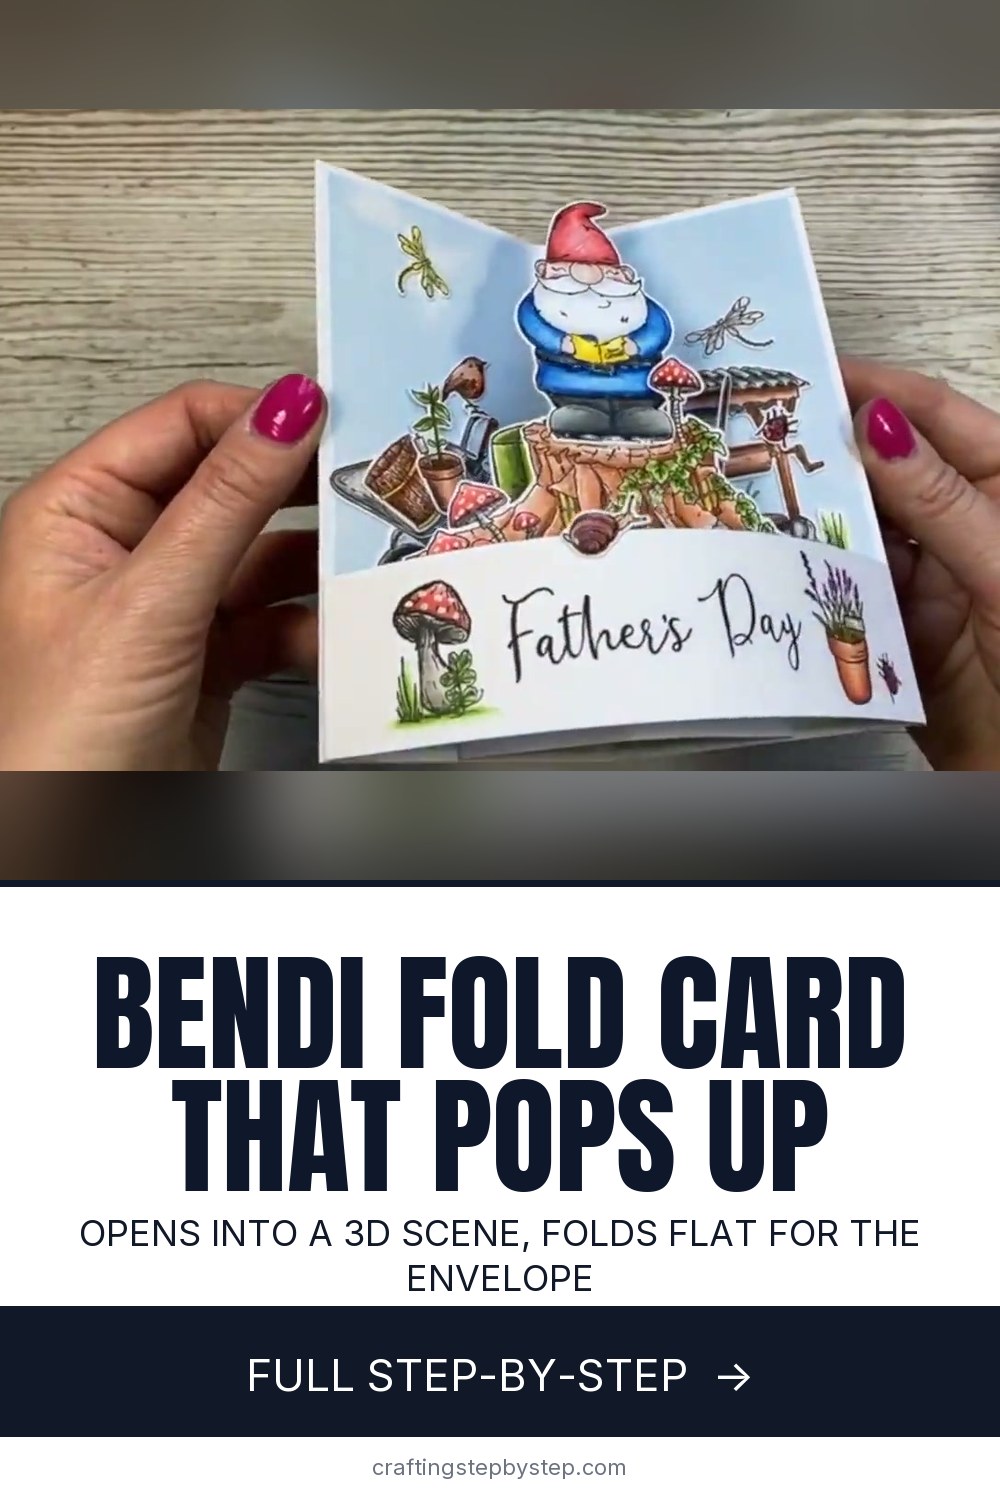
The finished result: How to Make a Bendi Card (Bendy Fold Card Tutorial)
  • Difficulty: Easy
  • About 1 hour
  • 10 steps

You tapped Save

Save this project for later

We'll email you a link, no password.

How to Make a Bendi Card (Bendy Fold Card Tutorial)

  • Your saved projects in one list
  • Your ticked steps on any device

Check your inbox for an email from us. Not there? Look in your spam folder.

Print

Steps written out by Crafting Step by Step from Sam Calcott UK - Mixed Up Craft's video (opens YouTube) (7:38). Published .

A bendi card, also called a bendy fold card, is a fun fold card with a strip of card stuck across the front that bows outward when you open it. The bend turns a flat card into a little 3D scene that stands up on its own, then folds flat again to fit a square envelope. This tutorial follows Sam Calcott of Mixed Up Craft as she builds one with a garden gnome for Father's Day. The base takes a few minutes. Most of the time goes into stamping and coloring the pieces you put on it.

How to make a bendi card: the short version

  • Score a 6 by 6 inch card at 3 inches and fold it in half.
  • Cut a 7 by 1.5 inch strip and score half an inch in from each end.
  • Glue the strip tabs to the card base, flush with the outer edges and the bottom.
  • Add an inner support tab in the middle for the main image.
  • Decorate the strip and tab with stamped, colored and fussy cut pieces.

Measurements at a glance

  • Card base: 6 x 6 inches, scored at 3 inches.
  • Bendi strip: 7 x 1.5 inches, scored at 0.5 inch from each end. Make it taller if your sentiment is big.
  • Background panels: 2.75 x 5.75 inches, four of them, two for the front and two for the back.
  • Inner tab (optional): 4.5 x 1.75 inches, scored at 0.5, 2, 2.5 and 4 inches.

Why it bends

The strip is longer than the card is wide. When the card is open flat, the extra inch has nowhere to go, so the strip pops forward into a curve. Close the card and the strip lies flat again. That is why the tabs must sit flush with the outer edges: if they creep inward, the curve gets too tall and the card will not close neatly.

Choosing the scene

Pick a stamp set with a main character and plenty of small extras. Sam uses a gnome, a tree stump, a toadstool, a wheelbarrow and a wishing well. Stamp and color everything before you build, then fussy cut it. Put the tallest piece on the inner tab so it stands in the middle, and tuck smaller pieces along the strip to fill the gaps.

Ideas beyond Father's Day

  • Birthdays. A cake on the inner tab and balloons along the strip.
  • Christmas. A snowman or tree in the middle with a Merry Christmas band.
  • Thank you cards. A flower pot scene with a short thank you on the strip.

Ink and coloring

Match the ink to how you color. Sam uses colored pencils, so any crisp black ink works. If you color with alcohol markers, use an ink that will not smear under them. For watercolor, use a waterproof ink.

Common problems

  • The card will not fold flat. A tab is glued too far in. Lift it while the glue is wet and line it up with the edge.
  • The strip sags. Use heavier cardstock, or add the inner tab for support.

More fun fold cards

Try a pop up card, a stepper card or an easel card. For another Father's Day idea, see this Father's Day card.

Free printable

Print the steps and supply list for this project

One page you can take to the table. Free with a free account, no password.

Get the free printable

What you'll need

Free, for this project

Get this checklist by email

  • All 9 tools and materials, with tick boxes
  • A link to print all 10 steps on paper, to keep by you while you craft

No password. The whole tutorial stays free on this page.

Quick answer

Make a bendi fold card that pops into a 3D scene and folds flat for a 6x6 envelope. An easy project: about 1 hour. Materials cost about $1 to $3. You need 9 things, including white cardstock, 6 x 6 patterned paper and black ink pad. The 10 steps start with score the Bendi Card Base Down the Middle, score Both Ends of the Bendi Card Strip and stamp the Sentiment on the Bendi Card Strip.

Step-by-step guide

10 steps, about 8 minutes. Tap a picture to jump to that step. Your progress saves automatically.

Tick each step off as you go.

  1. Step 1: Score the Bendi Card Base Down the Middle

    Watch this step · 1:04

    Cut a 6 by 6 inch square of sturdy white cardstock for the base. Lay it on a scoreboard and score a line down the middle at 3 inches. Fold it in half along the score and crease it well. This is the whole back of the card. A square base fits a standard 6 by 6 envelope once the card is finished and folded flat.

    Tip:

    Run a bone folder along the fold so the card closes cleanly.

    Back to all steps

  2. Step 2: Score Both Ends of the Bendi Card Strip

    Watch this step · 1:22

    Cut a strip 7 inches long and 1.5 inches tall. This is the piece that bends. Score a line half an inch in from each end and fold both tabs back. The strip can be taller if you want more room for a sentiment or a bigger design. Lay it across the base to see how it looks before you go further.

    Tip:

    Audition your sentiment on the strip now, before anything is glued.

    Back to all steps

  3. Step 3: Stamp the Sentiment on the Bendi Card Strip

    Watch this step · 2:00

    Stamp your sentiment across the middle of the strip. Sam stamps Father's Day in black ink, then adds small images at each end to fill the white space. A stamping platform holds the stamp in place so you can stamp again if the first one is faint. Color the small images before you glue the strip down.

    Tip:

    Pick an ink that suits your coloring: any crisp black for pencils.

    Back to all steps

  4. Step 4: Glue the Bendi Strip Tab to the Card Base

    Watch this step · 2:35

    If you plan to cover the base with patterned panels, peel back their corners or wait to add them. Put glue on the back of one end tab of the strip. Press it onto the card base along the outer edge, level with the bottom. The panels later go over the tabs, which hides them and makes the card look like one piece.

    Tip:

    Liquid glue gives you a few seconds of wiggle time to line things up.

    Back to all steps

  5. Step 5: Line the Bendi Strip Up Flush With the Card Edge

    Watch this step · 2:52

    Glue the second tab the same way on the other side. The fold of each tab must run flush with the outside edge of the card and sit right along the bottom corner. Take a minute here. When both ends are in place, open the card and watch the strip bow forward into its curve. Shape it gently with your fingers.

    Tip:

    If the card will not close flat, a tab has crept inward. Fix it while wet.

    Back to all steps

  6. Step 6: Score the Inner Support Tab for the Bendi Card

    Watch this step · 3:32

    The inner tab gives your main image something to stand on. Cut a piece 4.5 by 1.75 inches. Score it at half an inch, 2 inches, 2.5 inches and 4 inches, then fold it into a small bridge shape. This piece is optional. You can stick everything onto the bendi strip instead, but the tab lets a tall image stand in the middle.

    Tip:

    Change the size to suit your main image.

    Back to all steps

  7. Step 7: Glue the Inner Support Tab Into the Bendi Card

    Watch this step · 3:48

    Add glue to the two outer tabs of the support piece. Set it in the middle of the card base so the half inch center section hangs over the center score line. Keep it flush with the bottom of the strip. Sam's tab comes up a little higher than the strip, but the main image will cover it from the front.

    Tip:

    Check the card still folds flat before the glue sets.

    Back to all steps

  8. Step 8: Glue the Top of the Bendi Card Support Tab

    Watch this step · 4:22

    Put a line of glue along the top front of the support tab. This is where the main scene attaches. Sam sticks her fussy cut tree stump here, so it rises up behind the curved strip when the card opens. Press it on and hold it for a moment. Open and close the card once to make sure the stump moves with the fold.

    Tip:

    Use a fine tip glue bottle so glue does not show around the edges.

    Back to all steps

  9. Step 9: Add the Gnome to the Front of the Bendi Card

    Watch this step · 4:48

    Now add the star of the card. Sam glues her colored gnome on top of the tree stump so he sits right in the middle of the scene. Add the toadstool next to him. Press each piece in place and open the card to check that it pops up the way you want before moving on to the smaller pieces.

    Tip:

    Foam squares behind a piece add a little extra depth.

    Back to all steps

  10. Step 10: Trim and Add Fussy-Cut Garden Pieces to the Bendi Card

    Watch this step · 5:25

    Trim around the rest of your stamped pieces with small scissors, then glue them around the scene. Sam adds a wheelbarrow, plant pots, a bird and a wishing well, and decorates the inside back with more stamped bits. A touch of glossy accents on a few spots catches the light. Fold it flat and slip it into its envelope.

    Tip:

    Stand taller pieces at the back and small ones in front.

    Back to all steps

How to Make a Gatefold Card (Side Gatefold With Measurements)

Keep going

How to Make a Gatefold Card (Side Gatefold With Measurements)

10 steps · about 7 minutes

Keep going with card making

More on this topic, picked for this bendi card.

You reached the last step

Save this project to come back to it

Your ticked steps, the free printable and your other saved makes, together in My Projects. Free, no password.

You tapped Save

Save this project for later

We'll email you a link, no password.

How to Make a Bendi Card (Bendy Fold Card Tutorial)

  • Your saved projects in one list
  • Your ticked steps on any device

Check your inbox for an email from us. Not there? Look in your spam folder.

Free printable

Printable sheet and shopping list for this project

The bonus is hidden until you sign up.

Free with a free account, no password. Every step above stays open to everyone.

Products Used

The Checklist

How to Make a Bendi Card (Bendy Fold Card Tutorial)

Tools
4
Materials
5
Steps
10
Video
8 min

Tools we recommend

As an Amazon Associate we earn from qualifying purchases. Links on this page may be affiliate links - clicking them and buying doesn't change your price, but helps support Crafting Step by Step.

Tags

The Crafter's Weekly

New card making tutorials, every Sunday

One short email with the week's best step-by-step guides. Free, no spam, unsubscribe anytime.

Did this work for you?

What's next

Related collections

Curated theme pages that include this tutorial.

Similar tutorials

Hand-picked next reads based on the one you just finished.

Liked this card making tutorial?

Pick the crafts you want to hear about. One email every Sunday with new step-by-step tutorials. No spam, easy to unsubscribe.

Get more like this in your inbox

Weekly digest. Pick the categories you want. Unsubscribe anytime.

Send me tutorials about

We only email about new tutorials. Easy unsubscribe anytime.