How to Make a Tiered Wiper Card (No Dies Needed)

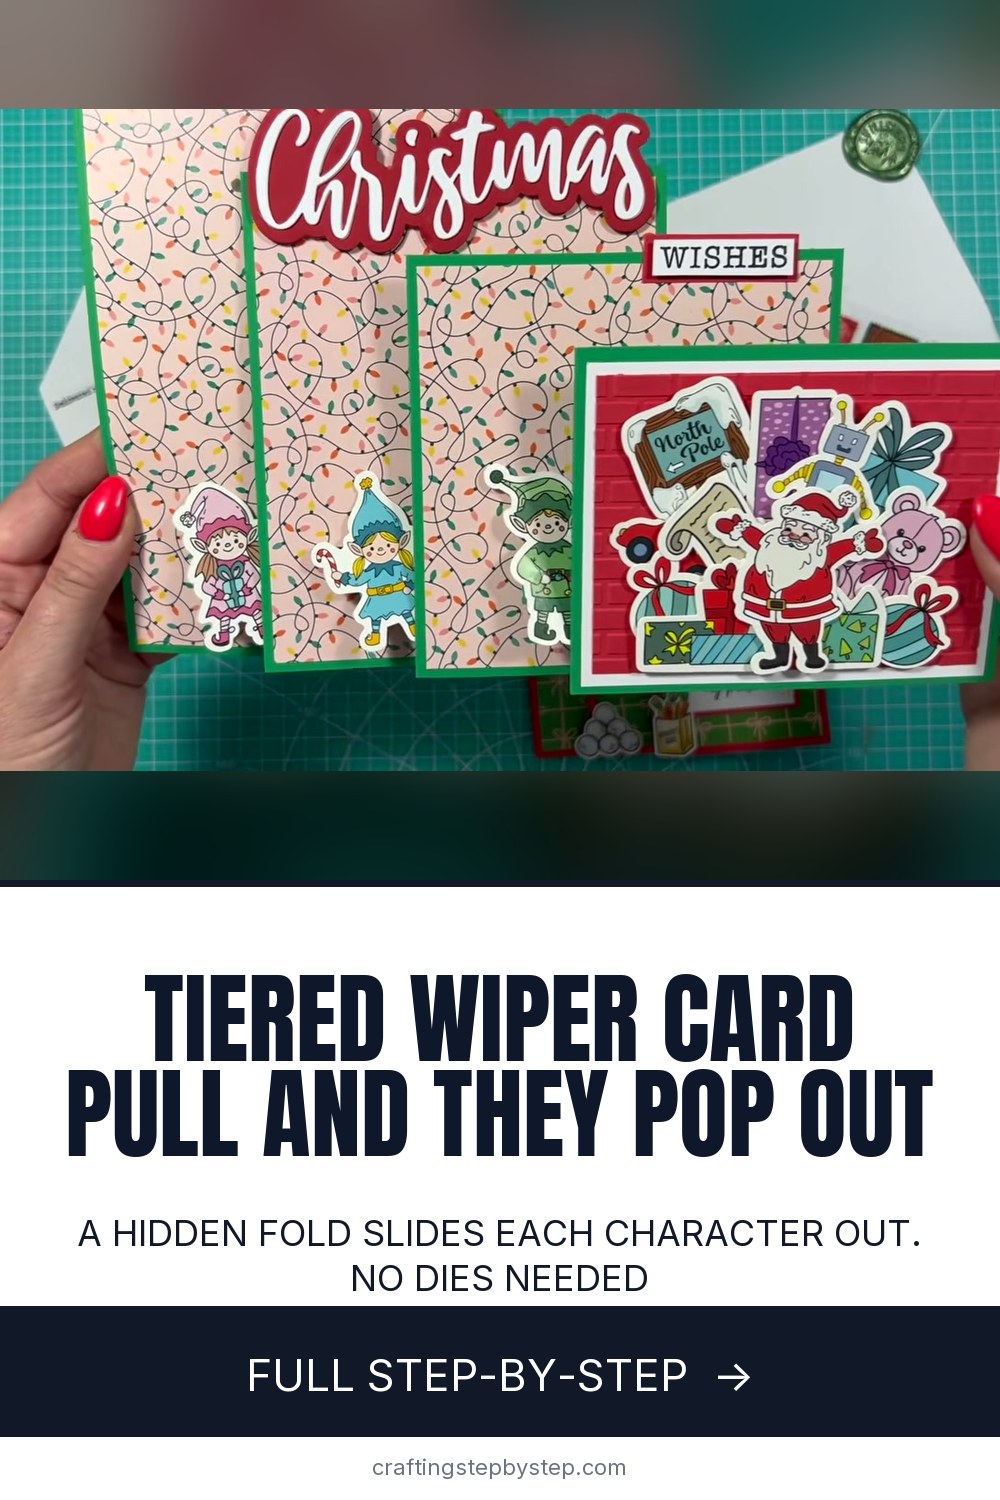
The finished result: How to Make a Tiered Wiper Card (No Dies Needed)
  • Difficulty: Medium
  • About 1 hour
  • 10 steps

You tapped Save

Save this project for later

We'll email you a link, no password.

How to Make a Tiered Wiper Card (No Dies Needed)

  • Your saved projects in one list
  • Your ticked steps on any device

Check your inbox for an email from us. Not there? Look in your spam folder.

Print

Steps written out by Crafting Step by Step from Sam Calcott UK - Mixed Up Craft's video (opens YouTube) (14:47). Published .

Also in:Paper Crafts

A tiered wiper card looks like a neat stack of panels until you pull a tab. Then little characters swing out from the side, one per tier, and slide back when you push it closed. Sam Calcott of Mixed Up Craft builds this Christmas version with three tiers, a hidden folded mechanism behind each one, and no dies at all. The idea comes from Cary's Creative Table; Sam converts the measurements to inches and simplifies them.

How to make a tiered wiper card: the short version

  • Cut and mat four panels: 5x7, 5x6, 5x5 and a 5x4 front.
  • Score three 6-1/2 x 1-1/2 inch strips and fold each into a wiper mechanism.
  • Cut three 1 inch wide levers, 6, 5-1/2 and 5 inches long.
  • Glue a mechanism and lever into the bottom corner of each panel, then stack the panels.
  • Stick a character to the end of each lever and decorate the front.

The panel sizes

Every panel is 5 inches wide and steps down in height, so each tier peeks out above the next. Mat each with patterned paper 1/4 inch smaller: 4-3/4 x 6-3/4 on the 5x7, 4-3/4 x 5-3/4 on the 5x6, a 4-3/4 inch square on the 5x5. The 5x4 front holds your main scene. Sam embossed hers with a brick wall folder to look like the front of the North Pole.

Make a mechanism template first

The mechanism has several score lines and two diagonals. Make one from scrap paper, write the measurements on it, and keep it in a clear pocket with your card supplies. Sam calls it a mechanism you can add to almost any fold, so it earns its place in the drawer. Test it on scrap card before you glue anything to a good panel.

Card weight and posting

Use a 220 to 230 gsm cardstock (around 80 lb). Heavier is not needed, since the mats and layers add strength. With all three tiers the finished card is about 1/4 inch thick, which can push it into a higher postage rate. One tier keeps it slim and still works. It fits a 5x7 envelope.

Showing bigger pop-outs

With every panel at the full 5 inch width, only small images fit at the lever ends. Keep the heights as given but trim the front two panels narrower. More of each lever shows, so larger characters or photos fit and still slide back in.

Ideas beyond Christmas

  • Sea creatures sliding out of an underwater scene.
  • A name, one letter per tier, for a birthday.
  • Small family photos for a grandparent.
  • A short sentiment on each lever that shows as it slides out.

Common problems

  • The mechanism resists folding flat. Trim a thin sliver off the end flap and fold again.
  • The lever sticks. Glue only the small triangle, never the edge you see when the card is open.
  • Characters catch on the way in. Tuck part of each image under the next panel and curve any ends slightly under.

More interactive cards

Try a slider card, a waterfall card or a stepper card. For something that springs up instead of out, see how to make a pop-up card.

Free printable

Print the steps and supply list for this project

One page you can take to the table. Free with a free account, no password.

Get the free printable

What you'll need

Free, for this project

Get this checklist by email

  • All 11 tools and materials, with tick boxes
  • A link to print all 10 steps on paper, to keep by you while you craft

No password. The whole tutorial stays free on this page.

Quick answer

Make a tiered wiper card with pop-out characters. A medium project: about 1 hour. Materials cost about $2 to $5. You need 11 things, including cardstock, patterned paper and craft glue. The 10 steps start with cut, Mat and Emboss the Tiered Wiper Card Panels, make a Template for the Wiper Card Mechanism, score the Wiper Mechanism Strip on a Scoring Board, score the Diagonal Lines on the Wiper Mechanism and fold the Scored Strip Into the Wiper Mechanism.

Step-by-step guide

10 steps, about 15 minutes. Tap a picture to jump to that step. Your progress saves automatically.

Tick each step off as you go.

  1. Step 1: Cut, Mat and Emboss the Tiered Wiper Card Panels

    Watch this step · 2:58

    Cut four 5 inch wide panels from cardstock: 5x7, 5x6, 5x5 and 5x4. Mat the first three with patterned paper 1/4 inch smaller on each side. The 5x4 is the front. Sam layers it with a 4-3/4 x 3-3/4 white mat and a 4-1/2 x 3-1/2 red panel, run through a brick wall embossing folder. The panels step down so every tier shows above the next.

    Tip:

    Make the panels in contrasting colors so the tiers stand out.

    Back to all steps

  2. Step 2: Make a Template for the Wiper Card Mechanism

    Watch this step · 4:50

    Cut a scrap strip 6-1/2 x 1-1/2 inches. Along the long side, mark score lines at 1, 2-3/4, 3-3/4 and 5-1/2 inches, plus a small dent at 4-3/4. Fold the third section in half and mark a dent 1/2 inch down. Then draw the two diagonals that make the V. Write every measurement on it. This template saves you measuring again for each tier.

    Tip:

    Store the template in a clear pocket for the next time.

    Back to all steps

  3. Step 3: Score the Wiper Mechanism Strip on a Scoring Board

    Watch this step · 5:00

    Cut three strips of cardstock 6-1/2 x 1-1/2 inches, one for each tier. Lay a strip on the scoring board along the long side and score at 1, 2-3/4, 3-3/4 and 5-1/2 inches. Press a small dent at 4-3/4. Fold along the third score line, set the fold at the top of the board, and dent it at 1/2 inch.

    Tip:

    Only want one pop-out? Make one strip. It still works.

    Back to all steps

  4. Step 4: Score the Diagonal Lines on the Wiper Mechanism

    Watch this step · 5:10

    Lay a metal ruler from the top of the second score line down to the 1/2 inch dent and score that line with a bone folder. Then score from the same point up to the 4-3/4 inch dent. These two diagonals let the mechanism collapse flat and swing open. Check the template to make sure the V points the right way.

    Tip:

    Score lightly. A heavy diagonal can split the card at the point.

    Back to all steps

  5. Step 5: Fold the Scored Strip Into the Wiper Mechanism

    Watch this step · 5:42

    Fold along every score line and burnish each one well. Fold the diagonals down to the 1/2 inch mark on both sides. Now push the whole piece in so it collapses along the folds, keeping the edges lined up. You will feel some resistance at the end flap. Trim a thin sliver off it and fold it over flat.

    Tip:

    Trimming a sliver is easier than chasing an odd measurement.

    Back to all steps

  6. Step 6: Glue the Wiper Mechanism Into a Tube

    Watch this step · 6:18

    Add a little glue to the end flap and fold it over to close the shape. You now have a small rectangular tube with a folded pocket in it. That pocket is where the lever slides in to push the character out. Make three mechanisms the same way, one for each tier.

    Tip:

    Let the glue grab for a minute before you handle the tube.

    Back to all steps

  7. Step 7: Glue the Wiper Mechanism Into the Corner of the Card Panel

    Watch this step · 7:46

    Fold a mechanism so the sloped section faces you. Cover the square back section and the slope behind it with glue. Press it into the bottom right corner of the 5x7 panel, flush with the bottom edge. A flush bottom matters, since the finished card stands on that edge. Let it dry while you cut the levers.

    Tip:

    Use a clear, quick-grab craft glue so nothing shows at the edges.

    Back to all steps

  8. Step 8: Slide the Lever Into the Wiper Card Mechanism

    Watch this step · 8:10

    Cut three levers 1 inch wide: 6, 5-1/2 and 5 inches long. Take the longest. Glue only the small triangle at its end, then slide it into the mechanism's slot while the mechanism is upright. Keep it at a right angle to the panel. Test it now: lift the lever and watch the far end swing out and back.

    Tip:

    Do a trial run on scrap card if this is your first one.

    Back to all steps

  9. Step 9: Stack the Next Tier on the Wiper Card Mechanism

    Watch this step · 10:32

    Put glue on the sloped section only. Never glue the edge you see when the card is open. Press the 5x6 panel on top, flush with the bottom and lined up on the right. Repeat for the next tier: mechanism in the corner, middle lever, glue on the slope, then the 5x5 panel. Finish with the front panel.

    Tip:

    Check every tier slides freely before the glue sets.

    Back to all steps

  10. Step 10: Attach the Pop-Out Characters to the Wiper Card Levers

    Watch this step · 11:52

    Pull the card open and glue a small image to the end of each lever, as close to the edge as you can. Sam used three elves for this Christmas card. Tuck part of each image under the panel above and curve any loose ends slightly under so nothing catches. Close it, open it, then decorate the front.

    Tip:

    Write your message on the back of the 5x7 panel.

    Back to all steps

How to Make a Pop Up Christmas Tree Card

Keep going

How to Make a Pop Up Christmas Tree Card

Keep going with card making

More on this topic, picked for this tiered wiper card.

You reached the last step

Save this project to come back to it

Your ticked steps, the free printable and your other saved makes, together in My Projects. Free, no password.

You tapped Save

Save this project for later

We'll email you a link, no password.

How to Make a Tiered Wiper Card (No Dies Needed)

  • Your saved projects in one list
  • Your ticked steps on any device

Check your inbox for an email from us. Not there? Look in your spam folder.

Free printable

Printable sheet and shopping list for this project

The bonus is hidden until you sign up.

Free with a free account, no password. Every step above stays open to everyone.

Products Used

The Checklist

How to Make a Tiered Wiper Card (No Dies Needed)

Tools
5
Materials
6
Steps
10
Video
15 min

Tools we recommend

As an Amazon Associate we earn from qualifying purchases. Links on this page may be affiliate links - clicking them and buying doesn't change your price, but helps support Crafting Step by Step.

Tags

The Crafter's Weekly

New card making tutorials, every Sunday

One short email with the week's best step-by-step guides. Free, no spam, unsubscribe anytime.

Did this work for you?

What's next

Related collections

Curated theme pages that include this tutorial.

Similar tutorials

Hand-picked next reads based on the one you just finished.

Liked this card making tutorial?

Pick the crafts you want to hear about. One email every Sunday with new step-by-step tutorials. No spam, easy to unsubscribe.

Get more like this in your inbox

Weekly digest. Pick the categories you want. Unsubscribe anytime.

Send me tutorials about

We only email about new tutorials. Easy unsubscribe anytime.