How to Make a Gatefold Card (Side Gatefold With Measurements)

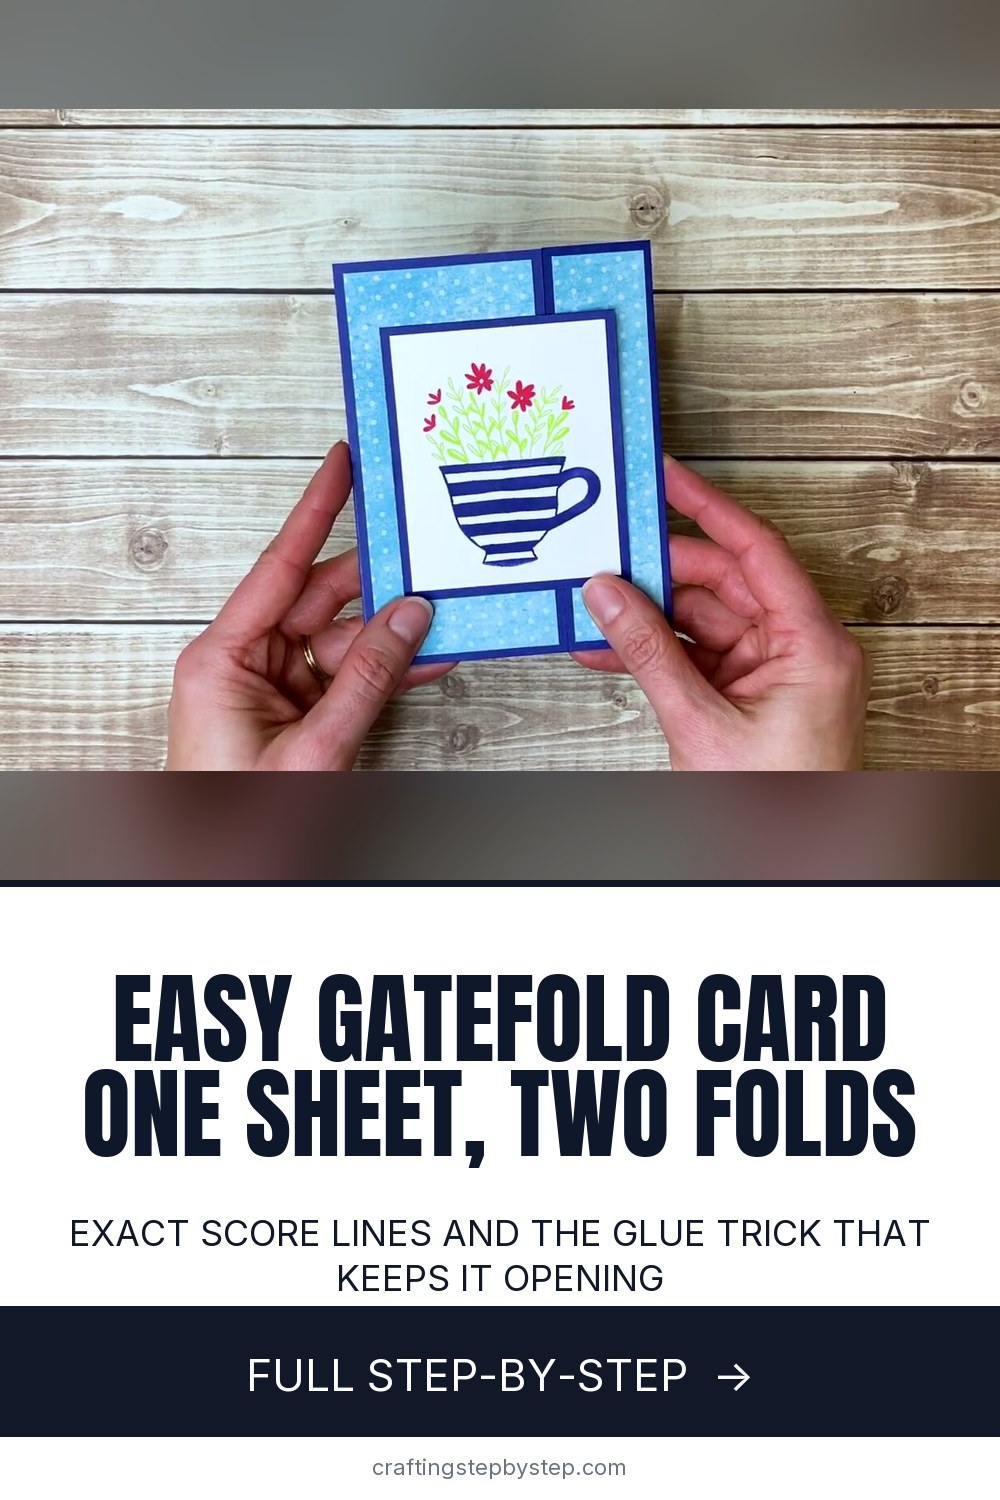
The finished result: How to Make a Gatefold Card (Side Gatefold With Measurements)
  • Difficulty: Easy
  • About 20 minutes
  • 10 steps

You tapped Save

Save this project for later

We'll email you a link, no password.

How to Make a Gatefold Card (Side Gatefold With Measurements)

  • Your saved projects in one list
  • Your ticked steps on any device

Check your inbox for an email from us. Not there? Look in your spam folder.

Print

Steps written out by Crafting Step by Step from Jessica Taylor's video (opens YouTube) (6:55). Published .

Also in:Paper Crafts

A gatefold card opens like a pair of doors. This version is a side gatefold: the two flaps meet off center instead of in the middle, so the front gets one wide flap and one narrow one. Jessica Taylor of Ink It Up with Jessica shows how to make one from a single piece of cardstock, two score lines and a stamped focal panel. The trick is all in where you put the glue.

How to make a gatefold card: the short version

  • Cut a 5-1/2 x 8-1/2 inch card base and score it at 1-1/2 and 5-3/4 inches.
  • Fold both flaps in so their edges meet without a gap.
  • Cover each flap with patterned paper cut to fit.
  • Stamp a focal image and mat it.
  • Glue the panel to one flap only, then add a white insert inside.

Side gatefold vs classic gatefold

A classic gatefold has two equal flaps that meet in the center. A side gatefold moves the join off to one side, which leaves a wider front for your main image. The math is the same idea. The two flaps must add up to the width of the middle panel. Here that is 1-1/2 plus 2-3/4 inches, which equals the 4-1/4 inch back. For a classic version on the same base, score at 2-1/8 and 6-3/8 inches instead.

Do not glue the card shut

This is the mistake almost everyone makes once. The focal panel overlaps the join. If adhesive touches both flaps, the card will not open. Put tape on only the left side of the panel. Open the card flat before you press it down, so nothing grabs the other flap by accident. Double-sided tape and foam dimensionals both work, as long as they stay on one side.

Getting the pattern to line up

A busy print can look broken where the flaps meet. To keep it flowing, cut one piece of patterned paper 3-3/4 x 5-1/4 inches, then trim a 1-1/4 inch strip off one side. Put the strip on the narrow flap and the rest on the wide flap. Close the card and the pattern runs straight across.

Finished size and envelopes

Folded, this card measures 4-1/4 x 5-1/2 inches, the standard A2 card size. It slips into an A2 envelope (4-3/8 x 5-3/4 inches). Layers add thickness, so keep foam pieces thin if you plan to mail it with a single stamp.

Ideas to try next

  • Add pieces to both flaps that lock together when the card closes.
  • Tie a ribbon or baker's twine around the card as a closure.
  • Use the same fold for a wedding invitation or a gift card holder.
  • Stamp a background on plain cardstock if you have no patterned paper.

Common problems

  • Flaps overlap. The score lines are off. Measure from the same end each time.
  • A gap between the flaps. Same cause. A small gap is fine, a big one looks sloppy.
  • A blotchy stamped image. Put a foam mat under the cardstock for clear stamps.

More card making

New to cards? Start with how to make a card. For more fun folds, try an easel card or a slider card. This one makes a lovely handmade thank you card.

Free printable

Print the steps and supply list for this project

One page you can take to the table. Free with a free account, no password.

Get the free printable

What you'll need

Free, for this project

Get this checklist by email

  • All 13 tools and materials, with tick boxes
  • A link to print all 10 steps on paper, to keep by you while you craft

No password. The whole tutorial stays free on this page.

Quick answer

Make a gatefold card from one sheet of cardstock. An easy project: about 20 minutes. Materials cost about $1 to $3. You need 13 things, including patterned paper, white cardstock and contrast cardstock for the mat. The 10 steps start with score the Gatefold Card Base on a Scoring Board, fold the First Gatefold Card Flap and Crease It, fold the Second Flap So the Gatefold Edges Meet and cover the Narrow Gatefold Flap With Patterned Paper.

Step-by-step guide

10 steps, about 7 minutes. Tap a picture to jump to that step. Your progress saves automatically.

Tick each step off as you go.

  1. Step 1: Score the Gatefold Card Base on a Scoring Board

    Watch this step · 0:46

    Cut a piece of cardstock to 5-1/2 x 8-1/2 inches. Jessica uses a dark navy. Lay it on a scoring board with the long side across and score two lines: one at 1-1/2 inches and one at 5-3/4 inches. You can use the scoring blade on a paper trimmer instead. A scoring board is handy if you plan to make a batch, since you only set the marks once.

    Tip:

    Run the stylus firmly down the groove. A deep score folds cleaner.

    Back to all steps

  2. Step 2: Fold the First Gatefold Card Flap and Crease It

    Watch this step · 1:12

    Fold the narrow flap in along the 1-1/2 inch score line. Line the edges up neatly at top and bottom before you press down. Then run a bone folder along the fold to give it a sharp crease. A crisp crease helps the card stand up and makes the flap sit flat when the card is closed.

    Tip:

    Crease from the middle out to each end so the fold stays straight.

    Back to all steps

  3. Step 3: Fold the Second Flap So the Gatefold Edges Meet

    Watch this step · 1:28

    Fold the wide flap in along the other score line. Its edge should butt right up against the edge of the narrow flap, with no big gap and no overlap. Check the top and bottom line up, then crease it with the bone folder. If the flaps overlap or gap, the score lines were off, so measure again from the same end.

    Tip:

    A hair of a gap is fine. Overlap makes the card bulge.

    Back to all steps

  4. Step 4: Cover the Narrow Gatefold Flap With Patterned Paper

    Watch this step · 1:50

    Cut a strip of patterned paper 1-1/4 x 5-1/4 inches for the narrow flap. Jessica prefers double-sided tape for this. Run tape on the back of the strip and center it on the flap, leaving an even navy border all round. The dark border frames the paper and hides any small cutting wobble.

    Tip:

    No patterned paper? Stamp a background on plain cardstock.

    Back to all steps

  5. Step 5: Cut Patterned Paper So It Flows Across the Gatefold Card

    Watch this step · 2:32

    Cover the wide flap with a 2-1/2 x 5-1/4 inch piece. If your paper has an obvious pattern, like these teacups, start with one 3-3/4 x 5-1/4 inch piece instead. Trim a 1-1/4 inch strip off one side on your paper trimmer. Use the strip on the narrow flap and the rest on the wide flap, and the pattern runs straight across the closed card.

    Tip:

    Lay both pieces on the closed card before you tape them.

    Back to all steps

  6. Step 6: Stamp the Focal Image for the Gatefold Card

    Watch this step · 3:27

    Cut white cardstock to 2-3/4 x 3-1/2 inches. Ink a clear stamp, here a striped teacup, and press it straight down. Clear photopolymer stamps make it easy to see where you are placing the image. Add more layers in other colors, such as leaves and flowers. They do not have to line up exactly, so do not overthink it.

    Tip:

    Patchy image? Stamp on a foam mat for a crisper print.

    Back to all steps

  7. Step 7: Add Adhesive to One Side of the Gatefold Focal Panel

    Watch this step · 4:43

    Tape the stamped piece to a 3 x 3-3/4 inch navy mat. Now the important part. Turn the mat over and put adhesive only down its left side. Leave the right side bare. That side will sit over the join between the flaps, and any tape there would glue the card shut.

    Tip:

    Mark the no-glue side with a pencil tick if you tend to forget.

    Back to all steps

  8. Step 8: Open the Gatefold Card Flat Before Gluing

    Watch this step · 5:06

    Open the card all the way so it lies flat on the table. Run a line of adhesive along the edge of the wide front flap, where the panel will land. Opening the card first means no stray tape can grab the other flap. Jessica's honest advice: she learned this one the hard way.

    Tip:

    Keep tape a little way in from the flap edge.

    Back to all steps

  9. Step 9: Press the Focal Panel Onto the Gatefold Card Front

    Watch this step · 5:18

    Close the card and use it as a guide for placement. Line up the panel so it sits centered on the front and overlaps the join. Press it down on the left side only. Then open and close the card a few times to make sure it swings freely. If it sticks, lift the panel before the tape sets.

    Tip:

    Foam dimensionals on the glued side give the panel a little lift.

    Back to all steps

  10. Step 10: Add a White Insert Inside the Gatefold Card

    Watch this step · 5:38

    Dark cardstock is hard to write on, so add a white insert to the inside panel. Cut it a little smaller than the panel, about 4 x 5-1/4 inches. Stamp a small flower in one corner or leave it plain for a long message. Run adhesive on the back and press it in place. Your side gatefold card is ready to sign.

    Tip:

    Cut several inserts at once and keep them for future cards.

    Back to all steps

How to Make a Snow Globe Shaker Christmas Card

Keep going

How to Make a Snow Globe Shaker Christmas Card

10 steps · about 9 minutes

Keep going with card making

More on this topic, picked for this gatefold card.

You reached the last step

Save this project to come back to it

Your ticked steps, the free printable and your other saved makes, together in My Projects. Free, no password.

You tapped Save

Save this project for later

We'll email you a link, no password.

How to Make a Gatefold Card (Side Gatefold With Measurements)

  • Your saved projects in one list
  • Your ticked steps on any device

Check your inbox for an email from us. Not there? Look in your spam folder.

Free printable

Printable sheet for this project

The bonus is hidden until you sign up.

Free with a free account, no password. Every step above stays open to everyone.

Products Used

The Checklist

How to Make a Gatefold Card (Side Gatefold With Measurements)

Tools
5
Materials
8
Steps
10
Video
7 min

Tools we recommend

As an Amazon Associate we earn from qualifying purchases. Links on this page may be affiliate links - clicking them and buying doesn't change your price, but helps support Crafting Step by Step.

Tags

The Crafter's Weekly

New card making tutorials, every Sunday

One short email with the week's best step-by-step guides. Free, no spam, unsubscribe anytime.

Did this work for you?

What's next

Related collections

Curated theme pages that include this tutorial.

Similar tutorials

Hand-picked next reads based on the one you just finished.

Liked this card making tutorial?

Pick the crafts you want to hear about. One email every Sunday with new step-by-step tutorials. No spam, easy to unsubscribe.

Get more like this in your inbox

Weekly digest. Pick the categories you want. Unsubscribe anytime.

Send me tutorials about

We only email about new tutorials. Easy unsubscribe anytime.