How to Do Bounce Lettering With Brush Pens

The finished result: How to Do Bounce Lettering With Brush Pens
  • Difficulty: Medium
  • About 30 minutes
  • 9 steps

You tapped Save

Save this project for later

We'll email you a link, no password.

How to Do Bounce Lettering With Brush Pens

  • Your saved projects in one list
  • Your ticked steps on any device

Check your inbox for an email from us. Not there? Look in your spam folder.

Print

Steps written out by Crafting Step by Step from kellycreates' video (opens YouTube) (11:59). Published .

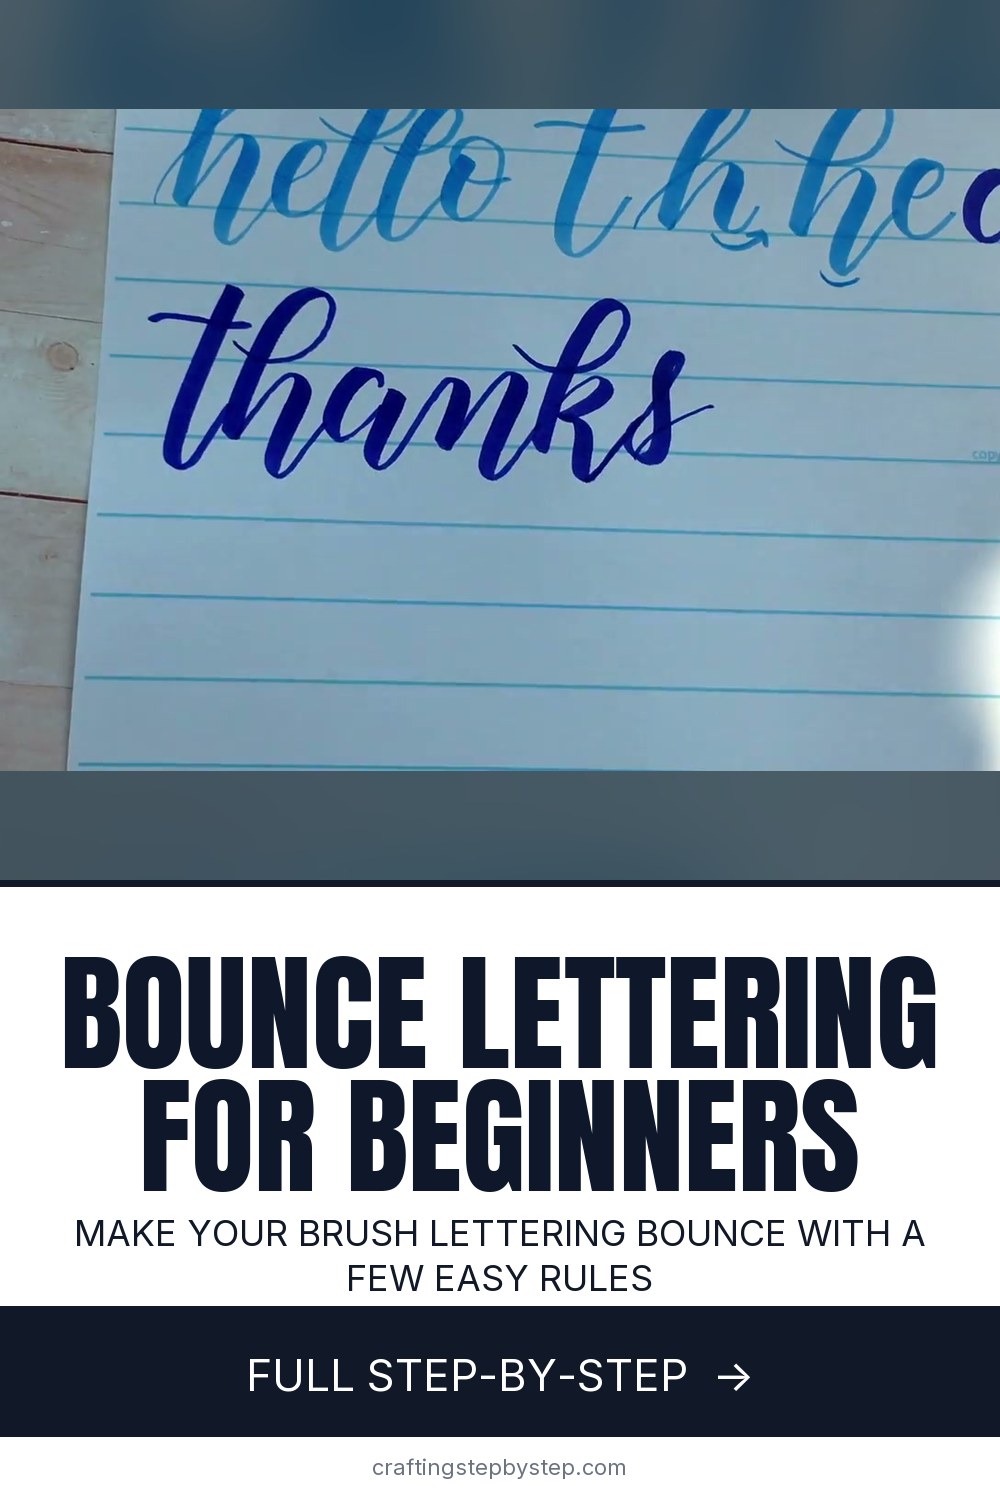
Bounce lettering is brush script where the letters hop up and down instead of sitting in a tidy row. It looks relaxed and playful, which is why you see it on cards, chalkboards and party signs. Kelly from Kelly Creates teaches it by writing each word twice, once in her regular brush script and once bounced, so you can see exactly which strokes move and which stay put.

The idea is simple. Regular brush lettering keeps every letter between the same guidelines. Bounce lettering breaks those lines on purpose, letting some strokes drop below the baseline or rise higher, while the thick and thin strokes stay exactly as they were.

How to do bounce lettering: the rules in short

  • Learn regular brush script first. Bounce is a variation, not a new alphabet.
  • Bounce some strokes, never all of them.
  • Keep vowels and ovals on the baseline while you learn.
  • Bounce the second stroke of a letter, not its oval.
  • Make exit strokes narrower and carry them up to where the next letter starts.
  • Keep your thick downstrokes and thin upstrokes the same as always.

Pens and paper

Kelly uses four brush pens in the video: Kuretake Zig Brushables, Tombow Dual Brush Pens, Marvy Le Plume II and Sakura Koi coloring brush pens. A large, flexible tip like the Tombow makes the thick and thin contrast easy to see. The Koi gives slightly thinner downstrokes and is a good middle ground. Use smooth paper: a Rhodia pad, a marker pad or a good laser printer paper. Rough copy paper frays brush tips fast.

Why guidelines matter more, not less

It sounds backward, but you need lined paper to bounce well. You can only break the baseline on purpose if you can see where it is. Print a sheet with a baseline, waistline and ascender line, or rule your own in pencil. Once the bounce feels natural, you can drop the lines.

Pick a bounce pattern

A good first pattern is to bounce every downstroke that ends a letter, like the second leg of an h or n, and leave loops alone. Kelly keeps the ascender loops of h and k ending on the baseline, and drops the strokes that follow. Once you see a pattern, the word looks planned instead of messy. Write the same word three or four ways and keep the one you like.

Common problems

  • Letters do not connect. Your exit stroke stopped too low. Carry it up to where the next letter begins.
  • Misshapen ovals. You dragged an oval below the line. Keep the oval on the baseline and bounce the stroke after it.
  • It looks chaotic. Too many bounces. Pick two or three letters per word.
  • Thin, wobbly downstrokes. Hold the pen further back and at a lower angle, and press harder on the way down.

Practice ideas

Warm up with drills: compound curves, ovals and underturns. Then write short words with easy bounce letters, like hello, thanks, believe and happy. Holiday tags and place cards are a good low-pressure place to try it on real projects.

Keep lettering

New to brush script? Start with brush pen calligraphy and how to use a calligraphy pen. No brush pen yet? Try faux calligraphy with any marker. When you are ready to use it, letter some calligraphy place cards.

Free printable

Print the steps and supply list for this project

One page you can take to the table. Free with a free account, no password.

Get the free printable

What you'll need

Free, for this project

Get this checklist by email

  • All 3 tools and materials, with tick boxes
  • A link to print all 9 steps on paper, to keep by you while you craft

No password. The whole tutorial stays free on this page.

Quick answer

Learn bounce lettering with brush pens. Which strokes to drop below the baseline, which to keep, and how to make bouncy words look planned. A medium project: about 30 minutes. You need 3 things, including smooth paper, brush pens and lined practice sheets. The 9 steps start with write a Word in Regular Brush Script on the Baseline Before Bounce Lettering and drop the Second Stroke of the h Below the Baseline for Bounce Lettering.

Step-by-step guide

9 steps, about 12 minutes. Tap a picture to jump to that step. Your progress saves automatically.

Tick each step off as you go.

  1. Step 1: Write a Word in Regular Brush Script on the Baseline Before Bounce Lettering

    Watch this step · 1:00

    Start with a short word in your normal brush script so you have something to compare against. Kelly writes hi on a lined practice sheet. Every letter sits on the bottom guideline, called the baseline. Downstrokes are thick and upstrokes are thin. Bounce lettering keeps those thicks and thins exactly the same. The only thing that changes is where some strokes land in relation to the lines.

    Tip:

    Use evenly spaced guidelines. You need to see the baseline clearly to break it on purpose.

    Back to all steps

  2. Step 2: Drop the Second Stroke of the h Below the Baseline for Bounce Lettering

    Watch this step · 1:35

    Write the word again, this time with a bounce. Keep the h ascender loop the same. Then bring the second stroke of the h down past the baseline before you exit. That one dropped stroke is what makes the letters look like they are bouncing. Put the two versions side by side and you can see the difference straight away.

    Tip:

    Bounce the stroke that ends a letter, like the second leg of an h, m or n.

    Back to all steps

  3. Step 3: Write a Bouncy Hello With the Vowels Kept on the Baseline

    Watch this step · 3:25

    Try a longer word like hello. Write it in regular script first, then bounced underneath. While you are learning, keep the vowels, e and o, sitting on the baseline. Move the l strokes instead. Drop one below the line and make the next a little higher or smaller. This is where your own judgment and style come in, so try it a few ways.

    Tip:

    Keeping vowels on the line gives the word an anchor, so it still reads as one word.

    Back to all steps

  4. Step 4: Narrow the Exit Strokes on Your Bounce Lettering

    Watch this step · 4:05

    Look at how each letter leaves for the next one. In regular script, the exit stroke of an h swings out wide and open. In bounce lettering, Kelly makes it tighter, coming up at a sharper angle. Narrow exits keep the letters close together even when they move up and down. Some people find them trickier at first, and some find them easier.

    Tip:

    Write a regular h and a bouncy h next to each other and compare the exits.

    Back to all steps

  5. Step 5: Hold the Brush Pen Far Back on the Barrel for Bounce Lettering

    Watch this step · 4:55

    Your grip affects every stroke. Kelly switches to a Sakura Koi brush pen here and shows where she holds it: well back on the barrel, not near the tip. That lets the pen lie at a low angle so the side of the brush makes the thick downstrokes. Gripping close to the tip makes the pen stand upright and your strokes come out thin and shaky.

    Tip:

    Relax your hand. A tight grip makes the curves wobble.

    Back to all steps

  6. Step 6: Bounce the Second Stroke of the a, Not the Oval

    Watch this step · 6:26

    Letters with an oval, like a, d and g, need care. If you drag the oval below the baseline it looks misshapen. Instead, write the oval sitting on the line as usual. Then bounce the second part of the letter, the compound curve that follows, below the baseline. The letter still reads clearly, and you still get the bounce.

    Tip:

    This same rule works for o, q and the bowl of a d.

    Back to all steps

  7. Step 7: Bounce the n and Keep the k Loop in the Bounce Lettering Word Thanks

    Watch this step · 7:35

    Write thanks to put it all together. Bounce the t below the baseline. Make a bigger h loop that stops on the line, then drop its second stroke. Keep the a oval on the line and bounce its tail. Drop the second stroke of the n. For the k, keep the loop the same as the h so the word looks consistent, and stop it on the baseline.

    Tip:

    Carry each exit stroke right up to where the next letter starts, or they will not connect.

    Back to all steps

  8. Step 8: Try Two Ways to Bounce the s in Bounce Lettering

    Watch this step · 8:26

    The s is an awkward letter to bounce. Kelly shows two options. Drop the s below the baseline and exit with a loop, or use a simpler s shape and raise it higher than the letters around it. Either works. Practise both at the end of a word and pick the one that looks better with your style.

    Tip:

    If one letter keeps fighting you, swap to a simpler form of it. Nobody will mind.

    Back to all steps

  9. Step 9: Practice Bounce Lettering Drills on a Printed Worksheet

    Watch this step · 9:05

    The fastest way to get comfortable is drills. Trace rows of the basic strokes: compound curves, ovals, reverse ovals, upstrokes and downstrokes. Use a big brush pen like a Tombow. When these feel easy, bouncy letters get much easier too. Then practise whole letters, and finish with words like hello, thanks and believe.

    Tip:

    Slide a sheet of tracing paper over a printed worksheet so you can reuse it many times.

    Back to all steps

How to Write in Blackletter (Gothic Calligraphy)

Keep going

How to Write in Blackletter (Gothic Calligraphy)

Keep going with calligraphy

More on this topic, picked for this project.

You reached the last step

Save this project to come back to it

Your ticked steps, the free printable and your other saved makes, together in My Projects. Free, no password.

You tapped Save

Save this project for later

We'll email you a link, no password.

How to Do Bounce Lettering With Brush Pens

  • Your saved projects in one list
  • Your ticked steps on any device

Check your inbox for an email from us. Not there? Look in your spam folder.

Free printable

Printable sheet and shopping list for this project

The bonus is hidden until you sign up.

Free with a free account, no password. Every step above stays open to everyone.

Products Used

The Checklist

How to Do Bounce Lettering With Brush Pens

Tools
2
Materials
1
Steps
9
Video
12 min

Tools we recommend

As an Amazon Associate we earn from qualifying purchases. Links on this page may be affiliate links - clicking them and buying doesn't change your price, but helps support Crafting Step by Step.

Tags

The Crafter's Weekly

New calligraphy tutorials, every Sunday

One short email with the week's best step-by-step guides. Free, no spam, unsubscribe anytime.

Did this work for you?

What's next

Related collections

Curated theme pages that include this tutorial.

Similar tutorials

Hand-picked next reads based on the one you just finished.

Liked this calligraphy tutorial?

Pick the crafts you want to hear about. One email every Sunday with new step-by-step tutorials. No spam, easy to unsubscribe.

Get more like this in your inbox

Weekly digest. Pick the categories you want. Unsubscribe anytime.

Send me tutorials about

We only email about new tutorials. Easy unsubscribe anytime.