How to Make Calligraphy Place Cards - Easy DIY Brush Lettering

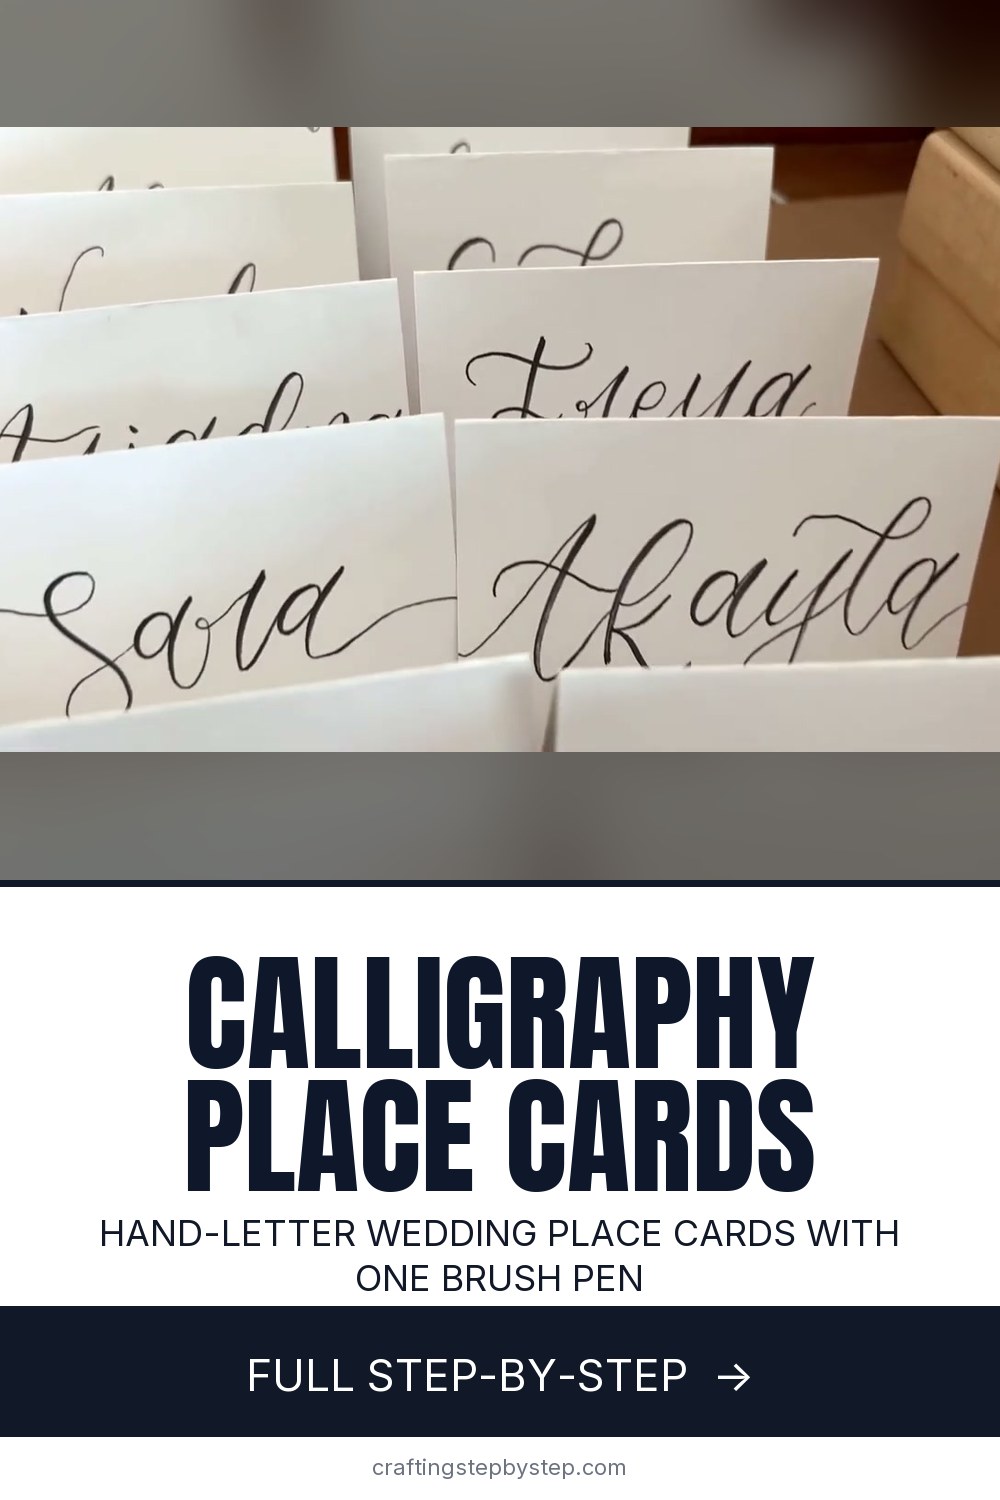
The finished result: How to Make Calligraphy Place Cards - Easy DIY Brush Lettering
  • Difficulty: Easy
  • 8 steps

You tapped Save

Save this project for later

We'll email you a link, no password.

How to Make Calligraphy Place Cards - Easy DIY Brush Lettering

  • Your saved projects in one list
  • Your ticked steps on any device

Check your inbox for an email from us. Not there? Look in your spam folder.

Print

Steps written out by Crafting Step by Step from Lettering With Liv's video (opens YouTube) (5:23). Published .

Handwritten place cards make a table feel personal in a way printed ones never do. The lettering artist behind Lettering With Liv writes place cards for formal events, and in this video she shares how she does them with nothing fancier than folded 4x6 index cards and two Tombow Fudenosuke brush pens. No pencil guidelines, no projector, no template. Slow, steady lettering and a few layout ideas.

How to make calligraphy place cards: the short version

  • Fold 4x6 index cards in half to make tent cards.
  • Have your guest list, spelled right, next to you.
  • Write each name slowly with a brush pen: press down on downstrokes, lighten up on upstrokes.
  • Add a last name or table number in small print with a fine marker.
  • Let each card be a little different. That is the charm.

Pens for place cards

The Tombow Fudenosuke comes in a hard tip and a soft tip. The hard tip is easier to control and is the better pick if you are new to brush lettering. The soft tip gives more contrast between thick and thin strokes once your hand is steady. For table numbers and surnames, an ultra fine Sharpie or a fineliner gives a crisp small print that sits nicely under the brush name.

Card stock and size

Folded 4x6 index cards are cheap and give a 4 x 3 inch face, which is a standard place card size. Use unruled cards, or turn lined ones so the lines face in. Smooth, bright white card stock keeps brush pen tips from fraying. Heavier cardstock, kraft paper or patterned cards all work for different themes.

Layout ideas

LayoutLooks like
Lowercase name, spaced capital surnameModern and airy
Name edge to edge, table number belowBold and full
Centered name, capital table numberClassic and formal
Bouncy thick name, table line belowPlayful and relaxed

Planning a big batch

For a wedding, print the guest list sorted by table and tick off each card as you go. Write a few practice cards first so your hand warms up. Do the cards in sittings of 20 or 30 rather than all at once, since lettering gets rushed when your hand is tired. Buy an extra pack of cards. You will spoil some, and that is fine. Guests often take their card home, so a handwritten one doubles as a small keepsake.

Common problems

  • Long names run off the card. Start a little left of center and keep the letters narrower.
  • Shaky strokes. Slow down. Speed hides nothing in brush lettering.
  • Smudges. Let the ink dry a minute before stacking the cards.

More lettering projects

Build your basics with brush pen calligraphy or faux calligraphy if you only have a regular pen. Then address the invitations with envelope calligraphy, or learn how to use a calligraphy pen for a dip-pen look.

Free printable

Print the steps and supply list for this project

One page you can take to the table. Free with a free account, no password.

Get the free printable

What you'll need

Free, for this project

Get this checklist by email

  • All 5 tools and materials, with tick boxes
  • A link to print all 8 steps on paper, to keep by you while you craft

No password. The whole tutorial stays free on this page.

Quick answer

Write calligraphy place cards by hand with a brush pen and folded index cards. An easy project. You need 5 things, including 4x6 unruled index cards, guest list and ultra fine black marker. The 8 steps start with fold 4x6 Index Cards Into Tent Place Cards, write the Name on the Place Card Without Penciling, add a Table Number to the Place Card in Small Print and use Thick Downstrokes and Thin Upstrokes on the Place Card Name.

Step-by-step guide

8 steps, about 5 minutes. Tap a picture to jump to that step. Your progress saves automatically.

Tick each step off as you go.

  1. Step 1: Fold 4x6 Index Cards Into Tent Place Cards

    Watch this step · 0:40

    Fold a stack of 4x6 index cards in half across the short side so each one stands up as a tent. Run a fingernail along the fold so it stays crisp. Set your pens out next to the cards, along with your list of names. She uses a hard tip and a soft tip Tombow Fudenosuke brush pen, plus a fine marker for the small print.

    Tip:

    Lined index cards work too. Fold them so the lines end up on the inside.

    Back to all steps

  2. Step 2: Write the Name on the Place Card Without Penciling

    Watch this step · 0:48

    Skip the pencil guide. Pencil rarely erases cleanly on index card stock. It smudges and can leave dents even when you press lightly. Write the name straight onto the card with the brush pen instead, moving slowly and steadily. Rest your other hand on the card so it does not slide while you letter.

    Tip:

    Warm up on a scrap card first. Your first few names are always the stiffest.

    Back to all steps

  3. Step 3: Add a Table Number to the Place Card in Small Print

    Watch this step · 1:10

    Under the name, add the table number in small print with an ultra fine Sharpie or a fineliner. Keep it simple and light, like table two, so the name stays the star of the card. Small print in plain letters also makes a good contrast with the brush script above it. Line it up under the end of the name or center it.

    Tip:

    Use the same pen for every table number so the set looks consistent.

    Back to all steps

  4. Step 4: Use Thick Downstrokes and Thin Upstrokes on the Place Card Name

    Watch this step · 1:16

    Brush lettering comes from pressure. Press the tip down as your pen moves toward you for a thick stroke. Ease up as the pen moves away for a thin hairline. You can see it in the capital A here: heavy legs, thin connecting lines. Go letter by letter, lifting the pen between strokes if it helps you keep control.

    Tip:

    Hold the pen at a low angle. Standing it upright makes thick strokes hard to get.

    Back to all steps

  5. Step 5: Slow Down and Check the Spelling on Each Place Card

    Watch this step · 3:45

    Take your time on every card. Speed is where mistakes creep in, so write as slowly as you need. Before you start a name, check it against your list twice. She has written a gorgeous card with the name spelled wrong, and it happens to everyone. If you slip, grab a fresh card and start over.

    Tip:

    Read each finished card back against the list before it goes in the done pile.

    Back to all steps

  6. Step 6: Try a Lowercase Name With a Spaced Capital Surname

    Watch this step · 4:20

    For a modern look, write the first name in all lowercase calligraphy. Underneath, print the last name in small capital letters with extra space between each one. The wide spacing balances the loops of the script above. Here a small boxed number in the corner marks the table without crowding the names.

    Tip:

    Space the capitals to roughly match the width of the name above.

    Back to all steps

  7. Step 7: Run the Calligraphy Name Edge to Edge on the Place Card

    Watch this step · 4:30

    Let the first and last strokes of the name run right off both edges of the card. On the Wenday card, the W and the y both reach the edge. It makes a bold, full card. Add the table number in small capitals below, centered under the name. You can also keep the name centered and only stretch the entry and exit strokes.

    Tip:

    Start the first stroke off the card on scrap paper so the line stays smooth.

    Back to all steps

  8. Step 8: Write a Bouncy Calligraphy Place Card With a Table Assignment

    Watch this step · 4:50

    Bounce lettering lets letters sit above and below the line instead of in a flat row. Write the name in thicker strokes and let some letters dip and others rise. Add the table assignment underneath in a lighter hand. It looks relaxed and fun, which suits birthdays, showers and casual weddings.

    Tip:

    Keep the bounce on the lowercase letters. Capitals stay steady.

    Back to all steps

How to Write Italic Capital Letters

Keep going

How to Write Italic Capital Letters

8 steps · about 8 minutes

Keep going with calligraphy

More on this topic, picked for this project.

You reached the last step

Save this project to come back to it

Your ticked steps, the free printable and your other saved makes, together in My Projects. Free, no password.

You tapped Save

Save this project for later

We'll email you a link, no password.

How to Make Calligraphy Place Cards - Easy DIY Brush Lettering

  • Your saved projects in one list
  • Your ticked steps on any device

Check your inbox for an email from us. Not there? Look in your spam folder.

Free printable

Printable sheet and shopping list for this project

The bonus is hidden until you sign up.

Free with a free account, no password. Every step above stays open to everyone.

Products Used

The Checklist

How to Make Calligraphy Place Cards - Easy DIY Brush Lettering

Tools
3
Materials
2
Steps
8
Video
5 min

Tools we recommend

As an Amazon Associate we earn from qualifying purchases. Links on this page may be affiliate links - clicking them and buying doesn't change your price, but helps support Crafting Step by Step.

Tags

The Crafter's Weekly

New calligraphy tutorials, every Sunday

One short email with the week's best step-by-step guides. Free, no spam, unsubscribe anytime.

Did this work for you?

What's next

Related collections

Curated theme pages that include this tutorial.

Similar tutorials

Hand-picked next reads based on the one you just finished.

Liked this calligraphy tutorial?

Pick the crafts you want to hear about. One email every Sunday with new step-by-step tutorials. No spam, easy to unsubscribe.

Get more like this in your inbox

Weekly digest. Pick the categories you want. Unsubscribe anytime.

Send me tutorials about

We only email about new tutorials. Easy unsubscribe anytime.