How to Paint a Snowman (Easy Acrylic Painting for Beginners)

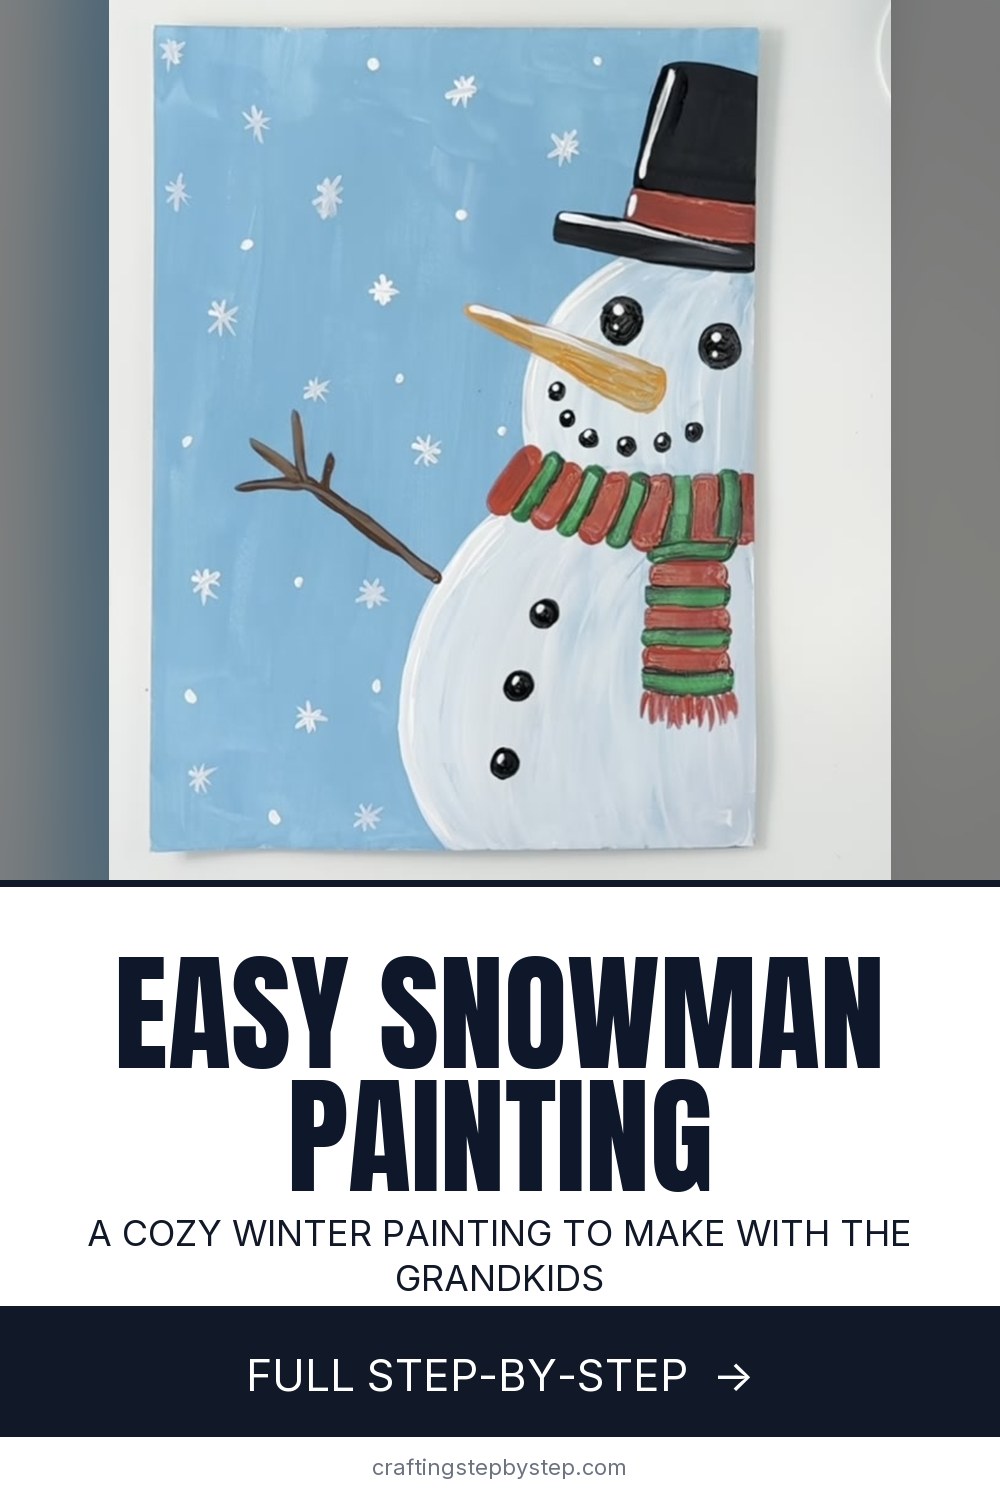
The finished result: How to Paint a Snowman (Easy Acrylic Painting for Beginners)
  • Difficulty: Easy
  • About 45 minutes
  • 10 steps

You tapped Save

Save this project for later

We'll email you a link, no password.

How to Paint a Snowman (Easy Acrylic Painting for Beginners)

  • Your saved projects in one list
  • Your ticked steps on any device

Check your inbox for an email from us. Not there? Look in your spam folder.

Print

Steps written out by Crafting Step by Step from Quick and Easy Paintings' video (opens YouTube) (7:28). Published .

This snowman painting is a winter afternoon project you can finish in under an hour. It comes from Quick and Easy Paintings and is built for kids and beginners: a light blue background, two white circles, a top hat, a carrot nose, a striped scarf and a sky full of snowflakes. Seven paint colors and three brushes. It makes a lovely project to do side by side with a grandchild.

How to paint a snowman: the short version

  • Cover the paper in light blue.
  • Outline and fill two white circles running off the right edge.
  • Add a red hat band, a brown stick arm and a black top hat.
  • Paint an orange carrot, black eyes, a dotted smile and buttons.
  • Paint a red and green striped scarf.
  • Finish with white snowflakes and highlights.

What you need

Acrylic paint in white, black, light blue, green, red, orange and brown. A large flat brush for the background, a medium brush for the snowman and scarf and a small round brush for the face and snowflakes. Paint on a canvas panel or heavy mixed media paper; thin printer paper will curl. Keep a cup of water and a paper towel close, and wipe the brush between every color.

Why the snowman runs off the edge

Placing the snowman big and partly off the right side makes the picture feel close and friendly, as if he is leaning into the frame. It also means less white to paint and a big face that is easy for small hands to work on. Leave the left side open for the stick arm and the snowflakes.

Painting with kids

Let the background dry fully before the snowman goes on, or the white turns pale blue. A hair dryer on low speeds that up. Pre-mix small puddles of each color so nobody has to squeeze bottles mid-stroke. Wonky circles are fine. Every snowman in the yard is a little lumpy too, and a crooked smile has more personality.

Make it your own

  • Swap the top hat for a knitted beanie with a pom-pom.
  • Paint the scarf in a family's favorite team colors.
  • Add a cardinal on the stick arm or a few pine trees in the background.
  • Use a sponge dabbed in white for fluffy falling snow.

Showing it off

Once it is dry, the painting slips into an inexpensive frame or onto the fridge. Painted on card stock, it folds into a handmade holiday card. Kids can sign and date the back, and a batch of them, one from each grandchild, makes a cheerful winter gallery on a hallway wall. Scan it and it becomes a gift tag for next year.

Common problems

  • Blue shows through the white. Paint a second coat once the first is dry.
  • Black dots smear. Wait until the white body is dry before adding the face and buttons.
  • Snowflakes look like blobs. Use the tip of the small brush with very little paint.

More winter painting

Prefer pencils? Try how to draw a snowman. Learn more about painting snow, then add a poinsettia to your holiday set. For a snowman you can hold, see how to make a snowman craft.

Free printable

Print the steps and supply list for this project

One page you can take to the table. Free with a free account, no password.

Get the free printable

What you'll need

Free, for this project

Get this checklist by email

  • All 8 tools and materials, with tick boxes
  • A link to print all 10 steps on paper, to keep by you while you craft

No password. The whole tutorial stays free on this page.

Quick answer

Paint an easy snowman with a top hat, carrot nose and striped scarf. An easy project: about 45 minutes. Materials cost about $2 to $5. You need 8 things, including large flat brush, medium brush and small round brush. The 10 steps start with paint the Snowman Background Light Blue, outline the Snowman's Body Circle in White, fill In the Snowman's Head and Body, add the Hat Band and the Snowman's Stick Arm and paint the Snowman's Black Top Hat.

Step-by-step guide

10 steps, about 7 minutes. Tap a picture to jump to that step. Your progress saves automatically.

Tick each step off as you go.

  1. Step 1: Paint the Snowman Background Light Blue

    Watch this step · 0:20

    Start with a large brush and light blue paint. Cover the whole sheet, working in long strokes from top to bottom. Small streaks and brush marks are fine; they look like a winter sky. Go right to the edges so no white paper peeks through at the borders. Let the background dry completely before you paint the snowman on top.

    Tip:

    A hair dryer on low dries the background in a couple of minutes.

    Back to all steps

  2. Step 2: Outline the Snowman's Body Circle in White

    Watch this step · 1:18

    Switch to a medium brush and white paint. In the bottom right corner, paint the curved outline of a large circle that runs off the right side and the bottom of the paper. Then outline part of a smaller circle on top of it for the head, also running off the right edge. Outlines first make the shapes easier to control.

    Tip:

    Sketch the circles lightly in pencil first if you feel unsure.

    Back to all steps

  3. Step 3: Fill In the Snowman's Head and Body

    Watch this step · 1:34

    Fill both shapes in with white paint. Use curved strokes that follow the round shape; they give the snowman a soft, snowy texture. A few streaks of blue showing through look like shadow, so do not worry about perfect coverage. If you want a brighter white, let it dry and add a second coat.

    Tip:

    Load the brush well. Thin white paint looks pale blue on top of blue.

    Back to all steps

  4. Step 4: Add the Hat Band and the Snowman's Stick Arm

    Watch this step · 2:18

    Wipe your brush and dip it in red. Paint a straight red line above the snowman's head; this becomes the hat band. Then wipe the brush again and switch to brown. Paint a straight line out to the left of the body for the stick arm, and add a couple of short twigs at the end for fingers.

    Tip:

    Paint the twig fingers with quick flicks so they taper to a point.

    Back to all steps

  5. Step 5: Paint the Snowman's Black Top Hat

    Watch this step · 3:02

    With black paint, paint a longer line right below the red band for the hat brim. Then outline a square shape above the red band for the crown of the hat. Once the outline looks right, fill it in with black. Paint carefully along the top edge of the red band so the stripe stays neat.

    Tip:

    Use the brush edge for crisp straight lines on the hat.

    Back to all steps

  6. Step 6: Paint the Snowman's Carrot Nose

    Watch this step · 3:24

    Switch to a small brush and orange paint. Paint a long, thin triangle pointing out to the left from the middle of the face. Outline the triangle first, then fill it in. A slightly crooked carrot looks more cheerful than a ruler-straight one, so let it point a little upward if you like.

    Tip:

    Add a few thin darker orange lines later for carrot ridges.

    Back to all steps

  7. Step 7: Paint the Snowman's Eyes and Smile

    Watch this step · 4:08

    Wipe the small brush and pick up black paint. Paint two circles above the carrot for eyes, then fill them in. Below the carrot, add a curved row of small black dots for a coal smile. Space the dots evenly and make the curve turn up at both ends. Keep the eyes about the same size.

    Tip:

    Dab the dots with the tip of the brush instead of drawing them.

    Back to all steps

  8. Step 8: Dot Three Buttons Down the Snowman

    Watch this step · 4:24

    Still with black paint and the small brush, add three round buttons down the middle of the body. Start a little below where the head meets the body and space them evenly toward the bottom. Paint each one as a small circle and fill it in. Wait for the white underneath to be dry so the black stays crisp.

    Tip:

    Make the buttons a touch bigger than the smile dots.

    Back to all steps

  9. Step 9: Paint the Snowman's Red and Green Scarf

    Watch this step · 5:30

    With a medium brush and red, paint straight vertical lines at equal distances across the neck, then a couple of horizontal red lines below for the hanging end. Wash the brush, dip it in green and fill the spaces between the red lines. Finish with a few short red lines on the edge of the scarf for fringe.

    Tip:

    Clean the brush well between red and green or they turn brown.

    Back to all steps

  10. Step 10: Add Snowflakes to the Snowman Painting

    Watch this step · 6:18

    Wash the small brush and dip it in white. Paint small snowflakes across the blue sky, then tiny white dots between them. Use white to highlight the edges of the head and the left side of the body. Add two tiny dots in each eye and on each button and smile dot, and a white line on top of the carrot.

    Tip:

    The tiny white dots in the eyes make the snowman look alive.

    Back to all steps

How to Transfer a Sketch to Canvas (2 Easy Ways)

Keep going

How to Transfer a Sketch to Canvas (2 Easy Ways)

Keep going with painting

More on this topic, picked for this snowman.

You reached the last step

Save this project to come back to it

Your ticked steps, the free printable and your other saved makes, together in My Projects. Free, no password.

You tapped Save

Save this project for later

We'll email you a link, no password.

How to Paint a Snowman (Easy Acrylic Painting for Beginners)

  • Your saved projects in one list
  • Your ticked steps on any device

Check your inbox for an email from us. Not there? Look in your spam folder.

Free printable

Printable sheet and shopping list for this project

The bonus is hidden until you sign up.

Free with a free account, no password. Every step above stays open to everyone.

Products Used

The Checklist

How to Paint a Snowman (Easy Acrylic Painting for Beginners)

Tools
6
Materials
2
Steps
10
Video
7 min

Tools we recommend

As an Amazon Associate we earn from qualifying purchases. Links on this page may be affiliate links - clicking them and buying doesn't change your price, but helps support Crafting Step by Step.

Tags

The Crafter's Weekly

New painting tutorials, every Sunday

One short email with the week's best step-by-step guides. Free, no spam, unsubscribe anytime.

Did this work for you?

What's next

Related collections

Curated theme pages that include this tutorial.

Similar tutorials

Hand-picked next reads based on the one you just finished.

Liked this painting tutorial?

Pick the crafts you want to hear about. One email every Sunday with new step-by-step tutorials. No spam, easy to unsubscribe.

Get more like this in your inbox

Weekly digest. Pick the categories you want. Unsubscribe anytime.

Send me tutorials about

We only email about new tutorials. Easy unsubscribe anytime.