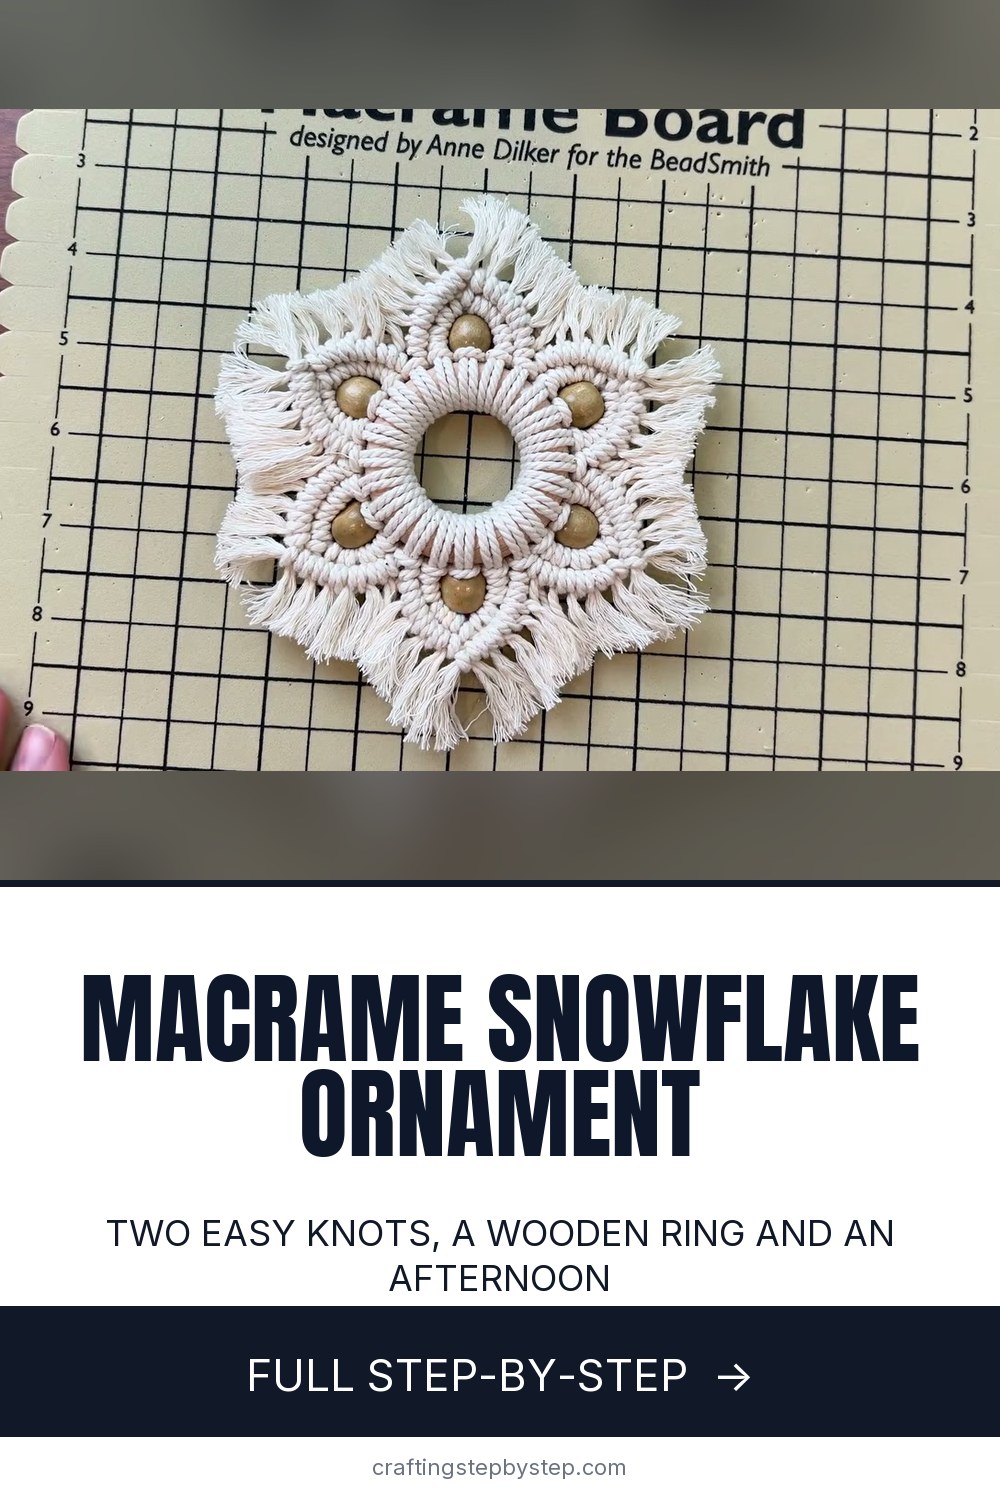
How to Make a Macrame Snowflake Ornament

The finished result: How to Make a Macrame Snowflake Ornament
  • Difficulty: Easy
  • About 1 hour 15 minutes
  • 10 steps

You tapped Save

Save this project for later

We'll email you a link, no password.

How to Make a Macrame Snowflake Ornament

  • Your saved projects in one list
  • Your ticked steps on any device

Check your inbox for an email from us. Not there? Look in your spam folder.

Print

Steps written out by Crafting Step by Step from Marching North's video (opens YouTube) (17:42). Published .

A macrame snowflake is a small ornament made by knotting cotton cord around a wooden ring, with six pointed arms and a soft brushed fringe. It looks detailed, but it uses only two knots. This tutorial follows Crystal Martin of Marching North, who ties hers on a 2 inch ring with six wooden beads and 2 mm cotton rope. Make a set in an afternoon and hang them on the tree, tie one to a gift or string a few into a garland.

How to make a macrame snowflake: the short version

  • Cut 24 cords at 20 inches and 12 cords at 10 inches.
  • Lark's head the long cords onto the ring.
  • Add a bead every four cords, six beads in all.
  • Tie a row of double half hitch knots around each bead.
  • Tie a second row to finish each snowflake point.
  • Trim, comb out the fringe and add a hook.

Cord, ring and bead sizes

Use 2 mm twisted cotton cord. It is thin enough for small knots and brushes out into fluffy fringe without unravelling first. Thicker 3 mm cord works but makes a bigger, chunkier snowflake, so cut the cords a few inches longer. The ring is about 2 inches across. The beads are around 5/16 inch with a large hole, since two cords have to pass through each one. Any color works. A cream snowflake with natural wood beads looks classic, and red beads read more like Christmas.

Getting the knots even

Pin the ring to a macrame board, or tape it to the table, so it stays put while you pull. Some lark's head knots will sit looser than others at first. That is normal. The double half hitch rows pull everything snug. Pick one direction for the center knot of each point and keep it the same on all six. Small changes like that are what make the finished snowflake look neat.

Stiffening and hanging

A brushed snowflake is soft and a little floppy. To keep the points crisp, spray it with fabric stiffener, or brush on watered down school glue and let it dry flat. An ornament hook through one point is the quick way to hang it. For a neater look, thread a loop of matching cord through a point and tie it off.

Ways to use your snowflakes

Tie one to the ribbon on a wrapped present in place of a bow. Hang three at different heights in a window. Glue a pin back on one for a winter brooch, or make a small one on a 1 inch ring for earrings. They also make a quick craft to do with older grandchildren, since each knot is easy to repeat.

Common problems

  • Bead will not fit over the cords. Twist the two cord ends together tightly, or pull them through with a large eye needle.
  • Points look uneven. Count four cords between each bead before you tie anything.
  • Fringe will not fluff. Comb in short strokes from the knot outward, a few strands at a time.
  • Snowflake curls. Press it flat under a book overnight, or stiffen it.

More macrame to try

Brush up on the lark's head knot and the half hitch before you start. For more holiday knotting, make a macrame Christmas tree, or see our other Christmas ornaments.

Free printable

Print the steps and supply list for this project

One page you can take to the table. Free with a free account, no password.

Get the free printable

What you'll need

Free, for this project

Get this checklist by email

  • All 8 tools and materials, with tick boxes
  • A link to print all 10 steps on paper, to keep by you while you craft

No password. The whole tutorial stays free on this page.

Quick answer

Learn how to make a macrame snowflake ornament with two easy knots, a wooden ring and six beads. An easy project: about 1 hour 15 minutes. Materials cost about $2 to $5. You need 8 things, including 2 mm cotton macrame cord, 2 inch wooden ring and ornament hook. The 10 steps start with cut the Cotton Cords for the Macrame Snowflake and attach the Long Cords to the Wooden Ring With Lark's Head Knots.

Step-by-step guide

10 steps, about 18 minutes. Tap a picture to jump to that step. Your progress saves automatically.

Tick each step off as you go.

  1. Step 1: Cut the Cotton Cords for the Macrame Snowflake

    Watch this step · 1:45

    Gather 2 mm cotton cord, a 2 inch wooden ring, six wooden beads and sharp scissors. Cut 24 pieces at 20 inches long and 12 pieces at 10 inches long. Keep the two lengths in separate piles so you grab the right one later. A large eye needle helps with the beads but is optional.

    Tip:

    Cut a few spare cords. If a knot goes wrong, you can swap one in without measuring again.

    Back to all steps

  2. Step 2: Attach the Long Cords to the Wooden Ring With Lark's Head Knots

    Watch this step · 2:58

    Fold one 20 inch cord in half. Push the loop under the ring, bring the two ends over and through the loop, and pull it snug. That is a lark's head knot. Repeat with all 24 long cords until the ring is covered. Some will sit tighter than others. Do not worry; the knots later even them out. Pin the ring to your board.

    Tip:

    Slide the knots around the ring so they are spaced evenly before you pin it.

    Back to all steps

  3. Step 3: Thread a Wooden Bead Onto the Snowflake Cords

    Watch this step · 4:05

    Pick two neighbouring center cords and slide a wooden bead up them until it sits against the ring. If the hole is tight, twist the two cord ends together and feed them through, or use a large eye needle. This bead marks the center of your first snowflake point, so take your time placing it.

    Tip:

    Put a bead on every fourth pair of cords now, all six, so you can see where each point goes.

    Back to all steps

  4. Step 4: Tie the First Double Half Hitch Knots Beside the Bead

    Watch this step · 4:50

    Take the cord to the left of the bead as your filler cord. Hold it angled down to the right. Use the next cord to wrap around it twice, tightening after each wrap. That is one double half hitch. The row of knots curves down along the side of the bead and starts to frame it.

    Tip:

    Keep the filler cord taut. A slack filler cord makes lumpy knots.

    Back to all steps

  5. Step 5: Add a Short Cord to the Snowflake With a Cow Hitch

    Watch this step · 5:15

    Fold one 10 inch cord in half. Attach it to the filler cord with a cow hitch, which is a lark's head turned the other way, so it blends in with the knots. Slide it down snug. Then tie the next double half hitch with the left center cord from the bead. Repeat on the right side, mirroring each move, and join the two center cords with one last knot.

    Tip:

    The short cords add fringe and fill out the points. Do not skip them.

    Back to all steps

  6. Step 6: Repeat the First Knot Row Around All Six Snowflake Beads

    Watch this step · 8:10

    Count four cords from the first bead and add the next bead. Keep counting four and adding beads until all six are on. Then tie the same first row of knots around each one, with a short cord added on each side. When you finish, the ring has six little framed beads spaced evenly around it.

    Tip:

    Rotate the board as you go so you always tie in the same comfortable direction.

    Back to all steps

  7. Step 7: Tie the Second Row of Knots to Form Each Snowflake Point

    Watch this step · 9:40

    Between each pair of points there are two unused center cords. The right one of the left pair and the left one of the right pair become filler cords. Tie five double half hitch knots down to the right on one side and five down to the left on the other. Cross the two fillers and tie one knot to close the point.

    Tip:

    Crystal ties the closing knot the opposite way from the first row. It gives each tip a neat finish.

    Back to all steps

  8. Step 8: Trim the Loose Cords Around the Macrame Snowflake

    Watch this step · 12:37

    With all six points done, cut the extra cord. Follow the angle of each side of the point and leave about half an inch of fringe. Short fringe is easier to comb and keeps the shape crisp, but you can leave it longer if you like a softer look. Work around one point at a time.

    Tip:

    Cut a little long at first. You can always trim more after combing.

    Back to all steps

  9. Step 9: Comb Out the Fringe on the Macrame Snowflake

    Watch this step · 13:40

    Use the fine side of a macrame comb to brush the fringe. With 2 mm cord you do not need to untwist it first; it brushes right out. Comb carefully from the knots outward, then fluff each point with your fingers. Trim any strands that stick out. For crisper points, spray with fabric stiffener and let it dry flat.

    Tip:

    Hold the knots firmly with your other hand so the comb does not pull them loose.

    Back to all steps

  10. Step 10: Hang the Macrame Snowflake Ornament on the Tree

    Watch this step · 15:18

    Slip an ornament hook through the knots at the top of one point. Be gentle so you do not pull a knot out. On a green tree the hook disappears. If you would rather not see it, thread a short loop of matching cord through a point and tie it. Then make a few more and hang the set together.

    Tip:

    Store finished snowflakes flat between tissue paper so the fringe stays fluffy next year.

    Back to all steps

How to Tie a Macrame Square Knot

Keep going

How to Tie a Macrame Square Knot

Keep going with macramé

More on this topic, picked for this macrame snowflake ornament.

You reached the last step

Save this project to come back to it

Your ticked steps, the free printable and your other saved makes, together in My Projects. Free, no password.

You tapped Save

Save this project for later

We'll email you a link, no password.

How to Make a Macrame Snowflake Ornament

  • Your saved projects in one list
  • Your ticked steps on any device

Check your inbox for an email from us. Not there? Look in your spam folder.

Free printable

Printable sheet and shopping list for this project

The bonus is hidden until you sign up.

Free with a free account, no password. Every step above stays open to everyone.

Products Used

The Checklist

How to Make a Macrame Snowflake Ornament

Tools
4
Materials
4
Steps
10
Video
18 min

Tools we recommend

As an Amazon Associate we earn from qualifying purchases. Links on this page may be affiliate links - clicking them and buying doesn't change your price, but helps support Crafting Step by Step.

Tags

The Crafter's Weekly

New macramé tutorials, every Sunday

One short email with the week's best step-by-step guides. Free, no spam, unsubscribe anytime.

Did this work for you?

What's next

Related collections

Curated theme pages that include this tutorial.

Similar tutorials

Hand-picked next reads based on the one you just finished.

Liked this macramé tutorial?

Pick the crafts you want to hear about. One email every Sunday with new step-by-step tutorials. No spam, easy to unsubscribe.

Get more like this in your inbox

Weekly digest. Pick the categories you want. Unsubscribe anytime.

Send me tutorials about

We only email about new tutorials. Easy unsubscribe anytime.