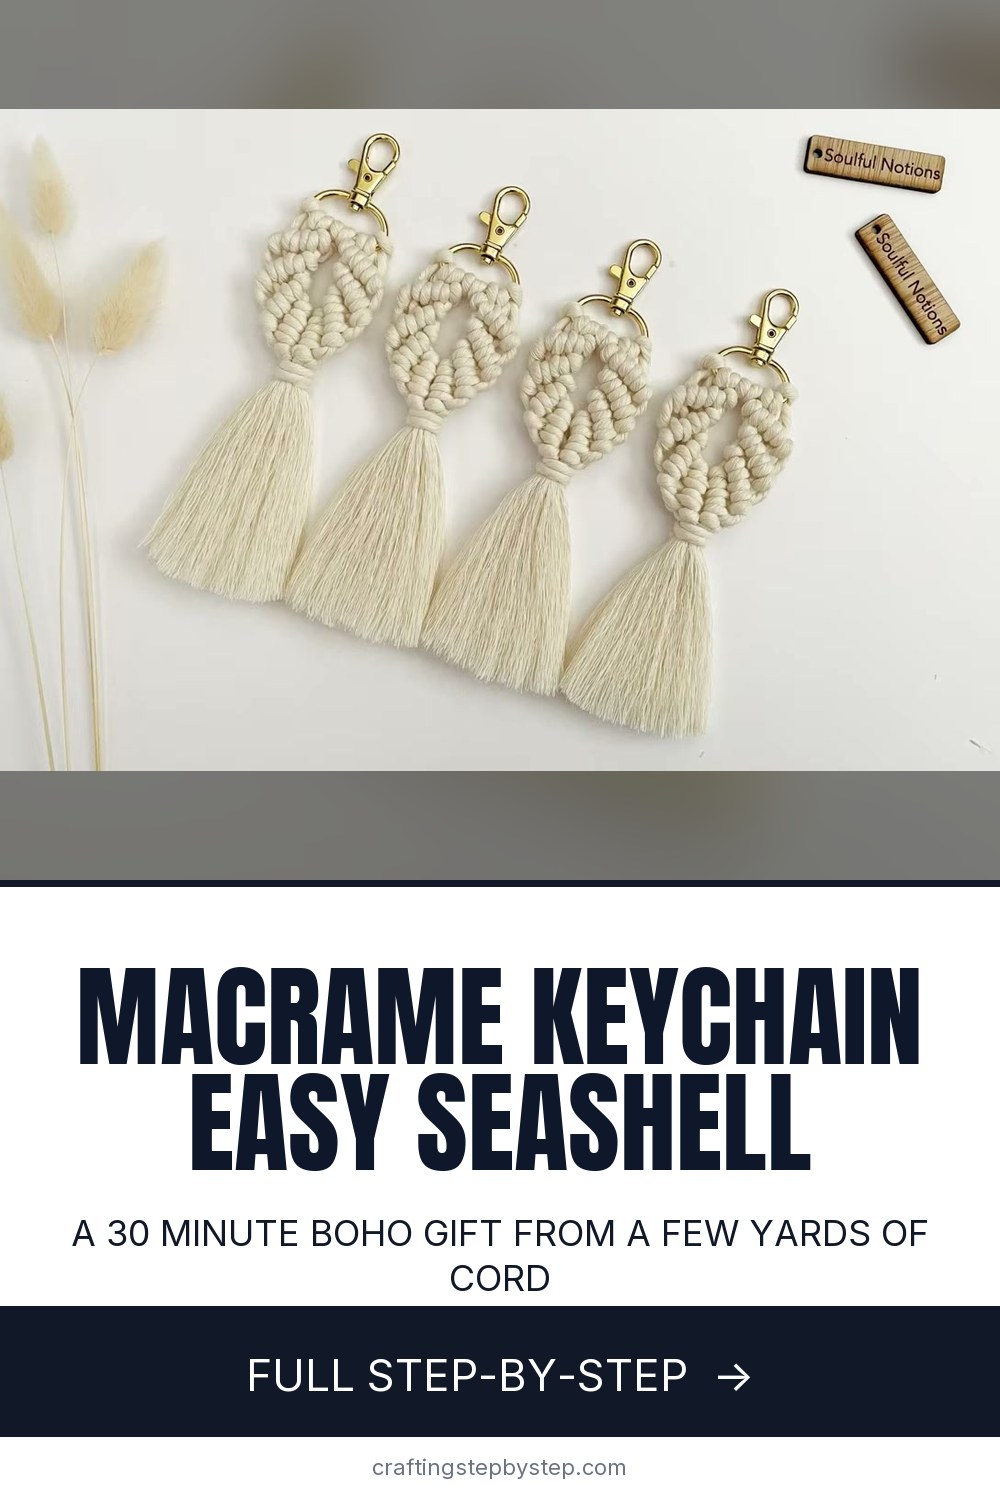
How to Make a Macrame Keychain - Easy Seashell Pattern for Beginners

The finished result: How to Make a Macrame Keychain - Easy Seashell Pattern for Beginners
  • Difficulty: Easy
  • About 30 minutes
  • 10 steps

You tapped Save

Save this project for later

We'll email you a link, no password.

How to Make a Macrame Keychain - Easy Seashell Pattern for Beginners

  • Your saved projects in one list
  • Your ticked steps on any device

Check your inbox for an email from us. Not there? Look in your spam folder.

Print

Steps written out by Crafting Step by Step from Soulful Notions' video (opens YouTube) (9:10). Published .

A macrame keychain is a perfect first macrame project. It is small, it takes about half an hour, and it uses only a few yards of cord. This one, from Soulful Notions, is shaped like a seashell or leaf and finished with a soft brushed tassel. Make one for your own keys, then make a handful more for gifts.

How to make a macrame keychain: the short version

  • Attach four folded cords to a swivel clasp with reverse lark's head knots.
  • Split the cords in half and tie diagonal rows of double half hitch knots on each side.
  • Work four rows, leaving a little more space each time, to form the shell.
  • Close it with a gathering knot, trim the fringe and brush it out.

What you need

The finished keychain is about 6 1/2 inches long and 1 3/4 inches wide. You need four pieces of 3mm single strand cotton cord at 30 inches each, plus one 10 inch piece for the gathering knot. Add a 1 1/4 inch swivel clasp, sharp scissors and a pet comb or brush for the fringe. A hook on the wall, or a clipboard, holds the clasp while you work.

The two knots you need

The reverse lark's head knot attaches the cords to the clasp. Everything else is the double half hitch, also called a diagonal clove hitch. You hold one cord at an angle as a guide and tie each working cord over it twice. If that knot is new to you, practise the half hitch on a spare piece first.

Getting both sides even

The shell only looks right when the two halves mirror each other. After each pair of rows, step back and compare. If one side sits higher, loosen the last knot and slide it down. Keep the guide cord at the same angle on both sides, and pull every knot with the same firmness.

Choosing cord

Single strand cotton is the best choice here. It knots crisply and brushes out into a soft tassel. Braided cord holds its shape but will not brush out, and 3-ply rope gives a crinkled tassel. Thinner 2mm cord makes a smaller, more delicate keychain if you shorten every cut length a little.

Ways to change it up

  • Use a pastel or earthy cord colour, or two colours split down the middle.
  • Add a wooden bead above the gathering knot.
  • Leave the fringe long and twisted for a boho look, or brush it short and full.
  • Use a larger ring and longer cords to make a bag charm.

Common mistakes

  • A gappy shell. Push each knot up snug against the one above.
  • A lopsided shape. Use the same guide cord position on each side.
  • A loose gathering knot. Pull the tail tight before you trim it.
  • A frizzy mess. Brush the fringe from the bottom up in short strokes.

Gift ideas

Macrame keychains make sweet stocking stuffers, teacher gifts and party favours. Match the cord to someone's favourite colour, or make a set for a bridal party. A batch of five takes an evening once you know the pattern.

Once you are comfortable, try square knots and other macrame basics. If you like making keychains, resin keychains are a fun next step.

Free printable

Print the steps and supply list for this project

One page you can take to the table. Free with a free account, no password.

Get the free printable

What you'll need

Free, for this project

Get this checklist by email

  • All 6 tools and materials, with tick boxes
  • A link to print all 10 steps on paper, to keep by you while you craft

No password. The whole tutorial stays free on this page.

Quick answer

How to make a macrame keychain: attach four cords to a clasp, tie diagonal hitch rows into a seashell, add a gathering knot and brush the tassel. An easy project: about 30 minutes. Materials cost about $2 to $5. You need 6 things, including 3mm single strand cotton cord, 1 1/4 inch swivel clasp and sharp scissors. The 10 steps start with attach the Cords to the Keychain Clasp With Reverse Lark's Head Knots.

Step-by-step guide

10 steps, about 9 minutes. Tap a picture to jump to that step. Your progress saves automatically.

Tick each step off as you go.

  1. Step 1: Attach the Cords to the Keychain Clasp With Reverse Lark's Head Knots

    Watch this step · 0:48

    Hang the swivel clasp on a wall hook so both hands are free. Fold one 30 inch cord in half to find the centre. Take the loop behind the ring, bring it over the front, and pull the two ends down through the loop. That is a reverse lark's head knot. Repeat with all four cords so you have eight strands hanging from the clasp.

    Tip:

    Push the knots close together on the ring so the top of the shell stays neat.

    Back to all steps

  2. Step 2: Start the First Row of Hitch Knots on the Macrame Keychain

    Watch this step · 1:30

    Divide the eight strands into two groups of four. On one side, take the fifth cord in and lay it across the other three at a gentle angle. This is your guide cord. Take the very next cord, bring it over the guide and pull it through the loop it makes. Do that twice to close the knot. This first row sits close to the top.

    Tip:

    Keep the first row only slightly diagonal. It forms the top curve of the shell.

    Back to all steps

  3. Step 3: Tighten the First Diagonal Row of Hitch Knots

    Watch this step · 2:08

    Work along the guide cord, tying each cord over it twice, until all three cords are knotted. Hold the guide cord taut and at the same angle the whole way. Use your thumb to push each finished knot up into place so the row looks tidy. You now have one side of the top row done.

    Tip:

    If a knot looks loose, push it up before tying the next one. It is hard to fix later.

    Back to all steps

  4. Step 4: Mirror the Hitch Knot Row on the Other Side of the Keychain

    Watch this step · 2:36

    Now do the same in the opposite direction. On the other group of four, take the fourth cord, point it across the others as the guide, and tie each cord over it: over, through and tighten, twice each, all the way to the end. Check that both rows are close to even. They do not need to be perfect, but neither side should sit much higher.

    Tip:

    Compare both rows at eye level. Small differences are easier to spot that way.

    Back to all steps

  5. Step 5: Tie the Second Row of Hitch Knots With a Little Space

    Watch this step · 3:42

    For the second row, use the first cord that comes out on each side as the new guide and pull it down at an angle. This time, leave a little space. Pull the first knot all the way up, leave a small gap with the second, and a slightly bigger gap with the third. Those gaps are what make the shell flare out like a real seashell.

    Tip:

    Do not pull this row as tight as the first. The space gives the shell its shape.

    Back to all steps

  6. Step 6: Add the Third Row to Build the Seashell Shape

    Watch this step · 5:30

    Repeat the same steps for the third row, always starting with the very first cord on each side as the guide. Keep leaving a little space between this row and the one above. After the third row, step back and look at both sides. If one knot sits loose or uneven, give it a gentle tug to match the other side.

    Tip:

    Count your rows out loud. It is easy to lose track on a small piece.

    Back to all steps

  7. Step 7: Close the Macrame Seashell With the Last Row

    Watch this step · 6:30

    Tie the fourth and final row on each side the same way. This one can sit a little closer to the row above than the previous ones did, which helps the bottom of the shell taper in. When both sides are done, push all the knots back so the centre closes up nicely and the two halves meet in the middle.

    Tip:

    Pinch the bottom of the shell together while you move to the next step.

    Back to all steps

  8. Step 8: Wrap a Gathering Knot Below the Macrame Seashell

    Watch this step · 7:50

    Take the short 10 inch cord and make a small loop pointing down, laid along the bundle below the shell. Wrap the long end around the bundle and the loop, starting right under the last knots. Two wraps is enough, but more makes a longer band. Push the end through the little loop, hold it tight, and pull the top tail to draw it inside.

    Tip:

    Trim both tails close and tuck any ends that poke out back under the wraps.

    Back to all steps

  9. Step 9: Cut the Macrame Keychain Fringe to Length

    Watch this step · 8:44

    Decide how long you want the tassel. Soulful Notions goes about two inches below the gathering knot. Hold the strands together and cut straight across with sharp scissors. You can leave the fringe as it is for a twisted rope look, or brush it out for a soft, fluffy tassel.

    Tip:

    Cut a little long first. You can trim again after brushing, since brushing adds volume.

    Back to all steps

  10. Step 10: Brush Out the Macrame Keychain Fringe With a Pet Comb

    Watch this step · 8:59

    Brush the fringe with a metal pet comb or slicker brush, working from the bottom up so the strands untwist into soft fibres. Hold the gathering knot with your other hand so you do not pull it loose. Once the tassel is fluffy, give it a final trim to straighten the ends. Your keychain is ready to clip onto your keys.

    Tip:

    Brush over a towel. Cotton cord sheds a lot of fluff as it untwists.

    Back to all steps

How to Make a Macrame Wall Hanging - Beginner Pattern

Keep going

How to Make a Macrame Wall Hanging - Beginner Pattern

8 steps · about 13 minutes

Keep going with macramé

More on this topic, picked for this macrame keychain.

You reached the last step

Save this project to come back to it

Your ticked steps, the free printable and your other saved makes, together in My Projects. Free, no password.

You tapped Save

Save this project for later

We'll email you a link, no password.

How to Make a Macrame Keychain - Easy Seashell Pattern for Beginners

  • Your saved projects in one list
  • Your ticked steps on any device

Check your inbox for an email from us. Not there? Look in your spam folder.

Free printable

Printable sheet for this project

The bonus is hidden until you sign up.

Free with a free account, no password. Every step above stays open to everyone.

Products Used

The Checklist

How to Make a Macrame Keychain - Easy Seashell Pattern for Beginners

Tools
4
Materials
2
Steps
10
Video
9 min

Tools we recommend

As an Amazon Associate we earn from qualifying purchases. Links on this page may be affiliate links - clicking them and buying doesn't change your price, but helps support Crafting Step by Step.

Tags

The Crafter's Weekly

New macramé tutorials, every Sunday

One short email with the week's best step-by-step guides. Free, no spam, unsubscribe anytime.

Did this work for you?

What's next

Related collections

Curated theme pages that include this tutorial.

Similar tutorials

Hand-picked next reads based on the one you just finished.

Liked this macramé tutorial?

Pick the crafts you want to hear about. One email every Sunday with new step-by-step tutorials. No spam, easy to unsubscribe.

Get more like this in your inbox

Weekly digest. Pick the categories you want. Unsubscribe anytime.

Send me tutorials about

We only email about new tutorials. Easy unsubscribe anytime.