How to Make a Macrame Bookmark

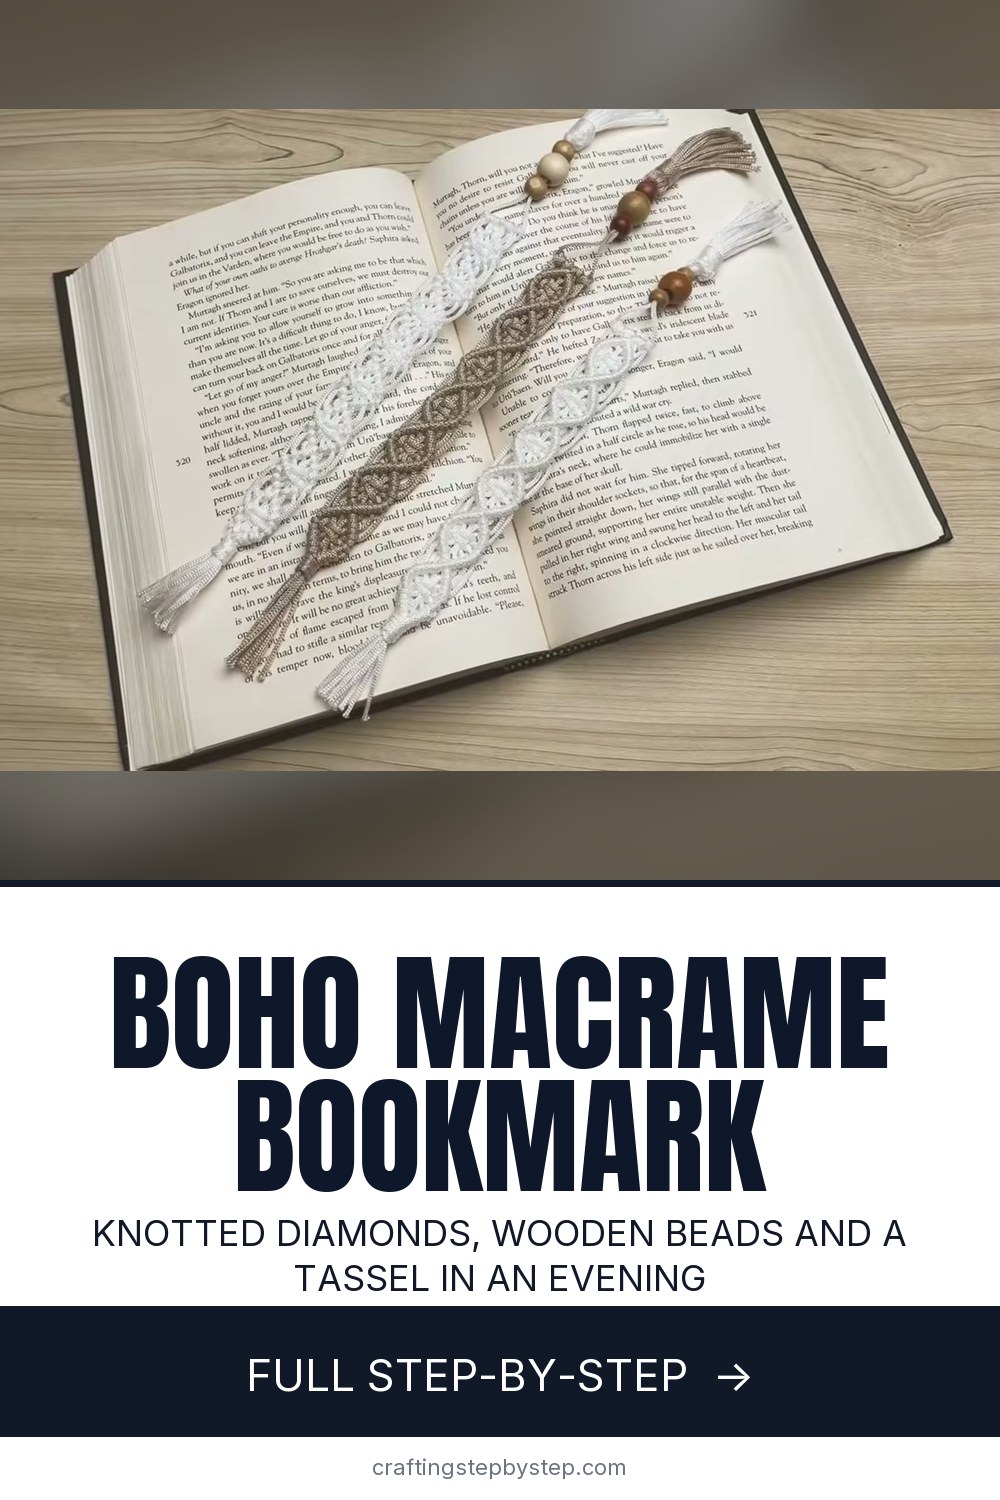
The finished result: How to Make a Macrame Bookmark
  • Difficulty: Easy
  • About 1 hour
  • 10 steps

You tapped Save

Save this project for later

We'll email you a link, no password.

How to Make a Macrame Bookmark

  • Your saved projects in one list
  • Your ticked steps on any device

Check your inbox for an email from us. Not there? Look in your spam folder.

Print

Steps written out by Crafting Step by Step from Simply Inspired's video (opens YouTube) (7:37). Published .

Also in:Crafts

A macrame bookmark is a small, quick project that makes a lovely handmade gift for a reader. This boho design, from the maker of the video credited on this page, uses a row of knotted diamonds, a pair of wooden beads and a tassel. It is mostly double half hitch knots, so it is good practice if you are new to macrame, and you can finish one in an evening.

How to make a macrame bookmark: the short version

  • Attach four long cords to a short cord with lark's head knots.
  • Tie double half hitch knots on diagonals to form a diamond, with a square knot in the middle.
  • Repeat the diamond down the length of the bookmark.
  • Close the end with gathering double half hitches and a gathering knot.
  • Add beads and a small tassel.

What you need

The pattern uses 0.8mm nylon cord: three 40 inch pieces, four 75 inch pieces and eleven 6 inch pieces for the tassel. Thin nylon cord gives a flat, tidy bookmark that will not dent your pages. You also need a cork or macrame board, a few pins, scissors and two or three wooden beads.

The three knots

  • Lark's head: fold a cord in half, lay the loop behind the holding cord and pull the tails through.
  • Double half hitch: wrap a working cord around a filler cord twice. A row of them makes the diagonal lines.
  • Square knot: two outer cords loop around the middle ones, left then right.

Getting neat diamonds

The shape comes from how you hold the filler cord. Angle it to match the diamond and keep it taut while you knot over it. Pull each knot snug, but not so tight that the band narrows. Pin the work as you go so the diagonals stay straight.

How long it takes and how long it ends up

Expect about an hour for your first one, and less once the knots feel natural. Five and a half diamonds give a bookmark about 7 inches long before the tassel, which suits most paperbacks. Each extra diamond adds roughly an inch, so plan your long cords a little longer if you want more.

Looking after it

Nylon cord holds its shape and wipes clean. If the tassel frizzes, a quick pass of steam relaxes the fibers, then trim it straight again.

Common problems

  • Lopsided diamonds. Count your cords and make sure you are using the right filler on each side.
  • Gaps between diamonds. Push each row up against the last.
  • Beads will not go on. Thread a loop of fishing line through and pull the cords after it.
  • Gathering knot loop will not pull in. Tie an overhand knot in the top tail for grip.

Make it your own

Try colored cord, a beige and white pair, or a different bead at the end. Stop after three diamonds for a shorter bookmark or keep going for a larger book. A set tucked into a favorite paperback makes a thoughtful gift.

More knotting

Brush up on the lark's head knot, the half hitch and square knots. Then try a macrame keychain, or fold an origami bookmark to go with it.

Free printable

Print the steps and supply list for this project

One page you can take to the table. Free with a free account, no password.

Get the free printable

What you'll need

Free, for this project

Get this checklist by email

  • All 7 tools and materials, with tick boxes
  • A link to print all 10 steps on paper, to keep by you while you craft

No password. The whole tutorial stays free on this page.

Quick answer

Make a boho macrame bookmark with knotted diamonds, wooden beads and a tassel. An easy project: about 1 hour. Materials cost about $1 to $3. You need 7 things, including 0.8mm nylon cord, 2 to 3 wooden beads and cork board or macrame board. The 10 steps start with attach the Macrame Bookmark Cords With Lark's Head Knots, tie Double Half Hitch Knots Along the Diagonals and tie a Square Knot in the Center of the Macrame Diamond.

Step-by-step guide

10 steps, about 8 minutes. Tap a picture to jump to that step. Your progress saves automatically.

Tick each step off as you go.

  1. Step 1: Attach the Macrame Bookmark Cords With Lark's Head Knots

    Watch this step · 0:44

    Pin a 40 inch cord across your cork board. Fold one of the 75 inch cords in half, lay the loop behind the pinned cord and pull both tails through the loop. That is a lark's head knot. Attach all four long cords side by side the same way, close together in the middle. You now have eight working strands hanging down.

    Tip:

    Pin both ends of the holding cord so it stays straight and tight.

    Back to all steps

  2. Step 2: Tie Double Half Hitch Knots Along the Diagonals

    Watch this step · 0:56

    Cross the two center cords. The one now on the left becomes your filler cord. Angle it down to the left and wrap the next cord around it twice, pulling each wrap snug. That is a double half hitch. Keep going with each cord along the filler to make a diagonal line. Repeat on the right side with the fifth cord as the filler so the lines form a V.

    Tip:

    Hold the filler at the angle you want the diamond to take.

    Back to all steps

  3. Step 3: Tie a Square Knot in the Center of the Macrame Diamond

    Watch this step · 2:08

    Inside the V, use the second and seventh strands to tie a square knot around the four middle cords. Make a loop with the second strand, then pass the seventh behind and through it. Pull it up. Repeat on the other side, looping the seventh and passing the second through. This square knot fills the middle of the diamond.

    Tip:

    Push the square knot up so it sits right in the middle.

    Back to all steps

  4. Step 4: Close the Bottom of the Diamond With Double Half Hitches

    Watch this step · 2:40

    Take the first filler cord and angle it back toward the center. Tie double half hitch knots along it until you reach the middle. Do the same on the other side. The two diagonals meet and close the bottom of your first diamond. Keep tension on the filler so the line stays straight and even.

    Tip:

    Count your knots on each side. They should match.

    Back to all steps

  5. Step 5: Repeat the Diamond Pattern Down the Macrame Bookmark

    Watch this step · 3:44

    To close the small gap below the diamond, carry the diagonal lines straight on down to the edges. These lines also form the top of the next diamond. Then work back in, add the square knot and close it, the same as before. Repeat until the bookmark is as long as you want. The original has five and a half diamonds.

    Tip:

    Finish on half a diamond so the end comes to a point.

    Back to all steps

  6. Step 6: Tie Gathering Double Half Hitches at the Bookmark End

    Watch this step · 4:16

    To close the last half diamond, tie a double half hitch as usual, but do not drop the working cord. Gather it into your hand alongside the filler. Tie the next double half hitch around both cords together. Keep adding each cord into the bundle until you reach the center. Repeat from the other side so all the cords meet at a point.

    Tip:

    The bundle gets thicker as you go. That is what tapers the end.

    Back to all steps

  7. Step 7: Wrap a Gathering Knot Below the Macrame Diamonds

    Watch this step · 5:04

    Take the second 40 inch cord and tie an overhand knot at the top for grip. Lay a loop down along the bundle, then wrap the long tail tightly around everything, working down. Thread the tail through the loop at the bottom. Hold it and pull the top end so the loop disappears inside the wraps. Trim both ends close.

    Tip:

    That overhand knot gives you something to grab when you pull.

    Back to all steps

  8. Step 8: Thread Wooden Beads Onto the Bookmark Cords

    Watch this step · 5:44

    Thread two or three wooden beads onto the center cords below the gathering knot. If the cord is fiddly, fold a short piece of fishing line into a loop, pass it through the bead and pull the cords after it. Once the beads sit where you like, tie an overhand knot under them so they cannot slide off.

    Tip:

    Pick beads with holes wide enough for two strands of cord.

    Back to all steps

  9. Step 9: Tie On the Short Cords to Start the Macrame Tassel

    Watch this step · 6:26

    Take ten of the 6 inch cords and lay them with the overhand knot in the center. Place the eleventh cord behind them and tie a double overhand knot with it right above the knot, so it holds the bundle tight. Then flip all the short cords down and smooth them flat with your fingers.

    Tip:

    Brush the cords out so they hang straight before you wrap them.

    Back to all steps

  10. Step 10: Wrap and Trim the Macrame Bookmark Tassel

    Watch this step · 6:48

    With the last 40 inch cord, tie a gathering knot around the tassel, starting about a centimeter from the top. Wrap it tightly, thread the tail through the loop, and pull the loop inside. Snip the excess at the top. Trim the tassel ends straight across, and your macrame bookmark is ready to slip into a book.

    Tip:

    Trim a little at a time. You can always cut more.

    Back to all steps

How to Make a Macrame Feather - Easy Macrame Leaf for Beginners

Keep going

How to Make a Macrame Feather - Easy Macrame Leaf for Beginners

10 steps · about 7 minutes

Keep going with macramé

More on this topic, picked for this macrame bookmark.

You reached the last step

Save this project to come back to it

Your ticked steps, the free printable and your other saved makes, together in My Projects. Free, no password.

You tapped Save

Save this project for later

We'll email you a link, no password.

How to Make a Macrame Bookmark

  • Your saved projects in one list
  • Your ticked steps on any device

Check your inbox for an email from us. Not there? Look in your spam folder.

Free printable

Printable sheet for this project

The bonus is hidden until you sign up.

Free with a free account, no password. Every step above stays open to everyone.

Products Used

The Checklist

How to Make a Macrame Bookmark

Tools
5
Materials
2
Steps
10
Video
8 min

Tools we recommend

As an Amazon Associate we earn from qualifying purchases. Links on this page may be affiliate links - clicking them and buying doesn't change your price, but helps support Crafting Step by Step.

Tags

The Crafter's Weekly

New macramé tutorials, every Sunday

One short email with the week's best step-by-step guides. Free, no spam, unsubscribe anytime.

Did this work for you?

What's next

Related collections

Curated theme pages that include this tutorial.

Similar tutorials

Hand-picked next reads based on the one you just finished.

Liked this macramé tutorial?

Pick the crafts you want to hear about. One email every Sunday with new step-by-step tutorials. No spam, easy to unsubscribe.

Get more like this in your inbox

Weekly digest. Pick the categories you want. Unsubscribe anytime.

Send me tutorials about

We only email about new tutorials. Easy unsubscribe anytime.