How to Make a Macrame Table Runner (Easy Boho DIY)

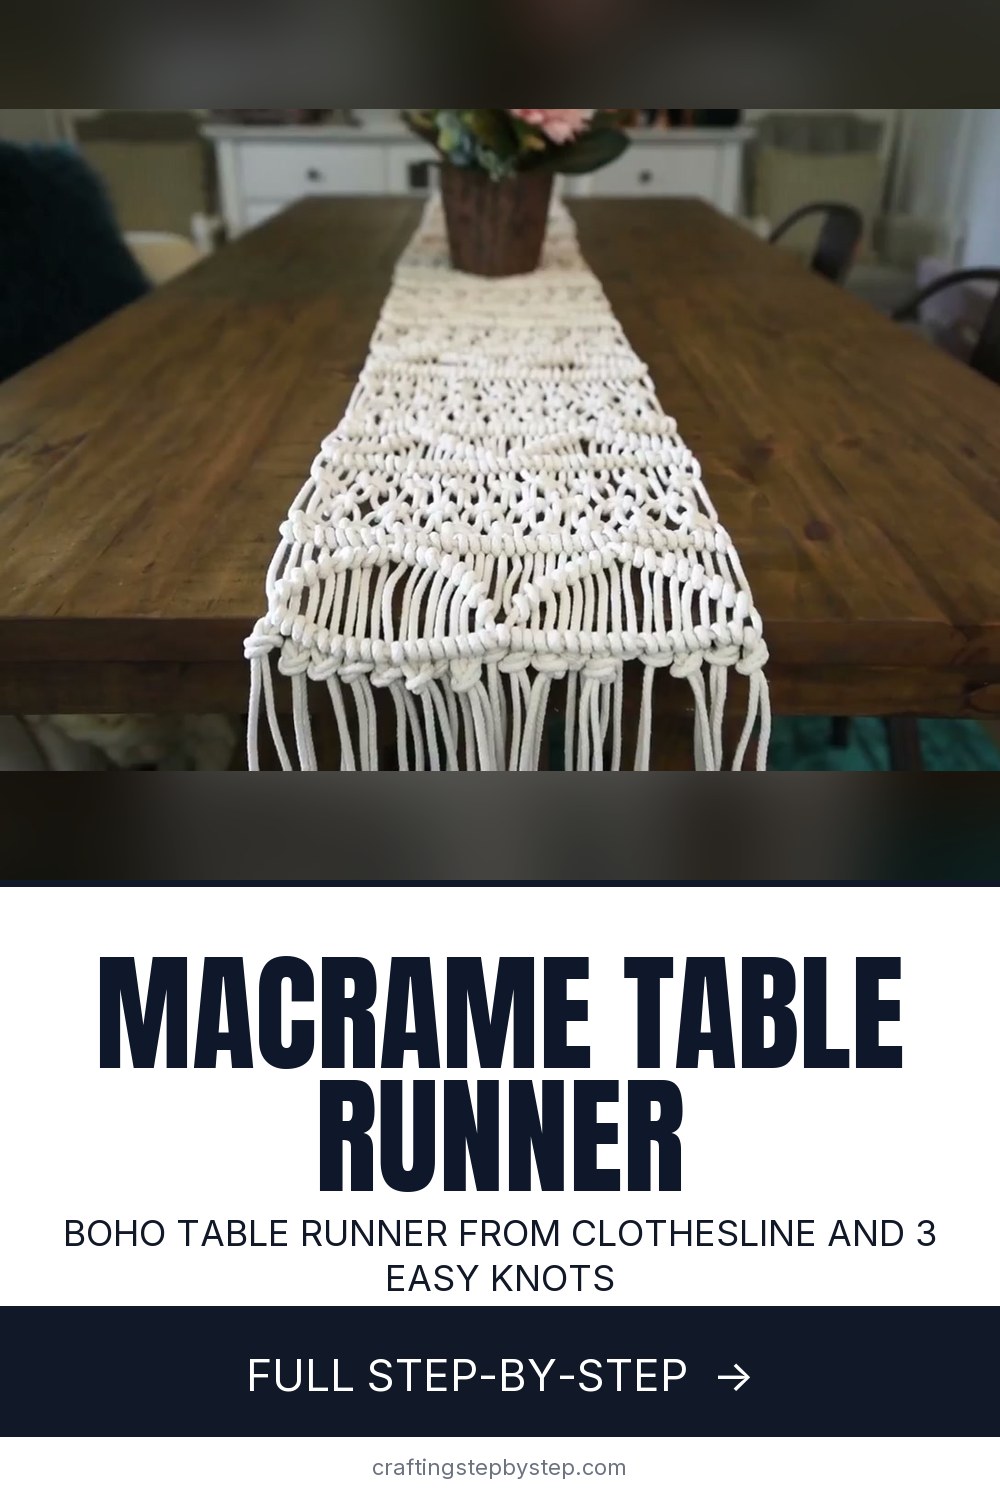
The finished result: How to Make a Macrame Table Runner (Easy Boho DIY)
  • Difficulty: Medium
  • About 6 hours
  • 10 steps

You tapped Save

Save this project for later

We'll email you a link, no password.

How to Make a Macrame Table Runner (Easy Boho DIY)

  • Your saved projects in one list
  • Your ticked steps on any device

Check your inbox for an email from us. Not there? Look in your spam folder.

Print

Steps written out by Crafting Step by Step from Cozy DIY Home's video (opens YouTube) (11:37). Published .

Also in:Crafts

A macrame table runner gives a dining table that relaxed boho texture you see in pricey home stores. Christina from Cozy DIY Home made this one after spotting a similar runner at Anthropologie, using plain clothesline cord and three basic knots. It is not hard, but it is long. Hers took several evenings and ended up over 8 feet long. The pattern repeats, so once you learn one section you can keep going as long as your table.

How to make a macrame table runner: the short version

  • Hang your folded cords on a rod with lark's head knots.
  • Tie a straight row of half hitches.
  • Make a zigzag of diagonal half hitches, then another straight row.
  • Tie three rows of square knots, the middle row staggered.
  • Close with a half hitch row and repeat the section to length.
  • Cut it off the rod, knot the fringe and trim.

How much cord you need

Christina used 36 strands across. Add or remove strands in groups of four to make the runner wider or narrower without breaking the square knot pattern. A common rule is to cut each cord about eight times the finished length. She found six times was enough for this airy pattern. For an 8 foot runner, that is a lot of rope: she bought nine bundles. Measure your table, add the overhang you want on each end, and buy a little extra.

Choosing your cord

Cotton or cotton blend clothesline is cheap, sturdy and holds a knot well. Soft 4 to 5 mm macrame cord gives a more polished look and is kinder on your hands over a long project. Single twist cord brushes out into a soft fringe. Three ply cord keeps a neat twisted end. Stick to cream or natural for the classic boho look, since it hides crumbs and stains better than pure white.

Working on something this long

A curtain rod at a comfortable height works fine as a hanging bar. As the runner grows, let the finished part drape over a chair and then onto the floor, the way Christina does. Keep the spacing between rows even, about an inch, so the pattern lines up. Do not worry if it is not perfect. Handmade macrame looks best a little relaxed.

Care and use

Shake the runner out or spot clean it with a damp cloth. For a full wash, put it in a mesh laundry bag on a gentle cycle and lay it flat to dry. Keep candles on a tray or plate rather than straight on the cord. A runner like this also works on a sideboard, a bed footboard or as a wall hanging.

Common problems

  • Rows slope. Hold the filler cord level and snug each half hitch against it.
  • Square knots twist into a spiral. You tied the same half twice. Alternate left and right.
  • Running short on cord. Add a new length with a lark's head knot hidden behind a square knot.

More macrame

Practice the knots first: lark's head knot, half hitch and square knots. Then match your runner with macrame coasters or a wall hanging.

Free printable

Print the steps and supply list for this project

One page you can take to the table. Free with a free account, no password.

Get the free printable

What you'll need

Free, for this project

Get this checklist by email

  • All 4 tools and materials, with tick boxes
  • A link to print all 10 steps on paper, to keep by you while you craft

No password. The whole tutorial stays free on this page.

Quick answer

Make a boho macrame table runner with clothesline cord and three basic knots. A medium project: about 6 hours. Materials cost about $50 to $90. You need 4 things, including curtain rod or dowel, fabric scissors and tape measure. The 10 steps start with mount the Macrame Cords on a Rod With Lark's Head Knots, tie a Half Hitch Row Across the Top of the Table Runner and work Diagonal Half Hitches Down From the Center.

Step-by-step guide

10 steps, about 12 minutes. Tap a picture to jump to that step. Your progress saves automatically.

Tick each step off as you go.

  1. Step 1: Mount the Macrame Cords on a Rod With Lark's Head Knots

    Watch this step · 2:06

    Cut your cords, then fold each one in half. Lay the loop over a curtain rod or dowel, bring it down behind and pull both tails through the loop. That is a lark's head knot. Snug it up and repeat across the rod. Christina leaves 10 to 12 inches of bare cord below the rod before her first knots, because that becomes the fringe at the top end of the runner.

    Tip:

    Count your strands before you start. An even number divisible by four keeps the square knots tidy.

    Back to all steps

  2. Step 2: Tie a Half Hitch Row Across the Top of the Table Runner

    Watch this step · 2:40

    Take the cord at one edge and hold it straight across the others as a filler cord. Wrap the next cord around it from back to front, then pull it through the loop you made. Do that twice for each cord. Work across the whole row, keeping the filler level. This straight band of half hitches is the first line of the pattern.

    Tip:

    Push each knot up snug against the one before so the row stays straight.

    Back to all steps

  3. Step 3: Work Diagonal Half Hitches Down From the Center

    Watch this step · 3:45

    Find the middle of your cords. Use the center cord as a filler and angle it down and out, then tie half hitches along it the same way. You are making a diagonal line from the center down. With 36 strands, Christina splits each half into two groups and runs eight knots down each, repeating the pattern on both sides to make a zigzag.

    Tip:

    Hold the filler cord at the angle you want before tying, not after.

    Back to all steps

  4. Step 4: Join the Diagonal Half Hitch Lines at the Point

    Watch this step · 4:16

    Where two diagonal lines meet at the bottom of each V, tie one more half hitch with the two filler cords to lock them together. It closes the point and keeps the zigzag from pulling apart when the runner lies flat. Check that every V ends at the same height across the row before moving on.

    Tip:

    Lay a ruler across the points to check they line up.

    Back to all steps

  5. Step 5: Tie a Second Straight Half Hitch Row Below the Zigzag

    Watch this step · 4:38

    Leave about an inch of bare cord under the zigzag. Take the outside cord as your filler, hold it straight across and tie a half hitch with every cord, back to front and through the loop. This second straight row frames the zigzag band. Try to keep it as level as the first row, but a little wobble suits the boho look.

    Tip:

    Pin the filler cord at both ends with a clip if it keeps slipping.

    Back to all steps

  6. Step 6: Tie the First Row of Square Knots in the Table Runner

    Watch this step · 6:00

    Work in groups of four cords and leave about an inch of space above. Cross the left cord over the middle two in a backwards 4 shape. Bring the right cord over it, under the middle and up through the loop. Pull tight. Then do the same from the other side. That makes one full square knot. Repeat across the row.

    Tip:

    Always start each knot from the same side so they all face the same way.

    Back to all steps

  7. Step 7: Tie a Staggered Row of Square Knots

    Watch this step · 7:10

    For the next row, leave two cords loose at the edge and start your groups of four from there. Each new knot sits between two knots above, so the rows stagger into a mesh. Keep the inch of space. Then tie a third row lined up with the first one, starting again from the edge, so the section has three rows of square knots.

    Tip:

    Count the loose cords at each edge before you start a row. It should be two.

    Back to all steps

  8. Step 8: Close the Square Knot Section With a Half Hitch Row

    Watch this step · 8:56

    Leave an inch below the square knots, take the rightmost cord as your filler and tie another straight row of half hitches across. That finishes one full repeat: zigzag band, square knot band, straight rows between. Repeat the whole section until the runner reaches the length you want, letting the finished part drape over a chair.

    Tip:

    Take a photo of one finished repeat so you can match the spacing later.

    Back to all steps

  9. Step 9: Tie Overhand Knots in the Table Runner Fringe

    Watch this step · 9:50

    When it is long enough, cut the cords right off the rod. Lay the runner on a table. At each end, take small bundles of cord under the last half hitch row and tie a plain overhand knot close to the work. That locks the rows so nothing slides loose, and it gives both ends a matching knotted fringe.

    Tip:

    Tie all the fringe knots at the same distance from the last row for a clean edge.

    Back to all steps

  10. Step 10: Trim the Looped Ends Off the Macrame Fringe

    Watch this step · 9:56

    The ends that were folded over the rod are still loops. Cut them open and trim the whole fringe to an even length with sharp fabric scissors. Kid scissors work in a pinch, as Christina found, but they chew the cord. Lay the runner down the middle of your table and adjust the overhang on each end.

    Tip:

    Comb out single twist cord ends with a pet brush for a soft, fluffy fringe.

    Back to all steps

How to Make a Macrame Pillow Cover

Keep going

How to Make a Macrame Pillow Cover

10 steps · about 8 minutes

Keep going with macramé

More on this topic, picked for this macrame table runner.

You reached the last step

Save this project to come back to it

Your ticked steps, the free printable and your other saved makes, together in My Projects. Free, no password.

You tapped Save

Save this project for later

We'll email you a link, no password.

How to Make a Macrame Table Runner (Easy Boho DIY)

  • Your saved projects in one list
  • Your ticked steps on any device

Check your inbox for an email from us. Not there? Look in your spam folder.

Free printable

Printable sheet and shopping list for this project

The bonus is hidden until you sign up.

Free with a free account, no password. Every step above stays open to everyone.

Products Used

The Checklist

How to Make a Macrame Table Runner (Easy Boho DIY)

Tools
3
Materials
1
Steps
10
Video
12 min

Tools we recommend

As an Amazon Associate we earn from qualifying purchases. Links on this page may be affiliate links - clicking them and buying doesn't change your price, but helps support Crafting Step by Step.

Tags

The Crafter's Weekly

New macramé tutorials, every Sunday

One short email with the week's best step-by-step guides. Free, no spam, unsubscribe anytime.

Did this work for you?

What's next

Related collections

Curated theme pages that include this tutorial.

Similar tutorials

Hand-picked next reads based on the one you just finished.

Liked this macramé tutorial?

Pick the crafts you want to hear about. One email every Sunday with new step-by-step tutorials. No spam, easy to unsubscribe.

Get more like this in your inbox

Weekly digest. Pick the categories you want. Unsubscribe anytime.

Send me tutorials about

We only email about new tutorials. Easy unsubscribe anytime.