How to Block Crochet (Wet, Spray, and Steam)

CrochetEasy10:108 stepsBrowse more →
Also in:Fiber Arts

By CraftingStepByStepPublished

Based on a video by Crochet With Tiffany.

Blocking is the finishing step that turns a slightly wonky crochet square into one that actually sits square, opens up the holes in a lace shawl so the pattern shows, and lines up granny squares so they sew together cleanly into a blanket. It is not hard. It just takes a damp piece, a pin board, and a day to dry.

This walkthrough covers all three blocking methods Tiffany teaches in her video: wet blocking (soak, blot, pin), spray blocking (pin, mist, dry), and steam blocking (pin, hover-steam, cool). Each method works best on a different fiber, so you will also learn how to match the method to the yarn you actually used.

If you are still building the basics, brush up on the magic ring, single crochet, and double crochet first. Finishing pairs naturally with weaving in your ends, which is the other side of making a project look truly done.

Step-by-Step Guide

1

Step 1: Understand What Blocking Actually Does

1:07
Step 1: Step 1: Understand What Blocking Actually Does

Blocking is taking your finished crochet piece, adding water or steam, then stretching it to the shape you want. It evens out wonky edges, opens up lacy stitch patterns, makes squares actually square, and helps pieces line up cleanly when you sew them together for a blanket.

Skip blocking on a washcloth or a dish scrubby. Use it on shawls, granny squares for a blanket, doilies, garments, and anything where the stitch pattern has detail you want to see clearly. The before-and-after on a stack of granny squares is the easiest way to understand the difference, and it is dramatic.

Tip

If you are making a blanket from squares, block each square individually before sewing them together. Pre-blocked squares line up at the seams without fighting you.

2

Step 2: Gather Your Blocking Supplies

2:04
Step 2: Step 2: Gather Your Blocking Supplies

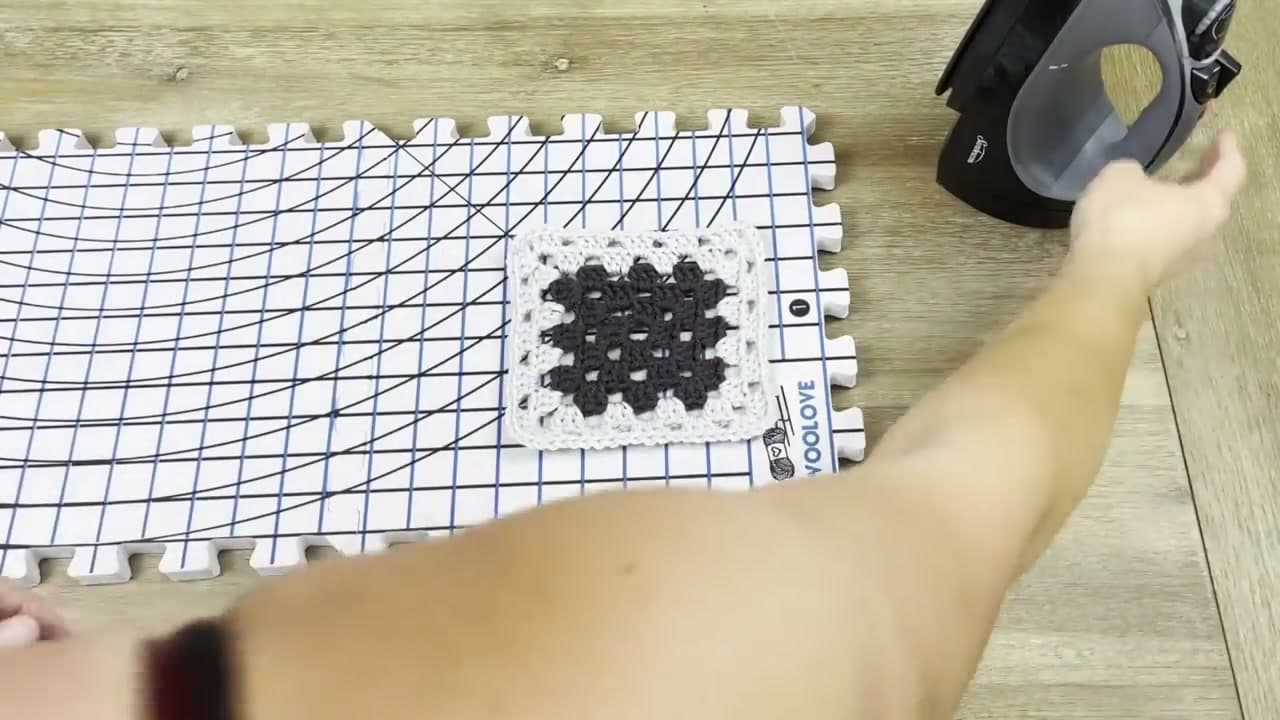
You need a flat surface you can pin into. Foam blocking mats with a grid printed on top are the easiest because the grid lets you eyeball straight lines and right angles without measuring. A folded towel on a table also works.

Grab rust-proof T-pins (regular dressmaker pins will leave orange marks on damp yarn after a day or two). A measuring tape lets you check that every side is the same length. Then add one tool for whichever method you choose: a bowl of warm water for wet blocking, a clean spray bottle for spray blocking, or a handheld steamer for steam blocking.

Tip

If you only want to buy one thing, get the foam blocking mats. They usually come with T-pins in the same kit, and the grid makes every step that follows much faster.

3

Step 3: Wet Blocking - The Classic Method

4:01
Step 3: Step 3: Wet Blocking - The Classic Method

Wet blocking is the deepest reset for your fibers, and it is the best choice for wool, cotton, and other natural yarns. Drop your finished piece into a bowl of warm water and let it soak until the fibers are fully saturated. Twenty minutes is plenty for most projects. Some people leave wool shawls in for an hour or two, which is fine.

Lift the piece straight out of the water and lay it onto a towel, then roll the towel up and gently press to squeeze out the excess water. Do not wring or twist - that pulls stitches out of shape. Move the damp piece onto your blocking mat. It is ready to pin.

Tip

Add a capful of no-rinse wool wash to the water if you have it. It softens the yarn and skips the rinse step. Eucalan and Soak are the two brands most crafters reach for.

4

Step 4: Pin to Shape and Measure

5:16
Step 4: Step 4: Pin to Shape and Measure

Start with the four corners and pin them where you want the finished edges to land. Use your measuring tape to confirm the diagonals match and that each side is the same length. Once the corners are anchored, add more pins along each edge, spaced about an inch apart, smoothing the fabric flat as you go.

The grid lines on a blocking mat make this much faster than eyeballing it. Pin until the whole piece sits flat with clean straight edges. If you over-stretch, the fabric will spring back a little when you let go, so do not yank.

Tip

For a granny square, the easiest check is corner-to-corner diagonal. Measure across the diagonal one way, then the other. If those two numbers match, the square is square.

5

Step 5: Spray Blocking - The Lazy-Day Method

5:56
Step 5: Step 5: Spray Blocking - The Lazy-Day Method

Spray blocking is great for granny squares and small motifs where you do not want to soak the whole thing. Pin your dry piece to the mat first, working corners and then edges exactly like the wet method.

Once it is fully pinned to shape, take a clean spray bottle filled with plain water and mist the entire surface until it is damp. Not soaking - just damp enough to feel cool to the touch. Set it aside to air dry. Spray blocking is the gentlest of the three methods and a good first attempt if you are nervous about water on a finished project.

Tip

Use a spray bottle that puts out a fine mist, not a stream. A coarse spray leaves wet patches that dry unevenly and can pucker the surface.

6

Step 6: Steam Blocking - The Fastest Finish

6:52
Step 6: Step 6: Steam Blocking - The Fastest Finish

Steam blocking is the fastest method and the only one that actually does anything to acrylic. Pin your dry piece to the mat first. Heat up a handheld garment steamer or an iron with a steam setting.

Hold the steamer six to eight inches above the fabric and let the steam fall onto the surface. Never press the iron flat onto the yarn - especially acrylic, which melts and locks into that shape forever. This is called killing the fabric, and while crafters sometimes do it on purpose to make acrylic hold its shape permanently, doing it by accident ruins the piece. Pass the steam slowly across each section until the whole piece is warm and slightly damp, then let it cool down completely before you unpin.

Tip

A handheld garment steamer is much safer than an iron because you cannot accidentally press it flat. If you are blocking acrylic regularly, a steamer is worth the small spend.

7

Step 7: Let It Dry Completely

7:39
Step 7: Step 7: Let It Dry Completely

This is the slowest part of the process and the most tempting one to rush. Walk away and leave the piece pinned in place for twenty-four to forty-eight hours, depending on how humid your room is.

Keep it out of direct sunlight so the yarn does not bleach unevenly. Once it feels completely dry to the touch, pull the pins out one by one and lift the piece off the mat. If it springs back to its old shape, the fiber needs another round of blocking or a different method. If it holds the new shape, you are done.

Tip

A ceiling fan running over the blocking mat cuts drying time roughly in half without bleaching the yarn. Skip the hair dryer - direct heat can felt wool unevenly.

8

Step 8: Match the Method to Your Yarn

8:55
Step 8: Step 8: Match the Method to Your Yarn

A few warnings before you start. Stainless steel T-pins matter more than people think - cheaper pins rust against damp yarn and leave permanent orange dots that you cannot wash out. Spend the few extra dollars on rust-proof pins.

Wool and cotton block beautifully with any of the three methods and hold their shape for a long time. One hundred percent acrylic does not block in the traditional sense unless you kill the fabric with steam, so do not be surprised if a wet-blocked acrylic project relaxes back to its original shape the first time you wash it. Match your method to your yarn and you will get the result you want.

Tip

If you blocked a project and the shape relaxes after the first wash, that is your fiber telling you to switch methods. Try steam blocking on the next acrylic piece you finish.

Products Used

☐ The Checklist

How to Block Crochet (Wet, Spray, and Steam)

Tools
7
Materials
3
Steps
8
Video
10 min

Your Guide

Crochet With Tiffany

As an Amazon Associate we earn from qualifying purchases. Links on this page may be affiliate links - clicking them and buying doesn't change your price, but helps support ShowMeStepByStep.

Tags

Test your knowledge

Did the lesson stick? Find out in 2 minutes.

5 quick questions covering what you just read. No signup, no score saved — just a gut check.

Quick reference

Key takeaways from How to Block Crochet (Wet, Spray, and Steam)

5 questions, answers, and one-line explanations. Tap to expand.

  1. 1.What does blocking actually do?

    Answer: Reshapes when wet

    Adds water/steam then stretches to shape. Evens edges, opens lace patterns, makes squares square, aligns sewn pieces.

  2. 2.Why use rust-proof T-pins?

    Answer: Avoid orange dots

    Regular dressmaker pins leave permanent orange rust marks on damp yarn after a day or two.

  3. 3.Best method for wool and cotton?

    Answer: Wet blocking

    Deepest reset for natural fibers. Soak ~20 min, blot in towel (don't wring), pin to shape.

  4. 4.Only method that actually works on acrylic?

    Answer: Steam blocking

    Steam from 6-8 inches above. NEVER press iron flat - acrylic melts and locks in shape forever ('killing the fabric').

  5. 5.Why keep blocked pieces out of sun while drying?

    Answer: Bleaches unevenly

    Direct sunlight bleaches yarn unevenly. Leave pinned 24-48 hr until completely dry, depending on humidity.

What's next

Weekly Digest

Liked this crochet tutorial?

Pick the categories you want to hear about. Weekly digest of new step-by-step tutorials. No spam, easy unsubscribe.

Send me tutorials about

We only email about new tutorials. Easy unsubscribe anytime.