How to Make a Popsicle Stick Sled Ornament

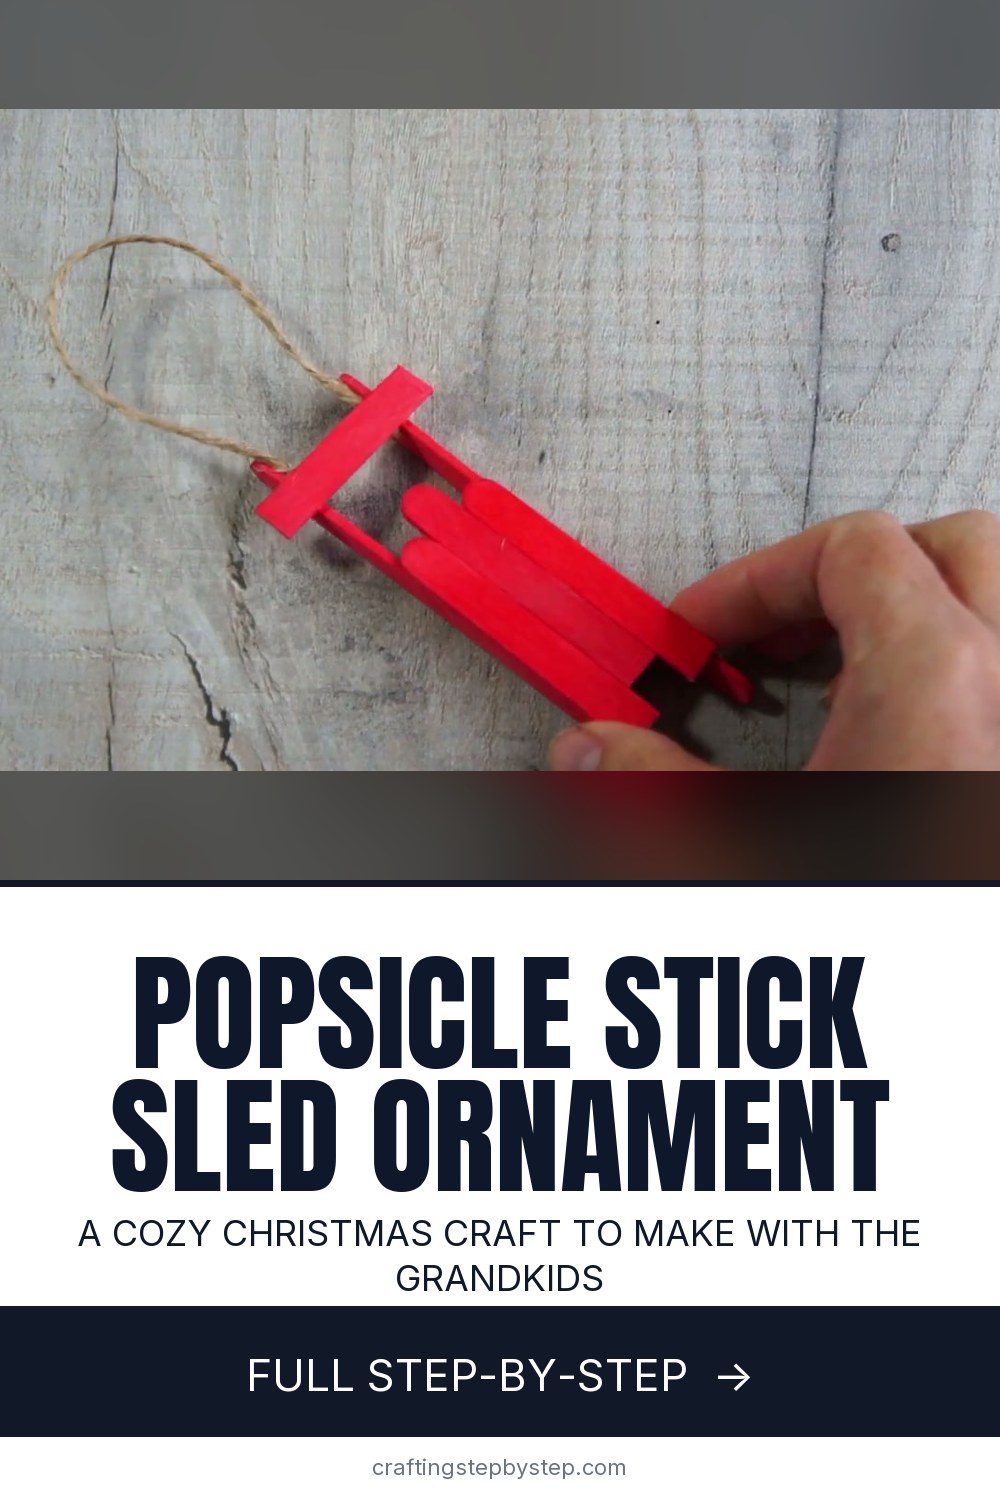
The finished result: How to Make a Popsicle Stick Sled Ornament
  • Difficulty: Easy
  • About 20 minutes, plus 1 hour to dry or set
  • 9 steps

You tapped Save

Save this project for later

We'll email you a link, no password.

How to Make a Popsicle Stick Sled Ornament

  • Your saved projects in one list
  • Your ticked steps on any device

Check your inbox for an email from us. Not there? Look in your spam folder.

Print

Steps written out by Crafting Step by Step from Christine's Crafts' video (opens YouTube) (5:50). Published .

A little red sled made from popsicle sticks is one of the easiest Christmas ornaments you can make. It costs pennies, it needs no special tools, and kids can do most of it. This tutorial follows Christine of Christine's Crafts, who builds one from pre-colored red craft sticks, a tube of clear glue and a loop of garden twine.

How to make a popsicle stick sled ornament: the short version

  • Cut three sticks to the same length and line them up for the seat.
  • Glue them together, then add a second layer and a short cross brace.
  • Glue a full stick along each side as runners.
  • Add a short bar across the front of the runners.
  • Glue a twine loop under the front bar to hang it.

Sticks, glue and cutting

Standard craft sticks, about 4.5 inches long, make an ornament that fits a normal tree branch. Christine uses red sticks, so nothing needs painting. Plain wood sticks work too. Paint them before you glue, or after for a more even finish. Sturdy craft scissors cut thin sticks fine. Cut slowly, since the ends tend to snap off and fly. A grown-up should do the cutting for little kids.

Any clear-drying all purpose or tacky glue works. Hot glue sets faster but leaves strings and is best for adults. White glue is the kid-safe choice. It needs longer to dry.

Patience between steps

The main lesson from this build is to let each part dry for a few minutes before adding the next. Wet joints slide when you press the next stick on. The seat first, then the runners, then the front bar, then the hanger. If you are making a batch, work them like an assembly line, so one sled dries while you glue the next.

Making a bigger or smaller sled

Jumbo craft sticks make a sled big enough to sit under the tree or hold a tiny gift. Mini sticks make a small one for a gift tag or a card. Keep the same plan: a seat of three, a brace, two runners that stick out past the front, and one front bar.

Ways to decorate

  • Write a name or the year on the seat with a paint pen.
  • Glue a tiny photo to the seat for a grandparent gift.
  • Brush on glitter glue or add a mini bow and a sprig of greenery.
  • Paint the runners a contrasting color, or wrap them in thin ribbon.
  • Make a set in red, green and white for a tree or a gift topper.

Common problems

  • Seat comes apart. The brace was too narrow or the glue was still wet. Let it dry and add a second brace.
  • Runners splay out. Hold them upright for a minute while the glue grabs, or rest them against something.
  • Sled hangs crooked. Center the twine under the front bar so both ends sit the same distance from the middle.
  • Glue shows. Use less, and keep the messy joins on the underside.

More ornaments to make

Pair it with a clothespin snowflake or a wood slice ornament for a rustic tree. For more ideas, see how to make Christmas ornaments and salt dough ornaments.

Free printable

Print the steps and supply list for this project

One page you can take to the table. Free with a free account, no password.

Get the free printable

What you'll need

Free, for this project

Get this checklist by email

  • All 6 tools and materials, with tick boxes
  • A link to print all 9 steps on paper, to keep by you while you craft

No password. The whole tutorial stays free on this page.

Quick answer

Make a popsicle stick sled ornament with craft sticks, glue and twine. An easy project: about 20 minutes, plus 1 hour to dry or set. Materials cost about $1 to $3. You need 6 things, including craft sticks, jute twine and red paint. The 9 steps start with cut Three Popsicle Sticks to the Same Length for the Sled Seat and line Up the Popsicle Sticks With the Middle One Set Forward.

Step-by-step guide

9 steps, about 6 minutes. Tap a picture to jump to that step. Your progress saves automatically.

Tick each step off as you go.

  1. Step 1: Cut Three Popsicle Sticks to the Same Length for the Sled Seat

    Watch this step · 1:12

    The seat is three sticks wide. If all your sticks are the same length, cut three of them a little shorter. Christine lays each cut piece on top of the next stick so she can trim it to match. Cut slowly with sturdy scissors, and watch out, because small bits of stick tend to fly off. You can make the seat wider or narrower if you like.

    Tip:

    Cut toward the table, not toward your face, and keep little ones back while you cut.

    Back to all steps

  2. Step 2: Line Up the Popsicle Sticks With the Middle One Set Forward

    Watch this step · 1:40

    Lay the three seat sticks next to each other. Christine sets the middle one slightly forward of the other two. It gives the seat a nicer shape that reads as a sled. Hold a full stick across the back ends to check that they are lined up. Then run a thin line of glue along the edges where the sticks touch, so they hold together.

    Tip:

    Work on a piece of baking paper so the glue does not stick the seat to the table.

    Back to all steps

  3. Step 3: Glue a Second Layer of Popsicle Stick Onto the Sled Seat

    Watch this step · 2:08

    Edge glue alone will not hold the seat for long. Cut a short piece of craft stick and glue it across the seat to add another layer. It holds the three sticks in place and makes the seat a lot more secure. Press it down for a moment so the glue grabs before you let go.

    Tip:

    Use only a thin line of glue. Too much oozes out and takes longer to dry.

    Back to all steps

  4. Step 4: Glue a Short Brace Across the Popsicle Stick Seat

    Watch this step · 2:35

    Cut one more piece of craft stick so it spans all three seat sticks. Leave a small gap at each edge, because the runners will go there. Christine trims hers twice to get it right. Glue it across the seat for extra stiffness so the sled does not fall apart. Then leave the seat to dry for a few minutes.

    Tip:

    Hold the brace up to the seat before gluing to check it leaves room for the runners.

    Back to all steps

  5. Step 5: Glue a Full Popsicle Stick Runner Along Each Side of the Sled

    Watch this step · 3:35

    Once the seat is dry, turn it over. Run a thin line of glue along each side of the bottom face. Lay a full-length stick along each side as a runner. Christine places them quite far forward on the sled, because the seat sits at the back. Doing both runners at the same time means they line up and dry together.

    Tip:

    Put the cap back on the glue between steps. It saves a lot of mess.

    Back to all steps

  6. Step 6: Set the Popsicle Stick Runners Upright and Let Them Dry

    Watch this step · 3:48

    Check the runners from above. They should run straight, side by side, and stick out past the front of the seat. Stand them upright so they are not leaning in or out. Turn the sled over to see how it looks from the top. When you are happy with them, leave the runners to dry for a few minutes before you go on.

    Tip:

    If a runner keeps tipping, lean it against a book while the glue sets.

    Back to all steps

  7. Step 7: Glue the Front Bar Across the Popsicle Stick Sled Runners

    Watch this step · 3:58

    With the sled upside down, cut a stick for the front bar. Christine makes hers a little wider than the runners. Put a small dab of glue on the top of each runner tip. Lay the bar across so it sticks out the same distance on both sides. That is the whole sled. Let it dry before adding the hanger.

    Tip:

    Measure by eye from both ends of the bar so it sits centered.

    Back to all steps

  8. Step 8: Glue the Twine Hanger Under the Sled Front Bar

    Watch this step · 4:52

    Turn the sled upside down again. Squeeze some glue into the corners under the front bar. Christine uses garden twine for a rustic look. Push one end of the twine into the glue on each side so it forms a loop. Some glue will squeeze out. It dries clear and it is on the underside, so nobody sees it. Leave it until it is thoroughly dry.

    Tip:

    Ribbon or baker's twine works too. Cut about 8 inches for a hanging loop.

    Back to all steps

  9. Step 9: Turn Over the Finished Popsicle Stick Sled Ornament

    Watch this step · 5:24

    When the glue has set, turn the sled the right way up. That is your finished ornament. Decorate it however you like. Add glitter, write a name on the seat, or glue on a small photo if it is a gift for grandma. Hang it on your tree, tie it to a present, or make a few to give to friends and family.

    Tip:

    Make several at once. Each part dries while you work on the next sled.

    Back to all steps

How to Make a Valentine's Day Box

Keep going

How to Make a Valentine's Day Box

Keep going with crafts

More on this topic, picked for this popsicle stick sled ornament.

You reached the last step

Save this project to come back to it

Your ticked steps, the free printable and your other saved makes, together in My Projects. Free, no password.

You tapped Save

Save this project for later

We'll email you a link, no password.

How to Make a Popsicle Stick Sled Ornament

  • Your saved projects in one list
  • Your ticked steps on any device

Check your inbox for an email from us. Not there? Look in your spam folder.

Free printable

Printable sheet and shopping list for this project

The bonus is hidden until you sign up.

Free with a free account, no password. Every step above stays open to everyone.

Products Used

The Checklist

How to Make a Popsicle Stick Sled Ornament

Tools
2
Materials
4
Steps
9
Video
6 min

Tools we recommend

As an Amazon Associate we earn from qualifying purchases. Links on this page may be affiliate links - clicking them and buying doesn't change your price, but helps support Crafting Step by Step.

Tags

The Crafter's Weekly

New crafts tutorials, every Sunday

One short email with the week's best step-by-step guides. Free, no spam, unsubscribe anytime.

Did this work for you?

What's next

Related collections

Curated theme pages that include this tutorial.

Similar tutorials

Hand-picked next reads based on the one you just finished.

Liked this crafts tutorial?

Pick the crafts you want to hear about. One email every Sunday with new step-by-step tutorials. No spam, easy to unsubscribe.

Get more like this in your inbox

Weekly digest. Pick the categories you want. Unsubscribe anytime.

Send me tutorials about

We only email about new tutorials. Easy unsubscribe anytime.