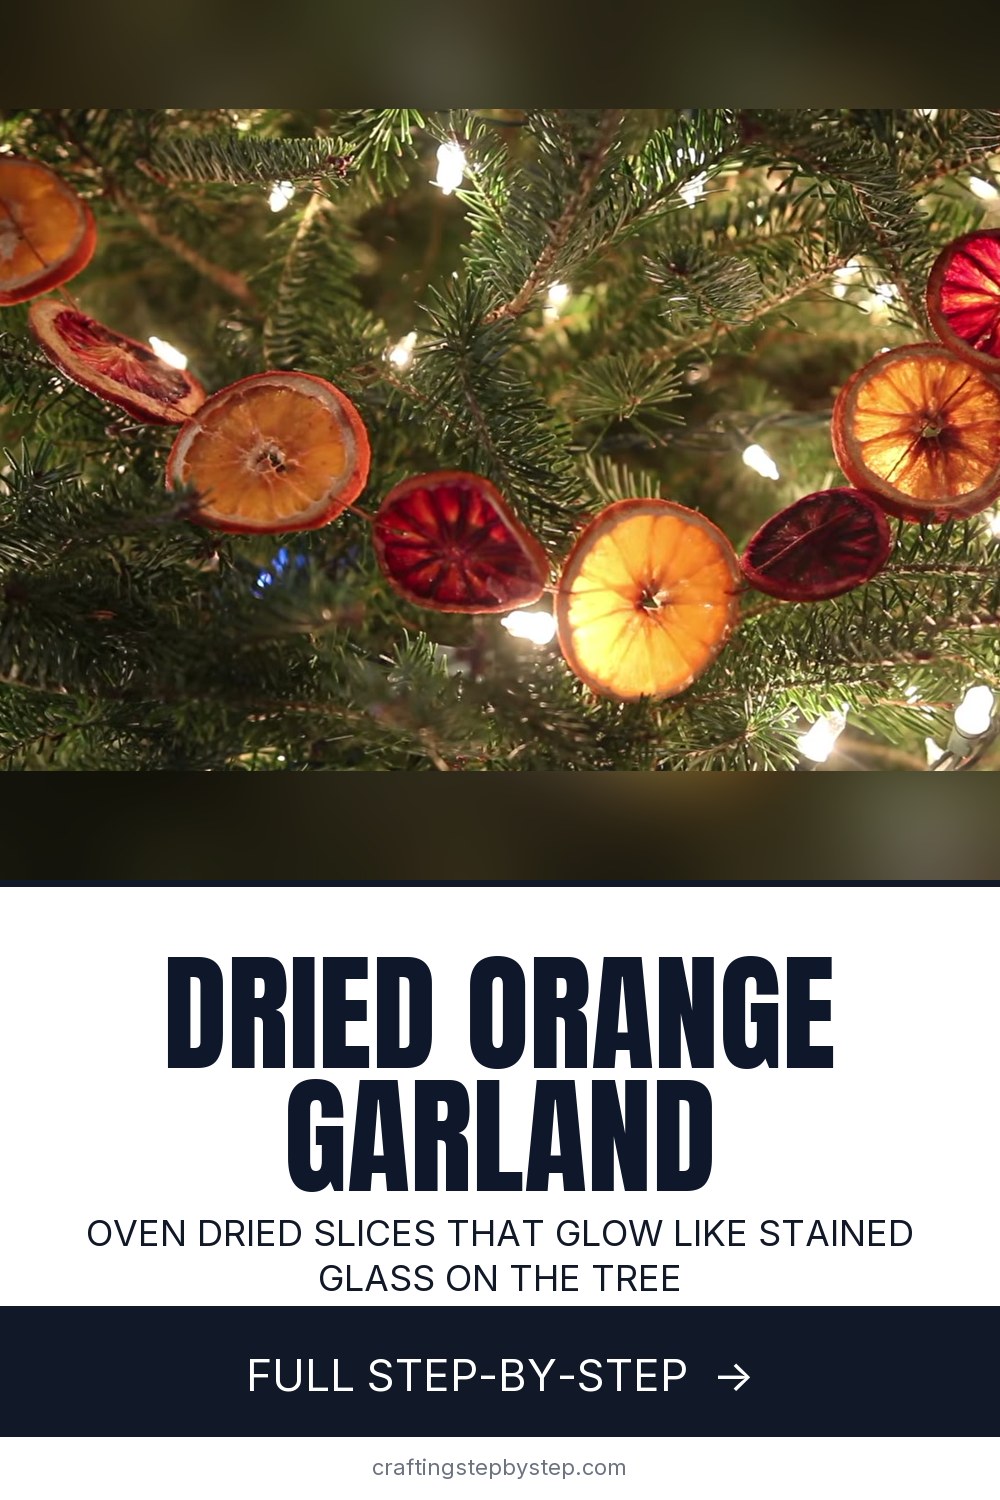
How to Make a Dried Orange Garland

The finished result: How to Make a Dried Orange Garland
  • Difficulty: Easy
  • About 45 minutes, plus 4 hours to dry or set
  • 9 steps

You tapped Save

Save this project for later

We'll email you a link, no password.

How to Make a Dried Orange Garland

  • Your saved projects in one list
  • Your ticked steps on any device

Check your inbox for an email from us. Not there? Look in your spam folder.

Print

Steps written out by Crafting Step by Step from Justine Silva's video (opens YouTube) (9:20). Published .

A dried orange garland glows like stained glass when the tree lights shine through it. Justine Silva makes hers from navel oranges and blood oranges, so the strand alternates gold and deep red. All you need is an oven, some citrus and a needle and thread. It is cheap, smells wonderful while it dries, and the slices keep for years if you store them dry.

How to make a dried orange garland: the short version

  • Slice oranges about a quarter inch thick.
  • Lay them on parchment lined trays.
  • Bake at 200 to 250 degrees F for 2 to 4 hours, flipping now and then.
  • Thread a tapestry needle with embroidery floss.
  • Push it through each slice near the rind and knot, then add a loop at each end.

What you need

Four or five oranges make a garland about 6 feet long. Navel oranges are easy to find and dry a warm gold; blood oranges add red. You also need a sharp knife, a cutting board, baking trays, parchment paper, embroidery floss or thin twine, a large eye tapestry needle and scissors.

Getting the slices right

Thickness matters most. About a quarter inch is right; slices shrink a lot in the oven, and thin ones turn brittle and crack when you thread them. Thick slices take far longer and may stay sticky in the middle. Pat each slice with a paper towel before it goes on the tray to cut the drying time.

Keep the oven low

It is tempting to turn up the heat, but anything above 250 degrees browns or burns the edges. Justine keeps blood oranges at 200, because their edges scorch faster. Flip the slices every hour or so. They are done when they feel dry and leathery, not wet or tacky. For more ways to dry them, including an air fryer and a dehydrator, see our guide to drying orange slices.

Pattern ideas

  • Alternate orange and blood orange slices for a red and gold strand.
  • Add fresh cranberries between slices if you cannot find blood oranges.
  • Mix in cinnamon sticks, bay leaves or small wooden beads.
  • Hang single slices on loops as tree ornaments.

Making it with grandkids

Stringing is easy for kids once the slices are dry. A tapestry needle has a blunt tip, so it is safer than a sewing needle. Let them choose the pattern while an adult handles the slicing and the oven. Poke holes with a toothpick first if small fingers struggle.

Common problems

  • Slices still sticky after 4 hours. They were cut too thick or crowded; give them another hour and flip again.
  • Brown, bitter looking edges. The oven ran too hot. Drop to 200 next batch.
  • Slices tear on the needle. Thread closer to the rind, or pre-punch with a toothpick.

Storing the garland

Fully dried slices last for several seasons. Wrap the garland loosely in tissue and keep it in a box somewhere dry. Damp air makes the slices soft and can lead to mold, so skip the basement.

For more natural decor, try a pinecone wreath, a felt garland or other Christmas garland ideas.

Free printable

Print the steps and supply list for this project

One page you can take to the table. Free with a free account, no password.

Get the free printable

What you'll need

Free, for this project

Get this checklist by email

  • All 10 tools and materials, with tick boxes
  • A link to print all 9 steps on paper, to keep by you while you craft

No password. The whole tutorial stays free on this page.

Quick answer

Make a dried orange garland: slice oranges a quarter inch thick, dry them low in the oven and string them on floss. An easy project: about 45 minutes, plus 4 hours to dry or set. Materials cost about $5 to $10. You need 10 things, including 4 to 5 navel oranges, blood oranges and parchment paper. The 9 steps start with slice the Oranges Into Quarter Inch Rounds and lay the Orange Slices on a Parchment Lined Tray.

Step-by-step guide

9 steps, about 9 minutes. Tap a picture to jump to that step. Your progress saves automatically.

Tick each step off as you go.

  1. Step 1: Slice the Oranges Into Quarter Inch Rounds

    Watch this step · 0:28

    Set a cutting board on the table and use a sharp knife. Cut the ends off each orange, then slice it into rounds about a quarter inch thick. Keep the thickness even so the slices dry at the same rate. Justine notes that slices shrink a lot in the oven, so going too thin makes them fragile. Four or five oranges are enough for one long garland.

    Tip:

    A serrated knife cuts through the peel without squashing the fruit.

    Back to all steps

  2. Step 2: Lay the Orange Slices on a Parchment Lined Tray

    Watch this step · 1:44

    Line a rimmed baking tray with parchment paper so the sugary juice does not stick. Pat each slice dry with a paper towel, then lay them out in a single layer. They can sit close together but should not overlap. Use a second tray if you run out of room, since crowded slices steam instead of drying.

    Tip:

    Press the slices with paper towels on both sides to shave off drying time.

    Back to all steps

  3. Step 3: Set the Oven Between 200 and 250 Degrees

    Watch this step · 1:56

    Turn your oven to a low temperature, between 200 and 250 degrees F. Justine sets hers to 250 for navel oranges. Any higher and the edges burn before the middle dries. Slide the tray onto a middle rack. A low oven also fills the house with a warm citrus smell, which is half the fun of this project.

    Tip:

    Prop the oven door open an inch to let moisture escape.

    Back to all steps

  4. Step 4: Slice Blood Oranges for Red Garland Slices

    Watch this step · 2:15

    For a pop of red, slice a few blood oranges the same way, about a quarter inch thick. Put them on their own parchment lined tray. Blood oranges have darker, thinner edges that scorch faster, so Justine dries them at 200 degrees instead of 250. If you cannot find blood oranges, cranberries give a similar red accent.

    Tip:

    Cara cara and grapefruit slices add pink and pale yellow tones.

    Back to all steps

  5. Step 5: Bake the Orange Slices Two to Four Hours, Flipping

    Watch this step · 3:22

    Let the slices bake for two to four hours. Check on them and flip each slice every hour or so, so both sides dry evenly and they do not curl. Justine's were mostly ready at about four hours. They are done when they feel dry and stiff, with no sticky spots in the middle. Let them cool completely on the tray.

    Tip:

    Pull out any thin slices that finish early so they do not burn.

    Back to all steps

  6. Step 6: Thread a Tapestry Needle With Embroidery Floss

    Watch this step · 4:17

    Pull off a long length of embroidery floss, longer than you want the garland to be. Justine uses a rust colored floss that blends with the dried peel. Thread it through a tapestry needle. Tapestry needles have an eye big enough for thick floss, and the blunt tip is gentle on the slices and on fingers.

    Tip:

    Jute twine or baker's twine gives a more rustic look.

    Back to all steps

  7. Step 7: Push the Needle Through the Orange Slice Near the Rind

    Watch this step · 4:47

    Take your first dried slice and push the needle through as close to the rind as you can. The rind is the strongest part, so the slice will not tear when it hangs. Pull the floss through, leaving a long tail, and tie a knot around the slice to hold it in place. Space the next slice a few inches along.

    Tip:

    If a slice resists, poke a hole first with a toothpick.

    Back to all steps

  8. Step 8: String More Dried Orange Slices Onto the Garland

    Watch this step · 5:45

    Keep adding slices the same way, pushing the needle through near the rind each time. Alternate orange and blood orange slices, or mix them however you like. Lay the strand flat on the table as you go to check the spacing. There is no wrong pattern, so this is a good step to share with family.

    Tip:

    Thread each slice through the same spot on the rind so they all face forward.

    Back to all steps

  9. Step 9: Tie Off the Dried Orange Garland With a Hanging Loop

    Watch this step · 6:58

    When you reach the last slice, tie a knot around it to lock everything in place. Use the extra floss to tie a small loop at each end so the garland hangs from a hook or a branch. Trim any loose tails. Drape it on the tree, along a mantel or across a window where light can shine through.

    Tip:

    Extra slices make quick ornaments on a short loop of floss.

    Back to all steps

How to Stencil on Wood (3 Ways to Get Crisp Wood Sign Letters)

Keep going

How to Stencil on Wood (3 Ways to Get Crisp Wood Sign Letters)

Keep going with crafts

More on this topic, picked for this dried orange garland.

You reached the last step

Save this project to come back to it

Your ticked steps, the free printable and your other saved makes, together in My Projects. Free, no password.

You tapped Save

Save this project for later

We'll email you a link, no password.

How to Make a Dried Orange Garland

  • Your saved projects in one list
  • Your ticked steps on any device

Check your inbox for an email from us. Not there? Look in your spam folder.

Free printable

Printable sheet and shopping list for this project

The bonus is hidden until you sign up.

Free with a free account, no password. Every step above stays open to everyone.

Products Used

The Checklist

How to Make a Dried Orange Garland

Tools
5
Materials
5
Steps
9
Video
9 min

Tools we recommend

As an Amazon Associate we earn from qualifying purchases. Links on this page may be affiliate links - clicking them and buying doesn't change your price, but helps support Crafting Step by Step.

Tags

The Crafter's Weekly

New crafts tutorials, every Sunday

One short email with the week's best step-by-step guides. Free, no spam, unsubscribe anytime.

Did this work for you?

What's next

Related collections

Curated theme pages that include this tutorial.

Similar tutorials

Hand-picked next reads based on the one you just finished.

Liked this crafts tutorial?

Pick the crafts you want to hear about. One email every Sunday with new step-by-step tutorials. No spam, easy to unsubscribe.

Get more like this in your inbox

Weekly digest. Pick the categories you want. Unsubscribe anytime.

Send me tutorials about

We only email about new tutorials. Easy unsubscribe anytime.