How to Make a Bottle Brush Tree Wreath

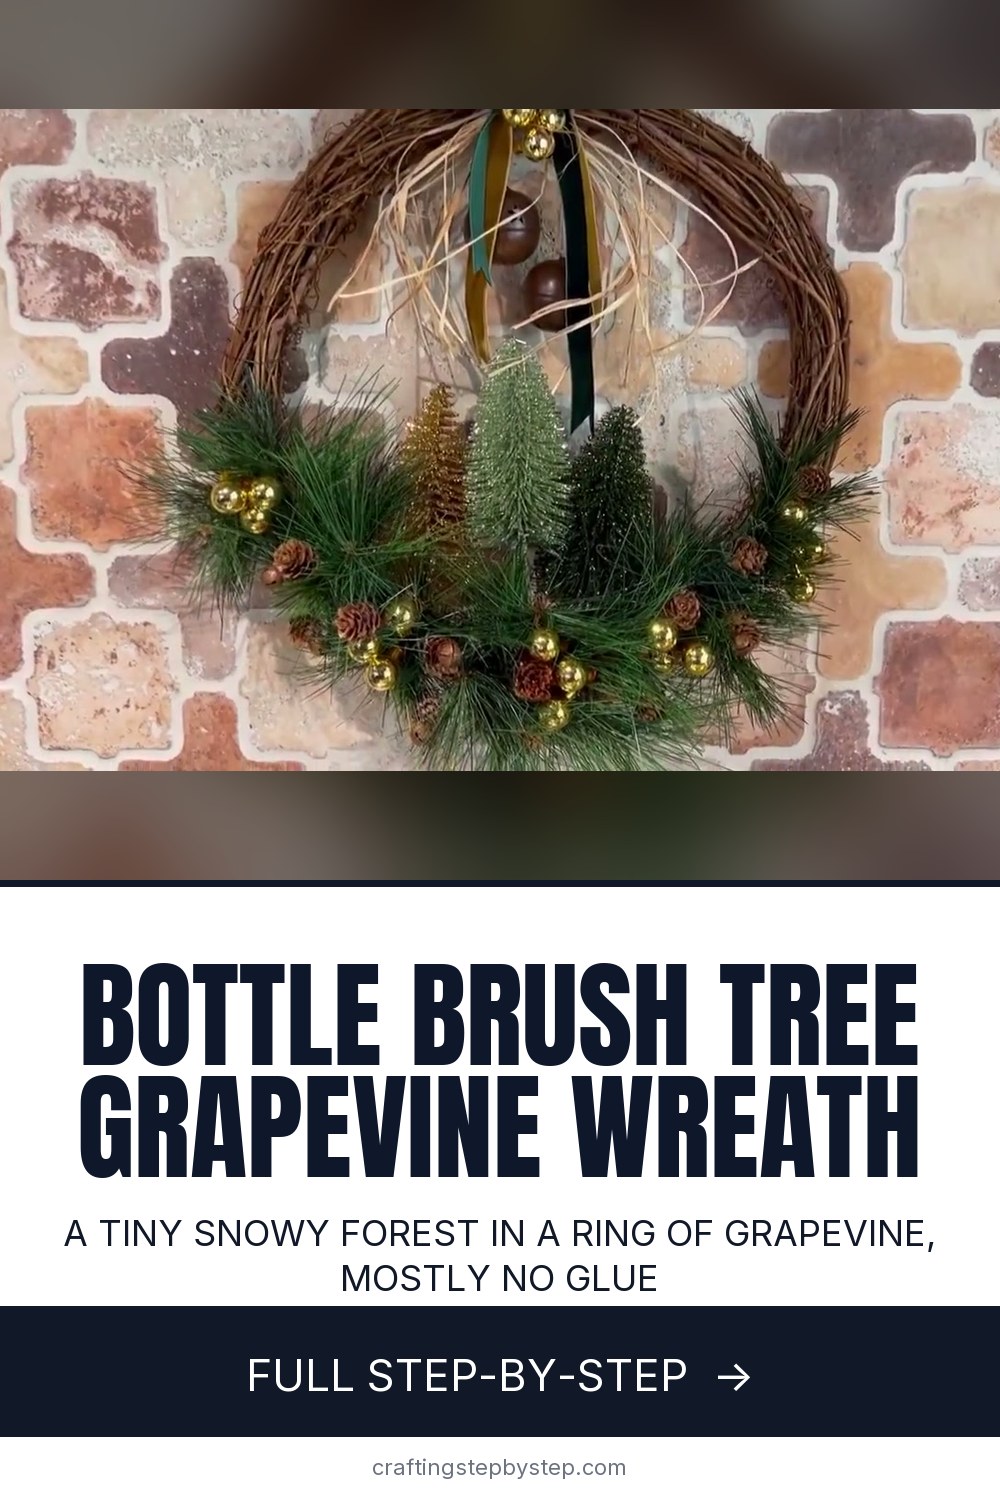
The finished result: How to Make a Bottle Brush Tree Wreath
  • Difficulty: Easy
  • About 30 minutes
  • 10 steps

You tapped Save

Save this project for later

We'll email you a link, no password.

How to Make a Bottle Brush Tree Wreath

  • Your saved projects in one list
  • Your ticked steps on any device

Check your inbox for an email from us. Not there? Look in your spam folder.

Print

Steps written out by Crafting Step by Step from J Dub By Design™'s video (opens YouTube) (6:27). Published .

A bottle brush tree wreath looks like a tiny snowy forest sitting in a ring of grapevine. J Dub By Design made this one for the wall above her stove using a small grapevine wreath from the grocery store and Christmas decor she already had. Three bottle brush trees go in first, then pine sprigs, pine cones, sleigh bells, two bows and a few gold balls. Most of it pushes straight into the vines, so you hardly need glue.

How to make a bottle brush tree wreath: the short version

  • Pull the bases off three bottle brush trees.
  • Push the trees into the bottom of a tight grapevine wreath, tallest in the middle.
  • Tuck cut pine sprigs around and beside the trees.
  • Glue mini pine cones into the greenery.
  • Loop two sleigh bells over the top, then glue on a raffia bow and a velvet bow.
  • Finish with small gold ball picks.

What you need

A small grapevine wreath, about 10 to 14 inches. Three bottle brush trees in two or three shades. A length of artificial pine garland to cut into sprigs. Mini pine cones, two sleigh bells on twine, raffia, velvet ribbon and a few gold ball picks. Tools are a hot glue gun, wire cutters and scissors. Dollar store and leftover decor works fine here.

Choosing the bottle brush trees

Pick trees of different heights so the group looks natural. If yours are all the same size, snip the bottom of one or two with wire cutters to stagger them. Most trees sit on a wood base with a wire stem underneath. Pull or cut the base off and keep the stem; that stem is what holds the tree in the vines. Glitter, flocked, gold and sage trees all mix well.

Glue or no glue?

A tightly woven grapevine wreath grips stems on its own. Push one in and give it a wiggle. If it stays put, skip the glue. A loose wreath needs a dab of hot glue on each stem before it goes in. Small items like pine cones and the bows always get glue, because they have no stem to grab.

Color ideas

  • Sage, gold and dark green trees with green velvet, like the video.
  • White flocked trees with red velvet and silver bells for a snowy look.
  • Pink and mint trees for a vintage, retro feel.
  • Plain green trees, burlap and red berries for a farmhouse wreath.

Making it with grandkids

Pushing trees and pine sprigs into the vines needs no glue, so little hands can do most of it. Let them pick the order of the trees and where the bells hang. An adult handles the hot glue and the wire cutters.

Where to hang it

This is a small wreath, so it suits a kitchen wall, a cabinet door, a mirror or a window. If you hang it over a range like in the video, keep it well above the cooktop. Raffia, ribbon and plastic greenery do not belong near heat or open flame.

Common problems

  • Trees lean forward. Push the stem deeper and angle it slightly back into the wreath.
  • Bare spots behind the trees. Add more short pine sprigs from the sides.
  • Bow droops. Glue it to the raffia bow, not only to the vines.

More wreaths

Learn how to make a bow for a wreath, then try a full Christmas wreath or a pinecone wreath. Leftover garland makes a good start on a Christmas garland.

Free printable

Print the steps and supply list for this project

One page you can take to the table. Free with a free account, no password.

Get the free printable

What you'll need

Free, for this project

Get this checklist by email

  • All 12 tools and materials, with tick boxes
  • A link to print all 10 steps on paper, to keep by you while you craft

No password. The whole tutorial stays free on this page.

Quick answer

Make a bottle brush tree wreath on a grapevine form with pine sprigs, pine cones, sleigh bells and a velvet bow. An easy project: about 30 minutes. Materials cost about $15 to $35. You need 12 things, including small grapevine wreath, 3 bottle brush trees and artificial pine garland. The 10 steps start with gather the Grapevine Wreath, Bottle Brush Trees and Trims and push the First Bottle Brush Tree Into the Grapevine Wreath.

Step-by-step guide

10 steps, about 6 minutes. Tap a picture to jump to that step. Your progress saves automatically.

Tick each step off as you go.

  1. Step 1: Gather the Grapevine Wreath, Bottle Brush Trees and Trims

    Watch this step · 0:38

    Lay everything out on the table before you start. You need a small grapevine wreath, three bottle brush trees with their bases removed and pine garland cut into short pieces. Add a few mini pine cones, two sleigh bells on twine, a raffia bow and two velvet ribbons for the top bow. Keep the glue gun warming nearby. Seeing it all at once helps you plan the colors.

    Tip:

    Grapevine wreaths from the grocery store are often cinnamon scented, which is a nice bonus.

    Back to all steps

  2. Step 2: Push the First Bottle Brush Tree Into the Grapevine Wreath

    Watch this step · 1:37

    Decide which part of the wreath will be the bottom. Take your tallest tree and push its wire stem straight down into the vines at the center of that section. Wiggle it a little to seat it. On a tightly woven wreath the tree holds firm with no glue. If the vines feel loose, put a dab of hot glue on the stem first and hold it for a few seconds.

    Tip:

    Stand the wreath up now and then to check the tree looks straight when it hangs.

    Back to all steps

  3. Step 3: Add Two More Bottle Brush Trees on Either Side

    Watch this step · 2:13

    Place a shorter tree on each side of the first one, close enough that they look like a little grove. Push the stems in the same way. Different heights look more natural. If your trees all match, snip a bit off the bottom of the side trees with wire cutters so the middle one stands tallest. Step back and check the spacing before you add greenery.

    Tip:

    Cut the wire stem, not the brush, so the tree keeps its shape.

    Back to all steps

  4. Step 4: Tuck Pine Sprigs Behind the Bottle Brush Trees

    Watch this step · 2:45

    Cut your pine garland into pieces about 4 to 6 inches long. Take one sprig and push its pointed end into the vines behind the trees. Keep adding sprigs around and between the trees so green frames them from behind. Like the trees, they should hold on their own. Add a tiny drop of glue to any piece that wants to fall out.

    Tip:

    Bend the wire inside each sprig to point the needles where you want them.

    Back to all steps

  5. Step 5: Fill Out the Wreath Sides With More Pine Greenery

    Watch this step · 3:03

    Now work outward. Add longer sprigs to the left and right of the trees so the greenery sweeps partway up each side of the wreath. This gives the design a soft crescent shape instead of a tight clump. Fluff and spread the needles with your fingers as you go. Leave the top half of the grapevine bare; the bells and bows go there.

    Tip:

    Hold the wreath up at arm's length to spot any thin areas.

    Back to all steps

  6. Step 6: Glue Mini Pine Cones Into the Wreath Greenery

    Watch this step · 3:26

    Cut small pine cones off a spare pine cone garland or use loose mini cones. Put a drop of hot glue on the bottom of each one and press it into the greenery, close to the vines so the glue can grab. Scatter them around the trees and along both sides. Odd numbers and uneven spacing look more natural than neat rows.

    Tip:

    Hold each cone for a few seconds while the glue sets.

    Back to all steps

  7. Step 7: Thread Two Sleigh Bells Through the Grapevine Wreath

    Watch this step · 4:10

    Turn the wreath so the trees are at the bottom. Take a sleigh bell on its twine and run the twine through the grapevine at the top. Loop it over itself and let the bell drop into the center of the wreath. Add the second bell a little lower than the first so they hang at different heights. No glue is needed for this step.

    Tip:

    Trim the twine so the bells hang inside the wreath, not below it.

    Back to all steps

  8. Step 8: Glue a Raffia Bow to the Top of the Wreath

    Watch this step · 4:38

    Make a simple bow from a bundle of raffia strands and tie it in the middle. Put a little hot glue on the back and press it onto the top of the wreath, right over where the bells hang. The raffia hides the twine and adds a rustic layer under the velvet bow. Spread the loose strands out so they look full.

    Tip:

    Use eight to ten raffia strands for a bow that looks full on a small wreath.

    Back to all steps

  9. Step 9: Layer a Velvet Ribbon Bow Over the Raffia Bow

    Watch this step · 5:06

    Tie a bow using two velvet ribbons held together, like dark green and gold. Glue it on top of the raffia bow so the two layers sit as one. Let the long tails hang down through the center of the wreath. Then trim each tail with a dovetail cut: fold the end in half lengthwise and snip from the fold up toward the edge at an angle.

    Tip:

    Sharp scissors give velvet a clean dovetail without fraying.

    Back to all steps

  10. Step 10: Tuck Gold Ball Picks Into the Wreath Greenery

    Watch this step · 5:36

    For a final bit of shine, add small gold ball picks. Push their stems into the greenery around the trees and along the sides, the same way you placed the pine. Glue a cluster to the center of the bow too. Any small shiny balls work, so use what you have. Then hang your bottle brush tree wreath and enjoy it.

    Tip:

    Keep the gold balls in groups of three for a balanced look.

    Back to all steps

How to Make Felt Pasta (6 Shapes)

Keep going

How to Make Felt Pasta (6 Shapes)

Keep going with crafts

More on this topic, picked for this bottle brush tree wreath.

You reached the last step

Save this project to come back to it

Your ticked steps, the free printable and your other saved makes, together in My Projects. Free, no password.

You tapped Save

Save this project for later

We'll email you a link, no password.

How to Make a Bottle Brush Tree Wreath

  • Your saved projects in one list
  • Your ticked steps on any device

Check your inbox for an email from us. Not there? Look in your spam folder.

Free printable

Printable sheet and shopping list for this project

The bonus is hidden until you sign up.

Free with a free account, no password. Every step above stays open to everyone.

Products Used

The Checklist

How to Make a Bottle Brush Tree Wreath

Tools
3
Materials
9
Steps
10
Video
6 min

Tools we recommend

As an Amazon Associate we earn from qualifying purchases. Links on this page may be affiliate links - clicking them and buying doesn't change your price, but helps support Crafting Step by Step.

Tags

The Crafter's Weekly

New crafts tutorials, every Sunday

One short email with the week's best step-by-step guides. Free, no spam, unsubscribe anytime.

Did this work for you?

What's next

Related collections

Curated theme pages that include this tutorial.

Similar tutorials

Hand-picked next reads based on the one you just finished.

Liked this crafts tutorial?

Pick the crafts you want to hear about. One email every Sunday with new step-by-step tutorials. No spam, easy to unsubscribe.

Get more like this in your inbox

Weekly digest. Pick the categories you want. Unsubscribe anytime.

Send me tutorials about

We only email about new tutorials. Easy unsubscribe anytime.