How to Make a Wind Chime

Based on a video by CraftyHope

Opens their YouTube channel

Steps written out by CraftingStepByStep · Published · Updated

Watch the original video (opens YouTube)
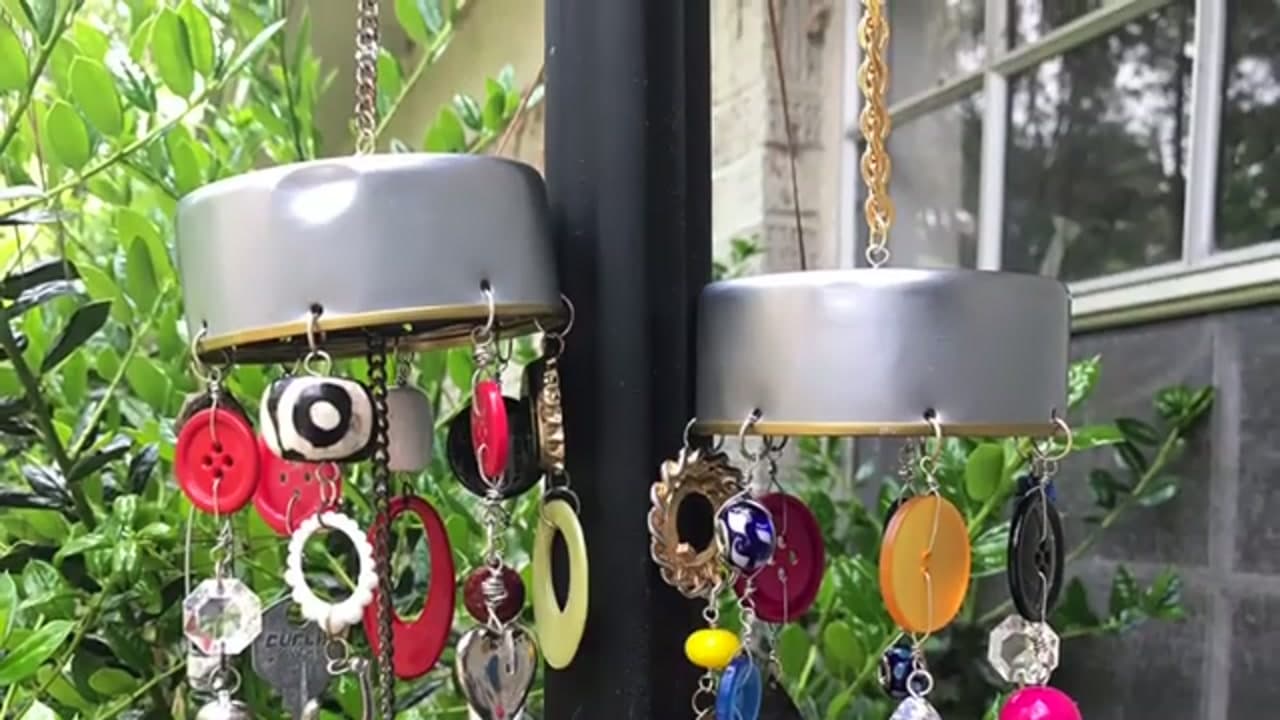
The finished result: How to Make a Wind Chime

Got a drawer full of odd buttons, single earrings, and spare keys you can't bring yourself to toss? This craft puts them to work. CraftyHope turns a clean tin can lid and a handful of junk-drawer bits into a colorful wind chime for your porch or garden.

The whole thing is upcycled, so your cost is close to nothing. You punch a few holes in a cleaned can, wire up your favorite little treasures, and link everything together with jump rings. No two chimes come out the same, which is half the fun.

Follow along and you'll have a one-of-a-kind wind chime swaying outside by the end of the afternoon.

What makes a chime ring

Sound comes from hard things hitting hard things. Keys, bells, old spoons, metal charms and washers clink. Plastic buttons and wooden beads clack softly or not at all. Put at least three or four metal pieces at the bottom of strands, where they swing the most.

Spacing matters as much as material. Dangles that hang too far apart never touch. Too close and they knot together. Leave about a finger width between neighbours and vary the lengths, so the ends sit at different heights and strike each other on the way past. A heavier center dangle works as a clapper.

Other bases that work

  • Driftwood. Drill small holes along the length and hang dangles in a row.
  • An embroidery hoop. The inner wooden ring makes a light circle. Seal it before it goes outside.
  • An old pot lid. The knob becomes your hanger. Punch holes around the edge.
  • A mason jar lid ring. Small, cheap, and easy to tie onto.

Smoothing the edges safely

Wear work gloves while you handle a cut can. Flatten any burr with a hammer on scrap wood, then run a metal file along the rim in one direction until your gloved thumb slides over it. A side-cutting can opener leaves a smooth rim to begin with, so use one if you have it. Punched holes have a rough back side too. File those or use large jump rings so the wire cannot saw through.

Wire, fishing line and knots

20 gauge craft wire is right for wrapped loops on beads and buttons. For long strands, braided or monofilament fishing line in the 20 to 30 pound range holds up well outdoors. Tie it with a palomar or improved clinch knot, the same knots anglers trust, and put a dab of clear glue on each one. Plain overhand knots in slippery line work loose in the first good wind.

Weatherproofing

Tin cans are steel with a thin coating, and they rust wherever you punched or scratched it. Hit the can with a rust-inhibiting spray primer before painting, then finish with a clear outdoor sealer. Seal any painted buttons or charms too. The same idea is covered in how to paint rocks for the garden.

Where to hang it

Hang it at head height or a little above, somewhere it will catch moving air. Under a porch eave keeps the worst rain off. Skip the spot right outside a bedroom window, and think about your neighbours before you hang a loud one by the fence.

Common mistakes

  • Tangled strands. Too long or too close. Shorten them or add a swivel at the top.
  • Rust streaks. No primer. Sand the spot, prime and reseal.
  • No sound. Too much plastic. Add metal at the strand ends.
  • Wire pulling out. Close every jump ring fully with two pliers.

If the wire loops are fun, the same skills make a beaded bracelet. For another piece to hang in the garden, try a suncatcher.
What you'll need

Step-by-step guide

8 steps, about 9 minutes. Tap a picture to jump to that step. Your progress saves automatically.

Tick each step off as you go.

  1. Step 1: Choose Your Can Base

    Watch this step · 1:00

    Grab a clean, empty can. A short tuna or chicken can works great, or use a taller vegetable can if you want more room for dangles. The lid end becomes the top of your chime, and everything hangs down from it. Since this is an upcycling project, dig through your recycling bin and pick whatever shape you like best.

    Tip:

    A wider can gives you more holes to work with, so you can hang more pieces around the rim.

    Back to all steps

  2. Step 2: Smooth Any Sharp Edges

    Watch this step · 1:30

    Cans can have a pokey rim, especially the pull-top kind. Set the can on a scrap of wood and give any sharp spots a few taps with a hammer to flatten them. You just want it safe to handle. Take your time here so you aren't fighting a sharp edge while you wire on your pieces later.

    Tip:

    Work on a scrap board, not your good table, so you don't dent the surface underneath.

    Back to all steps

  3. Step 3: Punch the Holes

    Watch this step · 2:00

    Start with one hole in the center of the top for the hanger. Then punch a ring of holes around the rim, one for each dangle you plan to add. Work from the inside of the can so the metal doesn't distort as much. A metal hole punch is easiest, but an awl or a nail and hammer will get the job done too.

    Tip:

    The center hole doesn't have to be perfectly centered. Just do your best and eyeball it.

    Back to all steps

  4. Step 4: Gather Your Junk-Drawer Elements

    Watch this step · 3:00

    This is the fun part. Pull out old jewelry, mismatched buttons, keys, bells, bottle caps, safety pins, crystals, and any small hardware you've been hanging onto. Spread it all out and pick the pieces that catch your eye. CraftyHope went with a black, white, and red theme, but you can mix colors however you like.

    Tip:

    Pick a loose color theme first. It makes a random pile of odds and ends look intentional.

    Back to all steps

  5. Step 5: Wire the Dangle Elements

    Watch this step · 7:00

    Now link your pieces into strands. Use craft wire and round-nose pliers to make a wrapped loop at the top and bottom of each button, bead, or charm. Buttons need a little extra wire so they sit right. Anything that already has a loop or a hole can just get a jump ring. Build each strand to the length you want it to hang.

    Tip:

    Save the jump rings from any jewelry you take apart. They're perfect for connecting everything here.

    Back to all steps

  6. Step 6: Attach the Dangles to the Can

    Watch this step · 7:20

    Connect each finished strand to a hole around the rim using a jump ring. Larger jump rings help the wire clear the sharp edge of the punched hole. Once the outer pieces are hanging, add a longer center dangle through the middle hole if you want. Then run a length of chain up through the top and finish with a big jump ring so the whole chime can hang.

    Tip:

    Add a bead above and below the center hole to hide the wire and give it a finished look.

    Back to all steps

  7. Step 7: See Your Finished Wind Chime

    Watch this step · 8:44

    Hold it up and take a look. The silver can top, the colorful buttons, and the little charms all come together into something bright and one-of-a-kind. Give it a gentle shake and listen. That soft clink is the reward for all those saved-up bits and pieces finally getting a job.

    Back to all steps

  8. Step 8: Hang It Outside

    Watch this step · 8:50

    Find a spot on the porch, a shepherd's hook, or a tree branch where it'll catch a breeze. Hung against greenery, all that color really pops. Make a second one while you're at it, they go quick and each turns out completely different. You just turned a can and a junk drawer into something worth looking at.

    Tip:

    Metal and glass pieces hold up outdoors better than paper or fabric ones, so lean on those for a chime that lasts.

    Back to all steps

Keep going

How to Make a Concrete Planter

Products Used

The Checklist

How to Make a Wind Chime

Tools
5
Materials
9
Steps
8
Video
9 min

Tools we recommend

As an Amazon Associate we earn from qualifying purchases. Links on this page may be affiliate links - clicking them and buying doesn't change your price, but helps support CraftingStepByStep.

Tags

The Crafter's Weekly

New crafts tutorials, every Sunday

One short email with the week's best step-by-step guides. Free, no spam, unsubscribe anytime.

Test your knowledge

Did the lesson stick? Start with this one.

5 questions covering what you just read. No signup, no score saved, and you can stop after this one.

Question 1 of 5

What forms the top of this upcycled wind chime?

Quick reference

Key takeaways from How to Make a Wind Chime

5 questions, answers, and one-line explanations. Tap to expand.

  1. 1.What forms the top of this upcycled wind chime?

    Answer: A cleaned tin can or lid

    A cleaned tin can lid is the base everything hangs from.

  2. 2.What safety step comes right after choosing the can?

    Answer: Smooth any sharp edges

    Filing down sharp metal edges keeps the build safe to handle.

  3. 3.What kind of objects does this craft use for the dangles?

    Answer: Junk-drawer odds and ends

    Spare buttons, keys, and single earrings get upcycled into the chime.

  4. 4.What links the dangling pieces together?

    Answer: Jump rings and wire

    Jump rings and wire connect the treasures so they swing freely.

  5. 5.Why does no two of these wind chimes come out the same?

    Answer: Each uses a different mix of found objects

    Because you wire up whatever bits you have, every chime is one of a kind.

Did this work for you?

What's next

Related collections

Curated theme pages that include this tutorial.

Similar tutorials

Hand-picked next reads based on the one you just finished.

Liked this crafts tutorial?

Pick the crafts you want to hear about. One email every Sunday with new step-by-step tutorials. No spam, easy to unsubscribe.

Get more like this in your inbox

Weekly digest. Pick the categories you want. Unsubscribe anytime.

Send me tutorials about

We only email about new tutorials. Easy unsubscribe anytime.