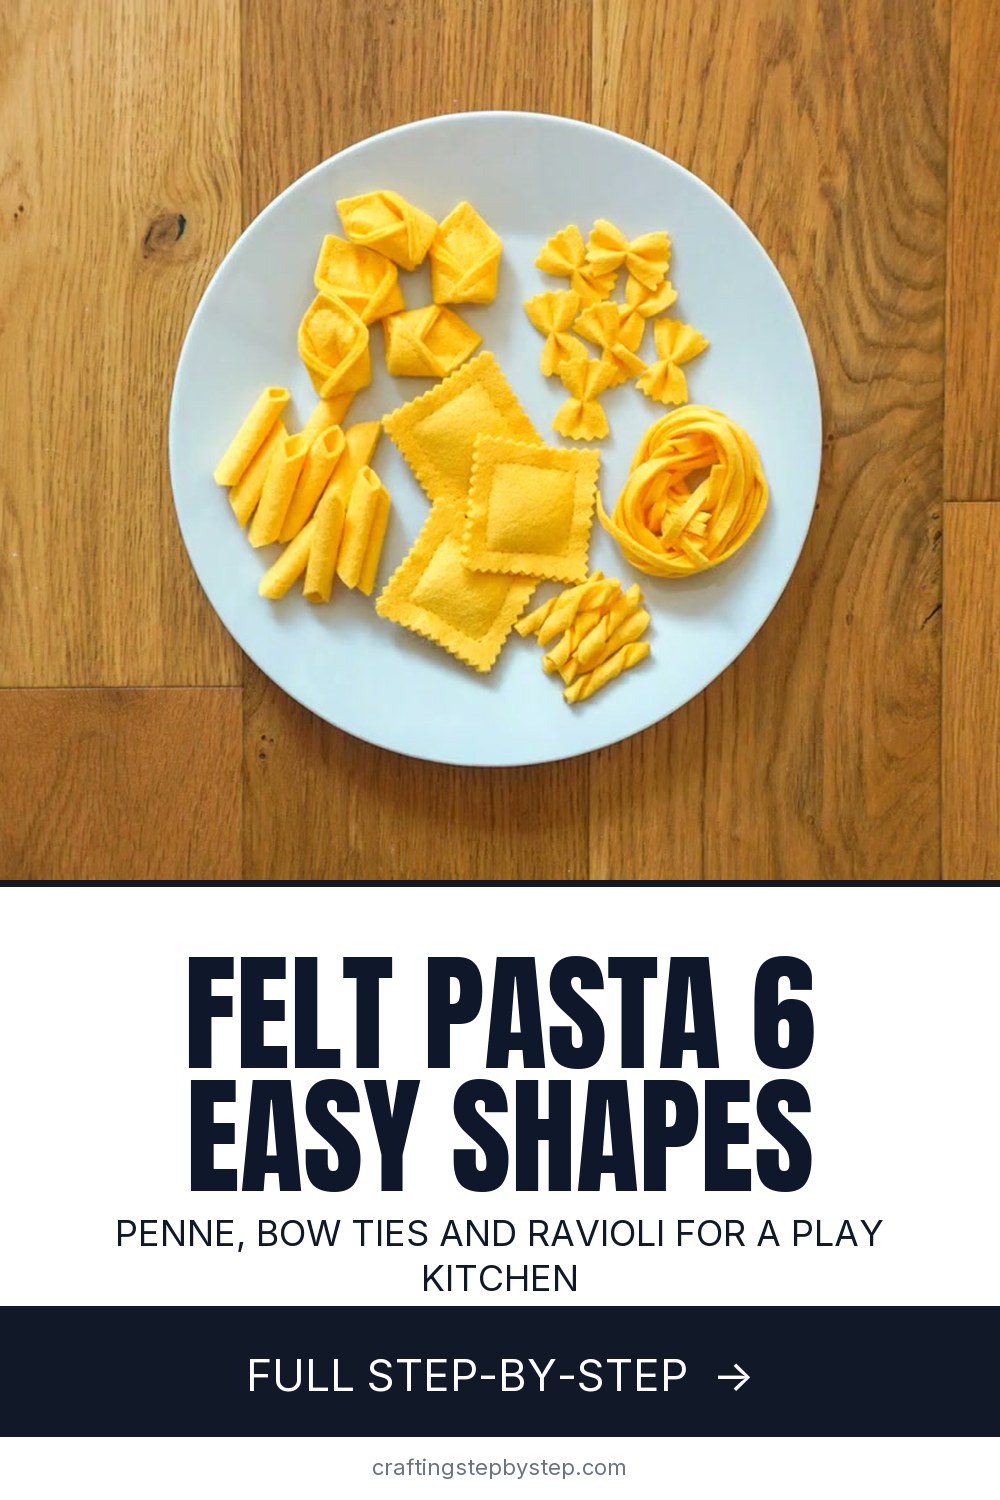
How to Make Felt Pasta (6 Shapes)

The finished result: How to Make Felt Pasta (6 Shapes)
  • Difficulty: Easy
  • About 2 hours, plus 1 hour to dry or set
  • 9 steps

You tapped Save

Save this project for later

We'll email you a link, no password.

How to Make Felt Pasta (6 Shapes)

  • Your saved projects in one list
  • Your ticked steps on any device

Check your inbox for an email from us. Not there? Look in your spam folder.

Print

Steps written out by Crafting Step by Step from Rokolee DIY's video (opens YouTube) (12:11). Published .

Felt pasta is a cheerful make for a play kitchen, a fridge magnet or a bit of food decor. Every shape uses one color of felt and a few basic tools. This tutorial follows Rokolee DIY, who makes six shapes from yellow felt: penne, fusilli, fettuccine, farfalle, ravioli and tortelloni. Some are glued, some are stitched, and two need no sewing at all.

How to make felt pasta: the short version

  • Penne: glue a 3 cm strip into a tube and cut it on the diagonal.
  • Fusilli: twist a 1 cm strip between clips, steam it and cut 4 cm pieces.
  • Fettuccine: cut 5 mm strips and twist them into a loose nest.
  • Farfalle: pink the ends of small rectangles, pleat and stitch the middle.
  • Ravioli and tortelloni: stitch 6 cm squares around a little stuffing.

Choosing felt

A warm golden yellow looks most like cooked pasta. Pale lemon reads as raw, and that works for a play kitchen too. Wool blend felt cuts cleanly and holds a crease or a twist far better than thin acrylic craft felt, which stretches and pills. A couple of letter size sheets make a full plate. Green felt makes spinach pasta, and a mix of colors looks fun in a toy shop window or a kids' cafe.

Measurements at a glance

  • Penne: 3 cm strip, pieces 4 cm long with 1 cm diagonal ends.
  • Fusilli: 1 cm strip, pieces 4 cm long.
  • Linguine 4 mm, fettuccine 5 mm, tagliatelle 7 mm, pappardelle 12 mm wide.
  • Farfalle: 3.5 cm by 2.5 cm rectangles.
  • Ravioli and tortelloni: 6 cm squares.

Safety for little ones

Small felt pasta is a choking risk for babies and toddlers who put things in their mouths. Rokolee DIY says it plainly: do not give it to a child who might try to eat it. For young kids, make bigger shapes, stitch everything instead of gluing, and skip the tiny penne and fusilli. Keep the iron and steam for grown-ups. Check play food seams now and then, and restitch anything that starts to come loose.

Ways to use it

  • Fill a toy saucepan or a bowl for a pretend pasta night.
  • Glue a magnet to the back of a farfalle or ravioli for the fridge.
  • Add a pin back for a quirky brooch.
  • Pair it with felt meatballs, basil leaves or a red felt sauce circle.
  • Sort the shapes into bowls as a counting and matching game with grandkids.

Common problems

  • Penne seam pops open. Fill the gaps with glue on a toothpick and let it dry fully before cutting.
  • Fusilli untwists. Twist tighter, steam a few more times and let it cool while still clipped.
  • Ravioli looks flat. Add a little more stuffing before the last edge.
  • Uneven bows. Fold the rectangle in half twice to find the true center.

More felt and stitching

New to hand sewing? Learn backstitch first for the ravioli and tortelloni. Then try felt leaves, felt acorns or a felt owl ornament.

Free printable

Print the steps and supply list for this project

One page you can take to the table. Free with a free account, no password.

Get the free printable

What you'll need

Free, for this project

Get this checklist by email

  • All 13 tools and materials, with tick boxes
  • A link to print all 9 steps on paper, to keep by you while you craft

No password. The whole tutorial stays free on this page.

Quick answer

Make felt pasta: penne, fusilli, fettuccine, bow ties, ravioli and tortelloni from yellow felt. An easy project: about 2 hours, plus 1 hour to dry or set. Materials cost about $2 to $6. You need 13 things, including yellow felt, yellow thread and glue suitable for felt. The 9 steps start with press Ridges Into a Felt Strip for Penne, glue the Felt Strip Around a Needle Into a Penne Tube and cut the Felt Tube Into Diagonal Penne Pieces.

Step-by-step guide

9 steps, about 12 minutes. Tap a picture to jump to that step. Your progress saves automatically.

Tick each step off as you go.

  1. Step 1: Press Ridges Into a Felt Strip for Penne

    Watch this step · 1:32

    Cut a strip of yellow felt 3 cm wide. A rotary cutter and the lines on a cutting mat make this quick, but scissors and a fabric pen line work too. For ridged penne, lay the strip on the ironing board and run the tip of a dry iron along it in rough parallel lines. Use no steam, and keep your fingers well clear of the hot plate.

    Tip:

    The ridges are optional. Smooth penne looks fine too.

    Back to all steps

  2. Step 2: Glue the Felt Strip Around a Needle Into a Penne Tube

    Watch this step · 2:16

    Curl the strip around a rod about 5 mm thick. Rokolee DIY uses a knitting needle, so pick something you do not mind getting glue on. Run glue along one long edge and press the other edge over it to close the tube. If any gaps remain along the seam, push in a little more glue with a toothpick. Let the tube dry fully.

    Tip:

    Slide the tube off the needle before the glue sets hard, or it may stick.

    Back to all steps

  3. Step 3: Cut the Felt Tube Into Diagonal Penne Pieces

    Watch this step · 3:10

    Once the glue is dry, cut the tube into penne. Make a diagonal cut at one end that slopes about 1 cm across the tube. Move 4 cm along and make another diagonal cut the same way. Keep going down the whole tube. Each piece comes out with the slanted ends you see on real penne.

    Tip:

    A rotary cutter gives the cleanest ends, but sharp fabric scissors work.

    Back to all steps

  4. Step 4: Twist a Felt Strip Between Clips for Fusilli

    Watch this step · 3:32

    For fusilli, cut strips 1 cm wide. Clip a bulldog clip to each end, then twist the strip as many times as you can while keeping it straight. Hold it over the ironing board and steam it a few times with the iron held a little above the felt. Do not press down. Let it cool and dry, then cut it into 4 cm pieces.

    Tip:

    Leave the clips on until the felt is cool so the twist holds.

    Back to all steps

  5. Step 5: Cut Thin Felt Strips and Twist Them Into a Fettuccine Nest

    Watch this step · 4:49

    Fettuccine is the easiest shape. Cut long strips 5 mm wide. For other ribbons, change the width: 4 mm for linguine, 7 mm for tagliatelle and about 12 mm for pappardelle. Once you have a handful, twist them together and tie a very loose knot. Tuck the ends in and you have a pasta nest.

    Tip:

    Cut the strips as long as your felt sheet allows for a fuller nest.

    Back to all steps

  6. Step 6: Pink the Ends of Felt Rectangles for Farfalle

    Watch this step · 5:12

    For bow tie pasta, cut strips 3.5 cm wide, then cut them every 2.5 cm to make small rectangles. Trim the two short ends of each rectangle with pinking shears to give them a zigzag edge. Leave the long sides straight. That zigzag is what makes the finished shape look like real farfalle.

    Tip:

    Pink one edge, then line the shears up with the first cut so the pattern matches.

    Back to all steps

  7. Step 7: Pleat and Stitch the Felt Bow Tie Pasta

    Watch this step · 6:08

    Thread a needle with yellow thread. Fold a rectangle in half twice to find the center. Stitch through it and tie a double knot to fix the thread. Concertina the rectangle into three even lengthwise folds, then stitch in and out through the middle to hold them. Secure the thread with a small knot at the back and trim it.

    Tip:

    Matching thread hides the stitches, so a few extra will not show.

    Back to all steps

  8. Step 8: Backstitch Two Felt Squares Into a Ravioli

    Watch this step · 8:45

    Cut pairs of 6 cm squares. Hold each pair together and trim all four edges with pinking shears. Backstitch the two layers together about 9 mm in from the edge, keeping the stitches 4 to 5 mm long. When you reach the last side, push in a little stuffing. Then finish the stitching and knot the thread on the back.

    Tip:

    Use less stuffing than you think. Overfilled ravioli puckers at the seam.

    Back to all steps

  9. Step 9: Fold and Stitch a Felt Tortelloni

    Watch this step · 10:50

    Start with another 6 cm square. Put a small amount of stuffing in the middle and fold the square in half into a triangle. Backstitch the two open edges about 5 mm in. Then fold the two side points forward so they overlap, and stitch them in place. Some cooks wrap the points under instead, which works too.

    Tip:

    Keep the neatest stitches on the outside, where they show most.

    Back to all steps

How to Make a Valentine's Heart Wreath

Keep going

How to Make a Valentine's Heart Wreath

Keep going with crafts

More on this topic, picked for this project.

You reached the last step

Save this project to come back to it

Your ticked steps, the free printable and your other saved makes, together in My Projects. Free, no password.

You tapped Save

Save this project for later

We'll email you a link, no password.

How to Make Felt Pasta (6 Shapes)

  • Your saved projects in one list
  • Your ticked steps on any device

Check your inbox for an email from us. Not there? Look in your spam folder.

Free printable

Printable sheet and shopping list for this project

The bonus is hidden until you sign up.

Free with a free account, no password. Every step above stays open to everyone.

Products Used

The Checklist

How to Make Felt Pasta (6 Shapes)

Tools
9
Materials
4
Steps
9
Video
12 min

Tools we recommend

As an Amazon Associate we earn from qualifying purchases. Links on this page may be affiliate links - clicking them and buying doesn't change your price, but helps support Crafting Step by Step.

Tags

The Crafter's Weekly

New crafts tutorials, every Sunday

One short email with the week's best step-by-step guides. Free, no spam, unsubscribe anytime.

Did this work for you?

What's next

Related collections

Curated theme pages that include this tutorial.

Similar tutorials

Hand-picked next reads based on the one you just finished.

Liked this crafts tutorial?

Pick the crafts you want to hear about. One email every Sunday with new step-by-step tutorials. No spam, easy to unsubscribe.

Get more like this in your inbox

Weekly digest. Pick the categories you want. Unsubscribe anytime.

Send me tutorials about

We only email about new tutorials. Easy unsubscribe anytime.