How to Make a Peek a Boo Window Card

The finished result: How to Make a Peek a Boo Window Card
  • Difficulty: Medium
  • About 1 hour, plus 15 minutes to dry or set
  • 10 steps

You tapped Save

Save this project for later

We'll email you a link, no password.

How to Make a Peek a Boo Window Card

  • Your saved projects in one list
  • Your ticked steps on any device

Check your inbox for an email from us. Not there? Look in your spam folder.

Print

Steps written out by Crafting Step by Step from My Favorite Things' video (opens YouTube) (6:45). Published .

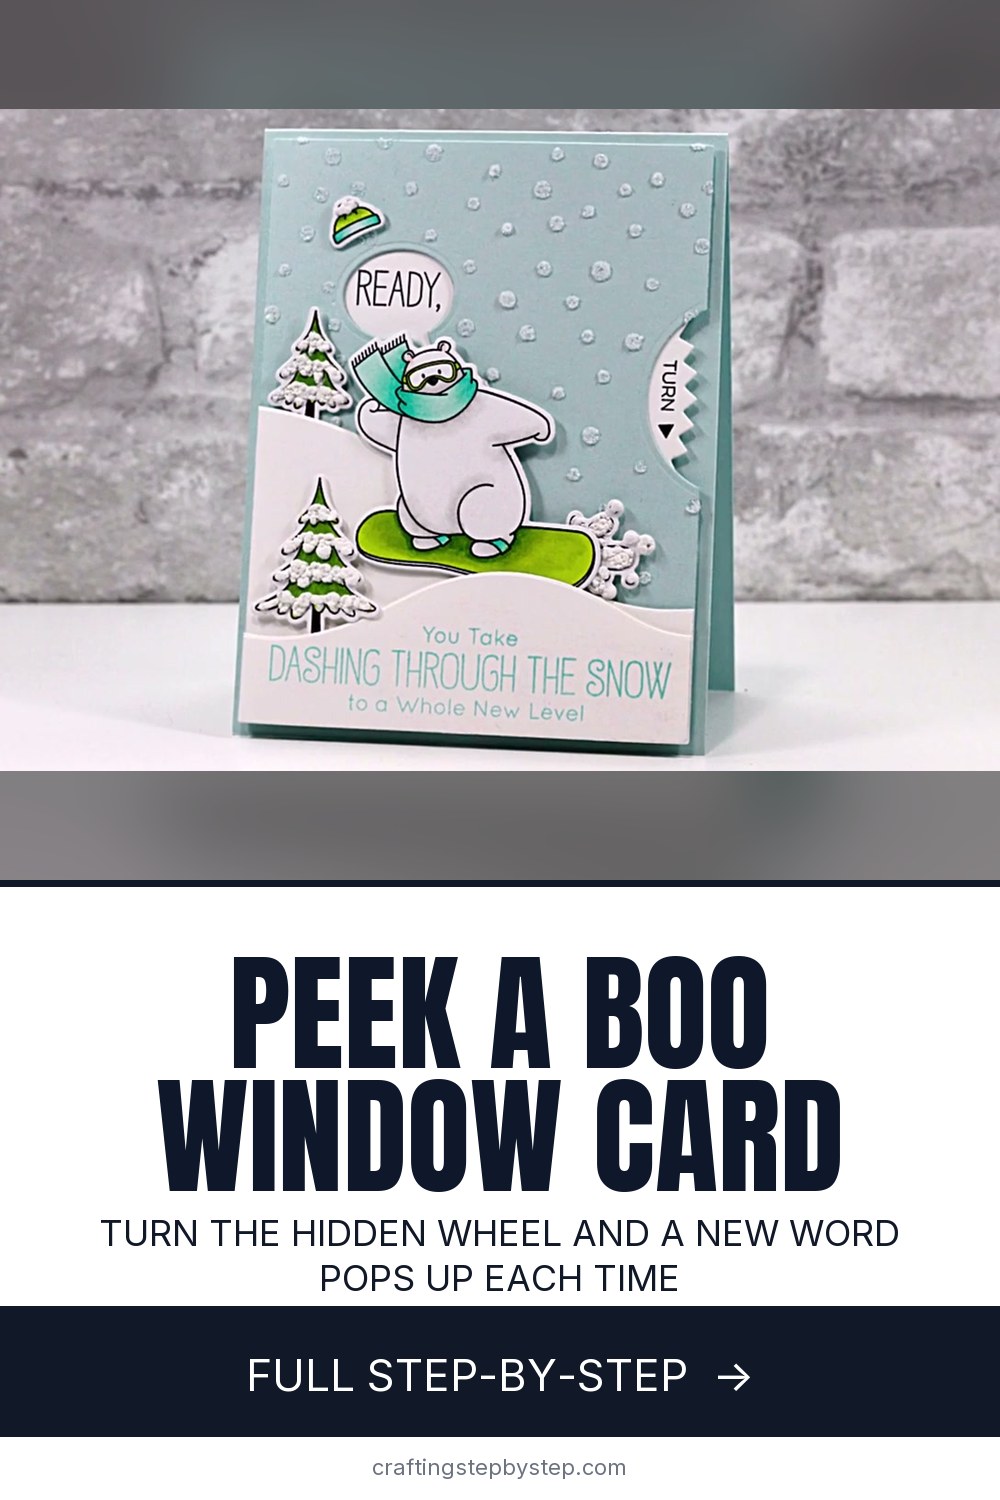
A peek a boo window card has a hidden paper wheel behind the front. Turn the wheel and new words or pictures pop up in a little window, one at a time. Karolyn from My Favorite Things makes one with a snowboarding polar bear whose speech bubble reads READY, SET, SNOW as you turn it. The trick is planning, and a paper template does most of that for you.

How to make a peek a boo window card: the short version

  • Die cut a wheel from cardstock and a matching one from printer paper.
  • Fold the paper one into quarters and snip the corners to make a template.
  • Stamp words or images on the wheel through the template windows.
  • Cut a window and a side notch in the front panel.
  • Attach the wheel behind the panel with a brad, decorate, then mount on a card base with foam squares.

What you need

A wheel die (Karolyn uses the My Favorite Things Peek-a-Boo Wheel set, which includes a notch die), a die cutting machine, white and colored cardstock, printer paper, stamps, black ink, a pencil, a small hole punch, one brad and foam squares. A stamp positioner helps line up words. The snowflake paste, stencil and colored scene are extras.

No wheel die? Make one by hand

You can trace a 4 inch circle from a lid or a compass and cut it out. Find the center by folding a paper copy in quarters. Cut the front window with a circle or speech bubble punch. The notch can be a half circle cut at the panel edge. The card turns the same way.

Getting the order right

This is where most first tries go wrong. The wheel spins behind the panel, so the words read in the opposite direction from how you stamp them. My Favorite Things notes that you should stamp the words in reverse order from the video for them to appear in order when you turn. Test with the paper template and a pencil before you ink anything.

Ideas for the windows

  • A three word message, like Merry, Christmas, Love.
  • A countdown: 3, 2, 1, Happy New Year.
  • Small photos of grandkids glued in each quarter.
  • A birthday riddle with the answer in the last window.

Making it with grandkids

Kids love the moment the words pop up. Let them choose the message, stamp the scene and color the bear or other images. An adult can handle the die cutting, punching and the brad. Then hand them the finished card and watch them turn it again and again.

Common problems

  • Wheel will not turn. Use foam squares under the panel, not flat glue, so the wheel has room.
  • Stamping shows where it should not. Keep every image inside the traced window marks.
  • Wheel is off center. Mark the hole through the template, then punch, not by eye.

More interactive cards

If you like moving parts, try a slider card, a waterfall card or a shaker card. For the holidays, a snow globe shaker Christmas card pairs well with this one.

Free printable

Print the steps and supply list for this project

One page you can take to the table. Free with a free account, no password.

Get the free printable

What you'll need

Free, for this project

Get this checklist by email

  • All 17 tools and materials, with tick boxes
  • A link to print all 10 steps on paper, to keep by you while you craft

No password. The whole tutorial stays free on this page.

Quick answer

Make a peek a boo window card with a hidden turning wheel. A medium project: about 1 hour, plus 15 minutes to dry or set. Materials cost about $2 to $5. You need 17 things, including smooth white cardstock, colored A2 cardstock and printer paper. The 10 steps start with fold the Paper Wheel Template and Snip the Corners, trace the Template Windows Onto the Cardstock Wheel and plan the Peek a Boo Window Card Scene on the Panel.

Step-by-step guide

10 steps, about 7 minutes. Tap a picture to jump to that step. Your progress saves automatically.

Tick each step off as you go.

  1. Step 1: Fold the Paper Wheel Template and Snip the Corners

    Watch this step · 0:45

    Die cut the large wheel twice: once from smooth white cardstock and once from thin printer paper. Fold the paper wheel in half, then in half again, so you have a quarter wedge. Snip off the folded corner with small scissors. When you open it, you get four small windows spaced evenly around the wheel. This paper copy is your planning template.

    Tip:

    Printer paper folds crisply; cardstock would crack.

    Back to all steps

  2. Step 2: Trace the Template Windows Onto the Cardstock Wheel

    Watch this step · 0:57

    Lay the paper template on top of the white cardstock wheel and line up the scalloped edges. Hold it flat and trace inside each of the four cut-out windows with a pencil. These marks show where each word or image must sit so it lines up with the window in the front panel. Then stamp a TURN arrow at the edge of each quarter.

    Tip:

    Press lightly with the pencil so the marks erase cleanly later.

    Back to all steps

  3. Step 3: Plan the Peek a Boo Window Card Scene on the Panel

    Watch this step · 1:48

    Trim an A2 panel (4 1/4 by 5 1/2 inches) from colored cardstock. Set the wheel and template toward the top of the panel and lay your snowdrift or hill die cuts on top. Move things around until you know where the speech bubble window should go. Karolyn places hers above the bear's head so it looks like he is talking.

    Tip:

    Take a phone photo of the layout so you can copy it later.

    Back to all steps

  4. Step 4: Stamp the Words Through the Template Opening

    Watch this step · 2:12

    Tape the paper template over the wheel with removable tape. Stamp your first word inside the window opening with black ink. Turn the template to the next quarter, using the cut corners as a guide, and stamp the next word. Karolyn had three words, so she stamped a little wind swirl in the last spot. A stamp positioner makes this easier.

    Tip:

    Stamp the words in reverse order so they read correctly when you turn the wheel.

    Back to all steps

  5. Step 5: Die Cut the Side Notch So the Wheel Peeks Out

    Watch this step · 2:55

    Cut a half circle notch in the side of the front panel so the wheel edge shows and you can grab it to turn. The notch die has two guides that help you line it up on the panel edge. Cut the notch first, then trim the outer edge of the panel. That order keeps the notch from embossing a line into your panel.

    Tip:

    The notch can go on any of the four sides of your card.

    Back to all steps

  6. Step 6: Mark the Wheel Center on the Card Panel

    Watch this step · 3:16

    Put the wheel back on the panel exactly where you planned it. Mark the center hole with a pencil, then punch it with a 1/8 inch hole punch or pierce it with a paper piercer. Hold the wheel in place temporarily with a brad. Now you can see where the speech bubble window has to be cut, and cut it.

    Tip:

    A pencil dot through the wheel's center hole is faster than a temporary brad.

    Back to all steps

  7. Step 7: Add Snowflake Paste Through a Snowfall Stencil

    Watch this step · 4:10

    For a wintry texture, tape a dotted snowfall stencil over the front panel. Spread white snowflake paste across it with a palette knife in a thin, even layer. Lift the stencil straight up to leave raised snowy dots. The paste takes about five minutes to dry, so set the panel aside and erase your pencil marks from the wheel.

    Tip:

    Wash the stencil right away before the paste dries in the holes.

    Back to all steps

  8. Step 8: Attach the Snow Slopes Below the Speech Bubble Window

    Watch this step · 4:42

    Push the brad through the panel and the wheel and open its legs on the back so the wheel can turn. Stick the biggest white snow slope across the bottom of the panel with thin 3D foam squares. Stamp a sentiment on the smaller slope in a soft blue ink and layer it in front the same way.

    Tip:

    Thin foam keeps the card flat enough to mail.

    Back to all steps

  9. Step 9: Add the Snowboarding Bear and Trees on Foam Squares

    Watch this step · 5:22

    Stamp, color and die cut your scene pieces. Karolyn uses a snowboarding bear, his hat, two snowy trees and a snow splash. Attach each piece with thin foam squares. Use the speech bubble window as your guide so the bear looks like he is saying the words. Everything in the scene has to line up with that window.

    Tip:

    A little glitter or puffy paint on the trees adds texture.

    Back to all steps

  10. Step 10: Mount the Panel and Turn the Peek a Boo Wheel

    Watch this step · 6:07

    Fold a top folding A2 card base from matching cardstock. Attach the finished panel to it with regular foam squares around the edges. The foam lifts the panel enough for the wheel to spin. Grab the wheel at the notch and turn it. Each word should pop up in the speech bubble right on time.

    Tip:

    Keep foam squares away from the wheel's path so it never snags.

    Back to all steps

How to Make a Gatefold Card (Side Gatefold With Measurements)

Keep going

How to Make a Gatefold Card (Side Gatefold With Measurements)

Keep going with card making

More on this topic, picked for this peek a boo window card.

You reached the last step

Save this project to come back to it

Your ticked steps, the free printable and your other saved makes, together in My Projects. Free, no password.

You tapped Save

Save this project for later

We'll email you a link, no password.

How to Make a Peek a Boo Window Card

  • Your saved projects in one list
  • Your ticked steps on any device

Check your inbox for an email from us. Not there? Look in your spam folder.

Free printable

Printable sheet and shopping list for this project

The bonus is hidden until you sign up.

Free with a free account, no password. Every step above stays open to everyone.

Products Used

The Checklist

How to Make a Peek a Boo Window Card

Tools
7
Materials
10
Steps
10
Video
7 min

Tools we recommend

As an Amazon Associate we earn from qualifying purchases. Links on this page may be affiliate links - clicking them and buying doesn't change your price, but helps support Crafting Step by Step.

Tags

The Crafter's Weekly

New card making tutorials, every Sunday

One short email with the week's best step-by-step guides. Free, no spam, unsubscribe anytime.

Did this work for you?

What's next

Related collections

Curated theme pages that include this tutorial.

Similar tutorials

Hand-picked next reads based on the one you just finished.

Liked this card making tutorial?

Pick the crafts you want to hear about. One email every Sunday with new step-by-step tutorials. No spam, easy to unsubscribe.

Get more like this in your inbox

Weekly digest. Pick the categories you want. Unsubscribe anytime.

Send me tutorials about

We only email about new tutorials. Easy unsubscribe anytime.