How to Do Watercolor Calligraphy

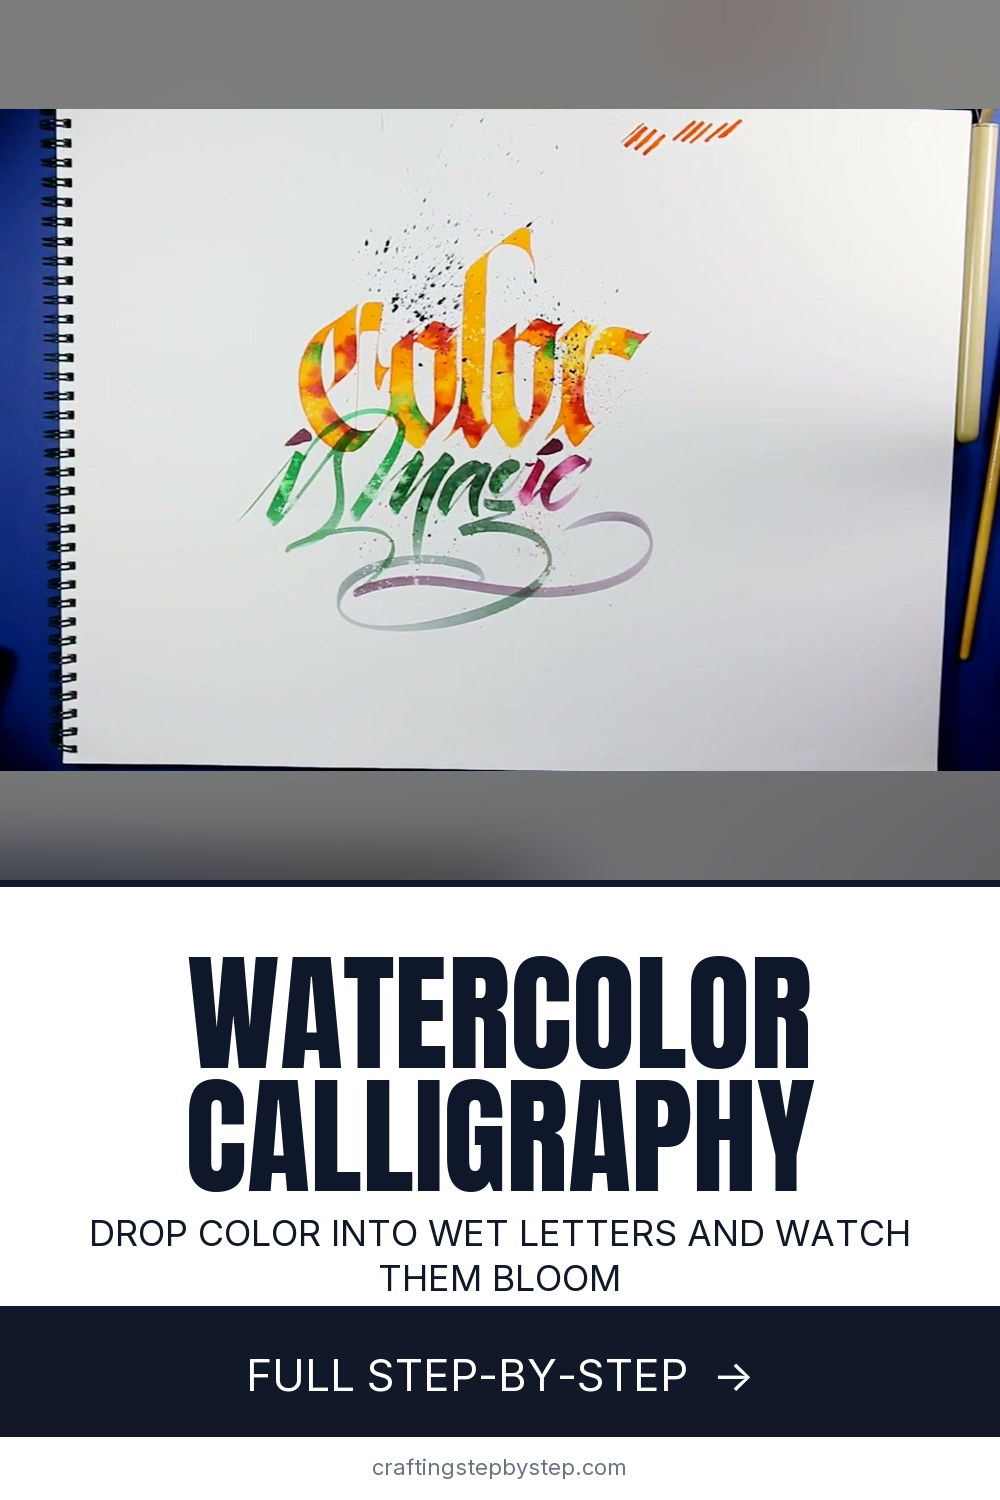
The finished result: How to Do Watercolor Calligraphy
  • Difficulty: Medium
  • 10 steps

You tapped Save

Save this project for later

We'll email you a link, no password.

How to Do Watercolor Calligraphy

  • Your saved projects in one list
  • Your ticked steps on any device

Check your inbox for an email from us. Not there? Look in your spam folder.

Print

Steps written out by Crafting Step by Step from Calligraphy Masters' video (opens YouTube) (17:00). Published .

Also in:Painting

Watercolor calligraphy is lettering where the color does half the work. You write with a wet, bright watercolor, then drop more color and water into the letters while they are still wet so they bloom and blend. This tutorial follows Francesco Guerrera, known as Fralligraphy, on the Calligraphy Masters channel. He writes a blackletter word with an automatic pen and liquid Ecoline watercolor, then plays with the color until the piece glows.

How to do watercolor calligraphy: the short version

  • Charge a broad pen with a light liquid watercolor and test it on scrap.
  • Write your word quickly so the letters stay wet.
  • Touch drops of other colors into the wet letters with a fine brush.
  • Blot with tissue or drop in clean water for texture.
  • Add a second line with a brush pen and finish with a few splatters.

Tools you need

Ecoline is a liquid watercolor. It flows like ink but blends like watercolor, which is why it suits this. Any liquid watercolor or thinned tube watercolor works. An automatic pen is a broad-edged dip pen with a folded nib that holds a lot of liquid. A Pilot Parallel pen or a broad nib also works. You will want a fine round brush for dropping color, a flat brush or pipette for loading the pen, and a brush pen for the second line.

Pick the right paper

Francesco uses plain layout paper in the video so you can see the effect, but he strongly suggests watercolor paper. The letters get very wet. Thin paper buckles and the color can run where you do not want it. A smooth, hot press watercolor paper keeps the edges of the letters crisp and still lets the colors move inside them.

Work fast and stay inside the letters

The magic only happens while the letters are wet. Write the word at a steady, quick pace and start dropping color right away. Touch the brush to the letter and let the color flow in. Do not paint. Keep a clean, steady hand and stay inside the strokes, because anything that lands on the white paper will spread. Splatter and outside marks come last, once the letters are set.

Color combinations that work

  • Yellow base with orange and red drops for a warm sunset.
  • Light blue base with violet and teal for a cool, watery look.
  • Pale pink base with magenta and gold for a card or a wedding sign.

Start with the lightest color as the base. Dark drops into light letters bloom nicely. Light into dark barely shows.

Common problems

  • Color will not spread. The letter dried. Rewet it with clean water first.
  • Muddy letters. Too many colors, or colors that mix to brown. Clean the brush between colors and stop sooner.
  • Blobs at the start of strokes. The pen is overloaded. Dab it on scrap before writing.

More lettering to try

New to broad-edge pens? Start with how to use a calligraphy pen. For the second line, see brush pen calligraphy. For basics, read how to learn calligraphy and how to do calligraphy.

Free printable

Print the steps and supply list for this project

One page you can take to the table. Free with a free account, no password.

Get the free printable

What you'll need

Free, for this project

Get this checklist by email

  • All 8 tools and materials, with tick boxes
  • A link to print all 10 steps on paper, to keep by you while you craft

No password. The whole tutorial stays free on this page.

Quick answer

Learn watercolor calligraphy: write with liquid watercolor, drop new colors into the wet letters, blot and bloom them, then add splatter. A medium project. You need 8 things, including liquid watercolor, watercolor paper and clean water. The 10 steps start with load the Automatic Pen With Watercolor and Test the Strokes, write the Word in Watercolor Calligraphy With the Automatic Pen, drop Purple Watercolor Into the Wet Calligraphy Letters and add Green Watercolor Drops Inside the Calligraphy Letters.

Step-by-step guide

10 steps, about 17 minutes. Tap a picture to jump to that step. Your progress saves automatically.

Tick each step off as you go.

  1. Step 1: Load the Automatic Pen With Watercolor and Test the Strokes

    Watch this step · 3:05

    Francesco starts with a very light yellow Ecoline for the base color of the letters. He uses a brush to load drops of the watercolor into his automatic pen. Make a few test strokes on a scrap first. The pen holds a lot of color, and the first strokes are very dense. Testing lets the charge settle so the lettering starts clean.

    Tip:

    Choose the lightest color you plan to use as the base. Darker drops go in later.

    Back to all steps

  2. Step 2: Write the Word in Watercolor Calligraphy With the Automatic Pen

    Watch this step · 4:08

    Write your word. Francesco writes 'color' in blackletter. Every time you recharge the pen, the color starts dense and gets lighter, which already gives a gradient. Work a bit faster than usual. You need the letters to stay wet so the next colors can move inside them. Shapes still matter, so keep the letters as good as you can.

    Tip:

    Write short words or one line at a time so nothing dries before you add color.

    Back to all steps

  3. Step 3: Drop Purple Watercolor Into the Wet Calligraphy Letters

    Watch this step · 4:52

    Pick up a very thin brush and load it with a second color. Francesco uses purple. Touch the brush to the wet letters and leave a few drops. The color spreads inside the strokes and stays inside the letters, the same way watercolor works. The more color you drop in, the stronger the effect. Work around the whole word.

    Tip:

    Touch, do not paint. Let the water carry the color.

    Back to all steps

  4. Step 4: Add Green Watercolor Drops Inside the Calligraphy Letters

    Watch this step · 6:20

    Clean the brush so you do not mix colors, then load a third color. Francesco adds green here and there. The wetter the paper, the more random and lively the result. Keep a steady hand and stay inside the letters. If you want drops outside, save that for later or do it before you start writing.

    Tip:

    Rinse the brush fully between colors to keep them bright and not muddy.

    Back to all steps

  5. Step 5: Blot the Watercolor Calligraphy With Tissue for Texture

    Watch this step · 6:52

    Take a clean piece of tissue or paper towel and press it onto part of a letter. It lifts some of the color and lightens the background tone. You can press firmly to take a lot away or lightly to soften the drops you added. Francesco loves the texture this gives. Always use a clean piece so you do not print old color back on.

    Tip:

    Crumpled tissue gives a mottled pattern. Folded tissue gives a cleaner lift.

    Back to all steps

  6. Step 6: Drop Clean Water Into the Watercolor Letters for Blooms

    Watch this step · 8:35

    With a clean brush, drop plain water into the colored letters. Watch what happens. The color pushes out and leaves soft blooms and lighter spots. Orange may fade toward yellow where the water lands. Blot again with paper to stop the process when you like what you see. This is the texture people ask about most.

    Tip:

    Small drops give tight blooms. Bigger drops spread wider and lighten more.

    Back to all steps

  7. Step 7: Write a Second Line With a Watercolor Brush Pen

    Watch this step · 11:30

    For the second line, Francesco switches to an Ecoline brush pen in green, with purple as a second color. He dips the tip of the brush pen into the liquid Ecoline before writing. The pen lays down a gradient as it runs from the dipped color into its own ink. Write the line under your first word in a looser script.

    Tip:

    A contrasting style, like blackletter over brush script, makes the layout look planned.

    Back to all steps

  8. Step 8: Add Water Drops to the Watercolor Brush Pen Lettering

    Watch this step · 12:43

    Treat the brush pen line the same way as the first word. Drop clean water into it and watch the texture come out. The two styles start to look like one piece because the colors, gradients and texture now match. Blot with paper to stop anywhere. Francesco stops when he sees something he likes, before the color washes away.

    Tip:

    Too much water can erase the color. Blot early if a stroke starts to vanish.

    Back to all steps

  9. Step 9: Add Final Drops of Color to the Watercolor Calligraphy

    Watch this step · 14:38

    Look over the whole layout. Use the fine brush to add a few more drops where a letter needs more color or depth. Francesco adds a touch of black at the very end to give the layout more contrast and depth. Keep these drops small. A little dark goes a long way next to bright colors.

    Tip:

    Step back from the piece before adding more. It is easy to overwork it.

    Back to all steps

  10. Step 10: Splatter Ink Over the Finished Watercolor Calligraphy

    Watch this step · 15:25

    For the finishing splatter, load the small brush with plenty of color. Hold it over the paper and blow hard across the bristles. The color sprays out in fine dots. Francesco learned this from a fellow artist. Add splashes here and there, then a few black drops for contrast. Let it dry flat before you move it.

    Tip:

    Cover parts you want clean with scrap paper before you splatter.

    Back to all steps

How to Use a Calligraphy Pen

Keep going

How to Use a Calligraphy Pen

10 steps · about 6 minutes

Keep going with calligraphy

More on this topic, picked for this project.

You reached the last step

Save this project to come back to it

Your ticked steps, the free printable and your other saved makes, together in My Projects. Free, no password.

You tapped Save

Save this project for later

We'll email you a link, no password.

How to Do Watercolor Calligraphy

  • Your saved projects in one list
  • Your ticked steps on any device

Check your inbox for an email from us. Not there? Look in your spam folder.

Free printable

Printable sheet and shopping list for this project

The bonus is hidden until you sign up.

Free with a free account, no password. Every step above stays open to everyone.

Products Used

The Checklist

How to Do Watercolor Calligraphy

Tools
5
Materials
3
Steps
10
Video
17 min

Tools we recommend

As an Amazon Associate we earn from qualifying purchases. Links on this page may be affiliate links - clicking them and buying doesn't change your price, but helps support Crafting Step by Step.

Tags

The Crafter's Weekly

New calligraphy tutorials, every Sunday

One short email with the week's best step-by-step guides. Free, no spam, unsubscribe anytime.

Did this work for you?

What's next

Related collections

Curated theme pages that include this tutorial.

Similar tutorials

Hand-picked next reads based on the one you just finished.

Liked this calligraphy tutorial?

Pick the crafts you want to hear about. One email every Sunday with new step-by-step tutorials. No spam, easy to unsubscribe.

Get more like this in your inbox

Weekly digest. Pick the categories you want. Unsubscribe anytime.

Send me tutorials about

We only email about new tutorials. Easy unsubscribe anytime.