How to Do Chalkboard Lettering (Faux Calligraphy With Chalk)

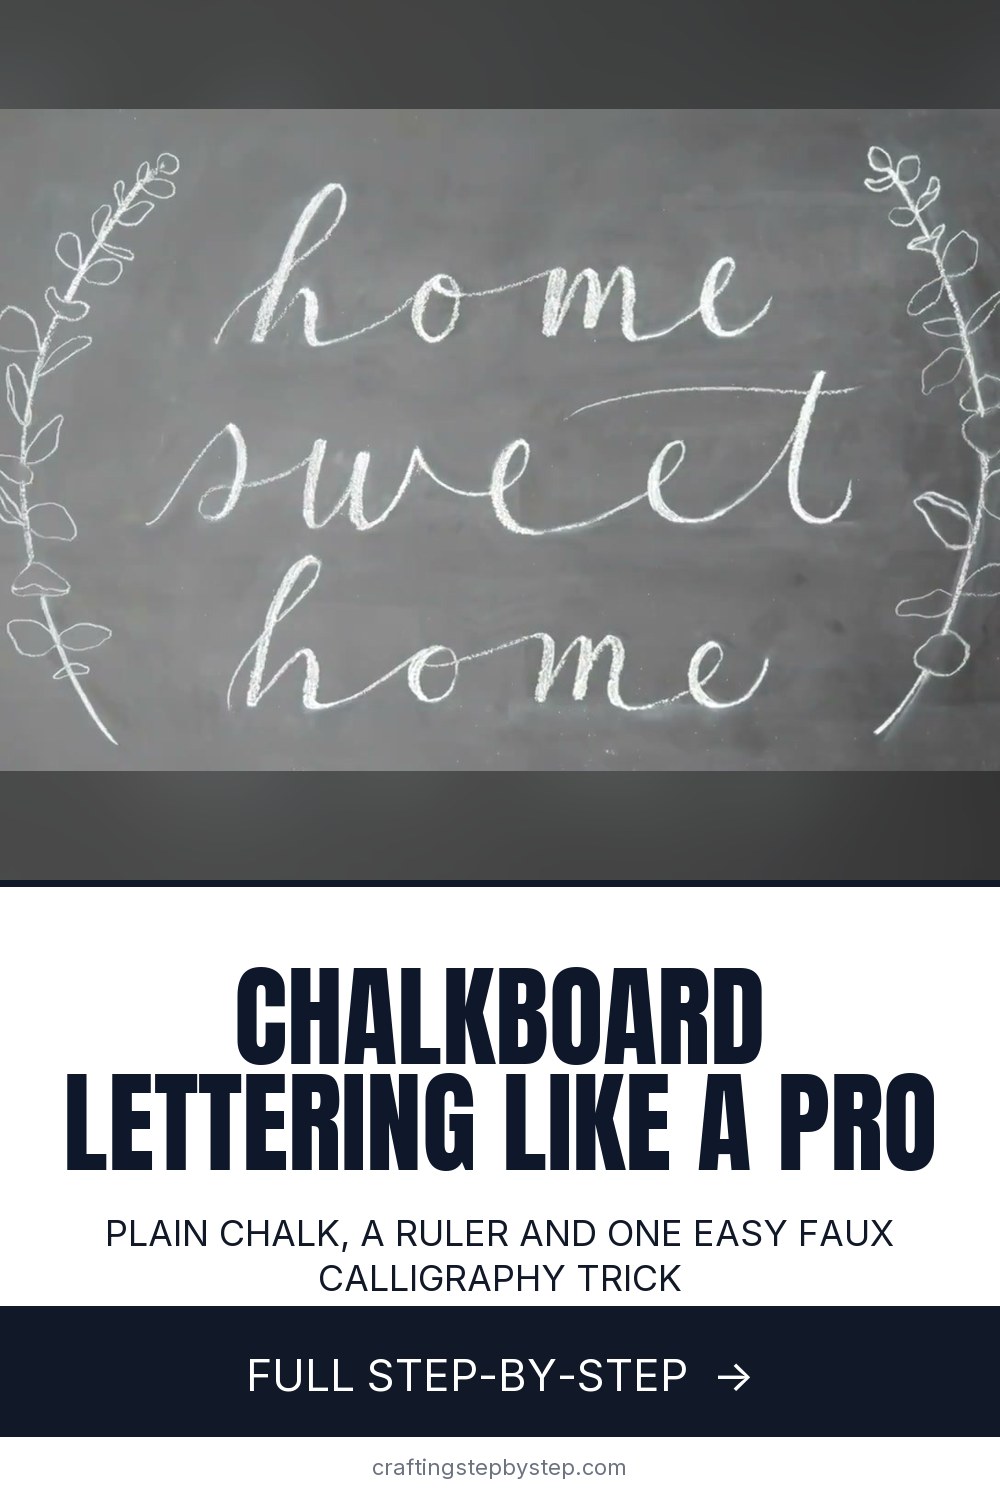
The finished result: How to Do Chalkboard Lettering (Faux Calligraphy With Chalk)
  • Difficulty: Easy
  • About 1 hour 15 minutes
  • 10 steps

You tapped Save

Save this project for later

We'll email you a link, no password.

How to Do Chalkboard Lettering (Faux Calligraphy With Chalk)

  • Your saved projects in one list
  • Your ticked steps on any device

Check your inbox for an email from us. Not there? Look in your spam folder.

Print

Steps written out by Crafting Step by Step from Carter Sams' video (opens YouTube) (5:57). Published .

Chalkboard lettering is hand lettering done in chalk on a chalkboard, the kind you see on cafe menus, wedding signs and kitchen walls. This tutorial follows Carter Sams as she makes a home sweet home chalkboard from a blank board. She uses ordinary white chalk and a ruler, and the lettering style is faux calligraphy: plain cursive with the downstrokes drawn thicker. Most of what makes chalk art look professional is planning and cleanup, not a steady hand.

How to do chalkboard lettering: the short version

  • Sharpen your chalk and make small erasers.
  • Sketch the layout on paper first.
  • Rule center lines and row guidelines on the board.
  • Write the words in cursive, then thicken every downstroke.
  • Add a simple design around the words and erase every guideline.

Chalk, chalk markers or a chalk pencil?

Plain chalk is cheap, forgiving and erases cleanly, which is why Carter uses it here. A pencil sharpener turns a stick into a point for fine lines. Liquid chalk markers give brighter, crisper lines, but they can stain a porous board and do not smudge off with a finger. Test a marker on a corner first, or save it for a sign that stays up. Chalk pencils sit in between and hold a point well for small details.

Getting a new board ready

Season a new chalkboard before you letter on it. Rub the side of a chalk stick over the whole surface, then wipe it off with a dry cloth. Without this step, your first design can leave a ghost image that never fully erases. A lightly dusty board also makes erasing small mistakes cleaner.

Why guidelines matter

Carter calls guidelines tedious, and they are, but they are the difference between a sign that looks homemade and one that looks hand lettered by a pro. On her board each row is four inches tall with an inch of space between rows, measured out from the center of the board. Mark where each word starts and ends too, so the words sit centered.

Faux calligraphy in plain words

Real calligraphy pens get thicker when you press on the way down. Chalk cannot do that, so you fake it. Write the word in thin cursive, then add a second line beside every stroke that moves toward the bottom of the board and fill the gap. Keep all the thick strokes the same width. On a small letter, add the extra line on the outside so the letter does not shrink.

Common problems

  • The letters lean every which way. Pick one slant and keep it for every letter.
  • Fingerprints and smudges. Rest your hand on a paper towel and clean up with a cotton swab.
  • The design fights the words. Letter first, decorate second, and keep the design lighter than the words.

More lettering to try

Practice the stroke on paper first with faux calligraphy with any pen, or brush up your cursive. When you want more style, try bounce lettering or brush pen calligraphy.

Free printable

Print the steps and supply list for this project

One page you can take to the table. Free with a free account, no password.

Get the free printable

What you'll need

Free, for this project

Get this checklist by email

  • All 7 tools and materials, with tick boxes
  • A link to print all 10 steps on paper, to keep by you while you craft

No password. The whole tutorial stays free on this page.

Quick answer

Letter a chalkboard sign like a pro with plain chalk and a ruler. An easy project: about 1 hour 15 minutes. You need 7 things, including white chalk, chalkboard and pencil sharpener. The 10 steps start with sharpen the Chalk for Chalkboard Lettering, make a Fine Chalk Eraser From a Paper Towel, sketch Chalkboard Lettering Layouts on Paper First, draw the Center Line on the Chalkboard With a Ruler and draw Chalk Guidelines for Each Row of Lettering.

Step-by-step guide

10 steps, about 6 minutes. Tap a picture to jump to that step. Your progress saves automatically.

Tick each step off as you go.

  1. Step 1: Sharpen the Chalk for Chalkboard Lettering

    Watch this step · 0:12

    A blunt stick of chalk makes fat, fuzzy lines. Run your chalk through an ordinary pencil sharpener until it has a clean point, the way Carter does here. The point lets you draw thin guidelines and crisp letter edges. Sharpen again whenever the tip wears flat. Keep the shavings over a trash can, because chalk dust gets everywhere.

    Tip:

    Use a sharpener you do not need for pencils. Chalk dust dulls the blade.

    Back to all steps

  2. Step 2: Make a Fine Chalk Eraser From a Paper Towel

    Watch this step · 0:22

    Gather your erasers before you start. Cotton swabs are good for cleaning up small mistakes inside a letter. For even finer details, wrap a small piece of paper towel around anything pointy, like a toothpick or a bobby pin. Leave a tail of towel hanging so it stays on while you erase. A full paper towel handles big areas, and a damp one clears heavy dust.

    Tip:

    Keep a dry towel under your hand so you do not smudge finished letters.

    Back to all steps

  3. Step 3: Sketch Chalkboard Lettering Layouts on Paper First

    Watch this step · 0:42

    Before any chalk touches the board, sketch a few small layouts on paper. Carter tries the words in a circle, inside a house shape and stacked in rows. Sketching lets you test ideas, check the spacing and pick a direction before you commit. Choose the layout you like best and keep the sketch next to you while you work.

    Tip:

    Draw the sketch in the same shape as your board, wide or tall.

    Back to all steps

  4. Step 4: Draw the Center Line on the Chalkboard With a Ruler

    Watch this step · 1:02

    Find the center of your board and split it in half both ways. Use a long metal ruler and sharpened chalk to draw a light vertical line down the middle and a horizontal one across it. Everything else on the board is measured out from these two lines. That is what keeps your finished lettering centered instead of drifting to one side.

    Tip:

    Press lightly. Guidelines have to erase completely at the end.

    Back to all steps

  5. Step 5: Draw Chalk Guidelines for Each Row of Lettering

    Watch this step · 1:28

    Now draw the rows. Carter's board has three rows, each four inches tall, with one inch of space between them. Her middle row sits two inches above and two inches below the center line. Rule every line with the ruler. Then mark where each word should start and stop. Go over the whole board with a light layer of chalk to hide fingerprints.

    Tip:

    Jot which letters fall on each side of the center line at the top of the board.

    Back to all steps

  6. Step 6: Write the Words in Cursive Between the Chalk Guidelines

    Watch this step · 2:18

    Do the lettering before any decoration, so the words stay large and easy to read. Write each word in plain cursive, leaving a little extra space between letters for a light, airy look. Line the bottoms and tops of the letters up with your guidelines. Keep the height, width, spacing and slant the same from letter to letter.

    Tip:

    Write the same letter the same way each time. Consistency reads as skill.

    Back to all steps

  7. Step 7: Thicken the Downstrokes for Faux Calligraphy on the Chalkboard

    Watch this step · 3:20

    This is the faux calligraphy part. Find every stroke where the chalk moved toward the bottom of the board. Draw a second line beside it and fill in the gap so it looks thick. Keep all the thick strokes the same width. On small letters, add the line on the outside. Where two letters sit far apart, thicken the outer edge to close the gap.

    Tip:

    Clean up wobbly edges with a cotton swab as you go.

    Back to all steps

  8. Step 8: Draw Curved Stems Around the Chalkboard Lettering

    Watch this step · 4:12

    With the words done, add a design that frames them. Carter draws two long curved stems, one on each side, for eucalyptus sprigs. Make them start and stop at about the same height and sit the same distance from the words and the edges of the board. She eyeballs this part instead of measuring. Keep the design simple so it supports the words.

    Tip:

    Draw both stems at once, one in each hand, to help them match.

    Back to all steps

  9. Step 9: Draw Eucalyptus Leaves on the Chalkboard Stems

    Watch this step · 5:00

    Pull up a reference photo of the plant you are drawing. Carter keeps hers on her phone and looks at the photo more than at her drawing. Add small rounded leaves along each stem, copying the shapes, sizes and angles you see. Work from the bottom of the stem up so your hand does not rub the leaves you already drew.

    Tip:

    Not sure you can draw it? A reference photo makes a big difference.

    Back to all steps

  10. Step 10: Wipe Away Smudges for a Clean Chalkboard Finish

    Watch this step · 5:24

    Now the final touch-ups. Erase every guideline completely, including the center lines and word marks. Wipe off fingerprints and smudges with a dry paper towel or a cotton swab. Then go back over any letter that got rubbed, so the lettering looks exactly how you want it. Step back across the room to check it before you call it done.

    Tip:

    Photograph the board in daylight from straight on so the chalk does not glare.

    Back to all steps

How to Do Faux Calligraphy

Keep going

How to Do Faux Calligraphy

10 steps · about 12 minutes

Keep going with calligraphy

More on this topic, picked for this project.

You reached the last step

Save this project to come back to it

Your ticked steps, the free printable and your other saved makes, together in My Projects. Free, no password.

You tapped Save

Save this project for later

We'll email you a link, no password.

How to Do Chalkboard Lettering (Faux Calligraphy With Chalk)

  • Your saved projects in one list
  • Your ticked steps on any device

Check your inbox for an email from us. Not there? Look in your spam folder.

Free printable

Printable sheet and shopping list for this project

The bonus is hidden until you sign up.

Free with a free account, no password. Every step above stays open to everyone.

Products Used

The Checklist

How to Do Chalkboard Lettering (Faux Calligraphy With Chalk)

Tools
6
Materials
1
Steps
10
Video
6 min

Tools we recommend

As an Amazon Associate we earn from qualifying purchases. Links on this page may be affiliate links - clicking them and buying doesn't change your price, but helps support Crafting Step by Step.

Tags

The Crafter's Weekly

New calligraphy tutorials, every Sunday

One short email with the week's best step-by-step guides. Free, no spam, unsubscribe anytime.

Did this work for you?

What's next

Related collections

Curated theme pages that include this tutorial.

Similar tutorials

Hand-picked next reads based on the one you just finished.

Liked this calligraphy tutorial?

Pick the crafts you want to hear about. One email every Sunday with new step-by-step tutorials. No spam, easy to unsubscribe.

Get more like this in your inbox

Weekly digest. Pick the categories you want. Unsubscribe anytime.

Send me tutorials about

We only email about new tutorials. Easy unsubscribe anytime.